background image

22

2.10.

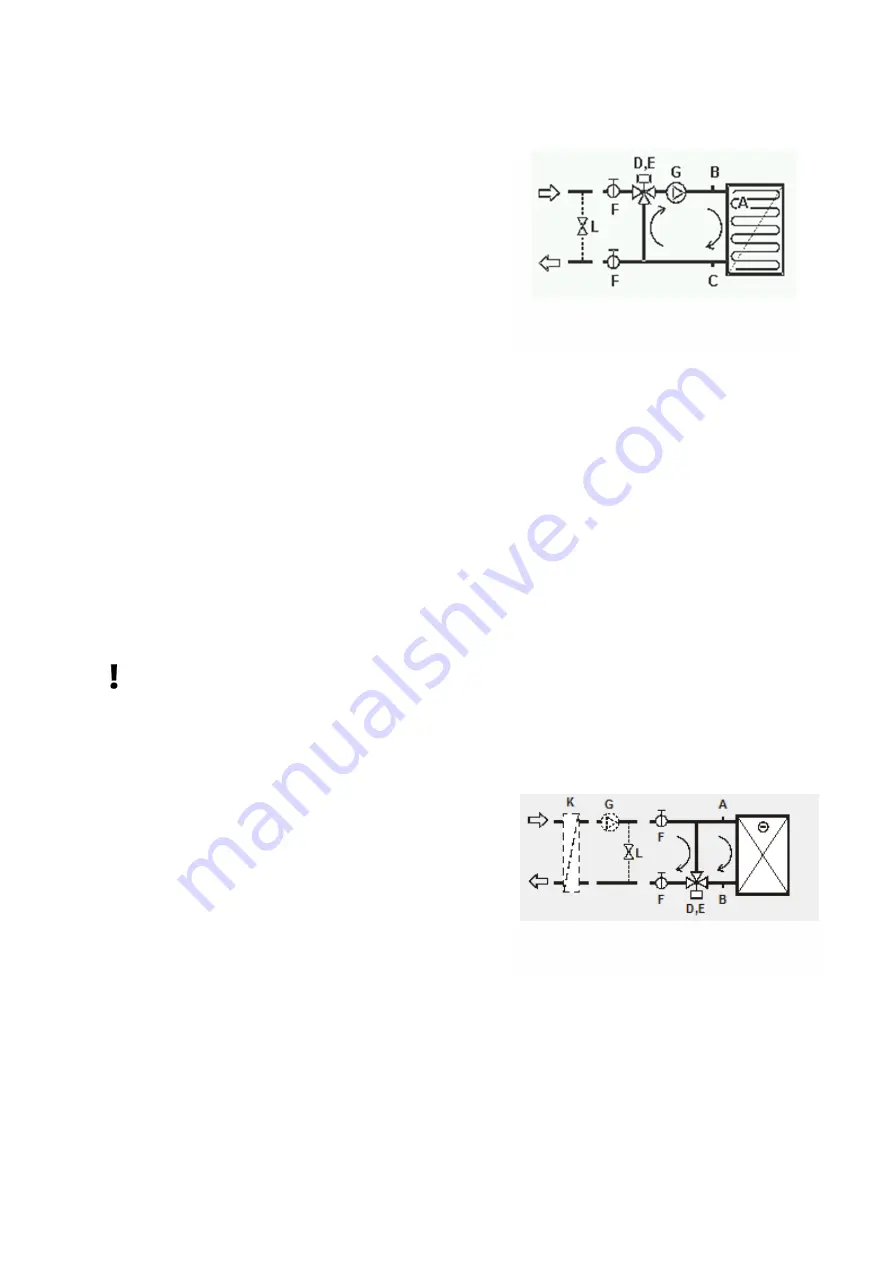
Connecting hot-water heating coil to a heating water supply

When connecting the water heating coil follow the instructions below:

1.

Maximum allowable heating medium temperature is
110°C. The max. operating pressure is 1.0 MPa.

2.

To ensure correct performance of the heating coil
hydraulic kit, fit the system with a pump with sufficient
performance that covers the entire pressure drop. The
pump supplied with the hydraulic kit is only designed to
cover pressure drop of the water heating coil!

3.

If the equipment is not equipped with a shutoff damper
on outside air intake (e1) put a tight shutoff damper in the
outside air inlet duct (we recommend a type with a spring
return actuator, closing on power interruption).

4.

Fit a strainer in the equipment heating system inlet pipe.

5.

When using a 3-way mixing, we recommend installing a
short circuit according to the diagram in Selection software (Operation point > Water heating coil).

When connecting the pre-heater, observe the following principles:

1.

The maximum permitted temperature of the heating fluid is 110°C and operating pressure is up to
1.0 MPa.

2.

Antifreeze must be used for circulation in all units fitted with the thermal fluid air pre-heater.

3.

The heating system must have a sludge filter fitted in the inlet to the unit.

4.

When a 3-way mixing manifold is used, we recommend installing a short-circuit by-pass.

Fluid pre-heater power control:

1.

The pre-heater is used for protecting heat recovery exchangers from freezing.

2.

The RD5 control system has a power control output.

3.

Pre-heater control is continuous.

4.

Pre-heaters are installed by service technicians.

For the wiring diagram see the selection software (Controls > Wiring diagram) or service
documentation.

2.11.

Connecting chilled-water cooling coil to a chilled water supply

When connecting the water cooling coil follow the instructions below:

1.

Fill the water cooling coil with a non-freezing mixture
with sufficient low-temperature resistance. Or drain the
coil for time period with risk of temperatures below
+3°C.

2.

The max. operating pressure is 1.0 MPa!

3.

Fit a strainer in the equipment chilled water system
inlet pipe.

2.12.

Connecting direct-expansion cooling coil

When connecting the DX cooling coil follow instructions of your supplier of condensing unit and
refrigeration system.

2.13.

Installation and connection of manometers for constant flow and

constant pressure feature

When installing the accessory mechanically and connecting its electronics please follow the guide
enclosed to this optional accessory.

A: frost thermostat; B: drain valve; C: drain
valve; D: mixing valve; E: actuator; F: ball
valve; G, pump L, short-circuit bypass

A: strainer; B: strainer; D: 3-way ball tap;
E: servo drive; F: ball valve; G: pump; L: short-
circuit by-pass; K: water / ethylene glycol coil

Summary of Contents for Duplexvent MULTI

Page 1: ...INSTRUCTION MANUAL for Duplexvent MULTI MULTI ECO and Basic units indoor version...

Page 2: ...ufacturer s technical conditions and respective valid regulations and technical standards The equipment must not be installed and operated in aggressive environment which could damage inner and outer...

Page 3: ...ns 21 2 9 Condensate drain connection 21 2 10 Connecting hot water heating coil to a heating water supply 22 2 11 Connecting chilled water cooling coil to a chilled water supply 22 2 12 Connecting dir...

Page 4: ...water during transportation and prior to completing the appliance assembly All holes must be covered with protective lids The same applies when the appliance is transported disassembled Secure the equ...

Page 5: ...ere is a danger of such gases and fumes temporarily entering the duct system e g during floor bonding painting the unit must be switched off sufficiently in advance Be careful during the installation...

Page 6: ...ronment with Class ETA 3 extract air must be arranged for operation in such a way so that positive pressure is on the supply side in comparison to the exhaust side This must be ensured under all opera...

Page 7: ...exchanger 5 Water cooling direct evaporator 6 Water heating 7 Supply fan 8 Exhaust supply air 9 Intake supply air 10 Supply air filter 11 Bypass flap 12 Condensate drain 13 Circulation flap 14 Exhaus...

Page 8: ...ation units are depicted in Duplexvent selection SW when you select the Duplexvent unit Design Show total dimensions The information is available also in technical datasheets as well as in the technic...

Page 9: ...0 700 7100 Basic 1300 900 8100 Basic 1300 1100 10100 Basic 1500 1300 Floor standing position The appliance is placed on a base frame which is attached on the bottom side of the unit It is not allowed...

Page 10: ...ter side of the casing horizontally The unit must be secured against movement Ceiling suspended position Slope both the longer and shorter side of the casing 3 towards the condensate drain at exhaust...

Page 11: ...ct on the ventilation unit Below you will find examples of unit suspension 500 1000 Multi 500 1100 MultiEco 1500 6500 Multi 1500 5500 MultiEco Description Description 1 Screw rod M10 1 Screw rod M10 2...

Page 12: ...xvent 12100 15100 Basic are a new generation of versatile outdoor ventilation units with counterflow Multi Multi Eco and crossflow Basic heat recovery exchangers The units consist of two or three bloc...

Page 13: ...escribed in the Chapter 7 Assembly of blocks Make sure that the surface of the intended placement of the unit is even Mount adjustable bases part of delivery on all stand feet Screw the adjustable bas...

Page 14: ...ll around the bottom inlet of the block Place the blocks next to each other and make sure they are all levelled Adjust the stand feet as needed Using the spirit level make sure that the blocks 1 2 and...

Page 15: ...2 by using M8 bolts slightly together Use triangle members in inner corners Slightly tighten the upper part of blocks 1 and 2 using M8 bolts and nuts x y z 1 2 3 Levelling the blocks of the unit 1 2 3...

Page 16: ...act air 2 Exhaust fan Mi 3 Temperature sensor TU2 4 Manometer of exhaust fan PMi 5 Heat exchanger 6 Water cooling direct evaporator 7 Water heating 8 Capillary thermostat TFK 9 Manometer of supply fan...

Page 17: ...e cable Mi with the working voltage 400V from the junction box into the wiring box Connect the blocks 1 with 2 and subsequently 2 with 3 by green yellow grounding wires cable comes connected on delive...

Page 18: ...ox Manostat PFe is connected to the wiring box Connected on delivery optional equipment Manometer cable PMe is connected to the junction box Pressure measurement point PDi measuring the pressure incre...

Page 19: ...g box Connected on delivery optional equipment The circuit of cooler CHW is connected to the hydraulic kit The circuit of heater TPO is connected to the hydraulic kit Hydraulic kit LS controlling the...

Page 20: ...the slots Cover the slots where cables lead from the junction box Use cover metal sheets and 4mm rivets supplied along with the unit Cover the connected junction box In case the wires of unit blocks a...

Page 21: ...as in the picture below Sufficiently fix the trap s shape 2 Connect a pipe of the same or larger diameter to each trap and connect the pipes to a sewer 3 Make sure the whole pipe run including inside...

Page 22: ...en a 3 way mixing manifold is used we recommend installing a short circuit by pass Fluid pre heater power control 1 The pre heater is used for protecting heat recovery exchangers from freezing 2 The R...

Page 23: ...h air filter Make sure that the location of the label enables regular inspection of values to be measured 3 Fully unscrew the rotation knob for setting zero on the scale bottom knob marked and then sc...

Page 24: ...d on separate documentation 5 You will find the description of the control in a separate documentation called Regulation control The unit shall be protected using a breaker with characteristics C In c...

Page 25: ...og 5 Access to the unit using the internet Ventilation units Multi MultiEco and Basic equipped with control system RD5 1 can also be controlled using a web browser This allows the user to do the follo...

Page 26: ...d up to the junction box Fan Mi is connected to the connector Connect Connect grey connector above the middle block Unit with RD5 CPM regulation2 Unit without regulation Connect the blocks 1 with 2 an...

Page 27: ...x Cable powering the condensate heating HC is connected to the connector Connect Lead the cables TEA and TU2 with temperature sensors from the junction box into their intended position Connect optiona...

Page 28: ...essure measurement point are installed Connect optional equipment Connect grey connector which powers manostat PFe The same connector powers also the servo drive of the flap Se Unit with RD5 CPM regul...

Page 29: ...lic kit Hydraulic kit LS controlling the chiller or heater is located on the upper side of the unit The kit is completely connected up to the junction box Water pump LP in the heating circuit is locat...

Page 30: ...by RD5 regulation or for units without regulation Connect connector powering the supply air flap Se the same connector powers also the manostat PFe Unit with RD5 CPM control system Unit without contr...

Page 31: ...31 Notes...

Page 32: ...80000582 Issue 2 01 21 Call 01494 525252...

Reviews: