8.
CamPro
Express
User’s
Manual
138
AirLive POE-260CAM User’s Manual
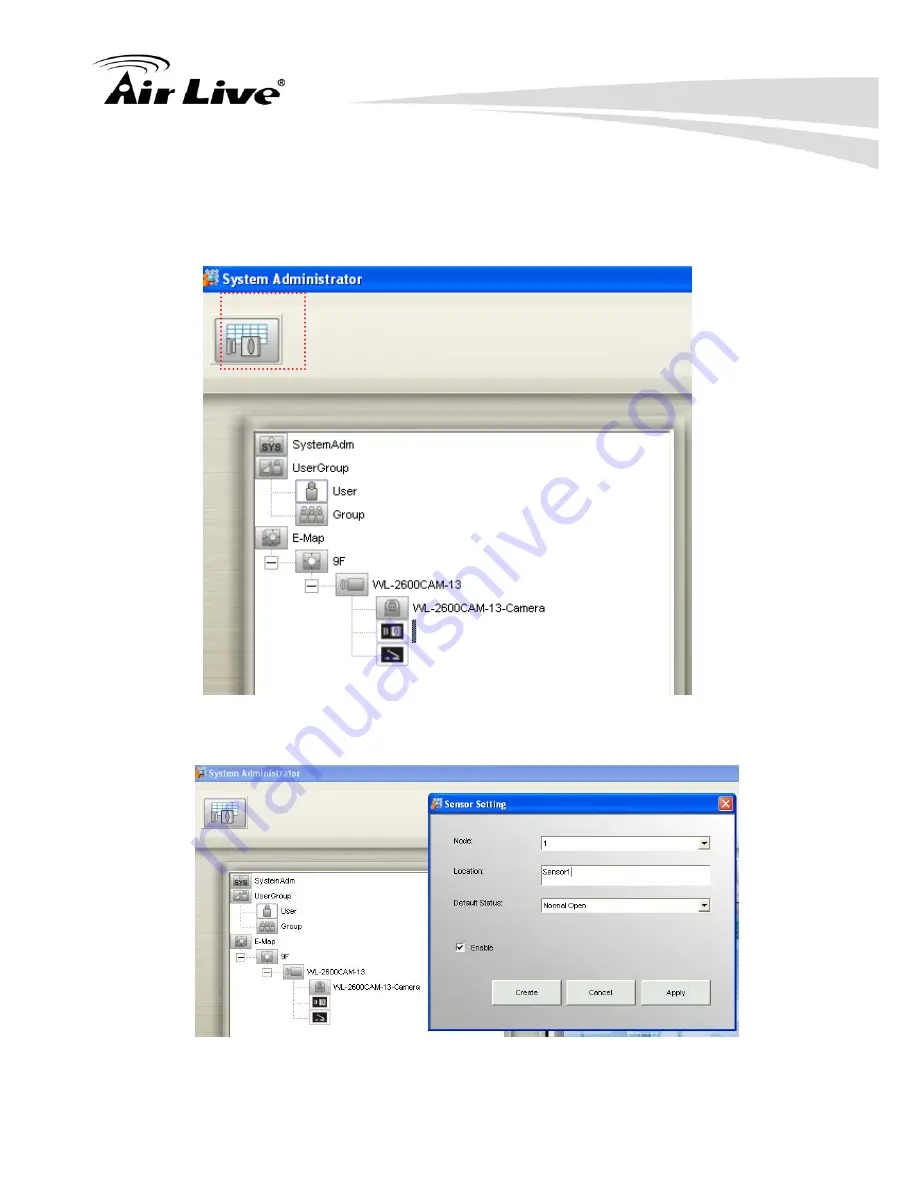
APPENDIX G: How can I configure DI/DO at CamProExpress
1. Add an IPCAM then select Sensor
2. Click “Sensor setting “ then enter a name for Location
Page 1: ...Copyright Disclaimer AirLive POE 260CAM User s Manual POE 260 CAM POE Pan Tilt hision IP Camera User s Manual...
Page 2: ...recording without the written consent of OvisLink Corp OvisLink Corp has made the best effort to ensure the accuracy of the information in this user s guide However we are not liable for the inaccurac...
Page 3: ...nnecting cables 2 Contact your authorized dealer or the store where you purchased the product Operation Notice Operating or storage location Avoid operating or storing the camera in the following loca...
Page 4: ...Pro Express 8 3 Using IP Camera via Mobile Phone 22 3 1 3G Mobile Phone Viewing 22 3 2 2 5G Mobile Phone Viewing 22 4 Using IP Camera via Web Browser 23 5 Initial accessing the IP Camera 24 6 How to U...
Page 5: ...The POE 260CAM is an advanced POE IP camera with Pan and Tilt function You can set a particular patrol area it will then move its lens in both horizontal and vertical direction continuously to scan t...
Page 6: ...client verison This is must read section when you need to setup multiple camera and recording in the computer Chapter 5 This section has default settings information suchs as IP password of the devic...
Page 7: ...e com The tech support FAQ are frequently updated with latest information In addition you might find new firmwares that either increase software functions or provide bug fixes for POE 260CAM You can r...
Page 8: ...m 12 pcs Infrared LEDs for night use up to 10 working distance IEEE 802 3 af Power over Ethernet Support 2 Way Audio Capability Support Mac OS Browser CAMPRO Express 16 channel recording software Supp...
Page 9: ...e hardware installation procedure for the POE 260CAM For software configuration please go to chapter 3 for more details 2 1 Hardware Installation Steps Follow these steps to install the POE 260CAM on...
Page 10: ...llation Guide Brief product information and quick installation Software CD IP Surveillance Software Intelligent IP Installer User Manuals Language Packs Screw Pack Two screws and plastic wall anchors...
Page 11: ...Overviews Front Side DI DO Terminal connector diagram Please refer the following illustration below for connection method NO COM D D Note Hold the Reset Button for 10 seconds to restore the camera to...
Page 12: ...EZ Install CamPro Express All ipcam use the factory default settings All ipcam and Airlive CamPro Express server in the same subnet Please see the detail setting in user manual Step 1 Install 1 Select...
Page 13: ...k 10 100 Mbps Fast Ethernet Display Card 1024 x 768 XVGA or above System Requirement CLIENT version Networking Suggestion AirLive CamPro Express is optimized for small scale project simple LAN or simp...
Page 14: ...Express is consisted of SERVER version and CLIENT version SERVER version limits one installation SERVER version includes Admin Monitor Control and Web Monitor programs The CLIENT version is designed f...
Page 15: ...e Installshield Wizard will check if IIS is installed at your system If not you can continue installing AirLive CamPro Express but you will not be able to use the WEB monitoring feature without IIS To...
Page 16: ...e Step 6 Choose Setup type and click Next to continue For first time installation please select server to install AirLive CamPro Express is consisted of SERVER version and CLIENT version SERVER versio...
Page 17: ...fault location is deemed adequate for most situations it is recommended that you use the default location Step 8 Choose the components to install then click Next to continue Main Component is a requir...
Page 18: ...e depending on the handling capability of your computer system refer to Section 7 1 2 System Requirement for system requirement detail Step 11 Click Next to continue Step 12 Installshield Wizard Compl...
Page 19: ...AirLive POE 260CAM User s Manual Setting 1 Run the Airlive CamPro Express Admin 2 Select E MAP then Add Area 3 Enter the Area Name then Create 4 Select area name then select 5 When search completed se...
Page 20: ...ct the ipcam device icon 7 Select the ipcam device icon then select Image Setting then select Motion Detcetion 8 Setting motion detection area in this page 9 Select the ipcam device icon then select I...
Page 21: ...2 Hardware Installation 17 AirLive POE 260CAM User s Manual 10 Setting motion detection alarm in this page 11 Select SystemAdm then select Rotation 12 Setting rotation place in the monitor...
Page 22: ...2 Hardware Installation 18 AirLive POE 260CAM User s Manual 13 Run the Airlive CamPro Express Monitor...
Page 23: ...2 Hardware Installation 19 AirLive POE 260CAM User s Manual Uninstall 1 Run windows Add or Remove Programs then select utility name to remove 2 Select Remove then Next to start uninstall...
Page 24: ...irLive POE 260CAM User s Manual Appendix Save Into Network Storage If you want to save to local recording to your Network Storage Please do the following 1 Copy your file location that you want to sav...
Page 25: ...ave location in 3 Make your 2nd Saving Location to Nus the monitor mode for the local recording 4 Sometimes when your network traffic is very busy or you wish to decrease your computer networking load...
Page 26: ...viewing type rtsp IP PORT video 3gp into your 3G web browser IP is the IP address of your IP camera PORT is the RTSP port of your IP camera Default value is 8554 Example rtsp 100 10 10 1 8554 video 3...
Page 27: ...0MHz or equivalent AMD Graphic Card 64MB RAM graphic cards or equivalent on board graphic cards RAM 512MB Operating System Windows 98 ME Please see Note Windows 2000 2003 XP Vista Web Browser Internet...
Page 28: ...st name of the IP camera in the Location Address field of your browser Note If you only want to view the video without setting page enter http IP index2 htm as your web URL 2 Use the default account a...
Page 29: ...r s Manual in Windows operation systems The functions of the device should be set by the Administrator For further instructions on setting the device see Setting the Camera 6 1 Accessing the IP Camera...
Page 30: ...ox to choose between MPEG4 and MJPEG video compression mode Note MJPEG streaming is unavailable if RTSP mode is ON View Size Select the desired display image resolution to 640X480 or 320X240 Protocol...
Page 31: ...and save it in your computer 1 Press and a snapshot window will appear 2 Click Save to save the picture in your computer 3 Click Close to return to the view page Zoom in out the image via the monitor...
Page 32: ...ff Volume control bar Note It means the speakers of your computer are turned on to transmit the sounds from the connected IP camera s Similarly means you can broadcast to the connected IP camera s via...
Page 33: ...can setup image color network and different level user in this chapter 7 1 Basic Click on the Basic folder to display the sub folders including System Camera Network and Security 7 1 1 System Informat...
Page 34: ...ct this mode to make the date and time of the device the same as the monitoring PC Manual setting Select this mode to manually adjust the date time of the device Synchronize with NTP Specify the NTP s...
Page 35: ...save the setting data file to your specified location Restore setting Load the saved setting data of the device Click Browse and select the file in which the setting data is stored Click OK and the d...
Page 36: ...reen Night Mode Turn Night Mode ON OFF Lighting Choose the lighting environment among 50Hz 60Hz and Outdoor White Balance Choose the White Balance to Auto Fluorescent Incandescent and Black White Over...
Page 37: ...equested to key in username and password RTP If RTSP mode is ON Unicast streaming Unicast streaming Video Audio port range Specify the transmission port range of RTP streaming video RTP will select a...
Page 38: ...the frame rate of the MPEG4 image Selectable values are 5 10 15 20 25 30 fps The unit fps stands for frames sent per second Quality Auto The quality and bit rate will be automatically decided accordin...
Page 39: ...ulticast address Specify the multicast server address Video Audio Port Specify the transmission port number of the video data It is initially set to 10000 and 11000 Specify an even number from 1024 to...
Page 40: ...ssion port number of the video data and audio data used when UDP Unicast is selected with the TCP UDP transmission switching icon in the main viewer Image Size Specify the image size the network camer...
Page 41: ...sk Default gateway Enter the default gateway Use the following DNS server address Select this when you set the fixed address as the IP address of DNS server Primary DNS server Enter the IP address of...
Page 42: ...user ID for authentication necessary for PPPoE connections Type it up to 64 characters Password Enter the password for authentication necessary for PPPoE connections Type it up to 32 characters Re typ...
Page 43: ...or DDNS connections Type it up to 64 characters Password Enter the password for authentication necessary for DDNS connections Type it up to 32 characters Re type password Re type the password to confi...
Page 44: ...ld contact a user inside HTTP port Enter the HTTP port number and default HTTP port is 80 SSL port Enter the SSL port number and default SSL port is 443 MPEG4 viewer port Enter the MPEG4 viewer port n...
Page 45: ...cation methods from the followings SMTP Select if SMTP authentication is necessary when an e mail is sent POP before SMTP Select if POP before SMTP authentication is necessary when an e mail is sent N...
Page 46: ...ation including IP Port MAC Model Firmware Version and Web Version 7 1 5 Security 7 1 6 1 Account The device default account and password setting is admin admin That means everyone might access the de...
Page 47: ...layer between the HTTP and TCP You can use the IP camera through HTTPS easily by using https instead of http To use the HTTPS encryption please set up Create self signed certificate for the first time...
Page 48: ...n select On The FTP client setting page appears When you do not wish to use the FTP client function select Off Note The frame rate and operability on the main viewer may decrease while a file is being...
Page 49: ...te time suffix is added to the Image file name The date time suffix consists of lower two digits of year 2 digits month 2 digits date 2 digits hour 2 digits minute 2 digits second 2 digits and consecu...
Page 50: ...time suffix consists of lower two digits of year 2 digits month 2 digits date 2 digits hour 2 digits minute 2 digits and second 2 digits and consecutive number 2 digits thus 14 digit number is added...
Page 51: ...ion The common setting options are displayed below If you do not wish to use the e mail SMTP function select Off and click OK Note During transmission of an image file via mail the frame rate and oper...
Page 52: ...rver which sends e mails performs authentication using the POP user account User name Password Type the user name and Password of the user who has the mail account This setting is necessary when the S...
Page 53: ...underscore for naming Suffix Select a suffix to add to the file name None No suffix is added The Image file name is assigned to the image to be sent via an e mail Date time The date time suffix is ad...
Page 54: ...wo digits of year 2 digits month 2 digits date 2 digits hour 2 digits minute 2 digits and second 2 digits and consecutive number 2 digits thus 14 digit number is added to the file name Sequence number...
Page 55: ...function you can send the image and audio file which has been shot and recorded linked with the external sensor input or with the built in motion detection function to HTTP server HTTP client setting...
Page 56: ...ing is set to Off Alarm Buffer Select Use alarm buffer when you forward the image audio of before and after the alarm detection pre alarm post alarm If you do not select it only the image of the momen...
Page 57: ...g menu Setting Schedule selection Select the list box to specify the schedule you want to set E mail SMTP Alarm e mail SMTP Periodical FTP Alarm FTP Periodical HTTP event Alarm Alarm output Alarm or A...
Page 58: ...tions are displayed below If you do not wish to use the Motion Detection function click it Off and press OK Motion Detection 1 Click it on for using Motion Detection 1 function as a sensor You can adj...
Page 59: ...l bar to set Threshold and Sensitivity value 4 Follow the steps to set the other Motion Detection 5 Click the OK to save the setting Note Be careful Motion Detection function don t work with Patrol fu...
Page 60: ...ol the external alarm input of I O port on the rear of the device linked to FTP SMTP and HTTP sending function 7 2 8 Setting Sensor input 1 Click it on for using external sensor which is connected to...
Page 61: ...he Alarm output function select Off Recording capacity Pre alarm period Display the maximum recording capacity of image audio before the alarm detection Post alarm period Display the maximum recording...
Page 62: ...n CPU P 4 3 0G RAM 1G or above Operating System Windows XP Professional Service Pack2 English Traditional Chinese Simplified Chinese Windows Vista Home Basic Home Premium Business Ultimate Network 10...
Page 63: ...he system behind firewall or IP sharing device to efficiently protect this system from hackers attack AirLive CamPro Express is consisted of SERVER version and CLIENT version SERVER version limits one...
Page 64: ...ree languages Traditional Chinese Simplified Chinese English Step 3 The Installshield Wizard will check if IIS is installed at your system If not you can continue installing AirLive CamPro Express but...
Page 65: ...tep 6 Choose Setup type and click Next to continue For first time installation please select server to install AirLive CamPro Express is consisted of SERVER version and CLIENT version SERVER version l...
Page 66: ...e default location is deemed adequate for most situations it is recommended that you use the default location Step 8 Choose the components to install then click Next to continue Main Component is a re...
Page 67: ...lete depending on the handling capability of your computer system refer to Section 7 1 2 System Requirement for system requirement detail Step 11 Click Next to continue Step 12 Installshield Wizard Co...
Page 68: ...64 AirLive POE 260CAM User s Manual Setting 1 Run the Airlive CamPro Express Admin 2 Select E MAP then Add Area 3 Enter the Area Name then Create 4 Select area name then select 5 When search completed...
Page 69: ...elect the ipcam device icon 7 Select the ipcam device icon then select Image Setting then select Motion Detcetion 10 Setting motion detection area in this page 9 Select the ipcam device icon then sele...
Page 70: ...8 CamPro Express User s Manual 66 AirLive POE 260CAM User s Manual 10 Setting motion detection alarm in this page 11 Select SystemAdm then select Rotation 12 Setting rotation place in the monitor...
Page 71: ...ed of SERVER version and CLIENT version SERVER version limits one installation license key are required whenever adding devices for central management SERVER version includes Admin Monitor Control and...
Page 72: ...x 768 XVGA or above System Requirement CLIENT version CPU P 4 1 2G RAM 1G or above Operating System Windows XP Professional Service Pack2 English Traditional Chinese Simplified Chinese Windows Vista H...
Page 73: ...Programs AirLive CamPro Express Start Service The Start Service will hide itself automatically after start up and be displayed as an icon in the system tray 8 2 2Shutting Down the Start Service Progr...
Page 74: ...ll Programs AirLive CamPro Express Admin Step2 System Log on window Server Location 127 0 0 1 is the default for local server If you want to access server from client then please enter the IP of serve...
Page 75: ...resolution is at least 1024 x 768 and that the font size is Windows system default AirLive CamPro Express does not support font sizes larger than the Windows system default one Note The buttons that...
Page 76: ...ule setting which is not included in weekly routine DNS Setting Specify the Domain Name your computer registered for DNS service Storage Specify the path and storage for recorded file respectively Sys...
Page 77: ...ver which could forward your mail to receiver Some company mail server set the policy of exchanging email within company only We suggest you use the mail server of the receiver Mail From It is an emai...
Page 78: ...might require the same holiday setting you can set on one server first and use the Export function to save holiday setting Import You may update the holiday setting to another AirLive CamPro Express s...
Page 79: ...so that alarm action could be executed Step1 By selecting DNS Setting button from the Menu Bar you may specify the Domain Name Server Step2 If your computer gets IP from DHCP service or its IP change...
Page 80: ...2 Assigned the disk to store recorded data of Schedule and Alarm Alias suggest to give an alias for the path so that path could be easily differentiated Storage1 and Storage2 Set the maximum disk spac...
Page 81: ...h 2 is assigned for the backup purpose it is an optional service If this is configured identical recording information will be written to both path 1 and path 2 System Alarm By selecting System Alarm...
Page 82: ...t screen Take 16 splitscreen as example select Tab of 16CH and select the split ed screen remark the selection by changing color to orange to move camera from Unselected Column to Selected Column by c...
Page 83: ...o the system and differentiate their privilege by designating them to different groups Button Use To Button Use To Add User User Setting Remove User Add Group Group Setting Remove Group User Add User...
Page 84: ...oth general information and user belongs click Create to save the setting User Setting Modify Step1 Select User Setting Select User icon in the right the User Table display in the E Map Interface area...
Page 85: ...p can add users and assign users to whatever user group Monitor Group is the group for general users that has the full privilege to the Monitor program User Group is the group for viewing monitor prog...
Page 86: ...nd Function click Create to save the setting Modify Group Step1 Select User Group Select User Group icon in the System Setup area the User Group Table display in the right area when select the icon fr...
Page 87: ...em select eMap icon in the System Setup to bring up the Area button in the Menu Bar Select the newly created area under the eMap branch and use the corresponding menu options to add a LanCam or Video...
Page 88: ...on allows you to upload a blueprint or map to a selected area Refresh eMap This button allows you to refresh a blueprint or map from your PC to get updated in case a new eMap was uploaded from server...
Page 89: ...tep1 Select eMap icon from the System Setup Step2 Click Add Area button from the Menu Bar An Aarea Setting window will pop up Enter the name to the Area Name textbox Step3 Click Create to save setting...
Page 90: ...warning message pops up to get your confirmation Click OK to confirm Upload eMap Step1 Select Upload eMap button in the Menu Bar An Upload eMap window will pop up Step2 Click Browse to navigate the im...
Page 91: ...will explain the details of LanCam video server and I O Controller setting The supported H W manufactures and models for each device can be found in the AirLive CamPro Express Hardware Support list Ad...
Page 92: ...uto Add Device Step1 Click button from the Menu Bar to bring up the auto add device search window Tick the check box which you want to add the device or click the Select All button to select all found...
Page 93: ...erview Button Use To LanCam Setting to configure IP Port Number associated to a selected device it displays the information set in Add LanCam button for further modify Remove LanCam to remove the conf...
Page 94: ...olution of camera image Image Setting All the setting item defined as following Nodes the number of camera nodes of LanCam and video server could be varied base on what models is selected Location to...
Page 95: ...ion Detection to significantly reduce the storage of schedule recording Step1 Select the Image icon of a LanCam in the System Setup area and click Image Setting button from the Menu Bar to bring up th...
Page 96: ...ecording The activated block will turn pink Step4 Edit a Schedule To cancel or modify a schedule setting click the pink block to deactivate it Step5 Run schedule recording automatically Schedule recor...
Page 97: ...ure this device again Remove Image Remove all the configuration of a selected camera image Image Alarm Activate Alarm Action Step1 Start Alarm Action Select the Image icon of a LanCam Video Server in...
Page 98: ...ll alarm action configuration including Add Modify Remove and Copy and dismiss this window Click Cancel to ignore all configurations and dismiss this window Alarm Action Step1 To add Alarm Action by c...
Page 99: ...mage Alarm button from Menu bar then select Alarm action by Recording and Acting Device by Camera image 2 Alarm Live Video Scenario If only one alarm is triggered the different device breached by live...
Page 100: ...will also overwrite the previous setting stored in this preset location Preset locations can not be removed Set the other preset locations in the same process Click Exit to leave this dialog Motion De...
Page 101: ...nterface for motion detection adjustment Some may require you to install Active X components Image Quality Select the Image icon of a LanCam Video Server in the System Setup area and click Image Quali...
Page 102: ...W Password button from the Menu Bar to bring up the setting window Current UserName Password The default value for current username and current password is same as device default New UserName Password...
Page 103: ...ill appear only after a sensor has been configured Sensor Setting Click the Sensor Setting button to bring up the Sensor Setting dialog as shown below Node is the serial number of this sensor of the c...
Page 104: ...ll only appear if you select a configured relay Relay Settings Click Relay Setting button and the Relay Setting dialog will appear as shown below Node is the serial number of this relay on the current...
Page 105: ...rface area The tools of eMap interface could be used to control the EMap background as following Pointer to drag the device icon on the interface Area Zoom to enlarge background from the specified are...
Page 106: ...r Step2 System Log on window If this is the first time you login use Administrator as default user name and leave the password blank then click OK to log into the system Server Location 127 0 0 1 is t...
Page 107: ...al Video Setting PT Control interface System Setting Alarm eMap 8 4 3 Video Display Area Video display area display video of single camera or split screen of multiple cameras when you want to control...
Page 108: ...lect split screen in Display Selection the video display area will change the video accordingly Note Double click the selected screen in Split screen the split screen will change to single display mod...
Page 109: ...ding to Local Record The Process Bar will disappear Note The path of Local Record has no storage recycle service because Local Record could be executed in whatever CLIENT PC which is out of Server Man...
Page 110: ...will create a sub folder differentiate by camera location automatically Snapshot Saves snapshot of selected video source in JPEG format Follow below instruction Step1 Select a camera from Video Displ...
Page 111: ...angle of your camera to 4 directions manually 3 Zoom out to get PT camera zoom out 4 Zoom in to get PT camera zoom in 5 AutoPan to get PT camera auto panning 6 Stop to stop PT camera s auto action 7...
Page 112: ...s The text of the Relay Setting button changed to Cancel Alarm The most up to date alarm was logged in the Alarm notification log An eMap with the device that triggered the alarm will pop up in the Al...
Page 113: ...ation Step1 Click Server Query button Step2 Open the window Query Video File via criteria setting of Schedule recording or Alarm recording Image Location Query Date Step3 Click the Query a query resul...
Page 114: ...Step3 A query result will appear in the lower spreadsheet You can use the arrow button to navigate the page of the spreadsheet and print the page which you selected Home End Page Up Page Down Step4 Y...
Page 115: ...ing the audio conversation Press the button again to stop the function Note While you turn on the two way audio mode perform the below functions the audio conversation session will be automatically te...
Page 116: ...Live CamPro Express Web Monitor Log on Web Monitor from client You may open IE browser and entering the URL in the format of server IP and Web Example http localhost Web Step1 System will bring up IE...
Page 117: ...lation page will pop up for user to install this program Step4 After install all these required program the Web Monitor will pop up the operation process are exactly same as Monitor program Note Web M...
Page 118: ...6 1 Running Multi Playback Program Step1 Select Start All Programs AirLive CamPro Express Multi playback Step2 System Log on window If this is the first time you login use Administrator as default use...
Page 119: ...areas in detail Function Area Multi playback provides two major functions Recording History Query and Recording History Playback Recording History Query provides functions to add display group and qu...
Page 120: ...p configuration window Step 2 Playback Group Setting Add a new playback group Click Add button at the group window The system will show the window to add a group Use the split screen to select playbac...
Page 121: ...group Use the split screen to select playback location and or to select unselect cameras in the group Remove a playback group Users can delete an existing playback group by first select a playback gro...
Page 122: ...witch the display to single channel mode The playback can be controlled with the following Playback Control Back to the starting hour Play Rewind Stop Playback speed control The system supports five p...
Page 123: ...roup name the image viewing area will automatically show the configured playback group with black channels Selecting a date Use pull down menu to the right of the date field The system will show the c...
Page 124: ...criteria selected this area will show either query result for recording history or multiple channel playback for historical recordings Query Criteria Area Query criteria area provides user ability to...
Page 125: ...l 121 APPENDIX A IIS Installation for Windows Vista To Install IIS for Windows Vista version please do the followings Step1 Click Continue Step2 Start Control Panel Program and Features Click Turn Win...
Page 126: ...e Internet Information Services check box Step4 Double click or expand Web Management Tools double click IIS 6 Management Compatibility then select the IIS 6 Management Console IIS 6 Scripting Tools I...
Page 127: ...Express User s Manual 123 AirLive POE 260CAM User s Manual Step5 Double click or expand World Wide Web Services double click Application Development Features then select the ASP and ISAPI Extensions c...
Page 128: ...AM User s Manual APPENDIX B Security Setting in Web Monitor under Vista Step1 Launch Internet Explorer Browser Select Internet Options Select Security tab Choose Trusted sites and click Sites button S...
Page 129: ...xpress User s Manual 125 AirLive POE 260CAM User s Manual Step3 Select Trusted sites then click Custom level button Step4 Find Initialize and script ActiveX controls not marked as safe option then sel...
Page 130: ...240 160 120 Excellent 1000 300 90 Detailed 400 150 50 Good 300 100 30 Standard 250 70 25 Medium 250 55 20 MPEG4 kbps fps Image Size Bitrate Setting Frame Rate Setting Current Bitrate Current Frame Rat...
Page 131: ...ing Current Bitrate Current Frame Rate 640 480 Excellent 15 4000 13 640 480 Excellent 5 1600 5 640 480 Good 15 1600 13 640 480 Good 5 650 5 640 480 Medium 15 900 14 640 480 Medium 5 360 5 320 240 Exce...
Page 132: ...Ethernet VIA Rhine II Fast Ethernet Adapter Hard Disk ST3250620A 250 GB Graphic card ATI Technologies Inc EAX1600 Series Operating System Windows XP Professional SP2 x64 Results from Test with a Resol...
Page 133: ...Requirement GB channel day 15fps Quality 640 480 320 240 160 120 Excellent 5 3 1 6 0 4 Detailed 2 1 0 8 0 3 Good 1 6 0 6 0 2 Standard 1 3 0 4 0 1 Medium 1 3 0 3 0 1 MPEG4 Storage Requirement GB chann...
Page 134: ...re Alarm Output with Alarm Input 1 DI DO connection picture 2 DI need a sensor can output a DC voltage between 5V 12V For example we are use a sensor can output DC12V IR sensor Input DC 12V Output DC1...
Page 135: ...8 CamPro Express User s Manual 131 AirLive POE 260CAM User s Manual 4 Alarm output Setting like below picture 5 Alarm input Setting like below picture...
Page 136: ...e POE 260CAM User s Manual 6 Connect all device to DI DO connector Below pictures are my example not necessarily suits all kind of siren 7 Device connection pictures Below pictures is the example not...
Page 137: ...8 CamPro Express User s Manual 133 AirLive POE 260CAM User s Manual 1 1 2...
Page 138: ...8 CamPro Express User s Manual 134 AirLive POE 260CAM User s Manual 2...
Page 139: ...8 CamPro Express User s Manual 135 AirLive POE 260CAM User s Manual 8 Above pictures is the example not necessarily suits each one 9 When sensor receive signal will start the siren...
Page 140: ...anual 136 AirLive POE 260CAM User s Manual APPENDIX F How can I configure Alarm Output with Motion Detection 1 DO connection picture 2 DO need a siren buzzer For example we are use a siren that use DC...
Page 141: ...8 CamPro Express User s Manual 137 AirLive POE 260CAM User s Manual 3 Alarm output Setting like below picture 4 When Motion Detection will start the siren...
Page 142: ...Pro Express User s Manual 138 AirLive POE 260CAM User s Manual APPENDIX G How can I configure DI DO at CamProExpress 1 Add an IPCAM then select Sensor 2 Click Sensor setting then enter a name for Loca...
Page 143: ...Express User s Manual 139 AirLive POE 260CAM User s Manual 3 Select Relay and click Relay setting then enter a name for Location 4 Select sensor then click Sensor Alarm 5 Select always or schedule ena...
Page 144: ...8 CamPro Express User s Manual 140 AirLive POE 260CAM User s Manual 6 Add alarm action when sensor alert will enable Relay1 7 Add alarm action after 5 sec turn off Relay1...
Page 145: ...Pro Express User s Manual 141 AirLive POE 260CAM User s Manual 8 Click OK to save setting 9 Turn on the Sensor input1 in IPCAM WEB UI 10 Connect DI DO device to the IPACM 11 Click ok to finish the set...
Page 146: ...X H How can I configure Motion Detection with Alarm output at CamProExpress Please refer the How can I configure DIDO at CamProExpress guide to setting DI DO first 1 Select IPCAM and click MotionDetec...
Page 147: ...ro Express User s Manual 143 AirLive POE 260CAM User s Manual 3 Select always or schedule enable alarm 4 Add alarm action when MotionDetect will turn on Relay1 5 Add alarm action after 5 sec turn off...
Page 148: ...8 CamPro Express User s Manual 144 AirLive POE 260CAM User s Manual 6 Click OK to save setting 7 Click ok to finish setting...
Page 149: ...API 3 resolutions via configuration web page Frame rate Motion JPEG Up to 15 fps at 640x480 4 3 resolution MPEG 4 Up to 30 fps at 640x480 4 3 resolution Video streaming Simultaneous Motion JPEG and MP...
Page 150: ...Camera Management tool on CD and web based configuration Configuration of backup and restore Firmware upgrades over HTTP firmware available at www airlive com Minimum web browsing requirement Pentium...
Page 151: ...of backup and restore Firmware upgrades over HTTP firmware available at www airlive com Minimum web browsing requirement Pentium 4 1 8GHz or equivalent AMD 64 MB RAM graphic cards or equivalent on boa...
Page 152: ...ens A wide angle lens has a short focal length and covers a wider angle of view than standard or telephoto lenses which have longer focal lengths ARP Address Resolution Protocol This protocol is used...
Page 153: ...s zero configuration networking Bonjour enables devices to automatically discover each other on a network without having to enter IP addresses or configure DNS servers Bonjour is a trademark of Apple...
Page 154: ...d in integrated circuits or chips that convert for example analog video and audio signals into a digital format for transmission The codec also converts received digital signals back into analog forma...
Page 155: ...apply The domain server is the server that authenticates the users on the network Duplex See Full duplex Ethernet Ethernet is the most widely installed local area network technology An Ethernet LAN ty...
Page 156: ...asured in frames per second fps A higher frame rate is advantageous when there is movement in the video stream as it maintains image quality throughout Full duplex Transmission of data in two directio...
Page 157: ...or P VOPs included in the stream and their internal order See also GOV and VOP Half duplex See Full duplex HTML Hypertext Markup Language HTML is the set of markup symbols or codes inserted in a file...
Page 158: ...m all others and each data packet contains both the sender s address and the receiver s address The Internet Protocol ensures that the data packets all arrive at the intended address As IP is a connec...
Page 159: ...l area Linux Linux is an open source operating system within the Unix family Because of its robustness and availability Linux has won popularity in the open source community and among commercial appli...
Page 160: ...luding digital satellite and Cable TV MPEG 2 with some modifications is also the coding format used by standard commercial DVD movies MPEG 4 MPEG 4 is a group of audio and video coding standards and r...
Page 161: ...ard in Europe PAL delivers 625 lines at 50 half frames second PEM Privacy Enhanced Mail An early standard for securing electronic mail The PEM format is often used for representing an HTTPS certificat...
Page 162: ...plit into separate fields as in interlaced scanning Computer monitors do not need interlace to show the picture on the screen but instead show them progressively on one line at a time in perfect order...
Page 163: ...al number of pixels usually in megapixels in the image can be used In analog systems it is also common to use other format designations such as CIF QCIF 4CIF etc RTCP Real Time Control Protocol RTCP p...
Page 164: ...the picture The sharpness control attempted to put some of that detail back in the picture Sharpness controls are mostly superfluous in today s high end TVs The only logical requirement for it nowada...
Page 165: ...programming requests or function calls sometimes called the sockets application programming interface API SSL TSL Secure Socket Layer Transport Layer Security These two protocols SSL is succeeded by T...