background image

03

03

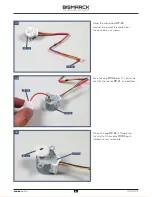
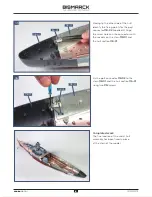
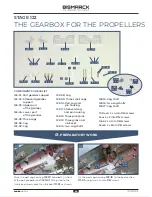
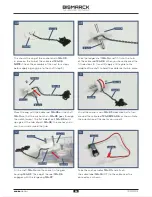
Insert the end of the propeller shaft 

121-02

 into the 

opening in the propeller housing 

115-04

, as shown.

01

PM 

2 x 3

115-04

PM 

2 x 4

120-01

PM 

2 x 3

120-02

121-02

121-02

121-02

121-02

115-01

115-04

04

03

. FITTING THE CENTRAL PROPELLER

02

04

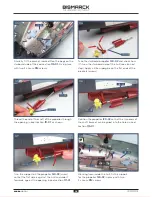
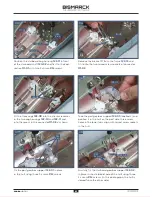
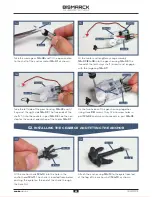
Take the central propeller 

121-02

 and identify the hole 

at the aft of the hull where it fits (arrow).

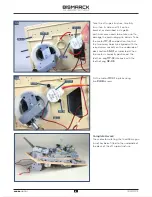
Fix the fine metal sleeve on the port propeller 

120-01


in position by screwing a 2 x 3mm 

PM

 screw into the 

hole in the shaft sleeve, as shown.

Similarly fit the metal sleeve on the starboard 
propeller 

120-02

 in position with a 2 x 3mm 

PM


screw.

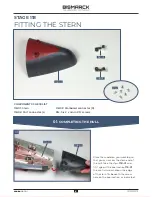
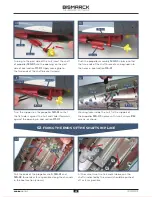
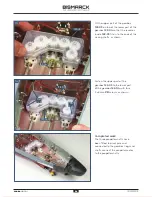
Fit the support for the propeller 

121-02

 (indicated by 

the arrow) against the opening in part 

115-04

.

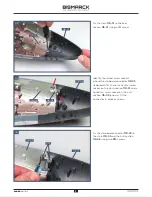
From inside the hull, fix the support for the propeller 

121-02

 to the keel section 

115-01

 using a 2 x 4mm

 PM


screw, as shown. 

18

18

AGORA

MODELS

19

AGORA

MODELS

Summary of Contents for Bismarck

Page 1: ...l pack you will assemble 2020 Hachette Partworks Ltd North America Edition by Agora Models STAGE 117 ROTATION MOTOR FOR THE THIRD 38CM GUN TURRET STAGE 118 FITTING THE STERN STAGE 119 THE AFT CIRCUIT BOARD STAGE 120 THE TWO OUTER PROPELLERS STAGE 121 THE CENTRAL PROPELLER STAGE 122 THE GEARBOX FOR THE PROPELLERS STAGE 123 THE TWIN RUDDERS STAGE 124 THE AFT ANCHOR AND MOTOR STAGE 125 MAINMAST AND F...

Page 2: ...ng multiple screws fit each screw loosely to ensure all the parts are correctly aligned before gently tightening them firmly but not overtight in the order in which you placed them Your screwdriver can be magnetised by stroking it with a magnet fridge magnet etc enabling it to hold the screws and make assembly easier If a screw is tight going into a metal part do not force it as you may shear the ...

Page 3: ...3 STAGE 117 ROTATION MOTOR FOR THE THIRD 38CM GUN TURRET COMPONENTS CHECKLIST Place the motor 117 01 on your worktop Remove the cable label 117 03 from its backing 117 01 Motor 117 02 Cog 117 03 Cable label PWB Three 2 3 x 5mm PWB screws 3 3 AGORAMODELS BISMARCK ...

Page 4: ...the connector as shown 04 Take the cog 117 02 and fit it on to the shaft of the motor 117 01 as indicated When the cog 117 02 is fitted onto the shaft of the motor 117 01 push it down as far as possible 117 03 117 01 117 01 117 01 117 02 117 02 4 4 AGORAMODELS BISMARCK ...

Page 5: ...lar care needs to be taken not to damage the protruding gun barrels Take the motor 117 01 and position it so that the two screw holes are aligned with the raised screw sockets on the underside of deck section 99 01 as indicated When the motor is correctly positioned the teeth on cog 117 02 interlock with the teeth of cog 112 09 06 112 09 PWB 117 01 99 01 117 02 117 01 99 01 PWB Fix the motor 117 0...

Page 6: ...top so that you can access the stern end of the hull Take the stern 118 01 and fit it against the keel section 115 01 the central screw hole on the edge of the stern fits beneath the screw hole on the keel section as indicated 118 01 Stern 118 02 Port connector L 118 03 Starboard connector R PM Six 2 x 4mm PM screws 6 6 AGORAMODELS BISMARCK ...

Page 7: ... fits there is a vertical screw socket on the stern section 118 01 and a horizontal screw socket on the hull section 116 02 arrows Fit the connector in place as shown Fix the starboard connector 118 03 to the stern 118 01 and the hull section 116 02 using two PM screws 118 03 PM 118 01 118 01 115 01 PM 116 02 118 03 118 01 116 02 7 7 AGORAMODELS BISMARCK ...

Page 8: ...hull identify the fixing points for the port connector 118 02 labelled L Align the screw holes on the connector with the sockets on the stern 118 01 and the hull section 116 01 Fix the port connector 118 02 to the stern 118 01 and the hull section 116 01 using two PM screws 06 118 02 PM 118 01 118 02 116 01 118 01 116 01 8 8 AGORAMODELS BISMARCK ...

Page 9: ... 119 THE AFT CIRCUIT BOARD COMPONENTS CHECKLIST Completed work There is no assembly work in this stage The circuit board 119 01 will be fitted beneath the aft superstructure in the next stage 119 01 Circuit board 9 9 AGORAMODELS BISMARCK ...

Page 10: ...abelled C 5 from the 38cm turret motor through the bracket in the centre of the upper deck structure as indicated by the arrow Carefully place the aft superstructure section sections 64 01 and 99 01 in support brackets so that you can access the underside of the upper deck Take care not to damage any of the parts already in place PM Nine 2 x 4mm PM screws PM Three 2 x 3mm PM screws PB Five 2 x 6mm...

Page 11: ...mpty Press the cables labelled C 8 C 9 and C 10 into the three slots in the bar on the other side of the deck as shown Gather together the cables marked C 5 C 6 and C 7 and run them towards the rear of the deck to the right in this photo so that the connectors are clear of where the circuit board 119 01 will be attached see next two steps Take the circuit board 119 01 and position it on the upper ...

Page 12: ...t 1 on the circuit board cable C 2 goes into port 2 and so on Continue up to the cable labelled C 10 which goes into port 10 The two ports 11 and 12 circled remain unused for the time being Take the tester box 18 01 and the battery box 4 07 Check that the switch on the battery box circled is off Connect the tester cable 18 02 to port 11 circled on the circuit board 119 01 12 12 AGORAMODELS BISMARC...

Page 13: ...on To test the two 15cm guns press button S2 on the tester box 18 01 inset below The two turrets swivel Press the button again to end the test When fully rotated the guns may pause for a few seconds before re starting NOTE Choose a suitable elevation for the gun barrels before starting the test red dotted arrow When initialization is complete press the S1 button on the tester box 18 01 inset below...

Page 14: ...4 on the tester box 18 01 inset below rotates the range finder on the aft control station End the test by pressing the S4 button again Completed work The aft superstructure electronics have been connected and tested After completing the tests turn off the battery box and carefully remove the tester cable from port 11 of the aft circuit board 09 07 14 14 AGORAMODELS BISMARCK ...

Page 15: ...mm PM screws NOTE You will also need all the parts supplied with stage 120 The 2 x 3mm PM screws are not used in this stage so store them safely for later Fit the bracket marked L on the two pegs located on the port side of the keel section 115 01 Fix in place with two 2 x 4mm PM screws as shown Place your model on your work surface so that you can access the stern of the hull Take the brackets A ...

Page 16: ...ropeller through the opening in keel section 111 01 as shown Position the propeller 120 02 so that the two ends of the shaft bracket can be glued into the holes in keel section 115 01 Turn the support on the propeller 120 02 arrow so that the flat side is against the hull and slide it forwards against the opening in keel section 111 01 Working from inside the hull fix the support for the propeller...

Page 17: ...ide is against the hull and slide it forwards against the opening in keel section 111 01 Working from inside the hull fix the support of the propeller 120 01 in place with two 2 x 4mm PM screws as shown Pull the ends of the propeller shafts 120 01 and 120 02 forwards as far as possible along the channels in the keel section arrows At the same time the fine metal sleeves on the shafts indicated by ...

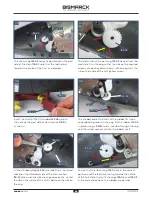
Page 18: ...e hull where it fits arrow Fix the fine metal sleeve on the port propeller 120 01 in position by screwing a 2 x 3mm PM screw into the hole in the shaft sleeve as shown Similarly fit the metal sleeve on the starboard propeller 120 02 in position with a 2 x 3mm PM screw Fit the support for the propeller 121 02 indicated by the arrow against the opening in part 115 04 From inside the hull fix the sup...

Page 19: ...15 04 over the metal tube of the propeller 121 02 as shown Fix the sleeve of the central propeller 121 02 in position using two 2 x 4mm PM screws At the same time slide the fine metal sleeve on the propeller 121 02 as far as possible aft to the left in the photo Pull the end of shaft 121 02 forwards as far as it will go on the right in the photo so that the middle propeller is against the support ...

Page 20: ...17 Cog shaft Thirteen 2 x 4mm PM screws Four 2 x 3mm PM screws Nine 2 x 4mm PB screws Seven 2 x 6mm PB screws Place the port cog housing 122 10 labelled L in front of the port propeller shaft 120 01 fitting it onto the two raised screw sockets on the keel 111 01 as shown Fix the port cog housing 122 10 to the keel section 111 01 using two 2 x 4mm PM screws 122 01 PM 2 x 4 PM 2 x 3 PB 2 x 4 PB 2 x ...

Page 21: ...ector 111 02 as shown Take the port gearbox support 122 01 labelled L and position it in the hull on the port side three screw holes in the lower tabs align with raised screw sockets in the hull Fix the port gearbox support 122 01 in place in the hull using three 2 x 4mm PM screws Similarly fix the starboard gearbox support 122 02 in place in the starboard side of the hull using three 2 x 4mm PM s...

Page 22: ...2 x 4mm PB screws 01 02 Fit the first pivot pin 122 12 into the port cog housing 122 10 Make sure that the hole in the pin faces upwards arrow Grip the end of shaft 120 01 with the flattened side of the end facing upwards red arrow Fit it into the open end of the pivot pin 122 12 yellow arrow Fix the motor 121 01 in place in the lower part of the gearbox 122 04 using the two 2 x 6mm PB screws as s...

Page 23: ...g 122 09 and the cog from 122 12 mesh with each other arrow Fit the third pivot pin 122 12 on the third cog housing again with the hole facing upwards Grip the end of the central shaft 121 02 so that the flat side faces upwards arrow 10 Fit the end of the propeller shaft 121 02 into the opening in part 122 12 Fix in place with a 2 x 3mm PM screw Fit the grip D from frame 122 13 over the pivot pin ...

Page 24: ...e lower end fits into the central hole on cog 122 09 arrow Fit the cog shaft 122 15 into the hole at the centre of the lower part of the gear box 122 04 and into the hole in cog 122 09 Similarly fit the second cog shaft 122 14 into the hole furthest to the port in the lower part of the gearbox 122 04 Push it down so the end fits into the hole in cog 122 09 03 04 05 06 122 04 122 14 122 01 122 04 1...

Page 25: ...rconnect with the teeth of cog 122 07 as shown Fit one of the cogs 122 05 on the right hand cog shaft 122 14 and one on the central cog shaft 122 15 as shown Fit cog 122 08 on the left hand cog shaft 122 16 Finally the third cog 122 05 is fitted on the left hand cog shaft 122 14 Fit the short cog shaft 122 17 into the central hole of cog 122 07 fitted on the motor 07 08 09 10 11 12 122 16 122 17 1...

Page 26: ... Fit the upper part of the gearbox 122 03 on top of the lower part of the gearbox 122 04 so that the recesses inside 122 03 fit on to the ends of the six cog shafts as shown Fasten the upper part of the gearbox 122 03 to the lower part of the gearbox 122 04 with four 2 x 6mm PB screws as shown 15 14 122 03 122 04 122 03 122 04 PB 2 x 3 PB 2 x 6 26 26 AGORAMODELS BISMARCK ...

Page 27: ...rn 118 01 as indicated Note the position of the three ribs rib 1 on the inside of the hull sits between the ribs 2 and 3 on the cog Position the cog support 123 05 on the hull assembly so that it sits on the raised screw sockets in the stern section 118 01 123 01 Motor for the rudders 123 02 Large cog 123 03 Port cog L 123 04 Starboard cog R 123 05 Cog support 123 06 Two rudders 123 07 Cable label...

Page 28: ...e port side of stern section 118 01 as shown The shaped end of the shaft of the rudder fits into a corresponding recess in the cog Fix the rudder 123 06 in place using a PWM screw inserted through the cog and the raised socket and into the rudder shaft Fit the starboard cog 123 04 marked R on the raised socket on the starboard side of the stern section 118 01 Make sure the ribs are aligned correct...

Page 29: ...round the end of the cable from motor 123 01 near to the connector as shown Fit the large cog 123 02 on the shaft of the motor 123 01 Make sure the side without any teeth is positioned as shown arrow Ensure that the cogs 123 03 and 123 04 are positioned as shown with the rudders parallel Identify the fixing point for the motor 123 01 at the rear of part 118 01 Fix the motor in place with two PWM s...

Page 30: ...24 04 Cog with brake tab 124 05 Cog with cable reel 124 06 Cable reel 124 07 Cog on shaft 124 08 Worm gear on shaft 124 09 Anchor chain 124 10 Anchor shank 124 11 Anchor head 124 12 Anchor ring 124 13 Shaft shorter 124 14 Shaft longer 124 15 Switch and cable 124 16 Cable label D 7 124 17 Cable label D 8 PM Three 2 x 4mm PM screws PB Four 1 7 x 6mm PB screws Place the right hand side of the gear ho...

Page 31: ... connector as shown Fit the switch 124 15 into the gear housing 124 03 Note the alignment of the switch the tab reaches towards the middle of the first cog Turn the shaft 124 07 until the tab on cog 124 04 comes up against the tab of the switch 124 15 indicated by the straight arrow Put the cable reel 124 06 on your worktop and check how the ring on the end of the anchor chain 124 09 fits over the...

Page 32: ...e anchor chain 124 09 goes through the notch arrow The flat side of part 124 05 butts up against the hub of part 124 06 The anchor chain can then wind around the hub Wind the anchor chain 124 09 clockwise half a turn around the cable reel 124 05 124 06 as shown Note the orientation of the reel as you wind it Fit the shaft 124 14 into the socket in the gear housing 124 03 The cog of the reel 124 05...

Page 33: ...st the right side 124 03 The free ends of the shafts fit into the sockets in part 124 02 See the next step for the correct orientation of the motor 124 01 Fix the two halves of the gear housing together using three PB screws they fit into screw holes in part 124 02 and screw into sockets in part 124 03 02 INSTALLING THE GEARBOX AND FITTING THE ANCHOR Fit the anchor shank 124 10 into the hole in th...

Page 34: ...s near the aft of the hull Before positioning the gearbox run the anchor chain 124 09 through the hole in part 118 01 on the port side at the stern as shown Position the gearbox housing 124 02 124 03 so that tabs with screw holes fit onto raised screw sockets in the hull section 118 01 arrows Use two PM screws to fix the gearbox housing in place on part 118 01 as shown Take the anchor assembly 124...

Page 35: ...D and the upper mast section B Carefully remove all four parts from the frame Remove the four ladders 7 10 from the frame 125 09 Bend the tabs up at right angles The lower tab on part 8 is bent twice at right angles forwards and upwards to form a U shape arrow 125 01 125 02 125 03 125 04 125 07 125 08 125 09 125 12 J K L 125 05 125 06 125 10 125 11 7 8 9 10 1 6 3 2 4 5 125 03 A B D C 10 7 8 9 01 T...

Page 36: ...the fit of spar D A peg on the mast fits into the socket in the spar When you are happy with the fit apply a little superglue to the peg and fix in place ensuring that both spars are parallel Take the tip of the mast part 3 from the metal frame 125 08 Very carefully bend the central prong upwards at right angles to the two arms Check the fit on the upper end of mainmast section B When you are happ...

Page 37: ...ientated noting the position of the holes arrows Glue the parts together as shown 11 12 The spar support 125 11 slopes upwards at an angle to the mast The spar A from frame 125 03 is fitted to the brackets on the front of part 125 11 Glue the spar in place as shown Glue the rail G from frame 125 02 to the central strut of part 125 11 on the upper side as shown The antenna 125 12 is glued in place ...

Page 38: ...rm F Check the fit with the open side of the barrier facing away from the ladder Glue in place On the open side of the barrier two tabs in part 6 fit into holes in part 1 from frame 125 08 the barrier and speed indicator Glue part 1 in place as shown 08 The ladder 9 from frame 125 09 fits on the lower section of the mainmast 125 01 Glue the two tabs to the mast Take the signal lamp support H and t...

Page 39: ...in the platform circled Glue in place Hold the lower mast 125 01 upright on your worktop Take the railing 125 10 and glue it in place around the edge of platform 2 Check the fit and then glue the mainmast 125 01 to the central hangar 94 01 as shown Note the position of the ladders Place the aft superstructure on your worktop Identify the hole on the central hangar 94 01 where the mainmast 125 01 f...

Page 40: ...n place The vent pipe K from frame 125 04 is glued to the other side of the main mast in the holes on the central hanger 94 01 and on the antenna shaft L Take strut 4 and a strut 5 from frame 125 08 they fit on the boat supports on the starboard side of the central hangar Make sure you have them in the correct position then glue in place The other two struts 4 and 5 from frame 125 08 fit on the bo...

Page 41: ... the lower edge of the gun mount 125 05 and fix the base to the mount as shown Repeat steps one and two with the three other parts 125 05 125 06 and 125 07 to make a total of four identical anti aircraft guns as shown Two of the four anti aircraft gun mounts 125 05 fit on the port side of the aft superstructure Pegs on the underside of the base plates fit into holes in the superstructure deck Pres...

Page 42: ...n place The skylight E from frame 126 03 fits in the adjacent recess of the upper deck section 126 01 Glue in place as shown STAGE 126 THE EIGHTH UPPER DECK SECTION COMPONENTS CHECKLIST 126 01 Eighth upper deck section 126 03 Skylights and two loading practice machines 126 04 Eleven smoke generation containers and ten depth charges 126 05 Two railings 126 06 Two railings 126 07 Railing port 126 08...

Page 43: ...3 04 Take the three identical skylights B from frame 126 03 and check how they fit at the front end of the upper deck section 126 01 Use a little superglue to fix them in place NOTE The AA gun circled in red will be supplied with a later stage Two skylights A from frame 126 03 are positioned on the upper deck section 126 01 close to the skylights B Glue in place as shown 43 43 AGORAMODELS BISMARCK...

Page 44: ...26 01 E H 07 99 01 126 01 E D G G 08 Separate all eleven smoke containers G from frame 126 04 and glue them in place next to skylights D and E on upper deck section 126 01 as shown The remaining six depth charges H from frame 126 04 are glued to the port side of the aft superstructure on upper deck section 99 01 as shown H 44 44 AGORAMODELS BISMARCK ...

Page 45: ...structure as shown NOTE In this photo there is an AA gun fitted on the upper deck of the superstructure arrow This gun will be supplied and fitted in pack 12 Take one of the two semicircular railings 126 06 this forms a continuation to railing Y The two pegs on the lower edge of the railing are glued into holes in the aft superstructure deck 102 02 The railing 126 07 forms a continuation to railin...

Page 46: ...perstructure will be fitted in pack 12 Railings 126 06 and 126 07 continue the line of railing X Glue them in place in the holes in the deck covering 102 01 and the superstructure deck 102 02 Completed work Various details have been fitted to the upper deck section Railings have been fitted around the superstructure 06 102 01 X 102 01 X 126 06 126 08 102 02 46 46 AGORAMODELS BISMARCK ...

Page 47: ... chain holder and depth charges E to H 127 05 Two electric capstans I to L 127 06 Two depth charge racks M N 127 07 Two platforms with railing O P 127 08 Four ladders Q to S PB Five 2 3 x 4mm PB screws Take two more skylights A from frame 127 02 and glue them in place at the forward end of the upper deck section 126 01 as shown Place the eighth upper deck section 126 01 on your worktop Separate on...

Page 48: ... parts fitted in step 4 Glue the six remaining skylights from frame 127 03 in place on the aft upper deck section 127 01 as shown Take the anchor chain opening F from frame 127 04 and glue it in place at the aft end of upper deck section 127 01 Glue the anchor chain holder E in line with it and the handwheel G on top of part E as shown Take the two parts M and N from the frame 127 06 and bend them...

Page 49: ...J L K I L J K 127 05 10 01 02 Glue the two depth charge racks M and N in place on the upper deck section 127 01 as shown Glue the depth charges H from frame 127 04 inside each of the depth charge racks The parts from frame 127 05 are used to make two capstans Take a base plate I and glue two rope drums K in the recesses on either side of the central socket The pin on the underside of capstan head ...

Page 50: ...parts to create two walkways that are mirror images of each other O and P Check the fit of walkway O on the starboard side of the aft superstructure Tabs on the side of the platform fit into holes in the vents on the gun turret circled and a peg on the bottom of the railing fits into a hole in deck covering 102 01 Glue in place Take the ladders Q and R from frame 127 08 Bend the handrails upwards ...

Page 51: ...perstructure It runs from the upper deck 99 01 to the decking of the superstructure deck 102 01 Glue in place as shown The first ladder S fits on the starboard side of the aft superstructure running from the decking of the superstructure deck 102 01 to the deck part 97 05 as shown Ladder R fits in the same place on the starboard side of the aft superstructure running from the upper deck 99 01 to t...

Page 52: ...rel cradle with base plate 128 10 Clutch shaft 128 11 Motor mounting lower part 128 12 Left side rangefinder arm hood 128 13 Right side rangefinder arm hood 128 14 Ring 128 15 Two gun barrels 128 16 Two ladders 128 17 Two washers 128 18 Cable label PB Eleven 2 x 6 mm PB screws When you have checked the fit of the periscopes in the holes on the sides of the gun turret housing apply a little supergl...

Page 53: ...x it in place in the connector as indicated Glue the second gun barrel 128 15 in place in the other socket on the connector 128 05 Fit the ring 128 14 against the back of the connector 128 05 so that the shaped edges match Have the clutch shaft 128 10 ready Insert the end of the clutch shaft 128 10 into the ring 128 14 and push it through so that the wide end of part 128 10 is flush with the edge ...

Page 54: ...screws Turn the assembly over and fix the upper part of the motor mounting 128 07 to the base plate 128 09 using the two PB screws Take the motor 128 01 and the cable label 128 18 Remove the label from its backing and wrap it around the end of the cable as shown Fit the motor 128 01 into the motor mounting 128 07 Make sure that the cables on the circuit board of the motor 128 01 are in the directi...

Page 55: ...egs on the sides of the cradle fit into raised brackets inside the gun housing arrows to hold the assembly in the correct position Take the aft upper deck section 126 01 127 01 and fit the small tabs on the barbette 128 02 into the recesses around the opening on the upper deck This shows the barbette 128 02 positioned on the upper deck section 126 01 NOTE The two AA guns shown in steps 1 and 2 wil...

Page 56: ...ge 123 Fix the motor 123 01 back in place using the two PM screws Fit a washer 128 17 on top of each of the raised screw holes where the motor was fitted Remove the two PM screws holding the motor 123 01 in place at the rear of the hull assembly The arrow indicates where the second screw has been removed Attach the cable label 121 03 D2 to the cable of the motor for the propellers 121 01 near the ...

Reviews: