©ASCO Valve, Inc. 50 Hanover Road, Florham Park, New Jersey 07932
l&M V 6584 R16 sec1
www.ascovalve.com
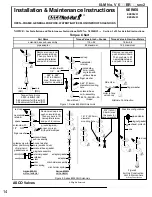
Remove red cap or retainer from top of solenoid base
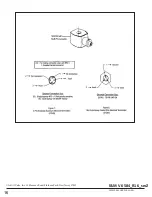
sub-assembly. For 3-way construction with pipe adapter
(Figure 3), remove pipe adapter, nameplate and solenoid.
Omit steps 4 and 5.
Push down on solenoid: Then using a suitable screwdriver,
insert blade between solenoid and nameplate/retainer. Pry
up slightly and push to remove. NOTE: Series 8202O/H
solenoids have a spacer between the nameplate/retainer and
solenoid.
Remove solenoid from solenoid base sub-assembly.
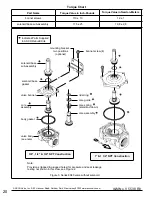
Reassemble in reverse order of disassembly. Use exploded
views for identification and placement of parts.
Torque pipe adapter to 90 inch-pounds maximum [10,2 Nm
maximum]. Then make up piping or tubing to pipe adapter
on solenoid.
3.
4.
5.
6.
7.
Disassembly and Reassembly of Solenoids
Remove solenoid, see
Solenoid Replacement.
Remove spring washer from solenoid base sub-assembly.
For 3-way construction, remove pipe adapter and plugnut
gasket.
1.
2.
Unscrew solenoid base sub-assembly from valve body.
Remove internal solenoid parts for cleaning or replacement.
Use exploded views for identification and placement of
parts.
If the solenoid is part of a valve, refer to basic valve instal-
lation and maintenance instructions for further disassembly.
Torque solenoid base sub-assembly and adapter to 175±25
in-lbs [19,8±2,8 Nm].
3.
4.
5.
6.
ORDERING INFORMATION FOR ASCO
SOLENOIDS
When Ordering Solenoids for ASCO Solenoid
Operators or Valves, order the number stamped on
the solenoid. Also specify voltage and frequency.
lnstallation & Maintenance Instructions
1
3
Summary of Contents for E-STOP09
Page 28: ...28...

