29
29
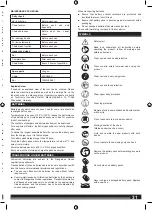
● Wear hearing protection and limit exposure.
■ Injury caused by contact with exposed saw teeth of the chain
■ Injury caused by thrown-out pieces of the workpiece (wood
chips, splinters)
■ Injury caused by dust and particles
■ Injury to the skin caused by contact with lubricants
■ Parts ejected from the saw chain (cutting/injection hazards)
■
Unforeseen, abrupt movement, or kickback of the guide bar
(cutting hazards)
RISK REDUCTION
It has been reported that vibrations from hand-held tools may
contribute to a condition called Raynaud’s Syndrome in certain
individuals. Symptoms may include tingling, numbness and
blanching of the fingers, usually apparent upon exposure to cold.
Hereditary factors, exposure to cold and dampness, diet, smoking
and work practices are all thought to contribute to the development
of these symptoms. There are measures that can be taken by the
operator to possibly reduce the effects of vibration:
■ Keep your body warm in cold weather. When operating the unit
wear gloves to keep the hands and wrists warm. It is reported
that cold weather is a major factor contributing to Raynaud’s
Syndrome.
■
After each period of operation, exercise to increase blood
circulation.
■ Take frequent work breaks. Limit the amount of exposure per
day.
■
Protective gloves available from professional chainsaw retailers
are designed specifically for chainsaw use which give protection,
good grip and also reduce the effect of handle vibration. These
gloves should comply with EN381-7 and must be CE marked.
If you experience any of the symptoms of this condition, immediately
discontinue use and see your physician.
WARNING! Injuries may be caused, or aggravated, by
prolonged use of a tool. When using any tool for prolonged
periods, ensure you take regular breaks.
SPECIFIED CONDITIONS OF USE
The cordless chainsaw is only intended for use outdoors. For safety
reasons the product must be adequately controlled by using two-
handed operation at all times.
The product is designed for cutting branches, trunks, logs and
beams of a diameter determined by the cutting length of the
guide bar. It is only designed to cut wood. It is only to be used by
adults who have received adequate training on the hazards and
preventative measures/actions to be taken while using it.
Do not use the product for any purpose not listed in the Specified
Conditions Of Use. It is not to be used for professional tree services.
The product is not to be used by children or by persons not wearing
adequate personal protective equipment and clothing.
WARNING! When using the product, the safety rules must
be followed. For your own safety and that of bystanders, you
must read and fully understand these instructions before
operating the product. You should attend a professionally
organized safety course in the use, preventative actions,
first-aid, and maintenance of chainsaws. Please keep these
instructions safe for later use.
WARNING! Chainsaws are potentially dangerous tools.
Accidents involving the use of chainsaws often result in loss
of limbs or death. It is not just the chainsaw that is the hazard.
Falling branches, toppling trees, and rolling logs can all kill.
Diseased or rotting timber poses additional hazards. You
should assess your capability of completing the task safely.
If there is any doubt, leave it to a professional tree surgeon.
Do not use the product in any other way as stated for normal use.
KNOW YOUR PRODUCT
See page 6-7.
1.
Rear handle
2.
Switch trigger
3.
Trigger release
4.
Front handle
5. Front hand guard/Chain brake
6. Chain cover
7.
Bar mounting nuts
8. Chain tensioning screw
9. Chain catcher
10.
Bar groove
11. Chain drive links
12.
Saw chain
13.
Guide bar cover
14.
Guide bar
15.
Spiked bumper
16. Chain lubricant cap
17. Combination wrench
18.
Battery
SAFETY DEVICES
Low kick-back saw chain
A low-kick-back saw chain helps to reduce the possibility of a
kickback event.
The rakers (depth gauges) ahead of each cutter can minimize
the force of a kick-back reaction by preventing the cutters from
digging in too deeply. Only use replacement guide bar and chain
combinations recommended by the manufacturer.
As saw chains are sharpened, they lose some of the low kickback
qualities and extra caution is required. For your safety, replace saw
chains when cutting performance decreases.
Spiked bumper
The integral bumper spike may be used as a pivot when making a
cut. It helps to keep the body of the chainsaw steady while cutting.
When cutting, push the machine forward until the spikes dig into
the edge of the wood, then by moving the rear handle up or down
in the direction of the cutting line it can help ease the physical strain
of cutting.
Guide bars
Generally, guide bars with small radius tips have somewhat lower
potential for kick-back. You should use a guide bar and matching
chain which is just long enough for the job. Longer bars increase
the risk of loss of control during sawing. Regularly check the chain
tension. When cutting smaller branches (less than the full length of
the guide bar) the chain is more likely to be thrown off if the tension
is not correct.
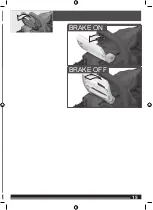
Chain brake
Chain brakes are designed to quickly stop the chain from rotating.
When the chain brake lever/hand guard is pushed towards the
bar, the chain should stop immediately. A chain brake does not
prevent kickback. It only lowers the risk of injury should the chain
bar contact the operator’s body during a kickback event. The chain
brake should be tested before each use for correct operation in both
the run and brake positions.
Chain catcher
A chain catcher prevents the saw chain from being thrown back
towards the operator if the saw chain comes loose or breaks.
ASSEMBLY
WARNING! If any parts are damaged or missing do not
operate the product until the parts are replaced. Failure to heed
this warning could result in serious personal injury.
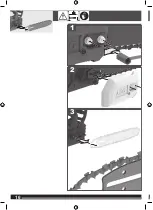
Assembling saw chain and guide bar
See pages 10 - 11.
Make sure to remove the battery pack from the product. Wear
protective gloves.
Remove the bar mounting nuts using the combination wrench
provided.
Remove the chain cover.
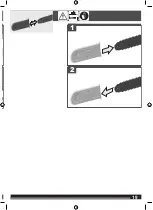
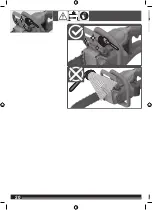
The saw chain should face in the direction of chain rotation. If they
face backwards, turn the loop over.
Place the chain drive links into the bar groove.
Position the chain so there is a loop at the back of the bar.
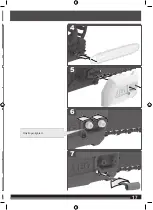
Attach the bar to the chain saw and loop the chain around the drive
sprocket.
Replace the chain cover and bar mounting nuts.
Finger-tighten the bar mounting nuts. The bar must be free to move
for chain tension adjustment.
Adjust the chain tension. Refer to the “Adjusting the chain tension”
section.
Hold the tip of the guide bar up and tighten the bar mounting nuts
securely.
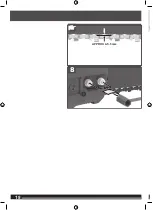
Adjusting the chain tension
See page 12.
Make sure to remove the battery pack from the product.
Make sure the bar mounting nuts are loosened to finger-tight.
To increase the chain tension, turn the chain tensioning screw
clockwise and check the chain tension frequently. To reduce the
chain tension, turn the chain tensioning screw counterclockwise
and check the chain tension frequently.
The chain tension is correct when the gap between the cutter in the
chain and the bar is about 4 - 5.5 mm. Pull the chain in the middle
of the lower side of the bar downwards (away from the bar) and
measure the distance between the bar and the chain cutters.
Tighten the bar mounting nuts by turning it clockwise.
NOTE:
The temperature of the chain increases during normal
operation causing the chain to stretch. Check the chain tension
frequently and adjust as required. A chain tensioned while warm
may be too tight upon cooling. Make sure that the chain tension is
correctly adjusted as specified in these instructions.
OPERATION
Adding the chain lubricating oil
See page 13.
WARNING! Never work without chain lubricant. If the saw
chain is running without lubricant, the guide bar and the saw
chain can be damaged. It is essential to frequently check the
oil level in the oil level gauge and before starting to use the
chainsaw.
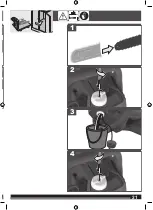
Clear surface around the oil cap to prevent contamination.
Unscrew and remove the cap from the oil tank.
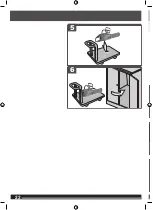
Pour the oil into the oil tank and monitor the oil level gauge. Ensure
that no dirt enters the oil tank while filling.
Put the oil cap back on and tighten it up. Wipe away any spillage.
One full oil tank will enable you to use the saw for 20- 60 min.
Summary of Contents for ACS183060
Page 1: ...ACS18B30 ACS183060 ...
Page 2: ...2 2 ENGLISH 1 2 3 Picture section with operating description and functional description 4 ...
Page 4: ...4 4 20 19 12 10 ...
Page 5: ...5 5 START STOP 8 16 21 13 14 23 15 ...
Page 6: ...6 6 12 13 6 9 10 11 8 7 ...
Page 7: ...7 7 17 18 16 15 14 1 2 3 4 5 ...
Page 8: ...8 8 Remove the battery pack before starting any work on the machine 1 click 2 1 2 ...
Page 9: ...9 9 75 100 0 25 50 75 25 50 ...
Page 10: ...10 10 2 1 3 ...
Page 11: ...11 11 5 4 6 Only finger tighten APPROX 4 5 5 mm ...
Page 12: ...12 12 FLATS APPROX 4 5 5 mm 2 3 1 ...
Page 13: ...13 13 2 3 1 ...
Page 14: ...14 14 1 2 3 START STOP ...
Page 15: ...15 15 BRAKE ON BRAKE OFF ...
Page 16: ...16 16 2 3 1 ...
Page 17: ...17 17 5 6 7 4 Only finger tighten ...
Page 18: ...18 18 FLATS APPROX 4 5 5 mm 8 ...
Page 19: ...19 19 2 1 ...
Page 20: ...20 20 ...
Page 21: ...21 21 2 3 1 4 ...
Page 22: ...22 22 6 5 ...
Page 23: ...23 23 Figure 1 Figure 6 Figure 2 Figure 3 Figure 5 1 3 2 5 cm 2 in 5 cm 2 in Figure 4 ...
Page 33: ...uct ant 30 ing 14 bH out 224 ...
Page 34: ......
Page 35: ......

