26
26
Cut wood only. Do not use chainsaw for purposes not
intended. For example: do not use chainsaw for cutting plastic,
masonry or non-wood building materials.
Use of the chainsaw
for operations different than intended could result in a hazardous
situation.
Causes and operator prevention of kickback:
Kickback may occur when the nose or tip of the guide bar touches
an object, or when the wood closes in and pinches the saw chain
in the cut.
Tip contact in some cases may cause a sudden reverse reaction,
kicking the guide bar up and back towards the operator.
Pinching the saw chain along the top of the guide bar may push the
guide bar rapidly back towards the operator.
Either of these reactions may cause you to lose control of the saw
which could result in serious personal injury. Do not rely exclusively
upon the safety devices built into your saw. As a chainsaw user,
you should take several steps to keep your cutting jobs free from
accident or injury.
Kickback is the result of tool misuse and/or incorrect operating
procedures or conditions and can be avoided by taking proper
precautions as given below:
Maintain a firm grip, with thumbs and fingers encircling the
chainsaw handles, with both hands on the saw and position
your body and arm to allow you to resist kickback forces.
Kickback forces can be controlled by the operator, if proper
precautions are taken. Do not let go of the chainsaw.
Do not overreach and do not cut above shoulder height.
This
helps prevent unintended tip contact and enables better control of
the chainsaw in unexpected situations.
Only use replacement bars and chains specified by the
manufacturer.
Incorrect replacement bars and chains may cause
chain breakage and/or kickback.
Follow the manufacturer’s sharpening and maintenance
instructions for the saw chain.
Decreasing the depth gauge
height can lead to increased kickback.
ADDITIONAL CHAINSAW SAFETY WARNINGS
It is recommended to cut logs on a saw-horse or cradle when
operating the product for the first time.
Ensure all guards, handles, and spiked bumper are properly fitted
and are in good condition.
Persons using the product should be in good health. The product
is heavy, so the operator must be physically fit. The operator
should be alert, have a good vision, mobility, balance, and manual
dexterity. If there is any doubt, do not operate the product.
Do not start using the product until you have a clear work area,
secure footing, and a planned retreat path away from a falling tree.
Beware of the emission of lubricant mist and saw dust. Wear a
mask or respirator, if required.
Do not cut vines and/or small undergrowth (less than 75 mm in
diameter).
Always hold the chainsaw with both hands during operation. Use a
firm grip with thumbs and fingers encircling the chainsaw handles.
Right hand must be on the rear handle and left hand on the front
handle.
Before starting the product, make sure the saw chain is not
contacting any object.
Do not modify the product in any way or use it to power any
attachments or devices not recommended by the manufacturer for
your saw.
There should be a first-aid kit containing large wound dressings and
a means to summon attention (e.g., whistle) close to the operator. A
larger more comprehensive kit should be reasonably nearby.
Wear a helmet at all times when operating the product. A helmet,
equipped with mesh visor, can help reduce the risk of injury to the
face and the head if kickback occurs.
An incorrectly tensioned chain can jump off the guide bar and could
result in serious injury or fatality. The length of the chain depends
on the temperature. Check the tension frequently.
You should get used to your new chainsaw by making simple
cuts on securely supported wood. Do this whenever you have not
operated the saw for some time.
To reduce the risk of injury associated with contacting moving parts,
always stop the motor, apply the chain brake, remove the battery
pack and make sure all moving parts have come to a stop before:
■
cleaning or clearing a blockage
■
leaving the product unattended
■
installing or removing attachments
■
checking, conducting maintenance or working on the product
The size of the work area depends on the job being performed as
well as the size of the tree or work piece involved. For example,
felling a tree requires a larger work area than making other cuts, i.e.,
bucking cuts, etc. The operator needs to be aware and in control of
everything happening in the work area.
Do not cut with your body in line with the guide bar and chain. If you
experience kickback, this will help prevent the chain coming into
contact with your head or body.
Do not use a back-and-forward sawing motion, let the chain do the
work. Keep the chain sharp and do not try to push the chain through
the cut.
Do not put pressure on the saw at the end of the cut. Be ready to
take on the weight of the saw as it cuts free from the wood. Failure
to do so could result in possible serious personal injury.
Do not stop the saw in the middle of a cutting operation. Keep the
saw running until it is already removed from the cut.
Push and pull
See figure 9.
The reaction force is always opposite to the direction the chain is
moving. Thus, the operator must be ready to control the tendency
for the product to pull away (forward motion) when cutting on the
bottom edge of the bar and the push backwards (towards the
operator) when cutting along the top edge.
Saw jammed in the cut
Stop the chainsaw and make it safe. Do not try to force the chain
and bar out of the cut as this is likely to break the chain, which may
swing back and strike the operator. This situation normally occurs
because the wood is incorrectly supported which forces the cut to
close under compression, thereby pinching the blade. If adjusting
the support does not release the bar and chain, use wooden
wedges or a lever to open the cut and release the saw. Never try
to start the chainsaw when the guide bar is already in a cut or kerf.
Personal protective equipment
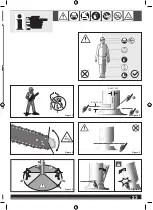
See page 23.
Good quality, personal protective equipment as used by
professionals will help to reduce the risk of injury to the operator.
The following items should be used when operating your chainsaw:
Safety helmet
–
should comply with EN 397 and be CE marked
Hearing protection
–
should comply with EN 352-1 and be CE marked
Eye and face protection
–
should be CE marked and comply with EN 166 (for safety
glasses) or EN 1731 (for mesh visors)
Gloves
–
should comply with EN381-7 and be CE marked
Leg protection (chaps)
–
should comply with EN381-5, be CE marked and provide
all-round protection.
Chainsaw safety boots
–
should comply with EN ISO 20345:2004 and be marked
with a shield depicting a chainsaw to show compliance with
EN 381-3. (Occasional users may use steel toe-cap safety
boots with protective gaiters which conform to EN 381-9
if the ground is even and there is little risk of tripping or
catching on undergrowth)
Chainsaw jackets for upper body protection
–
should comply with EN 381-11 and be CE marked
INSTRUCTIONS CONCERNING THE PROPER TECHNIQUES
FOR BASIC FELLING, LIMBING, AND CROSS-CUTTING
Understanding the forces within the wood
When you understand the directional pressures and stresses inside
the wood you can reduce the “pinches” or at least expect them
during your cutting. Tension in the wood means the fibers are being
pulled apart and if you cut in this area, the “kerf” or cut will tend to
open as the saw goes through. If a log is being supported on a saw
horse and the end is hanging unsupported over the end, tension is
created on the upper surface due to the weight of the overhanging
log stretching the fibers. Likewise, the underside of the log will be
in compression and the fibers are being pushed together. If a cut is
made in this area, the kerf will have the tendency to close up during
the cut. This would pinch the blade.
Felling a tree
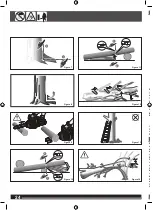
See figures 1 - 8.
When bucking and felling operations are being performed by two
or more persons at the same time, the felling operations should be
separated from the bucking operation by a distance of at least twice
the height of the tree being felled. Trees should not be felled in a
manner that would endanger any person, strike any utility line, or
cause any property damage. If the tree does make contact with any
utility line, the company should be notified immediately.
The chainsaw operator should keep on the uphill side of the terrain
as the tree is likely to roll or slide downhill after it is felled.
An escape path should be planned and cleared as necessary
before cuts are started. The escape path should extend back and
diagonally to the rear of the expected line of fall.
Before felling starts, consider the natural lean of the tree, the
location of larger branches, and the wind direction to judge which
way the tree will fall.
Remove dirt, stones, loose bark, nails, staples, and wire from the
tree.
Do not attempt to fell trees which are rotten or have been damaged
by wind, fire, lightning, etc. This is extremely dangerous and should
only be completed by professional tree surgeons.
1. Notching undercut
See figures 1 - 6.
Make the notch 1/3 the diameter of the tree, perpendicular to
the direction of the fall. Make the lower horizontal notching cut
first. This will help to avoid pinching either the saw chain or the
guide bar when the second notch is being made.
2. Felling-back cut
See figures 1 - 6.
Make the felling-back cut at least 50 mm/2 in. higher than the
horizontal notching cut. Keep the felling-back cut parallel to the
horizontal notching cut. Make the felling back cut so enough
Summary of Contents for ACS183060
Page 1: ...ACS18B30 ACS183060 ...
Page 2: ...2 2 ENGLISH 1 2 3 Picture section with operating description and functional description 4 ...
Page 4: ...4 4 20 19 12 10 ...
Page 5: ...5 5 START STOP 8 16 21 13 14 23 15 ...
Page 6: ...6 6 12 13 6 9 10 11 8 7 ...
Page 7: ...7 7 17 18 16 15 14 1 2 3 4 5 ...
Page 8: ...8 8 Remove the battery pack before starting any work on the machine 1 click 2 1 2 ...
Page 9: ...9 9 75 100 0 25 50 75 25 50 ...
Page 10: ...10 10 2 1 3 ...
Page 11: ...11 11 5 4 6 Only finger tighten APPROX 4 5 5 mm ...
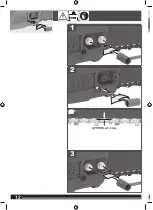
Page 12: ...12 12 FLATS APPROX 4 5 5 mm 2 3 1 ...
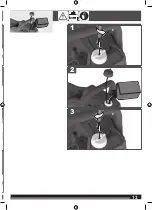
Page 13: ...13 13 2 3 1 ...
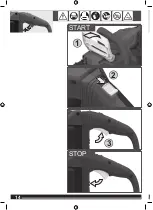
Page 14: ...14 14 1 2 3 START STOP ...
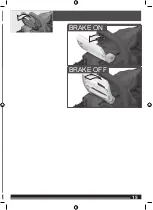
Page 15: ...15 15 BRAKE ON BRAKE OFF ...
Page 16: ...16 16 2 3 1 ...
Page 17: ...17 17 5 6 7 4 Only finger tighten ...
Page 18: ...18 18 FLATS APPROX 4 5 5 mm 8 ...
Page 19: ...19 19 2 1 ...
Page 20: ...20 20 ...
Page 21: ...21 21 2 3 1 4 ...
Page 22: ...22 22 6 5 ...
Page 23: ...23 23 Figure 1 Figure 6 Figure 2 Figure 3 Figure 5 1 3 2 5 cm 2 in 5 cm 2 in Figure 4 ...
Page 33: ...uct ant 30 ing 14 bH out 224 ...
Page 34: ......
Page 35: ......

