


30
30
Installing the battery pack
See pages 8 - 9.
Place the battery pack in the product. Align raised ribs on the
battery pack with grooves in the product’s battery port.
Make sure the latches on the battery pack snap in place and that the
battery pack is secured in the chainsaw before beginning operation.
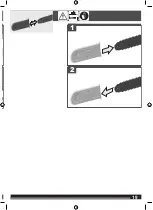
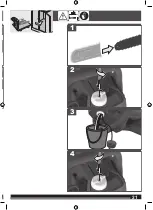
Holding the chainsaw
See figure 1.
Always hold the product with your right hand on the rear handle
and your left hand on the front handle. Grip both handles with the
thumbs and fingers encircling the handles. Ensure that your left
hand is holding the front handle so that your thumb is underneath.
Starting the product
See page 14.
Before starting the product, you should install the battery pack in the
product and make sure the chain brake is in run position by pulling
the chain brake lever/hand guard toward the front handle.
To start the product: pull the trigger release, and then press the
switch trigger.
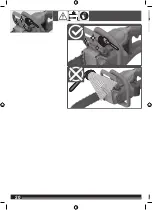
Checking and operating the chain brake
See page 15.
Engage the chain brake by rotating your left hand around the front
handle. Allow the back of your hand to push the chain brake lever/
hand guard toward the bar while the chain is rotating rapidly. Be
sure to maintain both hands on the saw handles at all times.
Reset the chain brake back into the run position by grasping the
top of the chain brake lever/hand guard and pulling toward the front
handle until you hear a click.
WARNING! If the chain brake does not stop the chain
immediately, or if the chain brake will not stay in the run
position without assistance, bring the product to an authorised
service centre for repair prior to use.
TRANSPORTATION AND STORAGE
Stop the product, remove the battery pack, and allow the product to
cool down before storing or transporting.
Clean all foreign material from the product. Store it in a cool dry
and well-ventilated place that is inaccessible to children. Keep away
from corrosive agents, such as garden chemicals and de-icing salts.
Do not store outdoors.
Fit the guide bar cover before storing the product or during
transportation.
For transportation, secure the product against movement or falling
to prevent injury to persons or damage to the product.
MAINTENANCE
WARNING! Use only AEG accessories and AEG spare
parts. Failure to do so can cause possible injury, contribute
to poor performance, and may void your warranty. Should
components need to be replaced which have not been
described, please contact one of our AEG service agents (see
our list of guarantee/service addresses).
WARNING! Servicing requires extreme care and knowledge
and should be performed only be a qualified service technician.
For service, bring the product to an authorised service centre
for repair. When servicing, use only original replacement parts.
WARNING! Remove the battery before adjustment,
maintenance or cleaning. Failure to do so could result in
serious personal injury.
You may only make adjustments or repairs described in this manual.
For other repairs, contact the authorised service agent.
Consequences of improper maintenance may cause the chain brake
and other safety features to not function correctly, thus increasing
the potential for serious injury. Keep your chainsaw professionally
maintained and safe.
Sharpening the chain safely is a skilled task. Therefore, the
manufacturer strongly recommends that a worn or dull chain
is replaced with a new one, available at your authorised service
centre. The part number is available in the product specification
table in this manual.
Follow instructions for lubricating and chain tension checking and
adjustment.
After each use, clean the product with a soft dry cloth.
Check all nuts, bolts, and screws at frequent intervals for security
to ensure the product is in safe working condition. Any part that is
damaged should be properly repaired or replaced by an authorised
service centre.
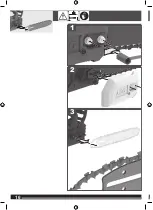
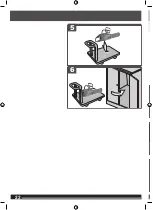
Replacing the guide bar and saw chain
See pages 16 - 18.
Make sure to remove the battery pack from the product. Wear
protective gloves.
Remove the bar mounting nuts using the combination wrench
provided.
Remove the chain cover.
Remove the bar and saw chain from the product.
Put the new chain in the correct direction onto the bar and make
sure that the drive links are aligned in the bar groove.
Attach the bar to the chain saw and loop the chain around the drive
sprocket.
Replace the chain cover and bar mounting nuts.
Finger-tighten the bar mounting nuts. The bar must be free to move
for chain tension adjustment.
Adjust the chain tension. Refer to the “Adjusting chain tension”
section.
Hold the tip of the guide bar up and tighten the bar mounting nuts
securely.
WARNING! A dull or improperly sharpened chain can
cause excessive motor speed during cutting which may result
in severe motor damage.
WARNING! Improper chain sharpening increases the
potential of kickback.
WARNING! Failure to replace or repair a damaged chain
can cause serious injury.
WARNING! The saw chain is sharp. Always wear protective
gloves when performing maintenance to the chain.
Inspecting and cleaning the chain brake
Always keep the chain brake mechanism clean by lightly brushing
the linkage free from dirt.
Always test the chain brake performance after cleaning. Refer to
“Checking and operating the chain brake” section in this manual for
additional information.
MAINTENANCE SCHEDULE
Daily check
Bar lubrication
Before each use
Chain tension
Before each use and
frequently
Chain sharpness
Before each use, visual
check
For damaged parts
Before each use
For loose fasteners
Before each use
Chain brake function
Before each use
Inspect and clean
Bar
Before each use
Complete saw
After each use
Chain brake
Every 5 hours of operation
Spare parts
Oregon
Chain
90PX045X
Bar
124MLEA041
Exploded view
If needed, an exploded view of the tool can be ordered. Please
state the machine type printed as well as the six-digit No. on the
label and order the drawing at your local service agents or directly
at: Techtronic Industries GmbH, Max-Eyth-Straße 10, 71364
Winnenden, Germany.
BATTERIES
Battery packs which have not been used for some time should be
recharged before use.
Temperatures in excess of 50°C (122°F) reduce the performance
of the battery pack. Avoid extended exposure to heat or sunshine
(risk of overheating).
The contacts of chargers and battery packs must be kept clean.
For an optimum life-time, the battery packs have to be fully charged,
after used.
To obtain the longest possible battery life remove the battery pack
from the charger once it is fully charged.
For battery pack storage longer than 30 days:
Store the battery pack where the temperature is below 27°C and
away from moisture.
Store the battery packs in a 30% - 50% charged condition.
Every six months of storage, charge the pack as normal.
TRANSPORTING LITHIUM BATTERIES
Lithium-ion batteries are subject to the Dangerous Goods
Legislation requirements.
Transportation of those batteries has to be done in accordance with
local, national and international provisions and regulations.
■
The user can transport the batteries by road without further
requirements.
■ Commercial transport of Lithium-Ion batteries by third parties is
subject to Dangerous Goods regulations. Transport preparation
and transport are exclusively to be carried out by appropriately
trained persons and the process has to be accompanied by
corresponding experts.
Summary of Contents for ACS183060
Page 1: ...ACS18B30 ACS183060 ...
Page 2: ...2 2 ENGLISH 1 2 3 Picture section with operating description and functional description 4 ...
Page 4: ...4 4 20 19 12 10 ...
Page 5: ...5 5 START STOP 8 16 21 13 14 23 15 ...
Page 6: ...6 6 12 13 6 9 10 11 8 7 ...
Page 7: ...7 7 17 18 16 15 14 1 2 3 4 5 ...
Page 8: ...8 8 Remove the battery pack before starting any work on the machine 1 click 2 1 2 ...
Page 9: ...9 9 75 100 0 25 50 75 25 50 ...
Page 10: ...10 10 2 1 3 ...
Page 11: ...11 11 5 4 6 Only finger tighten APPROX 4 5 5 mm ...
Page 12: ...12 12 FLATS APPROX 4 5 5 mm 2 3 1 ...
Page 13: ...13 13 2 3 1 ...
Page 14: ...14 14 1 2 3 START STOP ...
Page 15: ...15 15 BRAKE ON BRAKE OFF ...
Page 16: ...16 16 2 3 1 ...
Page 17: ...17 17 5 6 7 4 Only finger tighten ...
Page 18: ...18 18 FLATS APPROX 4 5 5 mm 8 ...
Page 19: ...19 19 2 1 ...
Page 20: ...20 20 ...
Page 21: ...21 21 2 3 1 4 ...
Page 22: ...22 22 6 5 ...
Page 23: ...23 23 Figure 1 Figure 6 Figure 2 Figure 3 Figure 5 1 3 2 5 cm 2 in 5 cm 2 in Figure 4 ...
Page 33: ...uct ant 30 ing 14 bH out 224 ...
Page 34: ......
Page 35: ......