background image

LEXIA3 User Guide

  - MOBILE Pack & LIGHT Pack -   83

M

O

BILE Pa

ck 

LIGHT Pack

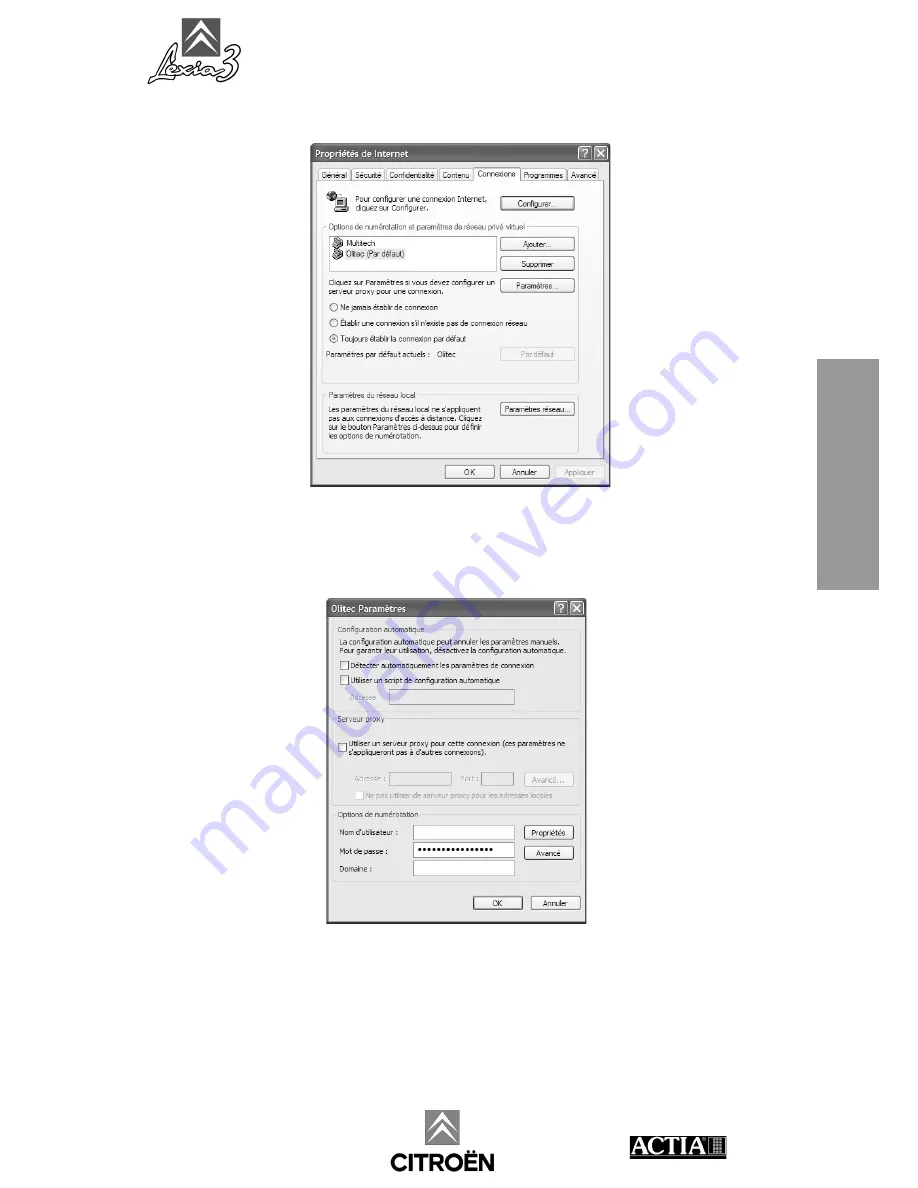
6. Press the 

Parameters (Paramètres)

 button.

7. Enter the 

User login (Nom d’utilisateur)

, the 

Password

 (

Mot de passe

) and the 

Sector name (Nom de domaine) 

supplied by your Internet provider, and then 

press the 

Properties (Propriétés)

 button.

Summary of Contents for LEXIA3 CHRONO

Page 1: ...www autokmfactory com ...

Page 2: ......

Page 3: ...OBILE Pack and LIGHT Pack 53 3 1 MOBILE Pack 54 3 2 LIGHT Pack 55 3 3 Installing the hardware 56 3 3 1 PC Tablet 56 3 3 2 PC Tablet protection cover 62 3 3 3 Multi connector Universal adapter Power supplies 62 3 3 4 Using the PCTablet for the first time 66 3 3 5 Vehicle adapter 72 3 3 6 Anti theft security 73 3 3 7 DVD drive 74 3 3 8 CITROËN Communication Interface ICC 76 3 3 9 ISDN modem 79 4 Opt...

Page 4: ... 3 Basic diagnostic process Related contexts 134 6 7 4 Basic diagnostic process Diagnostic charts 135 6 7 5 Basic diagnostic process Value measurement 136 6 7 6 Basic diagnostic process Diagrams 137 6 7 7 Guided diagnostic process 138 6 8 Using Teleassistance between LEXIA3 applications 140 6 8 1 Accessing Teleassistance 140 6 8 2 Teleassistance menu 141 6 8 3 Trainee mode Waiting for connection 1...

Page 5: ...technical data and CITROËN specific interfaces The LEXIA3 PC Tablet is a go anywhere system that will help your diagnostic both in the workshop and by the roadside The Communication Interface will enable you to cover the entire CITROËN vehicle range using the CITROËN diagnostic method The physical measurement interface and the 252 way controlled terminal box will minimise your diagnostic time by l...

Page 6: ...LEXIA3 User Guide 2 Preface Preface documentation supplied with LEXIA3 We wish you an easy installation and successful diagnostics ACTIA www autokmfactory com ...

Page 7: ...XIA3 are given below together with a glossary of the terms used throughout the remainder of the Guide Next you should go directly to the section corresponding to your Pack see Contents 1 4 Before any installation When you use your LEXIA3 package for the first time to enable us to provide the best possible service Customer Support Hotline etc you should register your software To register you need t...

Page 8: ... 5 Glossary HUB Common connector HUB providing duplicate USB ports enabling various hardware to be connected ICC Citroën Communication Interface your diagnostic tool external communication board Info Bubbles Simple message presenting information to the user Peripheral Hardware connected to a PC USB port Standard connector for connection to a PC using the USB standard Wi Fi Wireless Fidelity radio ...

Page 9: ...LEXIA3 User Guide Preface 5 Preface 1 6 Pictogram meanings Note Caution Reminder Risk of electric shock ...

Page 10: ...LEXIA3 User Guide 6 Preface Preface ...

Page 11: ...A3 User Guide EXPERT Pack CHRONO Pack 7 EXPERT Pack CHRONO Pack 2 EXPERT Pack and CHRONO Pack Installation time around In its fullest configuration your LEXIA3 comprises the following www autokmfactory com ...

Page 12: ...2 3 4 Multi connectors Universal adapter Power supplies 5 Vehicle adapter 2 3 6 Vehicle adapter 6 Anti theft security 2 3 7 Anti theft security 7 Common connector HUB 2 3 8 Common connector HUB 8 DVD drive 2 3 9 DVD drive 9 Keyboard and mouse 2 3 10 Keyboard and mouse 10 CITROËN Communication Interface 2 3 11 CITROËN Communication Interface 11 ISDN modem 2 3 12 ISDN modem OPTIONS 12 Physical Measu...

Page 13: ...ectors 2 3 4 Multi connectors Universal adapter Power supplies 5 Vehicle adapter 2 3 6 Vehicle adapter 6 Anti theft security 2 3 7 Anti theft security 7 Common connector HUB 2 3 8 Common connector HUB 8 DVD drive 2 3 9 DVD drive 9 Keyboard and mouse 2 3 10 Keyboard and mouse 10 CITROËN Communication Interface 2 3 11 CITROËN Communication Interface 11 ISDN modem 2 3 12 ISDN modem OPTIONS 12 Physica...

Page 14: ...IA3 equipment required and makes utilisa tion very simple and user friendly The trolley comprises the following elements 1 a stowage system for the PC Tablet and its protection cover 2 a cable entry exit grommet 3 a cable stowage system 4 a housing for the 252 way Controlled Terminal Box and the Physical Measurement Interface 5 a PC Tablet mounting system ...

Page 15: ...HRONO Pack The spanner supplied in the trolley drawer enables you to adapt the PC Tablet mounting system 5 to suit your own particular utilisation Tighten the PC Tablet mounting as follows 1 Remove the cover 2 Adjust the grip as required and install the cover ...

Page 16: ... Function Status 1 PC Tablet in operation Lights up when the PC Tablet is processing data 2 Battery charge indicator Green steady your battery is between 50 and 100 charged Orange steady your battery is between 13 and 49 charged Red steady your battery is between 0 and 12 charged Red flashing wrong battery www autokmfactory com ...

Page 17: ...nd battery are both available and system is not charging battery fully charged mains power available but battery not installed Orange flashing mains power and battery are both available and are waiting for charge battery is outside temperature tolerances Off mains power not available 4 On Off light Lights up when your PC Tablet is in opera tion or in standby 5 On Off button Switches the PC Tablet ...

Page 18: ...tery in the PC Tablet When delivered the battery is not installed in your PC Tablet Insert the battery into its housing on the left side of the PC Tablet The first time you use your system the battery is not fully charged Charge it using the external power unit supplied Section 2 3 4 www autokmfactory com ...

Page 19: ...A screen protection film is supplied with the PC Tablet The film has two protective layers To install the protection film on the PC Tablet screen 1 Remove one of the two protective layers 2 Bond the protection film on the screen of the PC Tablet 3 Remove the second protection film The adhesive bonds completely after 48 hours ...

Page 20: ...ctro magnetic light pen supplied If you lose the light pen you will not be able to use your LEXIA3 The following elements are supplied one light pen one wire one core extractor replacement cores To install the light pen on the PC Tablet 1 Insert one end of the wire into the light pen loop 2 Then make a loop in the other end of the wire 3 Tighten the link to properly retain the light pen 4 Insert t...

Page 21: ...tion operations However activating this function limits the battery endurance of your tool if there is no Wi Fi communication terminal in your workshop see Section 4 Thus if you are not using the Wi Fi option you must disable the Wi Fi function before continuing the installation To disable the Wi Fi function 1 Turn the PC Tablet over 2 Set the button shown below to OFF ...

Page 22: ... protection cover Description Before using your PC Tablet you must insert it in its protection cover as shown below Installing the PC Tablet on the trolley When the PC Tablet is equipped with its protection cover it can be installed on the trolley mounting system www autokmfactory com ...

Page 23: ...rs Universal adapter Power supplies Your tool is supplied with the necessary multi connectors and for some countries a universal adapter which will provide the power supplies required by your LEXIA3 PC Tablet mains power supply The PC Tablet mains power kit comprises the following elements ...

Page 24: ...le before connection to the PC Tablet The power cable must be equipped with its electro magnetic protection before it is connected to the PC Tablet 1 Insert the power cable once into the electro magnetic protection filter 2 Then make a loop and insert the cable a second time 3 Close the filter ...

Page 25: ...Pack 21 EXPERT Pack CHRONO Pack PC Tablet power supply for use on the trolley To install the PC Tablet on the trolley proceed as follows 1 Insert the power cable through the bottom of the trolley 2 Recover the cable at the top of the duct ...

Page 26: ... CHRONO Pack 3 Connect the power cable to the PC Tablet 4 Connect the power cable to the multi connector 5 Place the multi connector behind the sliding doors on the trolley 6 Connect the multi connector to mains power using the universal adapter if necessary ...

Page 27: ...ing the PC Tablet for the first time The diagnostic software is already installed on your tool However when using the PC Tablet for the first time you need to configure your own environment country language keyboard To power up your PC Tablet press the On Off Marche Arrêt button ...

Page 28: ... Configuring your PC Tablet To configure your PC Tablet for your own personal requirements numerical currency and date time formats place of utilisation keyboard configuration proceed as follows 1 Press Start 2 Select Control Panel 3 Select Regional and Language Options ...

Page 29: ...d Formats section select the language corresponding to the numerical currency and date time formats required 6 In the Location section select the place where your PC Tablet is being used Do not press OK or Apply a restart will be prompted 7 Then select the Languages tab and press the Details button to configure the keyboard ...

Page 30: ...ack CHRONO Pack 8 Then select the Settings tab 9 In the Default input language section select the keyboard entry language 10 In the Language used in menus and dialogs section select the required language Do not press OK or Apply a restart will be prompted ...

Page 31: ...ack CHRONO Pack 27 EXPERT Pack CHRONO Pack 11 Select the Advanced tab 12 In the Language for non Unicode programs section select the required language 13 Press OK 14 Press OK 15 Press Yes 16 Press Yes The PC Tablet will restart ...

Page 32: ...t be respected on your LEXIA3 diagnostic tool During the shutdown phase LEXIA3 updates its internal data Therefore you must quit the application properly respecting the procedure defined in Section 6 3 To shut down your PC Tablet you must 1 Press the Start button 2 Press the Turn Off Computer button 3 Press the Turn Off button ...

Page 33: ...ck CHRONO Pack 29 EXPERT Pack CHRONO Pack 2 3 6 Vehicle adapter The vehicle adapter provides a power supply for the PC Tablet when used onboard a vehicle The adapter comprises a PC Tablet power connector a cigar lighter connector ...

Page 34: ... The anti theft security device keeps the diagnostic system safe from theft both during operation and when not operating The anti theft security device comprises a locking cable two keys To install the anti theft security device 1 Make a loop around one of the trolley arms www autokmfactory com ...

Page 35: ...er Guide EXPERT Pack CHRONO Pack 31 EXPERT Pack CHRONO Pack 2 Insert the end piece into the rear panel of the PC Tablet and turn the key to lock it Keep the spare key in a safe place that you can easily remember ...

Page 36: ... Pack 2 3 8 Common connector HUB Description The common connector HUB centralises your USB connections DVD modem etc The common connector HUB comprises the following elements Labels are supplied to indicate to which elements your equipment or options are connected ...

Page 37: ... HUB labels The following labels are available PC Tablet DVD KEYBOARD MOUSE MODEM ICC for the CITROËN Communication Interface BBP2 for the 252 way Controlled Terminal Box MEASURE fore the Physical Measurement Interface PRINTER You have to bond these labels in their appropriate positions ...

Page 38: ... power to the common connector HUB 2 Connect the USB cable between the common connector HUB and the PC Tablet which must be switched on 3 Various Info bubbles appear on the screen to indicate that the common connector HUB has been recognised by the PC Tablet To close these Info bubbles use the light pen to press on the cross in the top RH corner ...

Page 39: ...e The DVD drive is used to update your LEXIA3 diagnostic tool and to consult the CI TROËN charts on the documentation CD ROM etc Description The DVD drive comprises the following elements To start up the DVD drive 1 Set the button shown below to ON Before using the DVD press I ON mode ...

Page 40: ... Pack CHRONO Pack EXPERT Pack CHRONO Pack 2 Open the drawer on the front of the trolley 3 Connect the USB cable to the DVD drive 4 Connect the power cable to the DVD drive 5 Slide the DVD drive into its housing inside the drawer ...

Page 41: ...NO Pack 37 EXPERT Pack CHRONO Pack 6 Various Info bubbles appear on the screen to indicate that the DVD drive has been recognised by the PC Tablet To close these Info bubbles use the light pen to press on the cross in the top RH corner ...

Page 42: ...ble and bond the KEYBOARD label on the base 3 Connect the keyboard USB cable to the common connector HUB and bond the KEYBOARD label on the corresponding common connector HUB USB port 4 Various Info bubbles appear on the screen to indicate that the keyboard has been recognised by the PC Tablet To close these Info bubbles use the light pen to press on the cross in the top RH corner 5 Proceed in the...

Page 43: ... communication board designed to provide the link between your PC Tablet and the vehicle LEXIA3 CITROËN Communication Interface components AC963833 P N Component 1 AC963833 CITROËN Communication Interface 2 AC911658 LEXIA3 OBD CITROËN Communication Interface adapter 3 AC911312 30 way Adapter 4 AC911107 Red Battery Clip 5 AC911108 Black Battery Clip 6 AC911664 USB Cable 7 AC911675 2 way cable Power...

Page 44: ...PC Tablet confirms that it has recognised the CITROËN Communication Interface by displaying the window below Proceed as follows 1 Press NEXT SUIVANT Cable compatibility table P N Cable LEXIA2 LEXIA3 AC911032 ADA 03 X AC9111001 Cigar lighter cable X X AC911312 30 way adapter X X AC911314 2 way adapter X AC911675 2 way adapter Power Pretensioner X X AC911440 LEXIA2 OBD adapter X AC911658 LEXIA3 OBD ...

Page 45: ...O Pack 2 Press FINISH TERMINER Checking the operation of the CITROËN Communication Interface CITROËN Communication Interface operation can be checked by running a full test of all the computer systems on a vehicle of your choice using the LEXIA3 tool see Section 5 ...

Page 46: ...DN modem The ISDN modem provides access to the following through Internet Software updates for your tool Remote coding and downloading data And remote assistance Depending on the country in which you are using your system the modem may be a different version www autokmfactory com ...

Page 47: ...k CHRONO Pack 43 EXPERT Pack CHRONO Pack Description of the OLITEC ISDN modem The OLITEC ISDN modem comprises the following elements Description of the MULTITECH ISDN modem The MULTITECH ISDN modem comprises the following elements ...

Page 48: ...ck CHRONO Pack EXPERT Pack CHRONO Pack Installing the modem To install the modem 1 Place the modem in the rear compartment of the trolley 2 Run the telephone cable out through the specific hole and connect it to the telephone socket ...

Page 49: ...the label base on the cable 5 Bond the MODEM label on the base 6 Bond the other MODEM label on the USB port at the common connector HUB level 7 Various Info bubbles appear on the screen to indicate that the modem has been recognised by the PC Tablet To close these Info bubbles use the light pen to press on the cross in the top RH corner ...

Page 50: ... Start Démarrer followed by Configuration panel Panneau de configuration 2 Select the Internet Options Options Internet icon 3 In the Internet Properties Propriété de Internet window select the Connection Connexions tab 4 Select the name corresponding to your modem In the example below the OLITEC modem connection has been selected 5 Activate Always make connection by default Toujours établir la co...

Page 51: ...XPERT Pack CHRONO Pack 6 Press the Parameters Paramètres button 7 Enter the User login Nom d utilisateur the Password Mot de passe and the Sector name Nom de domaine supplied by your Internet provider and then press the Properties Propriétés button ...

Page 52: ...uméro de téléphone of your Internet provider Check that the connection is actually using your modem The square corresponding to your modem must be ticked Then click on OK to confirm 9 If your Internet provider has supplied DSNs select the Network management Gestion de réseau tab www autokmfactory com ...

Page 53: ... Protocole Internet TCP IP and then press the Properties Propriétés button 11 Select Use next DNS address Utiliser l adresse de serveur DNS suivante enter the IP addresses Adresses IP of both primary and secondary DNS DNS primaires et secondaires servers and then press the OK button several times ...

Page 54: ... online To use your Internet connection normally you will need to work online Proceed as follows 1 Open Internet Explorer 2 In the File Fichier menu deactivate the Work offline Travailler hors connexion option if it was active if the option is not ticked then it is deactivated ...

Page 55: ...mple www actia com The remote connection dialogue box then appears 2 Press Connection Connexion The connection is made and the Web site home page is opened You can now browse the site Your Internet connection is properly configured For any problem refer to the Help section If you have purchased a CHRONO Pack your installation is COMPLETE If you have purchased an EXPERT Pack refer to sections 4 2 a...

Page 56: ...LEXIA3 User Guide 52 EXPERT Pack CHRONO Pack EXPERT Pack CHRONO Pack ...

Page 57: ...e MOBILE Pack LIGHT Pack 53 MOBILE Pack LIGHT Pack 3 MOBILE Pack and LIGHT Pack Installation time around In its fullest configuration your LEXIA3 MOBILE Pack or LIGHT Pack comprises the following www autokmfactory com ...

Page 58: ...ver Multi connector 3 3 4 Multi connector Universal adapter Power supplies Vehicle adapter 3 3 5 Vehicle adapter 3 DVD drive 3 3 7 DVD drive 4 CITROËN Communication Interface 3 3 8 CITROËN Communication Interface 5 ISDN modem 3 3 9 ISDN modem OPTIONS Physical Measurement Interface 4 2 Physical Measurement Interface Trolley 4 4 Trolley Anti theft security 4 8 Anti theft security Common connector HU...

Page 59: ...nector 3 3 3 Multi connectors Universal adapter Power supplies Vehicle adapter 3 3 5 Vehicle adapter 3 DVD drive 3 3 7 DVD drive 4 CITROËN Communication Interface 3 3 7 CITROËN Communication Interface 5 ISDN modem 3 3 9 ISDN modem OPTIONS Trolley 4 4 Trolley Anti theft security 4 8 Anti theft security Common connector HUB 4 1 Common connector HUB Keyboard and mouse 4 6 Keyboard and mouse Physical ...

Page 60: ...ription Front panel Button or indicator Function Status 1 PC Tablet in operation Lights up when the tool is processing data 2 Battery charge indicator Green steady your battery is between 50 and 100 charged Orange steady your battery is between 13 and 49 charged Red steady your battery is between 0 and 12 charged Red flashing wrong battery ...

Page 61: ...d battery are both available and system is not charging battery fully charged mains power available but battery not installed Orange flashing mains power and battery are both available and are waiting for charge battery is outside temperature tolerances Off mains power not available 4 On Off light Lights up when your PC Tablet is in operation or in standby 5 On Off button Switches the PC Tablet On...

Page 62: ...els Installing the battery in the PC Tablet When delivered the battery is not installed in your PC Tablet Insert the battery into its housing on the left side of the PC Tablet The first time you use your system the battery is not fully charged Charge it using the external power unit supplied Section 2 3 4 ...

Page 63: ... screen protection film is supplied with the PC Tablet The film has two protective layers To install the protection film on the PC Tablet screen 1 Remove one of the two protective layers 2 Bond the protection film on the screen of the PC Tablet 3 Remove the second protection film The adhesive bonds completely after 48 hours ...

Page 64: ...u lose the light pen you will not be able to use your LEXIA3 To obtain another light pen refer to Section 8 1 The following elements are supplied one light pen one wire one core extractor replacement cores To install the light pen on the PC Tablet 1 Insert one end of the wire into the light pen loop 2 Then make a loop in the other end of the wire 3 Tighten the link to properly retain the light pen...

Page 65: ...ion operations However activating this function limits the battery endurance of your tool if there is no Wi Fi communication terminal in your workshop see Section 4 Thus if you are not using the Wi Fi option you must disable the Wi Fi function before continuing the installation To disable the Wi Fi function 1 Turn the PC Tablet over 2 Set the button shown below to OFF ...

Page 66: ...ction cover Description Before using your PC Tablet you must insert it in its protection cover as shown below 3 3 3 Multi connector Universal adapter Power supplies Your tool is supplied with a multi connector and for some countries a universal adapter which will provide the power supplies required by your LEXIA3 ...

Page 67: ...LEXIA3 User Guide MOBILE Pack LIGHT Pack 63 MOBILE Pack LIGHT Pack PC Tablet mains power supply The PC Tablet mains power kit comprises the following elements ...

Page 68: ...e power cable before connection to the PC Tablet The power cable must be equipped with its electro magnetic protection before it is connected to the PC Tablet 1 Insert the power cable once into the electro magnetic protection filter 2 Then make a loop and insert the cable a second time 3 Close the filter ...

Page 69: ... MOBILE Pack LIGHT Pack PC Tablet power supply 1 Connect the power cable to the PC Tablet 2 Connect the power cable to the multi connector 3 Connect the multi connector to the mains power supply using the universal adapter supplied if necessary ...

Page 70: ...ack 3 3 4 Using the PCTablet for the first time The diagnostic software is already installed on your PC However when using the PC Tablet for the first time you need to configure your own environment country language keyboard To power up your PC Tablet press the On Off Marche Arrêt button ...

Page 71: ...Configuring your PC Tablet To configure your PC Tablet for your own personal requirements numerical currency and date time formats place of utilisation keyboard configuration proceed as follows 1 Press Start 2 Select Control Panel 3 Select Regional and Language Options ...

Page 72: ...tandards and Formats section select the language corresponding to the numerical currency and date time formats required 6 In the Location section select the place where your PC Tablet is being used Do not press OK or Apply a restart will be prompted 7 Then select the Languages tab and press the Details button to configure the keyboard ...

Page 73: ...ack LIGHT Pack 8 Then select the Settings tab 9 In the Default input language section select the keyboard entry language 10 In the Language used in menus and dialogs section select the required language Do not press OK or Apply a restart will be prompted ...

Page 74: ...T Pack EXPERT Pack CHRONO Pack MOBILE Pack LIGHT Pack 11 Select the Advanced tab 12 In the Language for non Unicode programs section select the required language 13 Press OK 14 Press OK 15 Press Yes 16 Press Yes The PC Tablet will restart ...

Page 75: ... be respected on your LEXIA3 diagnostic tool During the shutdown phase LEXIA3 updates its internal data Therefore you must quit the application properly respecting the procedure defined in Section 6 3 To shut down your PC Tablet you must 1 Press the Start button 2 Press the Turn Off Computer button 3 Press the Turn Off button ...

Page 76: ... Pack EXPERT Pack CHRONO Pack MOBILE Pack LIGHT Pack 3 3 5 Vehicle adapter The vehicle adapter provides a power supply for the PC Tablet when used onboard a vehicle The adapter comprises a PC Tablet power connector a cigar lighter connector ...

Page 77: ...rom theft both during operation and when not operating The anti theft security device comprises a locking cable two keys To install the anti theft security device 1 Make a loop around one of the trolley arms 2 Insert the end piece into the rear panel of the PC Tablet and turn the key to lock it Keep the spare key in a safe place that you can easily remember ...

Page 78: ... 7 DVD drive The DVD drive is used to update your LEXIA3 diagnostic tool and to consult the CI TROËN charts on the documentation CD ROM etc Description The DVD drive comprises the following elements To start up the DVD drive 1 Set the button shown below to ON Before using the DVD press I ON mode ...

Page 79: ...t the USB cable to the DVD drive 3 Connect the power cable to the DVD drive 4 Various Info bubbles appear on the screen to indicate that the DVD drive has been recognised by the PC Tablet To close these Info bubbles use the light pen to press on the cross in the top RH corner ...

Page 80: ...ication board designed to provide the link between your PC Tablet and the vehi cle Available only in the MOBILE Pack LEXIA3 CITROËN Communication Interface components AC963833 P N Component 1 AC963833 CITROËN Communication Interface 2 AC911658 LEXIA3 OBD CITROËN Communication Interface adapter 3 AC911312 30 way Adapter 4 AC911107 Red Battery Clip 5 AC911108 Black Battery Clip 6 AC911664 USB Cable ...

Page 81: ...recognised the CITROËN Communication Interface by displaying the window below Proceed as follows 1 Press NEXT SUIVANT Cable compatibility table P N Cable LEXIA2 LEXIA3 AC911032 ADA 03 X AC9111001 Cigar lighter cable X X AC911312 30 way adapter X X AC911314 2 way adapter X AC911675 2 way adapter Power Pretensioner X X AC911440 LEXIA2 OBD adapter X AC911658 LEXIA3 OBD adapter X AC911661 LEXIA2 USB c...

Page 82: ...E Pack LIGHT Pack 2 Press FINISH TERMINER Checking the operation of the CITROËN Communication Interface CITROËN Communication Interface operation can be checked by running a full test of all the computer systems on a vehicle of your choice using the LEXIA3 tool see Section 5 ...

Page 83: ... modem The ISDN modem provides access to the following through Internet Software updates for your LEXIA3 tool CITROËN remote coding and downloading data And CITROËN remote assistance Depending on the country in which you are using your system the modem may be a different version ...

Page 84: ...Pack EXPERT Pack CHRONO Pack MOBILE Pack LIGHT Pack Description of the OLITEC ISDN modem The OLITEC ISDN modem comprises the following elements Description of the MULTITECH ISDN modem The MULTITECH ISDN modem comprises the following elements ...

Page 85: ... modem 1 Connect the telephone cable to the telephone socket 2 Connect the modem USB cable to the PC Tablet 3 Various Info bubbles appear on the screen to indicate that the modem has been recognised by the PC Tablet To close these Info bubbles use the light pen to press on the cross in the top RH corner ...

Page 86: ...lows 1 Press Start Démarrer followed by Configuration panel Panneau de configuration 2 Select the Internet Options Options Internet icon 3 In the Internet Properties Propriétés Internet window select the Connection Connexions tab 4 Select the name corresponding to your modem In the example below the OLITEC modem connection has been selected 5 Activate Always make connection by default Toujours éta...

Page 87: ...OBILE Pack LIGHT Pack 6 Press the Parameters Paramètres button 7 Enter the User login Nom d utilisateur the Password Mot de passe and the Sector name Nom de domaine supplied by your Internet provider and then press the Properties Propriétés button ...

Page 88: ...the Telephone number Numéro de téléphone of your Internet provider Check that the connection is actually using your modem The square corresponding to your modem must be ticked Then click on OK to confirm 9 If your Internet provider has supplied DSNs select the Network management Gestion de réseau tab ...

Page 89: ...otocol Protocole Internet TCP IP and then press the Properties Propriétés button 11 Select Use next DNS address Utiliser l adresse de serveur DNS suivante enter the IP addresses Adresses IP of both primary and secondary DNS DNS primaires et secondaires servers and then press the OK button ...

Page 90: ...ack Working online To use your Internet connection normally you will need to work online Proceed as follows 1 Open Internet Explorer 2 In the File Fichier menu deactivate the Work offline Travailler hors connexion option if it was active if the option is not ticked then it is deactivated ...

Page 91: ... your PC Tablet To test your Internet connection proceed as follows 1 Enter the address of a Web site for example www actia com The remote connection dialogue box then appears 2 Press Connection Connexion The connection is made and the Web site home page is opened You can now browse the site Your Internet connection is properly configured For any problem refer to the Help section ...

Page 92: ...LEXIA3 User Guide 88 MOBILE Pack LIGHT Pack EXPERT Pack CHRONO Pack MOBILE Pack LIGHT Pack ...

Page 93: ...ises your USB connections DVD modem etc The common connector HUB comprises the following elements 4 1 2 Startup To start up the common connector HUB proceed as follows 1 Connect the power supply to the common connector HUB 2 Connect the USB cable between the common connector HUB and the PC Tablet which must be switched on ...

Page 94: ...tions Options 3 Various Info bubbles appear on the screen to indicate that the common connector HUB has been recognised by the PC Tablet To close these Info bubbles use the light pen to click on the cross in the top RH corner ...

Page 95: ... impedance 4 2 1 Description and contents Composition of the LEXIA3 Physical Measurement Interface AC964111 P N Element 1 AC964111 Physical Measurement Interface 2 AC911664 USB Cable 3 AC911685 Power Cable VBAT 4 AC911107 Red Battery Clip 5 AC911108 Black Battery Clip 6 AC911686 Test Probe Cable 7 AC911689 Red Plug Cable 8 AC911690 Black Plug Cable ...

Page 96: ...ck on the cross in the top RH corner 4 2 2 Utilisation recommendations Do not measure currents exceeding 10 A Do not measure voltages exceeding 400 V Do not measure mains power values 4 2 3 Installing the physical measurement interface The installation described here is for the utilisation of the physical measurement interface without the 252 way controlled terminal box To use the interface with t...

Page 97: ...LEXIA3 User Guide Options 93 Options 2 Connect the power supply Both indicators must be lit up 3 Connect the measuring cables To measure current values To measure voltage or impedance and ...

Page 98: ...e 252 way controlled terminal box enables fewer test points to be used The 252 way controlled terminal box is only used with the physical measurement interface 4 3 1 Description and contents Your 252 way controlled terminal box comprises the following elements 1 6 7 5 3 8 2 4 ...

Page 99: ...ges Do not measure mains power values 4 3 3 Installing the 252 way controlled terminal box The 252 way controlled terminal box and the physical measurement interface are strapped together using a belt Composition of LEXIA3 252 way Controlled Terminal Box AC964150 P N Element 1 AC964150 LEXIA3 252 way Controlled Terminal Box assembly 2 AC911029 USB cable 3 AC911107 252 way Controlled Terminal Box P...

Page 100: ...y formed can then either be used separately from the system or can be installed in the trolley 1 Connect the USB cable supplied with the physical measurement interface between the physical measurement interface and the 252 way controlled terminal box ...

Page 101: ...LEXIA3 User Guide Options 97 Options 2 Connect cable 5 3 Connect the power supply or ...

Page 102: ...ed terminal box and the PC Tablet or the common connector HUB The two indicators on the physical measurement interface and the indicator on the 252 way controlled terminal box should all be lit up 5 Connect cables 3 6 and 7 to measure the various electrical values on the vehicle 6 7 3 ...

Page 103: ...isa tion very simple and user friendly The trolley comprises the following elements 1 a mounting system for the PC Tablet and its protection cover 2 a cable entry exit grommet 3 a cable stowage system 4 a housing for the 252 way Controlled Terminal Box and the Physical Measurement Interface 5 a PC Tablet mounting system 4 2 1 5 3 ...

Page 104: ... spanner supplied in the trolley drawer enables you to adapt the PC Tablet mounting system to suit your own particular utilisation Tighten the PC Tablet mounting as follows 1 Remove the cover 2 Adjust the grip as required and install the cover ...

Page 105: ... 4 5 30 way and 2 way connectors Your LEXIA3 is designed to perform a diagnostic function on both new and old CITROËN vehicles P N Element 1 AC911312 30 way adapter 2 AC911675 2 way cable power pretensioner PR 9972 RF 30 way and 2 way kits ...

Page 106: ... an optical mouse Do not use it on shiny or reflecting surfaces To install the mouse proceed as follows 1 Connect the keyboard mouse USB cable to one of the ports on the PC Tablet 2 Various Info bubbles appear on the screen to indicate that the keyboard has been recognised by the PC Tablet To close these Info bubbles use the light pen to press on the cross in the top RH corner ...

Page 107: ... If you are using a different printer refer to the installation guide supplied with your printer 4 7 1 Description When the printer is connected to the PC Tablet several Info bubbles appear on the screen indicating that the PC Tablet has recognised the elements connected Close these Info bubbles by using the light pen topress on the cross in the top RH corner ...

Page 108: ...hould be connected to the mains power supply Connect the printer USB cable to one of the USB ports on the PC Tablet 4 7 3 Installing the printer when using a trolley 1 Connect printer power cable to the multi connector which should be connected to mains power 2 Then connect the USB cable to the printer and to the PC Tablet or common connector HUB ...

Page 109: ...r and telecopiers Imprimante et télécopieurs 2 Select your printer 3 In the File Fichier menu select Properties Propriétés 4 Press Print options Options d impression 5 Select the Main Principal tab 6 In the Print quality Qualité d impression section select Configured Personnalisée and press Define Définir ...

Page 110: ...he Reduce spooler data length function Réduire la taille des données de spouleur and press OK 8 Press OK 9 Press OK and close all the subsequent windows by clicking on the cross in the top RH corner of each window 10 Your printer is now operational ...

Page 111: ...ptions 4 7 4 Checking printer operation 1 From the WINDOWS desktop main screen double click on the LEXIA3 icon 2 The software then starts running and is configured 3 The main diagnostic screen appears 4 Press F8 to print this screen ...

Page 112: ...nti theft security 4 8 1 Description The anti theft security device keeps the diagnostic system safe from theft both during operation and when not operating The anti theft security device comprises the following elements a locking cable two keys ...

Page 113: ... If you are using a trolley make a loop around one of the trolley arms If you are not using a trolley use another fixed element to prevent the theft of your PC Tablet 2 Insert the padlock into the specific position on the PC Tablet and turn the key to lock it ...

Page 114: ...Options 4 9 Carrying case The carrying case will enable you to stow the essential elements of your pack to facilitate operation close to a broken down vehicle The illustration below shows a non contractual example of stowage 1 3 2 6 ...

Page 115: ...entralised on one telephone line Your movement around the workshop is thus completely unrestricted as these radio links do not necessitate wire connections The GPRS kit enables any Internet connection to the network covered by your telephone operator This enables teleassistance operations even by the roadside if your are carrying out this type of operation Specific installation and user guides are...

Page 116: ...de 112 Options Options 4 11 Checking kits Your LEXIA3 tool allows you to control the operation of the oxygen probe of the vehicle P N Element 1 AC911687 2 way Oxygen Probe Cable 2 AC911701 4 way Oxygen Probe Cable 1 2 ...

Page 117: ...es you to use Teleassistance 1 Insert the CD containing the LEXIA3 tools and then open the WINDOWS explorer using the path Start All programs Accessories Windows Explorer Démarrer Tous les programmes Accessoires Windows Explorer 2 Then run the PCAnywhere installation by double clicking on the Setup exe program ...

Page 118: ...er Guide 114 Installing PCAnywhere Installing PCAnywhere 3 The screen shown below is then displayed Press the Next button 4 Tick the square I accept the terms in the license agreement then press the Next button ...

Page 119: ...ling PCAnywhere 5 Enter your name User Name and the name of your company Organization then press the Next button 6 Press on the Next button 7 Press the Install button The screen shown below is then displayed to indicate the installation progress status ...

Page 120: ...LEXIA3 User Guide 116 Installing PCAnywhere Installing PCAnywhere 8 Wait for the end of the installation procedure 9 Press the Next button 10 Press the Next button ...

Page 121: ...LEXIA3 User Guide Installing PCAnywhere 117 Installing PCAnywhere 11 Press the Next button 12 Press the Next button ...

Page 122: ... Press the Next button 14 Wait for the end of the Symantec product update search procedure on Internet 15 If you cannot obtain the Internet connection the following screen is displayed after a few minutes 16 Press the Finish button to complete the installation procedure ...

Page 123: ...Anywhere 17 The installation procedure is completed 18 Press the Skip button You can register to receive Symantec product information and updates by pressing the Next button The registration procedure is not described in this document 19 Press the Yes button ...

Page 124: ... button The system restarts automatically to finish the installation procedure 22 Teleassistance is installed for LEXIA3 The PCAnywhere application can also be activated through the menu Start All programs Symantec PCAnywhere Dé marrer Tous les programmes Symantec PCAnywhere or using the icon on the desktop OR ...

Page 125: ...he LEXIA3 software detects the presence of this element and will generate an error message if the software is not detected 1 Your PC Tablet must be powered up 2 The LEXIA3 diagnostic application can be run in two ways either From the WINDOWS desk top main screen double click on the LEXIA3 icon OR Using the WINDOWS Start menu proceed as follows Press Start Select All programmes In the pull down men...

Page 126: ...t time to enable us to provide the best possible service Customer Support Hotline etc you should register your software To register your pack you need to contact your local agent to obtain an activation code Your LEXIA3 package will only be operational when your activation code has been registered 5 The main diagnostic screen is displayed www autokmfactory com ...

Page 127: ... LEXIA3 key functions are defined in the table below Function Short keyboard code Symbol Action Confirm Enter Confirm or go to next screen Return F9 Go back to previous screen General return F7 Go back to LEXIA3 main menu Exit F5 Quit the LEXIA3 application Print F8 Print the active page Confirm F3 Affirmative answer to a question ...

Page 128: ...tting down the LEXIA3 diagnostic package To shut down the LEXIA3 software proceed as follows 1 Press F7 to go to the LEXIA3 main menu 2 Press F5 to quit the application 3 If you wish you can save the software trace of your diagnostic session and or record the current action method ...

Page 129: ... Using the LEXIA3 package 125 Using the LEXIA3 package 4 Then press the return key F9 The programme will ask you to confirm 5 To confirm exit from the application press key F3 6 This puts you back in WINDOWS www autokmfactory com ...

Page 130: ...e Using the LEXIA3 package 6 4 Running the LEXIA3 tutorial To access the LEXIA3 User Guide proceed as follows 1 Press F7 to go to the LEXIA3 main menu 2 Select Tutorial and confirm 3 The tutorial is then run and the various functions are displayed ...

Page 131: ...To update the LEXIA3 package proceed as follows 1 Power up the PC Tablet and wait for the full WINDOWS restart 2 Check that your DVD ROM drive is powered up 3 Get the appropriate LEXIA3 update CD ROM 4 Insert it into the drive 5 If the screen shown below appears select your language 6 Confirm your language choice ...

Page 132: ...LEXIA3 User Guide 128 Using the LEXIA3 package Using the LEXIA3 package 7 Tick the Install Update option 8 Select the installation volume 9 Confirm your choice ...

Page 133: ...Manuel d utilisation LEXIA3 Using the LEXIA3 package 129 Using the LEXIA3 package 10 The update process then starts around 10 to 15 minutes LEXIA3 is now installed ...

Page 134: ...Update download Between distributions of a new LEXIA3 CD ROM the package can be partially updated by downloading This enables you to be informed of new computer programmes and obtain correction patch updates very simply The update download facility can be accessed from the LEXIA3 main menu by selecting Download update ...

Page 135: ... displayed 3 Confirm your choice by pressing Enter 4 Follow the prompts to select the update download from those that may be available on the server 5 When you have confirmed your choice the selected update is downloaded onto your PC Tablet When the update has been downloaded the LEXIA3 application is shut down and restarted automatically www autokmfactory com ...

Page 136: ...alogue with all the computers installed in the vehicle and to perform a diagnostic on these computers This operation is known as the General Test and provides an initial indication of any computer faults or malfunctions To run a General Test proceed as follows 1 From the main menu select Diagnostic and confirm 2 Select the vehicle to be tested and confirm ...

Page 137: ...of the vehicle status and will provide an indication of the types of computer that are performing correctly The test will also indicate any faults that may be detected for each computer This operation is essential to the vehicle diagnostic as it provides a simple means of knowing which element of the vehicle is causing problems sensor wiring harness short circuit etc ...

Page 138: ...d see Section 6 7 1 2 Then select the defective computer type the BSI in the example above and confirm 3 Read the faults The list of errors detected on the computer is then displayed 6 7 3 Basic diagnostic process Related contexts To identify the context in which a particular fault occurs LEXIA3 allows you to display the related variables recorded by the computer when the fault occurred for exampl...

Page 139: ...ask a series of questions that you answer based on your observations visual audio and or on various measured values voltage resistance 1 Read the faults on the system concerned see Section 6 7 2 2 Select the fault that you want to analyse 3 Press F5 to obtain the diagnostic chart 4 Carry out the series of checks proposed by the application 5 LEXIA3 then finally displays the cause of the fault and ...

Page 140: ...irectly controlled by the computer This data provides information concerning the dynamic characteristics of the vehicle 1 Run the General Test on the vehicle concerned see Section 6 7 1 2 Then select the computer type the BSI in the example above and confirm 3 Then measure the appropriate values The list of computer parameters that can be measured is then displayed together with their respective v...

Page 141: ...ostic process Diagrams Your LEXIA3 contains much information on CITROËN vehicle mechanics electrics and the computers To consult the technical documentation for the vehicle concerned press F3 Electrical diagrams available for consultation include the circuit diagram the wiring diagram and the layout ...

Page 142: ...y of vehicles certain situations can become increasingly delicate For this reason LEXIA3 provides a guided diagnostic facility To obtain information corresponding to the fault symptoms described by the customer you enter the customer s observations concerning the fault symptoms into the system An example is shown in the screens below ...

Page 143: ...ship between the vehicle mechanical electrical systems concerned Thus LEXIA3 displays the links existing between the computers of the vehicle concerned in chart format This function is part of the core system and will help you identify the systems involved in the observed problem and the computer types causing the fault based on the customer s description ...

Page 144: ...ther give precedence to the remote facilities offered by your system after contacting another technical expert or your assistance facility so that certain operations can be carried out on your behalf or to remotely take over the application of a colleague to provide your expertise for others 6 8 1 Accessing Teleassistance To access TeleAssistance select Teleassistance in the LEXIA3 main menu ...

Page 145: ...n with the person who will assist you Case 2 Master mode You want to assist one of your colleagues Select Call remote diagnostic system to make a master mode connection with your LEXIA3 6 8 3 Trainee mode Waiting for connection When you have selected Wait for connection in the Teleassistance menu LEXIA3 performs the following actions 1 Connection to Internet LEXIA3 is connected to Internet through...

Page 146: ...LEXIA3 User Guide 142 Using the LEXIA3 package Using the LEXIA3 package The screens below are displayed successively Press the confirm key to continue ...

Page 147: ...sk and waits for the call from the master colleague or technical expert The icon is visible in the tool bar 3 Request Teleassistance reference When the connection is made LEXIA3 automatically interrogates the Internet provider server to obtain the reference assigned to the Teleassistance operation 4 Display Teleassistance reference The reference that you have to give by telephone to your colleague...

Page 148: ...e to give this number to your colleague or to the technical expert by telephone Confirm Then go back to the LEXIA3 main menu An icon indicates that a Teleassistance session is active 5 End of Teleassistance session Press F4 on your PC Tablet to terminate the Teleassistance session ...

Page 149: ...nu LEXIA3 performs the following actions 1 Entry of Teleassistance reference of the colleague that you are assisting trainee Enter the reference given by the colleague by telephone 2 Connection to Internet LEXIA3 is automatically connected to Internet through the modem The Internet connection is already configured in WINDOWS The screens below are displayed successively Confirm to continue ...

Page 150: ...LEXIA3 User Guide 146 Using the LEXIA3 package Using the LEXIA3 package Press the Connection key to connect to Internet The connection is made ...

Page 151: ...calls your colleague trainee using the Teleassistance reference entered 4 Teleassistance session When the connection is made PCAnywhere displays your colleague s trainee s screen 5 End of Teleassistance session Press F4 on your PC Tablet to terminate the Teleassistance session from your colleague s LEXIA3 www autokmfactory com ...

Page 152: ...LEXIA3 User Guide 148 Using the LEXIA3 package Using the LEXIA3 package ...

Page 153: ...k of electric shock or damage to the hardware Ensure that the hardware is never splashed with liquid water acid cleaning products etc 7 2 Cleaning Clean the hardware with a soft cloth slightly damp or impregnated with an appropriate cleaner computer screen cleaner Do not use solvent to clean your PC Tablet 7 3 Handling Ensure that your PC Tablet is never dropped or allowed to fall Never obstruct t...

Page 154: ...e This will keep the battery in a serviceable condition Do not remove the battery except in the case of a standard replacement Do not open the battery Do charge the battery outside LEXIA3 7 5 Replacing the internal battery Use only a battery supplied by ACTIA customer support To replace the PC Tablet internal battery proceed as follows 1 The PC Tablet must be switched off 2 Disconnect all power so...

Page 155: ...r Never place the PC Tablette on an Airbag position The Airbag function may be activated 7 7 Sofware recommendations We recommend that no software be installed other than that supplied with LEXIA3 or by AUTOMOBILES CITROËN We recommend the use of a regularly updated anti virus package to provide effective virus protection when communicating by Internet To order see Section 9 2 ...

Page 156: ...LEXIA3 User Guide 152 Utilisation precaution Utilisation precautions ...

Page 157: ...ms of the guarantee 8 1 1 For France Contact ACTIA MULLER SERVICES Tel 00 33 2 37 33 42 12 Fax 00 33 2 37 33 42 36 Opening hours Monday to Thursday from 8 30 am to 12 noon and from 2 pm to 5 30 pm Friday from 8 30 am to 12 noon and from 2 pm to 5 pm If you are unable to contact technical support i e when closed an answering machine will record your message You will be called back 8 1 2 For other c...

Page 158: ... Via Europa 31 20010 PREGNANA MILANESE MI 39 029 327 131 39 029 359 5040 D I ME ACTIA Rebenring 33 D 38106 BRAUNSCHWEIG 49 531 387 010 49 531 387 0188 NL TBA BV Rijksstraatweg 45 1396 JD BAAMBRUGGE 31 294 284 428 31 294 281 857 S M SJÖBERG AB Rasundavagen 79 169 57 SOLNA 46 851 494 930 46 851 494 939 P EQUIAUTO Rua Rosa do Ulmeiro 29 Pav 10 Parque Industrial de Armés 2715 TERRUGEM SNT 351 219 678 ...

Page 159: ...LASER HOTLINE 33 02 37 33 42 17 33 02 37 33 42 36 GB ACTIA U K Unit 81 Mochdre Industrial Estate SY16 4LE NEWTON POWYS 44 168 662 1067 44 168 662 1068 E ACTIA VIDEOBUS Fol Ind Los Olivos Calle Calidad 66 28906 GETAFE MADRID 34 916 652 626 34 916 652 324 I ACTIA ITALIA Via Europa 31 20010 PREGNANA MILANESE MI 39 029 327 131 39 029 359 5040 D I ME ACTIA Rebenring 33 D 38106 BRAUNSCHWEIG 49 531 387 0...

Page 160: ...evica 29 HR 40323 PRELOG 385 406 458 61 385 406 481 20 A ANDETSBERGER Am Wiesensteig 14 A 4910 REID INNKREIS 43 775 283 768 43 775 287 056 GR ADOSOGLOU 122 Sygrou Avenue 11741 ATHENS 30 210 921 6752 30 210 923 8051 TR TIMPO Atatürk Sanayi Sitesi 2 4067 Ada 8 Parsel 14 Sok N 460 MASLAK ISTANBUL 90 212 276 6605 90 212 276 6606 CZ ATAL Lesli 47 39001 TABOR HORKY 420 361 251 7912 420 361 253 043 PL PR...

Page 161: ...rno N 456 19 Col Nueva Industrial Vallejo MEXICO D F 07700 52 511 922 78 52 575 276 43 J KOKUKA SHOKAI 5 23 Chikamadori Minami Ku NAGOYA 457 0071 81 523 313 351 81 523 226 553 IL TACT Kiryat Weizmann Rabin Park Open haimer 7st 76000 REHOVOT 972 893 614 77 972 893 633 08 RCH EMEQ Antonio Bellet 190 Of 207 PROVI DENCIA SANTIAGO 56 223 570 99 56 223 570 99 BG AVTO OIL 126 blvd Tzar Boris III 1612 SOF...

Page 162: ...LEXIA3 User Guide 158 Customer support Customer support ...

Page 163: ...umable part numbers The following are available from your local agent or Customer Support P N Item AY14400043 2 touch pad light pens for PC Tablet FUJI ST41XX AY14400034 Screen protection films for PC Tablet FUJI ST4120 AY30030000 Standard battery for PC Tablet FUJI ST41XX ...

Page 164: ...ble for LEXIA3 9972 RJ 252 way controlled terminal box cable for LEXIA2 9972 RF 2 way adapter kit cable power 30 way pretensioner AC911312 30 way adapter AC911675 2 way adapter cable power pretensioner AC911687 2 way probe cable 02 AC911701 4 way probe cable 02 AC911664 USBA USBB cable AC962473 LEXIA3 trolley AC501117 LEXIA3 equipped carrying case AY14400022 Common connector HUB 7 ports USB 2 0 AY...

Page 165: ...nd the cables to the vehicle Reconnect the cables Check that the CITROËN communication interface indicator is lit up Restart the LEXIA3 software When using with a common connector HUB check that the common connector HUB is operating properly COMMON CONNECTOR HUB No USB peripheral is operating Check the connection and proper operation of the common connector HUB external power supply and check that...

Page 166: ...roperly Check the USB connection with the PC Tablet or the common connector HUB If using with a common connector HUB check that the common connector HUB is operating properly MOUSE My mouse is not operating properly Check the USB connection with the PC Tablet or the common connector HUB If using with a common connector HUB check that the common connector HUB is operating properly MODEM I cannot ob...

Page 167: ...perly Check the external power supply Check that the button is set to ON Check that the disk surface is clean and undamaged not scored PRINTER I am unable to print Check the USB connection with the PC Tablet or the common connector HUB If using with a common connector HUB check that the common connector HUB is operating properly Check the external power supply Check that the button is set to ON Ch...

Page 168: ...pendices 9 4 Useful tips and shortcuts 9 4 1 Virtual keyboard To open the virtual keyboard click on the keyboard icon on the right of the Start button To close the virtual keyboard click on the cross top right in the Tablet PC Input Panel window ...

Page 169: ...r without lifting the light pen 2 Drag the virtual keyboard 3 Drop at the required position 9 4 2 Calibrating the light pen This configuration enables you to properly configure your light pen in relation to your PC Tablet Proceed as follows From the WINDOWS Start Démarrer menu 1 Select the Configuration panel Panneau de configuration www autokmfactory com ...

Page 170: ...LEXIA3 User Guide 166 Appendices Annexes Appendices 2 Select the option PC Tablet and light pen parameters Paramètres du Tablet PC et du stylet 3 Press the Calibrate Calibrer button ...

Page 171: ... User Guide Appendices 167 Appendices 4 Touch the light pen in the centre of each target indicated by the symbol and click on OK when calibrated 5 Close all the windows that were opened www autokmfactory com ...

Reviews: