background image


4

On Call

®

 Express Voice

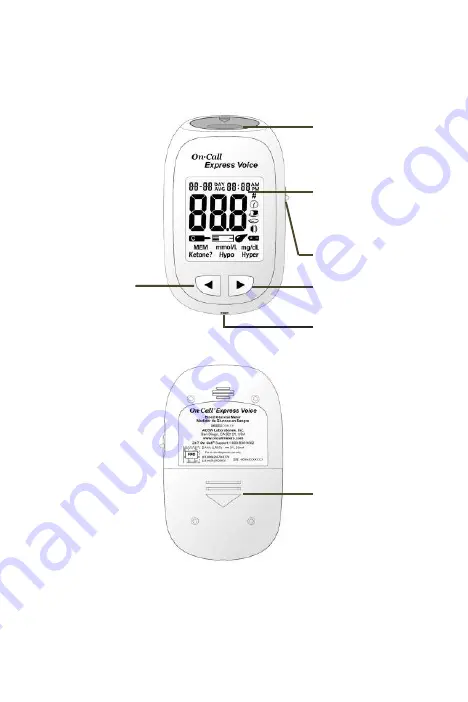
 Blood Glucose Meter 

The meter reads the test strips and displays the blood glucose concentration. Use 
these diagrams to become familiar with all the parts of your meter. 


Strip Port 


Liquid Crystal 

Display (LCD) 


Strip Ejector 


►Button 


Data Port 

Battery Cover 

◄ Button 


Summary of Contents for OGM-331

Page 1: ......

Page 2: ...ended Use The On Call Express Voice Blood Glucose Monitoring System is intended to be used for the quantitative measurement of glucose in fresh capillary whole blood from the fingertips forearm and palm by people with diabetes at home as an aid in monitoring the effectiveness of diabetes control programs Alternative site testing should be done only during steady state times when blood glucose leve...

Page 3: ... testing use only Test only whole blood samples with the On Call Express Blood Glucose Test Strips and On Call Express Voice Meter For self testers consult your physician or doctor before making any adjustments to your medication diet or activity routines Keep out of reach of children Keep this User s Manual in a safe place do not discard it Not for use on critically ill patients patients in shock...

Page 4: ...ing Your Blood 24 Step 1 Getting a Drop of Blood 24 Step 2 Testing Blood Glucose 29 HI and LO Messages 32 Hypo and Hyper Messages 33 Ketone Message 33 Using the Meter Memory 35 Viewing Stored Records 35 Clearing the Memory 37 Transferring Records 37 Maintenance 39 Replacing the Batteries 39 Caring for Your On Call Express Voice Blood Glucose Monitoring System 40 Suggested Testing Times and Target ...

Page 5: ... On Call Express Voice product you purchased you may need to buy some accessories separately please contact Customer Support at 1 800 838 9502 for purchasing Please check the list of contents on the outer box for details on which components are included with your purchase Lancing Device Sterile Lancet Test Strips Clear Cap Control Solution Carrying Case Blood Glucose Meter ...

Page 6: ...ading Three levels of control solution are included in the On Call Express Glucose Control Solution kit sold separately Control Solution 1 is all you will need most of the time Additional testing may be performed with Control Solution 0 and Control Solution 2 if you think your meter and test strips are not working properly Please contact Customer Support at 1 800 838 9502 to order the On Call Expr...

Page 7: ...ens Transmission For more information please refer to the FDA Public Health Notification Use of Fingerstick Devices on More than One Person Poses Risk for Transmitting Bloodborne Pathogens Initial Communication 2010 at http www fda gov MedicalDevices Safety AlertsandNotices ucm224025 htm You may also refer to the CDC Clinical Reminder Use of Fingerstick Devices on More than One Person Poses Risk f...

Page 8: ...ter The meter reads the test strips and displays the blood glucose concentration Use these diagrams to become familiar with all the parts of your meter Strip Port Liquid Crystal Display LCD Strip Ejector Button Data Port Battery Cover Button ...

Page 9: ... to perform a test Strip Ejector Slide the ejector forward to discard the used test strip Note Dispose of blood samples and materials with care Treat all blood samples as if they are infectious materials Follow your doctor s recommendations for disposal Battery Cover Remove the battery cover to install two 1 5V AAA batteries Data Port Sends information to a computer via an optional data transfer c...

Page 10: ...etone test should be taken Hypo Symbol Appears when the blood glucose concentration is below the Hypoglycemia low blood sugar target level that you have set Hyper Symbol Appears when the blood glucose concentration is above the Hyperglycemia high blood sugar target level that you have set Measurement Unit Only mg dL will be displayed on your meter It cannot be adjusted Battery Symbol Warns when yo...

Page 11: ...ng it to extremes temperature or humidity Do not leave it in your car Please use the meter indoor Do not drop the meter or get it wet If you do check the meter by running a quality control test Refer to Quality Control Test on page 20 for instructions Do not take the meter apart This will void the warranty Refer to the Caring for Your Meter section on page 40 for details on cleaning the meter Keep...

Page 12: ... results IMPORTANT Apply the sample only to the sample tip of the test strip Do not apply blood or control solution to the top of the test strip This may result in an inaccurate reading Hold the blood drop to the sample tip of the test strip until the check window is completely full The meter will then begin to count down If you applied blood but do not see the countdown start you may reapply a se...

Page 13: ...use test strips after the unopened expiration date printed on the vial Note All expiration dates are printed in Year Month Date format 2020 01 30 indicates January 30th 2020 A new vial of test strips may be used for 6 months after being first opened After 6 months they will expire Write the opened expiration date on the vial label after opening Test strips must be stored in the original vial with ...

Page 14: ...tus Not for use on critically ill patients patients in shock severely dehydrated patients or hyperosmolar patients with or without ketosis Not for use on neonates Consider alternate site testing when You are in a fasting state You are testing before a meal Two hours have passed since your last meal Two hours have passed since your last insulin dosing Two hours have passed since your last physical ...

Page 15: ...tion kit You should run a quality control test Before you first use your meter to familiarize yourself with its operation Before using a new box of test strips When you suspect that the meter or test strips are not working properly When you suspect that your test results are inaccurate or if they are inconsistent with how you feel When you suspect your meter is damaged After cleaning your meter At...

Page 16: ...igned to be accurate only when tested between 50 and 104 F 10 40 C The control ranges shown on the test strip vial or on the foil pouch are not recommended ranges for your blood glucose level Your personal blood glucose target ranges should be determined by your doctor Do not touch the test strip with the tip of the control solution bottle Use only the same brand of control solution that was provi...

Page 17: ...5V AAA batteries Please find the batteries in your carrying case and install them according to the following steps 1 Turn over the meter Slide the battery cover in the direction of the arrow to open it 2 Insert two 1 5V AAA batteries on top of the plastic tape 3 Close the battery cover until it snaps shut ...

Page 18: ...d then press the right button to save your choice If you want to choose Spanish press the left button again and the meter will say Spanish while displaying ES Then press the right button to save your choice and start setting the clock 3 Clock Wait for the meter to say Setup while displaying 12H default If you want to choose 12 hour mode press the right button to save your choice If you want to cho...

Page 19: ...ice and start setting the date After setting the month the meter will say Set Day and display the day at the center top part of the display You can press the Left button to increase the date Then press the Right button to save your choice and start setting the time 5 Time The hour will appear at the top of the display The meter will say Set Hour Adjust the hour with the Left button until the corre...

Page 20: ...he meal marker setting The meter allows the user to enable or disable this option The words On or Off will be displayed and voiced The before meal symbol together with the after meal symbol will be displayed as shown below Press the Left button to switch between turning the meal marker On and Off Press the Right button to confirm your selection and move to set the ketone indication 8 Ketone Indica...

Page 21: ...is On pressing the Right button will go to the Hyper indicator level set up At the Hyper level set up press the Left button to adjust the Hyper level Press the Right button to go to the Hypo indicator set up Note The meter allows the hyperglycemia level to be as low as 120 mg dL or higher The hyperglycemia level should be above the hypoglycemia level Consult your doctor before determining what you...

Page 22: ... the Right button will go to the setup of the second Test Reminder When the Test Reminder is On pressing the Right button will go to the setup of the time for the first Test Reminder Press the Left button to adjust the first Test Reminder time Press the Right button to confirm the first Test Reminder time and then go to the second Test Reminder set up When the Test Reminder is Off during the secon...

Page 23: ...rip or press any button This function will still work with the volume 0 beep on there will no change in the functionality of the meter When the meter beeps at the time set by the Test Reminder feature the date time and strip symbol will be displayed The Test Reminder symbol will also flash The display sample is shown below Note For any step of the setup if the Left button is pressed and held it wi...

Page 24: ...d After cleaning your meter At least once a week 1 Insert a test strip into the strip port contact bars end first and facing up It will turn on the meter and display all the display segments If the volume 0 the meter will say Power On signaling the meter is turned on 2 Check the display to confirm that all the display segments turn on Next a dash will move across the display and the meter will say...

Page 25: ...If the volume 0 the meter will beep and voice Testing It indicates a sufficient sample has been applied Notes Do not apply control solution to the test strip directly from the bottle If you applied the control solution sample but do not see the starting of the count down you may reapply a second drop within 3 seconds 6 Once a sufficient sample has been applied the meter display will count down fro...

Page 26: ...e test strip vial has not been opened for more than 6 months and the control solution bottle has not been opened for more than 6 months Discard any test strips or control solution that has expired Confirm the temperature in which you are testing is between 50 and 104 F 10 40 C Make sure that the test strip vial and control solution bottle have been tightly capped Confirm that you are using the sam...

Page 27: ...TRL 0 range Control Solution 1 tests should fall within the CTRL 1 range and Control Solution 2 tests should fall within the CTRL 2 range If the control solution test results do not fall within their respective ranges DO NOT use the system to test blood as the system may not be working properly If you cannot fix the problem please contact Customer Support at 1 800 838 9502 Please contact Customer ...

Page 28: ...thoroughly Make sure there is no alcohol soap cream or lotion on the test site Potential Biohazard All blood glucose measuring systems are considered bio hazardous All products or objects which come in contact with human blood even after cleaning should be handled as if capable of transmitting viral diseases The meter and lancing device are for single patient use Do not share them with anyone incl...

Page 29: ...ce 2 Hold the lancet firmly in the lancet holder and twist the safety tab of the lancet until it loosens Then pull the safety tab off the lancet Save the safety tab for lancet disposal 3 Carefully screw the cover back onto the lancing device Avoid contact with the exposed needle Make sure the cover is fully sealed on the lancing device 4 Adjust the puncture depth by rotating the lancing device cov...

Page 30: ...rm water to increase blood flow in your fingers if necessary Dry your hands thoroughly Massage your hand from the wrist up to the fingertip a few times to encourage blood flow 7 Hold the lancing device against the side of the finger to be lanced with the cover resting on the finger Push the release button to prick your fingertip You may hear a click as the lancing device activates Gently massage y...

Page 31: ...od levels are changing rapidly such as after a meal an insulin dose or exercise blood from the fingertips may show these changes more rapidly than blood from other areas You should use fingertips if testing is within 2 hours of a meal an insulin dose or exercise You should also use fingertip testing any time you feel glucose levels are changing rapidly You should test with the fingertips anytime t...

Page 32: ...e button of the lancing device Do not immediately lift the lancing device from the puncture site Continue to hold the lancing device against the puncture site until you can confirm a sufficient blood sample has formed Disposal of the Lancet 1 Unscrew the lancing device cover Place the safety tab of the lancet on a hard surface Carefully insert the lancet needle into the safety tab 2 Press the rele...

Page 33: ...2 for information on different lancet options Step 2 Testing Blood Glucose Note Insertion of a new test strip at any time except while in the data transfer mode detailed on page 37 will cause the meter to automatically enter the test mode 1 Insert a test strip into the strip port contact bars end first and facing up This will turn on the meter and display all the display segments If the volume 0 t...

Page 34: ...ch the blood sample to the sample tip at the end of the test strip If the volume 0 the meter will beep and voice Testing to indicate the sample is sufficient and the measurement has started If you applied a drop of blood but do not see the countdown begin you may reapply a second drop of blood within 3 seconds DO NOT Apply the sample to the front or back of the test strip Smear the blood drop onto...

Page 35: ... a new test strip When the meal marker feature is turned on the test result is displayed together with a suggested default meal marker based upon current time The before meal or after meal symbol is flashing until confirmed by pressing the Right button The meter allows the user to change the meal marker Press the Left button when meal marker symbol is flashing to switch the marker from before meal...

Page 36: ...ure blood glucose concentrations between 20 to 600 mg dL HI and LO messages indicate results outside of this range If HI appears on the display the meter will say High Glucose signaling measured concentration value is above 600 mg dL The test should be retaken to ensure that no mistake was made in the procedure If you are certain the meter is functioning properly and no mistakes were made in the p...

Page 37: ...t level that you have set If Hyper appears on the display the measured concentration value is above the Hyper high blood sugar target level that you have set Ketone Message If Ketone appears on the display the measured concentration value is above 300 mg dL A ketone test is recommended Consult your doctor about testing for ketones ...

Page 38: ...lk to your doctor to find out your hematocrit level The system is tested to accurately read the measurement of glucose in whole blood within the range of 20 600 mg dL Fatty substances have no major effect on test results These include triglycerides up to 3 000 mg dL or cholesterol up to 500 mg dL Ascorbic acid vitamin C when occurring in blood at normal or at high therapeutic concentration does no...

Page 39: ...ord MEM will appear on the display When a blood glucose test is completed and the test strip is still inserted in the meter press Right button will also enter the memory mode If you marked the test result as a before meal result after meal result or invalid result with pound sign the word MEM will also appear with the symbol on the display 2 If you are using the meter for the very first time the m...

Page 40: ...number of records used in the DAY AVG will also appear in the display Note Pre meal averages only include the test results that have been marked as before meal Post meal averages only include the test results that have been marked as after meal General 7 14 30 60 and 90 day averages include all blood glucose results 6 If there are fewer than 7 14 30 60 and 90 days in memory all the readings withou...

Page 41: ...tton and Right buttons for two seconds 3 The display will show MEM and After a second the meter will clear its memory and turn itself off 4 If you entered the delete mode but want to exit without deleting the recorded data press the right button This will turn the meter off without deleting any data Transferring Records The meter can transfer stored information to a Windows based personal computer...

Page 42: ...the software for how to transfer records 4 During the data transfer the meter will display to and PC This indicates the data is being transferred from the meter to the PC 5 Once the data transfer is complete the meter will display End and PC 6 After data transfer from meter to PC is completed press the Right button to turn off the meter If nothing else happens to meter 2 minutes after data transfe...

Page 43: ...se tests The meter will not function until the batteries are replaced Instructions 1 Turn the meter off before removing the batteries 2 Turn the meter over And then slide the battery cover in the direction of the arrow to open it 3 Remove and discard the old batteries Insert two new 1 5V AAA batteries in the battery carrier Make sure to match up the minus and plus symbols 4 Close the battery cover...

Page 44: ...ecting Towelette EPA Registration No 10492 4 to disinfect your meter and lancing device For disinfection please wipe the entire meter and lancing device thoroughly and leave the surface wet for 1 minute Please refer to the diagram for the On Call Express Voice meter and lancing device in the Getting Started section for meter and lancing device outside surface illustration Please refer to Disposal ...

Page 45: ...thyl benzyl ammonium chloride 0 12 and n alkyl dimethyl ethyl benzyl ammonium chloride 0 12 This DisCide Ultra Disinfecting Towelette is available through Palmero Health Care Company You can purchase this DisCide Ultra Disinfecting Towelette by either calling Palmero Health Care at 1 800 344 6424 or visiting their website at www palmerohealth com DisCide Ultra Disinfecting wipes are also available...

Page 46: ... include polymer crazing thin silver streaks cracking swelling dissolving softening or becoming brittle Signs of meter performance deterioration might include buttons not functioning properly audio not working missing display segments error messages during testing or control solution test results that are out of range Signs of lancing device performance deterioration might include reduced function...

Page 47: ...rs after Meals Less than 140 Less than 7 8 Talk to your doctor to set your own daily target ranges Time of Day Your Target Range Waking up Fasting level Before meals 2 hours after meals Bedtime 2 AM to 3 AM Other Note 1 mmol L 18 mg dL Use the logbook to record your blood glucose measurements and related information Bring the logbook with you when you visit your doctor Together you can determine h...

Page 48: ...nsure a reasonable comparison follow these guidelines Before you go to the lab Bring your meter test strips and control solution with you Make sure your meter is clean Perform a quality control test to make sure the meter is working properly Comparisons will be more accurate if you do not eat for at least four hours before testing Eight hours is preferable At the lab Wash your hands before obtaini...

Page 49: ...rnal calibration check error Turn off meter or remove test strip and then turn on meter again to retest If the problem persists please contact Customer Support at 1 800 838 9502 Test strip was removed during the test Repeat the test and ensure the test strip remains in place Sample was applied to the test strip too soon Repeat the test and apply sample after blood drop test strip symbol appears Te...

Page 50: ...oblem persists please contact Customer Support at 1 800 838 9502 Test strip damaged or calibration error Please test again by using a new strip If the problem persists please contact Customer Support at 1 800 838 9502 Communications failure There is an error in transferring data to the PC See the package insert included in the PC data transfer software for troubleshooting If the problem persists p...

Page 51: ...ource Two 2 AAA 1 5V batteries Battery Life 1 000 tests for glucose testing not considering data transfer Glucose Units of Measure The meter is preset to mg dL when sold in the United States Memory Up to 500 records with time and date Automatic Shutoff 2 minutes after last action Meter Size 100 0 mm 60 8mm 23 9 mm Display Size 39 2 mm 42 3 mm Weight About 90 0 g with batteries installed Operating ...

Page 52: ... fails to work for any reason other than obvious abuse within the first five 5 years from purchase we will replace it with a new meter free of charge For your records also write the purchase date of your product here Date of purchase __________________________________________________ Note This warranty applies only to the meter in the original purchase and does not apply to the batteries supplied ...

Page 53: ...etones 33 Results Lancing Device 1 24 40 Blood Glucose 31 Lancets 1 24 Control Solution 21 Logbook 2 43 Meter vs Lab Results 44 Maintenance 7 39 Target Goals 43 Measure Unit of 6 Unit of Measure 21 43 Meter 4 Suggested Testing Times 43 Cleaning 40 Test Strip 8 Display 6 Expiration 9 Error Messages 45 46 Precautions 10 HI and LO Messages 32 Testing Your Blood 24 Left Button 4 Getting a Drop of Bloo...

Reviews: