background image

3-42

Machine Maintenance

Removing the CPU

0

1.

Perform the “

Removing the Mainboard

” procedure described on page

3-37

.

2.

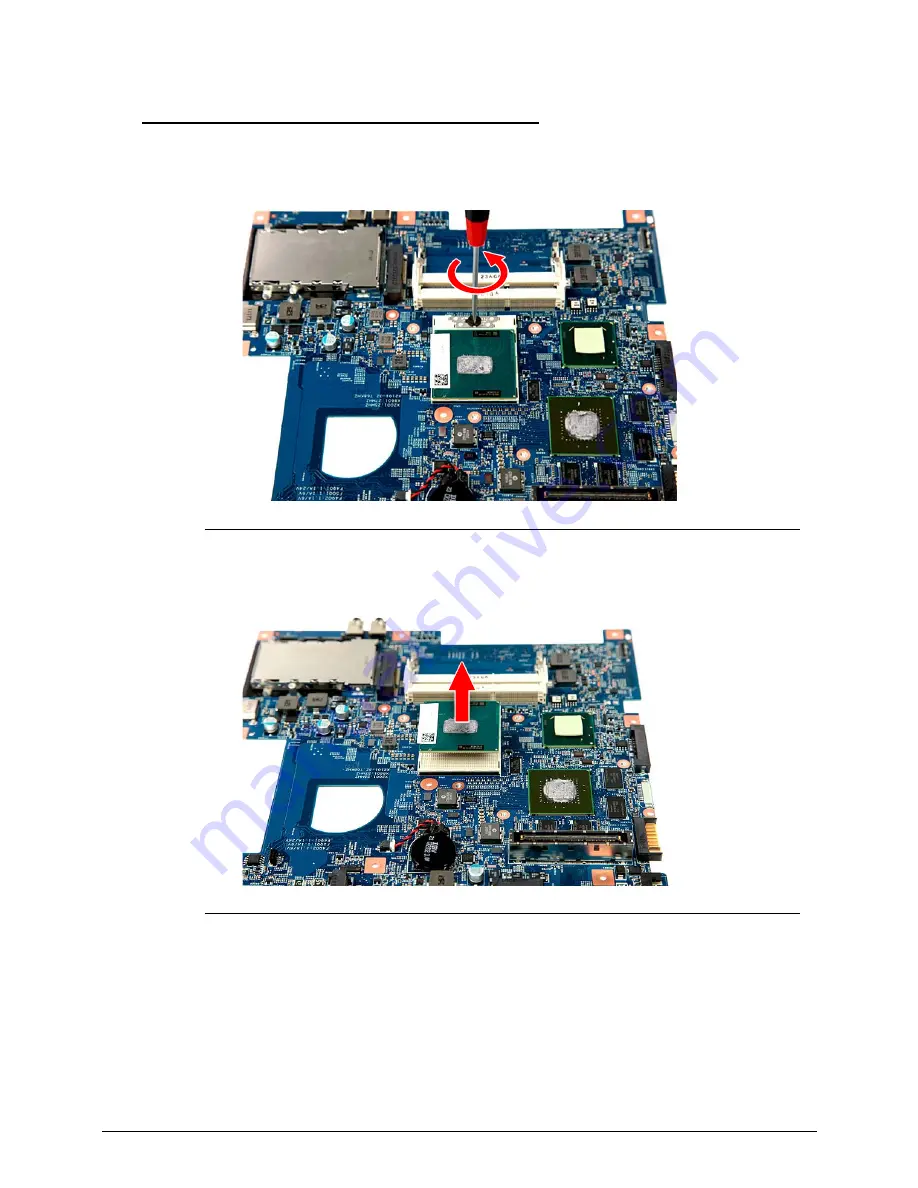
Use a flat-blade screwdriver to turn the CPU socket lock screw counter-clockwise.

Figure 1-59.

CPU Socket Screw

3.

Remove the CPU from the mainboard. 

Figure 1-60.

CPU

Summary of Contents for TravelMate P643-V

Page 1: ...TravelMate P643M P643V P643MG SERVICEGUIDE...

Page 2: ...or fitness for any particular purpose The software described in this manual is sold or licensed as is Should the programs prove defective following their purchase the buyer not the manufacturer distri...

Page 3: ...ocess names are shown in italics Example the DRS5 User s Guide usr local bin fd the TPH15spool_M program Computer output text that represents information displayed on a computer screen such as menus p...

Page 4: ...hese localized features are not covered in this generic service guide In such cases contact your regional office or the responsible personnel channel to provide you with further technical details When...

Page 5: ...Pointing Device 1 9 I O Ports 1 9 Software and Tools 1 10 Optional Items 1 11 Warranty 1 11 Dimensions and Weight 1 11 Environment 1 11 Notebook Tour 1 12 Open Front View 1 12 Close Front View 1 13 Le...

Page 6: ...External Modules Disassembly Flowchart 3 8 Removing the Battery Pack 3 9 Remove the Dummy Card 3 10 Removing the ODD Module 3 11 Removing the Base Door 3 14 Removing the HDD Module 3 15 Removing the M...

Page 7: ...ophone 3 63 Replacing the Camera Board 3 64 Replacing the LCD Bezel 3 65 Main Unit Reassembly Process 3 67 Replacing the LCD Module 3 67 Replacing the Speaker Module 3 70 Replacing the CPU 3 71 Replac...

Page 8: ...WLAN Failure 4 14 Bluetooth Failure 4 15 Card Reader Failure 4 16 Thermal Unit Failure 4 17 Other Functions Failure 4 18 Intermittent Problems 4 19 Undetermined Problems 4 19 Error Codes 4 20 BIOS Bee...

Page 9: ...st TravelMate P643V P643M P643MG Exploded Diagrams 6 4 Main Assembly 6 4 LCD Assembly 6 5 FRU List 6 7 CHAPTER 7 Test Compatible Components Microsoft Windows 7 Environment Test 7 4 CHAPTER 8 Online Su...

Page 10: ...6...

Page 11: ...CHAPTER 1 Hardware Specifications...

Page 12: ...1 Warranty 1 11 Dimensions and Weight 1 11 Environment 1 11 Notebook Tour 1 12 Open Front View 1 12 Close Front View 1 13 Left View 1 14 Right View 1 15 Base View 1 16 Indicators 1 17 Touchpad Basics...

Page 13: ...33 Supported GPU Resolutions 1 34 Audio Codec 1 34 Audio Interface 1 34 Webcam 1 34 LAN 1 35 Wireless LAN 1 35 USB Interface 1 36 HDMI Port 1 36 Expansion Card 1 36 System LED Indicators 1 36 Battery...

Page 14: ...1 4...

Page 15: ...ports the second generation Intel Core Mobile Processor Family Ivy Bridge Processor models and capacities are listed on the FRU list on page 1 28 Chipset vPro Mobile Intel QM77 Express Chipset Panther...

Page 16: ...nEXR High Dynamic Range HDR technology Shader Model 5 0 Microsoft DirectX 11 OpenGL 4 1 OpenCL 1 1 Dual Triple independent display support 16 7 million colors Internal resolutions and refresh rate sup...

Page 17: ...Picture Card xD cards Audio Subsystem 0 High definition audio support Two built in stereo speakers 1 watt stereo speakers MS Sound compatible Acer PureZone technology with two built in stereo microph...

Page 18: ...it network connection with Intel AMT 8 0 IEEE P802 3az Energy Efficient Ethernet EEE Non vPro Broadcom NetLink BCM57761 controller Privacy Control 0 Acer ProShield Security Manager including BIOS Sett...

Page 19: ...able key Acer Backup key Acer Bio Protection fingerprint reader Acer email key Microphone mute key and Communication key Windows and Application keys Multilanguage support Touchpad 0 Next generation o...

Page 20: ...2010 to use the full featured software except Japan newsXpresso Norton Online Backup Windows Live Essentials Manageability 0 Acer Office Manager Security 0 Acer Bio Protection Acer ProShield Absolute...

Page 21: ...ack 2 4 GB DDR3 soDIMM module 320 500 750 GB hard disk drive 9 cell Li ion 9000 mAh battery pack 6 cell Li ion 6000 mAh battery pack USB optical genius mini mouse External USB floppy disk drive 3 pin...

Page 22: ...am Web camera for video communication 3 Integrated microphone Two internal microphones for stereo sound recording 4 Display screen Also called liquid crystal display LCD displays computer output 3 P P...

Page 23: ...caps lock is on Table 1 2 Close Front View No Icon Item Description 1 Power indicator Indicates the computer s power status Blue The computer is turned on Blinking amber The computer is in power savi...

Page 24: ...rate at any given time Table 1 3 Left View No Icon Item Description 1 Ethernet RJ 45 port Connects to an 10 100 1000 based Ethernet network 2 External display VGA port Connects to a display device e g...

Page 25: ...Ds 4 Optical disk access indicator Lights up when the optical drive is active 5 Optical drive eject button Ejects the optical disk from the drive 6 Emergency eject hole Ejects the optical drive tray w...

Page 26: ...ry release latch Releases the battery for removal 4 WLAN module compartment Houses the computer s WLAN optional module 5 Acer ProDock connector Connects to the optional Acer ProDock 6 Acer MediaBay re...

Page 27: ...Indicator off The computer is turned off 2 Communication indicator Flashes amber when there is an active wireless connection 3 HDD indicator Flashes blue when there is hard drive activity 4 Battery in...

Page 28: ...the left button of a mouse Use Acer Bio Protection fingerprint reader 1 supporting Acer FingerNav 4 way control function only for certain models to scroll up or down and move left or right a page This...

Page 29: ...Application key function lock keys hotkeys and media control keys controlling various computer features Figure 1 8 Keyboard Access context menu Click once Scroll Swipe up down left rig ht using Acer...

Page 30: ...ve the following definitions When On the system boots with external keyboard keypad Num Lock status On Internal keyboard overlay numeric keys are disabled The key can be turned on off via the internal...

Page 31: ...o the desktop F1 Show the Help window E Open Windows Explorer F Search for a file or folder D Display the desktop Ctrl F Search for computers if you are on a network Ctrl L Lock your computer if you a...

Page 32: ...display output between the display screen external monitor if connected or both Fn F6 Screen blank Turns the display screen backlight off to save power Press any key to return Fn F7 Touchpad toggle T...

Page 33: ...Alt Gr and then press the key NOTE NOTE Some fonts and software do not support the Euro symbol See www microsoft com typography faq faq12 htm for more information The US dollar sign 0 1 Open a text e...

Page 34: ...OST press F1 to access the BIOS Setup screen 3 Press to select the Main menu 4 Press to select the D2D Recovery field and make sure it is set to Enabled 5 Press F10 to save settings and close the BIOS...

Page 35: ...Hardware Specifications and Configurations 1 25 System Block Diagram Figure 1 12 System Block Diagram UMA Figure 1 13 System Block Diagram Discrete...

Page 36: ...ing to optical disc 0 to 35 C 32 to 95 F Operating writing to optical disc 5 to 35 C 41 to 95 F Nonoperating 20 to 60 C 4 to 140 F Relative humidity Operating 10 to 90 Nonoperating 5 to 95 Maximum alt...

Page 37: ...BCM 43228 20702 Foxconn Atheros WB222 Liteon Atheros WB222 Intel WLAN 6235AN HMWG Foxconn BCM 43228 20702 Foxconn Atheros WB222 Liteon Atheros WB222 Intel WLAN 6235AN HMWG Audio codec Conexant CX 2058...

Page 38: ...MB 35 W 1 1 V i5 2520M 2 50 GHz 2C 4T 3 30 GHz 32 nm 3 MB 35 W 1 1 V i5 2540M 2 60 GHz 2C 4T 3 30 GHz 32 nm 3 MB 35 W 1 1 V i7 3520M 2 90 GHz 2C 4T 3 60 GHz 32 nm 4 MB 35 W 1 1 V i7 3612QM 2 10 GHz 2C...

Page 39: ...6 5919 4096 0 4096 4096 4096 7997 4096 3871 1024 804 2048 1883 Item Specification Specification System model P63V P63M P63MG Chipset UMA Intel HD Graphics 3000 4000 integrated in the Intel Core Mobile...

Page 40: ...on revision 2 1 BIOS Boot specification v1 01 Simple boot flag specification v2 1 System management bus specification v2 0 AHCI support Microsoft XP Vista Windows 7 logo program Microsoft SLP 1 0 supp...

Page 41: ...2A1YT0 Product series Hitachi Travelstar 5K750 5K500 B Toshiba MKxx59GSXP Western Digital Scorpio Black Blue Configuration Interface SATA Third Generation Form factor 2 5 inch Capacity GB 320 500 750...

Page 42: ...nasonic UJ 8A2 UJ8B2ABAA B Interface Slim type SATA Transfer rates DVD RAM DVD R DVD R DL DVD RW DVD R DVD R DL DVD RW DVD ROM Single Layer DVD ROM Dual Layer CD R CD RW CD ROM Read 5x 8x 8x 8x 8x 8x...

Page 43: ...TLF3 and LP140WH2 TLM1 LF Screen size diagonal 355 6 mm 14 in Active area 309 4 x 174 mm Display resolution pixels HD 1366 768 Pixel pitch 0 226 mm Viewing angle H V 90 50 Brightness 200 or 220 nit Co...

Page 44: ...16 9 Y Y Y Y Item Specification Controller Conexant CX 20584 audio codec Features Item Specification Controller Conexant CX 20584 audio codec Audio onboard Yes Audio channel Stereo Resolution 18 bit...

Page 45: ...edia access controller MAC Compliant with IEEE standards Compliant with IEEE 802 3az draft for Energy Efficient Ethernet EEE State of the art physical layer interface that exceeds IEEE requirements Ju...

Page 46: ...ft side Item Specification Form factor PCI Express Mini Card Number of slot 1 Supported card WLAN WiMAX WWAN module Item Specification Power status Solid blue The computer is turned on Blinking amber...

Page 47: ...3S2P 6 cell 3 0 Sanyo AS10G Li Ion 3S3P 9 cell 3 0 Panasonic AS10D5E 6 cell 3 0 Battery type Lithium ion Pack capacity 6 cell 1 4 1400 mAH 6 cell 3 0 6000 mAH 9 cell 3 0 9000 mAH Number of battery cel...

Page 48: ...run It is not safe to disassemble the machine in this state G1 Sleeping The computer consumes a small amount of power user mode threads are not being executed and the system appears to be off It is n...

Page 49: ...0 v2 3rd Gen Core processor PCI Express Root Port 0151 17 PCI Express Root port 6 1E1A 17 USB EHCI 1E26 18 PCI Express Root port 3 1E14 18 PCI Express Root port 3 1E1C 18 REALTEK PCI E cardreader 18 S...

Page 50: ...Digital Accelerometer 16 USB EHCI 1E2D 16 PCI Express Root port 1 1E10 16 ME interface 17 PCI Express Root port 6 1E1A 17 USB EHCI 1E26 18 PCI Express Root port 3 1E14 18 PCI Express Root port 3 1E1C...

Page 51: ...t Port 0151 3F80 3FFF NVIDIA GeForce GT 640M 4000 403F Intel HD Graphic 4000 4060 407F SATA AHCI controller 4080 4087 SATA AHCI controller 4088 408f SATA AHCI controller 4090 4093 SATA AHCI controller...

Page 52: ...64 Standard PS 2 keyboard 70 77 system CMOS real time clock F0 F0 Numeric data processor 3B0 3BB Intel HD Graphic 4000 3C0 3DF Intel HD Graphic 4000 2000 2FFF PCI Express Root port 7 1E1C 3000 303F In...

Page 53: ...CHAPTER 2 System Utilities...

Page 54: ...OS Utility 2 3 BIOS Flash Utilities 2 12 WinFlash Utility 2 13 Remove HDD BIOS Password Utilities 2 14 Removing the HDD Password 2 14 Removing the BIOS Passwords 2 15 Clearing the BIOS Passwords 2 16...

Page 55: ...uring the next POST press F12 to enter the multi boot menu Navigating the BIOS Utility 0 The BIOS Setup Utility has five menu options namely Information Main Security Boot Exit Perform the following a...

Page 56: ...on Table 2 1 Hardware Information Parameter Description CPU Type Model name and core frequency of the installed processor CPU Speed Core frequency of the installed processor HDD Model Name Model name...

Page 57: ...niversally unique identifier tag assigned to the computer Table 2 2 BIOS Main Parameter Description Format Option System Time System time expressed in 24 hour format Format HH MM SS hour minute second...

Page 58: ...ption Enabled or Disabled Bluetooth Option to enable the Bluetooth device Option Enabled or Disabled Card Reader Option to enable the multi function card reader device Option Enabled or Disabled Wired...

Page 59: ...its dealer Table 2 3 BIOS Security Parameter Description Option Supervisor Password Is Supervisor password setting Clear or Set User Password Is User password setting Clear or Set HDD Password State H...

Page 60: ...do not appear on the screen 4 Press Enter NOTE NOTE Users can choose to enable the Password on Boot parameter 5 Press F10 to save changes and exit from the BIOS Setup Utility Removing a Password 0 Pe...

Page 61: ...er 3 Type the new password in the Enter New Password field 4 Retype the password in the Confirm New Password field Figure 2 7 Setup Notice 5 Press Enter Computer sets Supervisor Password parameter to...

Page 62: ...operating system By default the computer searches for boot devices in the following order 1 Hard disk drive 2 Optical disc drive 3 Network boot 4 External USB hard drive 5 External USB optical drive 6...

Page 63: ...ters Parameter Description Exit Saving Changes Close the BIOS Setup Utility and save the setup changes Exit Discarding Changes Close the BIOS Setup Utility without saving the setup changes Load Setup...

Page 64: ...sed NOTE NOTE Use AC adaptor power supply when running Flash utility If battery pack does not contain power to finish loading BIOS Flash do not boot system Perform the following to run Flash 1 Rename...

Page 65: ...oot Menu to modify boot priority order Example If using USB HDD to Update BIOS move USB HDD to position 1 Figure 2 10 BIOS Boot 3 Insert the USB HDD and reboot computer 4 Execute BIOS BAT to update BI...

Page 66: ...D password is entered three times in succession an error is generated Figure 2 11 Figure 2 11 Password Error Status To reset the HDD password 1 Open the computer in a DOS environment 2 Type the follow...

Page 67: ...word prompt type the master password generated in step 5 then press Enter Removing the BIOS Passwords 0 To clear a lost BIOS password user or supervisor password you need to short the clear password h...

Page 68: ...he tool on the two contacts plug one end of the AC adapter into the DC in jack and plug one end to an electrical outlet 7 Press the button to turn on the computer 8 After the BIOS POST remove the tool...

Page 69: ...Utility 1 Create a DOS bootable USB HDD 2 Copy the contents of the MAC folder to the HDD and remove the HDD form the computer 3 Reboot the computer and press F2 during the boot sequence to enter the...

Page 70: ...2 18 System Utilities...

Page 71: ...CHAPTER 3 Machine Maintenance...

Page 72: ...he Keyboard 3 23 Removing the Palmrest Module Upper Cover 3 25 Removing the Power Button Launch Board 3 29 Removing the Fingerprint Board 3 31 Removing the Touchpad Board 3 33 Removing the USB Board 3...

Page 73: ...3 71 Replacing the Thermal Module 3 72 Replacing the RTC Battery 3 74 Replacing the Mainboard 3 75 Replacing the TPM Module 3 78 Replacing the USB Board 3 79 Replacing the Fingerprint Board 3 80 Repla...

Page 74: ...3 4...

Page 75: ...size During the disassembly process group the screws with the corresponding components to avoid mismatch when putting back the components The product previews seen in the disassembly procedures may n...

Page 76: ...eeding with the disassembly procedure make sure that you do the following 1 Turn off the power to the system and all peripherals 2 Unplug the AC adapter and all power and signal cables from the system...

Page 77: ...sequence Observe the order of the sequence to avoid damage to any of the hardware components For example if you want to remove the main board you must first remove the keyboard then disassemble the i...

Page 78: ...Table 3 2 Screw List Step Screw Quantity Acer Part Number Base Door Disassembly M2 L4 5 86 00Q76 620 ODD Plastic Holder Disassembly M2 L2 5 3 86 9A352 2R5 WLAN Module Cover Disassembly M2 L4 1 86 00Q...

Page 79: ...he battery bay a Slide the battery lock to the unlock position b Slide and hold the battery release latch all the way through to release the battery pack c Remove the battery pack from its bay Figure...

Page 80: ...mmy Card 0 1 Push against the card as if you were pushing it further into the slot 1 and then pull the dummy card out 2 Figure 1 4 Dummy Card 2 Repeat the above steps to remove the Express Card dummy...

Page 81: ...the ODD Module 0 1 Slide and hold the MediaBay release latch all the way through to release the ODD module 1 and then slide the drive out of the drive bay 2 Figure 1 6 ODD Module 2 Pry the ODD bezel o...

Page 82: ...rews securing the ODD plastic holder Figure 1 8 ODD Plastic Holder Screws 4 Detach the ODD plastic holder from the module Figure 1 9 ODD Plastic Holder Table 3 3 Screws Step Screw Quantity Screw Type...

Page 83: ...Machine Maintenance 3 13 5 Pull the connector adapter off the module Figure 1 10 ODD Connector Adapter...

Page 84: ...age 3 9 2 Remove the screws securing the base door Figure 1 11 Base Door Screws 3 Insert a non marring plastic scribe on the base door s notch to release the base door 1 and then remove the door from...

Page 85: ...Removing the HDD Module 0 1 Perform the Removing the Base Door procedure described on the preceding section 2 Disconnect the HDD cable Figure 1 13 HDD Cable 3 Lift the hard drive out of its compartmen...

Page 86: ...3 16 Machine Maintenance 4 Pull the HDD adapter cable off the HDD Figure 1 15 HDD Adapter Cable 5 Pry the front end 1 and strap 2 of the HDD rubber holder off the HDD Figure 1 16 HDD Rubber Holder...

Page 87: ...Machine Maintenance 3 17 6 Pull the HDD from the rubber holder Figure 1 17 HDD Rubber Holder...

Page 88: ...g the Base Door procedure described on page 3 11 2 Push out the latches on both sides of the memory slot until the module tilts upward 1 and then remove the DM1 slot module 2 Figure 1 18 DM1 Slot Modu...

Page 89: ...y Pack procedure described on page 3 9 2 Remove the screw securing the WLAN module cover Figure 1 20 WLAN Module Cover Screw 3 Pull the WLAN module cover off the computer Figure 1 21 WLAN Module Cover...

Page 90: ...ce during machine reassembly note which cable color corresponds to the main black and auxiliary white connectors Figure 1 22 WLAN Module Antennas 5 Remove the screw securing the WLAN module Figure 1 2...

Page 91: ...Machine Maintenance 3 21 6 Remove the WLAN module from the slot Figure 1 24 WLAN Module...

Page 92: ...6 00D91 723 Power Button Launch Board Disassembly M2 L3 2 86 00D91 723 Touchpad Bracket Disassembly M2 L3 3 86 00D91 723 Mainboard Disassembly M2 L3 1 86 00D91 723 Thermal Module Disassembly 3 UMA 5 D...

Page 93: ...ternal Module Disassembly Process procedure described on page 3 8 2 Remove the screws securing the keyboard Figure 1 26 Keyboard Screws 3 Turn the computer over and open the LCD panel 4 Use a non marr...

Page 94: ...3 24 Machine Maintenance 5 Gently pry up the keyboard and slide forward to access the keyboard cable 1 Open the connector latch 2 and then disconnect the cable 3 Figure 1 28 Keyboard...

Page 95: ...cedure described on the preceding section 3 Open the connector latch for the click button rubber dome cable 1 and then disconnect the cable 2 Figure 1 29 Click Button Rubber Dome Cable 4 Open the conn...

Page 96: ...and then disconnect the cable 2 Figure 1 31 Power Button Launch Board Cable 6 Remove the top side screws securing the upper cover Figure 1 32 Upper Cover Screw Top Side 7 Turn the computer over and o...

Page 97: ...rner screws Figure 1 33 Rubber Pads for the Top Corner Screws 9 Remove the base side screws securing the upper cover Figure 1 34 Upper Cover Screws Base Side 10 Turn the computer over and open the LCD...

Page 98: ...gaps between the upper cover and lower case and insert a small flat blade screwdriver or non marring scribe into each gap to separate the one from the other Once the upper cover is separated lift it...

Page 99: ...Palmrest Module Upper Cover procedure described on page 3 25 2 Open the connector latch 1 and then disconnect the power button launch board cable 2 Figure 1 36 Power Button Launch Board Cable 3 Detach...

Page 100: ...nch board Figure 1 38 Power Button Launch Board Screws 5 Lift the power button launch board at an angle and then remove from the upper cover Figure 1 39 Power Button Launch Board Table 3 11 Screws Ste...

Page 101: ...onnector latches for the touchpad and fingerprint board cables 1 and then disconnect the cables 2 Figure 1 40 Touchpad and Fingerprint Board Cables 3 Remove the screws securing the touchpad bracket Fi...

Page 102: ...t from the upper cover Figure 1 42 Touchpad Bracket 5 Insert a small flat blade screwdriver between the fingerprint board and the upper cover and carefully pry the board loose Remove the fingerprint b...

Page 103: ...nnector latches for the touchpad and fingerprint board cables 1 and then disconnect the cables 2 Figure 1 44 Touchpad and Fingerprint Board Cables 3 Remove the screws securing the touchpad bracket Fig...

Page 104: ...crewdriver between the touchpad board and the upper cover and carefully pry the board loose Remove the touchpad board from the palm rest Figure 1 47 Touchpad Board NOTE NOTE A circuit board that is 10...

Page 105: ...escribed on page 3 25 2 Open the connector latch on both ends of the USB board cable 1 and then disconnect the USB board cable from both the mainboard and the USB board 2 3 Remove the USB board cables...

Page 106: ...chine Maintenance Removing the TPM Module 0 1 Perform the Removing the Palmrest Module Upper Cover procedure described on page 3 25 2 Detach the TPM module from its mainboard connector Figure 1 50 TPM...

Page 107: ...procedure described on pages 3 19 3 Perform the Removing the Keyboard procedure described on page 3 23 4 Perform the Removing the Palmrest Module Upper Cover procedure described on page 3 25 5 Detach...

Page 108: ...type of circuit board 8 Lift the mainboard at an angle and gently turn it on its side 1 and then disconnect the DC input cable 2 from the mainboard Figure 1 54 Mainboard and DC Input Cable NOTE NOTE...

Page 109: ...Machine Maintenance 3 39 9 Remove the DC input cable from the lower case Figure 1 55 DC Input Cable...

Page 110: ...cable from the mainboard Figure 1 56 Fan Cable 3 Loosen the spring loaded captive screws securing the thermal module Follow the screw sequence indicated on Figure 1 57 Figure 1 57 Thermal Module Scre...

Page 111: ...Machine Maintenance 3 41 4 Remove the thermal module from the mainboard Figure 1 58 Thermal Module UMA Model Discrete Model...

Page 112: ...PU 0 1 Perform the Removing the Mainboard procedure described on page 3 37 2 Use a flat blade screwdriver to turn the CPU socket lock screw counter clockwise Figure 1 59 CPU Socket Screw 3 Remove the...

Page 113: ...cribed on page 3 37 2 Disconnect the RTC battery cable Figure 1 61 RTC Battery Cable 3 Remove the RTC battery from the mainboard Figure 1 62 RTC Battery NOTE NOTE The RTC battery is highlighted with a...

Page 114: ...ainboard procedure described on page 3 37 2 Remove the screws securing the speaker module Figure 1 63 Speaker Module Screws 3 Lift the speaker module from the lower case Figure 1 64 Speaker Module Tab...

Page 115: ...Removing the Mainboard procedure described on page 3 37 2 Release the antenna cables from their base side latches Figure 1 65 Antenna Cables Base Side Latches 3 Remove the black tapes securing the an...

Page 116: ...na cables from their top side latches Figure 1 67 Antenna Cables Top Side Latches 5 Remove the screws securing the LCD module Figure 1 68 LCD Module Hinge Screws Table 3 17 Screws Step Screw Quantity...

Page 117: ...Machine Maintenance 3 47 6 Lift the LCD module from the lower cover Figure 1 69 LCD Module...

Page 118: ...Number LCD Bezel Disassembly M2 5 L4 2 86 9AL53 4R0 LCD Panel Disassembly M2 L2 5 4 86 9A562 2R5 LCD Hinge Support Brackets Disassembly M2 L2 5 2 86 9A562 2R5 LCD Hinges Disassembly M2 5 L2 5 4 86 00...

Page 119: ...described on page 3 45 2 Remove the screw rubber covers on the lower corners of the LCD bezel Figure 1 71 LCD Bezel Screw Covers 3 Remove the screws on the lower corners of the LCD bezel Figure 1 72...

Page 120: ...ntenance 4 Carefully pry loose the LCD bezel from the LCD cover Start on the bottom side continue to the left and right sides and finally the top side 1 5 Remove the bezel from the LCD module 2 Figure...

Page 121: ...g the LCD Bezel procedure described on the preceding section 2 Detach the black tape securing the camera cable 1 and then carefully pry the camera board off the LCD cover 2 Figure 1 74 Camera Board 3...

Page 122: ...one 0 1 Perform the Removing the LCD Bezel procedure described on the preceding section 2 Carefully lift the microphone from the LCD cover Figure 1 76 Microphone 3 Disconnect the microphone cable from...

Page 123: ...Remove the screws securing the LCD panel Figure 1 78 LCD Panel Screws 3 Turn the LCD on its front to access the LCD cable 1 4 Detach the transparent tape securing the LCD cable 2 and then disconnect...

Page 124: ...ove the screws securing the left and right hinge support brackets and then remove the support brackets from the LCD cover Figure 1 80 Left and Right LCD Hinge Support Brackets 3 Release the antenna ca...

Page 125: ...screws securing the left and right LCD hinges Figure 1 82 LCD Hinge Screws 5 Remove the hinges from the LCD cover Figure 1 83 Left and Right LCD Hinges Table 3 22 Screws Step Screw Quantity Screw Typ...

Page 126: ...phone and Camera Cable 0 1 Perform the Removing the LCD Panel procedure described on page 3 53 2 Release the microphone and camera cable from the cable guides and then remove the cable from the LCD co...

Page 127: ...1 Perform the Removing the LCD Panel procedure described on page 3 53 2 Release the antenna cables from the cable guides and detach the tin foil tapes securing the antenna cables 3 Remove the antenna...

Page 128: ...ance LCD Module Reassembly Process 0 Replacing the Antennas 0 1 Place the antenna cables on the LCD cover and then secure the cables with tin foil tapes 2 Route the antenna cables to the cable guides...

Page 129: ...enance 3 59 Replacing the Microphone and Camera Cable 0 1 Place the microphone and camera cable on the LCD cover 2 Route the microphone and camera cable to the cable guides Figure 1 87 Microphone and...

Page 130: ...ght LCD hinges on the LCD cover aligning the screw holes on the left and right LCD hinges with the LCD cover Figure 1 88 Left and Right LCD Hinges 2 Secure the LCD hinges with the four screws Figure 1...

Page 131: ...1 90 Left and Right LCD Hinges 4 Place the left and right LCD hinge support brackets on the LCD cover and then secure the hinge support brackets with two screws Figure 1 91 LCD Hinge Support Brackets...

Page 132: ...board 1 and then secure LCD cable connection with the transparent tape 2 2 Place the LCD panel on the LCD cover 3 Figure 1 92 LCD Panel 3 Secure the LCD panel with the four screws Figure 1 93 LCD Pane...

Page 133: ...Machine Maintenance 3 63 Removing the Microphone 0 1 Connect the microphone cable to the microphone Figure 1 94 Microphone Cable 2 Place the microphone on the LCD cover Figure 1 95 Microphone...

Page 134: ...rd 0 1 Connect the camera cable to the camera board Figure 1 96 Camera Board Cable 2 Place the camera board on the LCD cover and then press down to secure in place 1 3 Secure the cable to the camera b...

Page 135: ...into place NOTE NOTE Make sure that the LCD camera microphone and antenna cables are properly routed on the hinge sides and there is no gap between the bezel and the LCD cover Figure 1 98 LCD Bezel 2...

Page 136: ...3 66 Machine Maintenance 3 Secure the bezel with the two screw covers Figure 1 100 LCD Bezel Screw Covers...

Page 137: ...ess 0 Replacing the LCD Module 0 1 Position the LCD module on the lower case Figure 1 101 LCD Module 2 Secure LCD module with the two screws Figure 1 102 LCD Module Screws Table 3 27 Screws Step Screw...

Page 138: ...hine Maintenance 3 Route the antenna cables through their top side latches Figure 1 103 Antenna Cables Top Side Latches 4 Secure the antenna cables underneath the black tapes Figure 1 104 Antenna Cabl...

Page 139: ...Machine Maintenance 3 69 5 Secure the antenna cables to their base side latches Figure 1 105 Antenna Cables Base Side Latches...

Page 140: ...odule 0 1 Position the speaker module on the lower case Figure 1 106 Speaker Module 2 Secure the speaker module with the two screws Figure 1 107 Speaker Module Screws Table 3 28 Screws Step Screw Quan...

Page 141: ...at blade screwdriver to turn the socket screw clockwise to secure the CPU in place 3 Make sure the gold arrow on the corner of the CPU is aligned with the beveled corner of the socket The CPU will eas...

Page 142: ...d the CPU 2 Apply a small amount of thermal grease onto the center area of the CPU There is no need to spread the grease manually the force used during the installation of the thermal module is suffic...

Page 143: ...e screw sequence indicated on Figure 1 111 Figure 1 111 Thermal Module Screws 5 Connect the fan cable to the mainboard Figure 1 112 Fan Cable Table 3 29 Screws Step Screw Quantity Screw Type Thermal M...

Page 144: ...tion the RTC battery on the mainboard and then press down to secure it to the mainboard Make sure to secure the battery in place using double sided adhesive tape Figure 1 113 RTC Battery 2 Connect the...

Page 145: ...1 3 Turn the mainboard over and slide the mainboard toward the left side of the lower case with the I O ports of the mainboard extruding from their port holes then lower the mainboard in place 2 Note...

Page 146: ...mainboard with the port holes on the lower case Make sure the heatsink is positioned above the enclosure rib Figure 1 117 Mainboard 5 Secure the mainboard with the one screw Figure 1 118 Mainboard Scr...

Page 147: ...he mainboard Figure 1 119 Speaker Cable 7 Connect the LCD cable to the mainboard 1 and then secure the cable connection with the transparent tape 2 8 Connect the microphone cable to the mainboard 3 Fi...

Page 148: ...3 78 Machine Maintenance Replacing the TPM Module 0 1 Connect the TPM module to the mainboard 2 Press down lightly to seat the module Figure 1 121 TPM Module...

Page 149: ...om their port holes and then lower the USB board in place Press down to secure in place Figure 1 122 USB Board 2 Position the USB board cables on the lower case and then press down to secure the cable...

Page 150: ...a double sided adhesive tape on the back side of the fingerprint board Position the fingerprint board on the upper cover and press down to secure the board in place Figure 1 124 Fingerprint Board 2 Co...

Page 151: ...Attach a double sided adhesive tape on the back side of the touchpad board Position the touchpad on the upper cover and press down to secure the board in place Figure 1 125 Touchpad Board 2 Lower the...

Page 152: ...Touchpad Bracket Screws 4 Connect the touchpad and fingerprint board cables 1 and then close the connector latches 2 Figure 1 128 Touchpad and Fingerprint Board Cables Table 3 31 Screws Step Screw Qua...

Page 153: ...upper cover aligning the tabs in the cover 1 and then lower the board in place 2 Figure 1 129 Power Button Launch Board 2 Secure the power button launch board with two screws Figure 1 130 Power Butto...

Page 154: ...power button launch board as shown Figure 1 131 Power Button Launch Board Tape 4 Connect the power button launch board cable 1 and then close the connector latch 2 Press down on the cable to secure it...

Page 155: ...nd touchpad board cables are not caught underneath the upper cover 2 Align the upper cover with the lower case then press it down on all sides until it snaps into place Figure 1 133 Upper Cover 3 Conn...

Page 156: ...ard connectors 1 and then close the connector latches 2 Figure 1 135 Fingerprint Board and Touchpad Cables 5 Connect the power button launch board cable to the mainboard 1 and then close the connector...

Page 157: ...panel and turn the computer over so that the base is facing up 8 Secure the upper cover with the 22 screws Figure 1 138 Upper Cover Screws Base Side Table 3 33 Screws Step Screw Quantity Screw Type Up...

Page 158: ...3 88 Machine Maintenance 9 Insert the rubber pads onto the hinge corner screws Figure 1 139 Rubber Pads for the Top Corner Screws...

Page 159: ...rd Standoffs 2 Connect the keyboard cable to the mainboard 1 and then close the connector latch 2 3 Slide the keyboard toward palmrest aligning the tabs along the bottom edge of the keyboard with the...

Page 160: ...3 90 Machine Maintenance 5 Secure the keyboard with the two screws Figure 1 142 Keyboard Screws Table 3 35 Screws Step Screw Quantity Screw Type Keyboard Assembly M2 5 L7 2...

Page 161: ...lacing the WLAN Module 0 1 Insert the WLAN module at a 30 angle into the Mini Card slot Figure 1 143 WLAN Module 2 Secure the WLAN module with the one screw Figure 1 144 WLAN Module Screw Table 3 36 S...

Page 162: ...hould be attached to connector near the module screw the auxiliary antenna cable white should be attached to the connector near the lower case cable opening Figure 1 145 WLAN Module Antennas 4 Insert...

Page 163: ...Machine Maintenance 3 93 5 Secure the WLAN module cover with the one screw Figure 1 147 WLAN Module Cover Screw Table 3 37 Screw Step Screw Quantity Screw Type WLAN Module Cover Assembly M2 L4 1...

Page 164: ...until it clicks into place 2 The module is keyed so it can only be inserted in one direction If the module does not fit make sure that the notch in the module lines up with the tab in the memory slot...

Page 165: ...HDD into the HDD rubber holder Figure 1 150 HDD Rubber Holder 2 Stretch the HDD rubber holder over the rest of the hard drive so that all the corners around the hard drive are covered 1 and then slip...

Page 166: ...96 Machine Maintenance 3 Connect the HDD adapter cable to the HDD module Figure 1 152 HDD Adapter Cable 4 Lay down the hard drive in the HDD bay and then press down into place Figure 1 153 HDD Module...

Page 167: ...Machine Maintenance 3 97 5 Connect the HDD cable Figure 1 154 HDD Cable...

Page 168: ...n the base door into the slots on the lower case 1 and then press down the base door into place 2 Figure 1 155 Base Door 2 Secure the base door with the five screws Figure 1 156 Base Door Screws Table...

Page 169: ...Machine Maintenance 3 99 Replacing the ODD Module 0 1 Attach the ODD bezel to the optical drive Figure 1 157 ODD Bezel 2 Attach the bracket to the ODD Figure 1 158 ODD Bracket...

Page 170: ...the plastic holder to the ODD Figure 1 159 ODD Bracket 4 Secure the ODD plastic holder with the three screws Figure 1 160 ODD Plastic Holder Screws Table 3 39 Screws Step Screw Quantity Screw Type ODD...

Page 171: ...Machine Maintenance 3 101 5 Slide the optical drive into the drive bay until the ODD bezel is flush against the lower case Figure 1 161 ODD Module...

Page 172: ...intenance Replacing the Dummy Card 0 1 Insert the dummy card into the slot until it clicks into place Figure 1 162 Dummy Card 2 To replace the ExpressCard dummy card repeat step 1 Figure 1 163 Express...

Page 173: ...Battery Pack 0 1 Turn the computer over so that the base is facing up 2 Position the battery pack into the bay 1 and then press it down until it snaps into place 2 3 Slide the battery lock to the loc...

Page 174: ...3 104 Machine Maintenance...

Page 175: ...CHAPTER 4 Troubleshooting...

Page 176: ...9 Internal Speaker Failure 4 10 Microphone Failure 4 12 USB Failure 4 13 WLAN Failure 4 14 Bluetooth Failure 4 15 Card Reader Failure 4 16 Thermal Unit Failure 4 17 Other Functions Failure 4 18 Interm...

Page 177: ...ain as much detailed information as possible about the problem 2 If possible verify the symptoms by re creating the failure through diagnostic tests or repeating the operation that led to the problem...

Page 178: ...the computer and the outlet 3 Remove all surge protectors between the computer and the electrical outlet Plug the computer directly into a known serviceable electrical outlet 4 Disconnect the power an...

Page 179: ...following one at a time 1 Make sure that internal display is selected Switch between the internal and external display by pressing Fn F5 NOTE NOTE This hotkey may not apply to all models Refer to the...

Page 180: ...The same goes for when there is extensive pixel damage i e different colored spots in the same locations on the screen Perform the Removing the LCD Module and Removing the LCD Panel procedures describ...

Page 181: ...Run the Windows Memory Diagnostic from the operating system DVD and follow the on screen prompts 9 If the issue is still not resolved refer to the Online Support Information on page 8 3 LCD Failure 0...

Page 182: ...4 8 Troubleshooting Keyboard Failure 0 If the Keyboard fails perform the following one at a time Do not replace a non defective FRU Figure 4 4 Keyboard Failure...

Page 183: ...Troubleshooting 4 9 Touchpad Failure 0 If the Touchpad fails perform the following one at a time Do not replace a non defective FRU Figure 4 5 Touchpad Failure...

Page 184: ...Start Control Panel System and Maintenance System Device Manager Check the Device Manager to determine that The device is properly installed There are no red Xs or yellow exclamation marks There are...

Page 185: ...w right click on the Playback tab and select Show Disabled Devices clear by default 7 Select Speakers and click Configure to start Speaker Setup Follow the on screen prompts to configure the speakers...

Page 186: ...vices clear by default The microphone appears on the Recording tab 3 Right click on the microphone and select Enable 4 Select the microphone then click Properties Select the Levels tab 5 Increase the...

Page 187: ...Troubleshooting 4 13 USB Failure 0 If the USB fails perform the following one at a time Do not replace a non defective FRU Figure 4 8 USB Failure...

Page 188: ...4 14 Troubleshooting WLAN Failure 0 If the WLAN fails perform the following one at a time Do not replace a non defective FRU Figure 4 9 WLAN Failure...

Page 189: ...Troubleshooting 4 15 Bluetooth Failure 0 If the Bluetooth fails perform the following one at a time Do not replace a non defective FRU Figure 4 10 Bluetooth Failure...

Page 190: ...4 16 Troubleshooting Card Reader Failure 0 If the Card Reader fails perform the following one at a time Do not replace a non defective FRU Figure 4 11 Card Reader Failure...

Page 191: ...Troubleshooting 4 17 Thermal Unit Failure 0 If the Thermal Unit fails perform the following one at a time Do not replace a non defective FRU Figure 4 12 Thermal Unit Failure...

Page 192: ...4 18 Troubleshooting Other Functions Failure 0 1 Check if drives are functioning correctly 2 Check if external modules are functioning correctly 3 Change mainboard to check if current one is defective...

Page 193: ...whether a short circuit is suspected or whether the system is inoperative Perform the following procedures to isolate the failing FRU do not isolate non defective FRU NOTE NOTE Verify that all attach...

Page 194: ...ration Error 010 Memory Error at xxxx xxxx xxxxh R xxxxh W xxxxh 070 Real Time Clock Error 071 CMOS Battery Bad 072 CMOS Checksum Error 110 System is disabled An incorrect password was entered No erro...

Page 195: ...alternate registers with initial POST values 12h Restore CPU control word during warm boot 13h Initialize PCI Bus Mastering devices 14h Initialize keyboard controller 16h 1 2 2 3 BIOS ROM checksum 17...

Page 196: ...OS 49h Initialize PCI bus and devices 4Ah Initialize all video adapters in system 4Bh QuietBoot start optional 4Ch Shadow video BIOS ROM 4Eh Display BIOS copyright notice 50h Display CPU type and spee...

Page 197: ...all external parallel ports 85h Initialize PC compatible PnP ISA devices 86h Re initialize onboard I O ports 87h Configure Motherboard Configurable Devices optional 88h Initialize BIOS Area 89h Enable...

Page 198: ...system B4h 1 One short beep before boot B5h Terminate QuietBoot optional B6h Check password optional B9h Prepare Boot BAh Initialize DMI parameters BBh Initialize PnP Option ROMs BCh Clear parity che...

Page 199: ...IOS E8h Set Huge Segment E9h Initialize Multi Processor EAh Initialize OEM special code EBh Initialize PIC and DMA ECh Initialize Memory type EDh Initialize Memory size EEh Shadow Boot Block EFh Syste...

Page 200: ...Codes Range Description 0x00 0x1f OEM Components These values are reserved for OEM components 0x20 0x9f These values are reserved for SecureCore Tiano core components POSTCODE_CC_VARIABLE_SERVICES 0x2...

Page 201: ...2_MOUSE 0x46 POSTCODE_CC_PS2_KEYBOARD 0x47 POSTCODE_CC_EHCI 0x48 POSTCODE_CC_XHCI 0x49 POSTCODE_CC_UHCI 0x4a POSTCODE_CC_OHCI 0x4b POSTCODE_CC_USB_KEYBOARD 0x4c POSTCODE_CC_USB_MOUSE 0x4d POSTCODE_CC_...

Page 202: ...xb0 0xbf These values are reserved for future expansion 0xc0 0xcf These values are reserved for core chipset drivers north bridge south bridge and CPU and are assigned by chipset family POSTCODE_CC_ME...

Page 203: ...STCODE_PC_IPL_S3 0xe5 Entering DXE IPL s S3 boot path POSTCODE_PC_S3_OS 0xe6 Exiting S3 boot path back to the OS POSTCODE_PC_IPL_RECOVERY 0xe7 Entering DXE IPL s recovery boot path POSTCODE_PC_IPL_EXI...

Page 204: ...art member function of the component s instance of the Driver Binding protocol was called POSTCODE_PC_COMP_STOP 0x07 The Stop member function of the component s instance of the Driver Binding protocol...

Page 205: ...CHAPTER 5 Jumper and Connector Locations...

Page 206: ...5 2 Mainboard Layout 5 3 Clearing Password Check and BIOS Recovery 5 7 Clearing the BIOS Passwords 5 7 Performing a BIOS Recovery 5 8...

Page 207: ...onnector 11 SIM1 3G card connector 2 PLED1 CHLED1 HLED1 Status indicators 12 BTNCN1 Power button board cable connector 3 CARD1 Memory card reader 13 KB1 Keyboard cable connector 4 TPMCN1 Trusted Platf...

Page 208: ...d Bottom No Code Component No Code Component 1 LOUT1 Headphones speaker line out jack 11 DOCK1 Docking device connector 2 MICIN1 Microphone jack 12 BAT1 Battery connector 3 DM2 DDR3 slot 2 13 RTC1 RTC...

Page 209: ...tery connector 10 DCIN1 DC input cable connector Table 5 3 Mainboard Bottom No Code Component No Code Component 1 LOUT1 Headphones speaker line out jack 11 DCIN1 DC input cable connector 2 MICIN1 Micr...

Page 210: ...HDD1 HDD connector 16 FAN1 Fan connector 7 PCH1 Mobile Intel Express Chipset 17 CPU1 CPU socket 8 BAY1 ODD connector 18 3GLAN1 3G network module slot 9 VGA1 NVIDIA N13PGS chipset 19 EXPC1 Express car...

Page 211: ...locate the G2201 gap 4 Use an electrical conductivity tool to short the two contacts on the hardware gap together 5 While resting the tool on the two contacts plug one end of the AC adapter into the...

Page 212: ...OS 1 Prepare a removable USB flash drive Note that all data in the USB flash drive will be cleared during the creation of the crisis disk 2 Set up a computer running the Windows XP Vista or 7 operati...

Page 213: ...ystem will force the BIOS to execute the boot block program To perform a BIOS recovery 1 Shut down the BIOS failed computer 2 Connect the USB flash drive containing the Crisis Recovery disk files to t...

Page 214: ...5 10 Jumper and Connector Locations...

Page 215: ...CHAPTER 6 FRU List...

Page 216: ...6 2 TravelMate P643V P643M P643MG Exploded Diagrams 6 4 Main Assembly 6 4 LCD Assembly 6 5 FRU List 6 7...

Page 217: ...ional web or channel Part number changes will not be noted on the printed Service Guide For ACER AUTHORIZED SERVICE PROVIDERS the Acer office may have a DIFFERENT part number code from those given in...

Page 218: ...oded Diagram Table 6 1 Main Assembly Exploded Diagram No Description Part Number 1 TP board bracket 56 V4M01 001 2 Upper case 60 V7HN1 00 3 Power button launch board 55 V7HN1 001 4 Keyboard KB I140A 3...

Page 219: ...r 55 V7HN1 003 11 HDD rubber holder 42 V7EN1 002 12 HDD module KH 32008 024 13 USB board 55 V7HN1 002 14 Base door 42 V7HN1 001 15 Thermal module 60 V7JN1 001 16 Mainboard NB V7J11 001 17 Lower case 6...

Page 220: ...er 1 LCD panel 6M V7HN1 002 2 LCD bezel 60 V7HN1 004 3 Camera board 56 18012 461 4 LCD cover 60 V7HN1 005 5 LCD right hinge support 33 V4801 004 6 LCD right hinge bracket 34 4NP02 011 7 LCD webcam coa...

Page 221: ...TERY BTY PACK LI SANYO 6C 3 0AH SANYO BT 00605 073 BTY PACK LI PANA 6C 3 0AH PANA BT 00603 129 BTY PACK LI SANYO 9C 3 0AH SANYO BT 00903 013 BOARDS WLAN BROADCOM 43228 20702 54 03384 011 WLAN 3RD WIFI...

Page 222: ...40 FP FFC HAM 50 4NP18 001 BAD40 TP FFC 50 4NP06 013 BAD40 TP FFC HAM 50 4NP06 003 BAD40 CR USB30 FFC CABLE JH 50 4SA01 011 BAD40 CR USB30 FFC CABLE HB 50 4SA01 001 BAD40 HC_USB_FFC_20PIN_JH 50 4SA04...

Page 223: ...571 CORD CHINA 10A 250V 3P 27 01518 701 CORD 10A 250V 3P CHINA BK 27 01518 591 CORD EUR 250V 3P BK 27 01518 731 CORD 16A 250V 3P EUR BK 27 01518 601 CORD ITALY 10A 250V 3P BK 27 01518 711 CORD 10A 25...

Page 224: ..._WIRELESS_DOOR_ASSY 42 V4M01 002 ASSY 60 BAD40 HC BIG DOOR 42 V7HN1 001 ASSY 60 BAD40 HC LCASE 60 V7HN1 001 BAD40_SPK 23 V4801 001 ASSY 60 BAD40 HC UCASE 60 V7HN1 002 BAD50_ODD_CHASSIS 42 V4B01 005 BA...

Page 225: ...HICONY 56 18006 461 CAMERA 1 0M_HD HF1016 A21U OV02 SUYIN 56 18007 A61 CPU PROCESSOR IC CPU INTEL CORE I5 I5 2450M PGA 2 5G KC 24501 DMP IC CPU IVY BRIDGE I5 3210M 2 5GHZ DC 3MB KC 32101 DMP IC CPU IV...

Page 226: ...SINK ASSY THM UMA SUNON SUNON BAD40 CR 60 V7HN1 003 ASSY THM DIS SUNON SUNON BAD40 CR 60 V7JN1 001 KEYBOARD KB 9Z N6HPW 10A ARABIC BW4P KB I140A 325 KB 9Z N6HPW 11A BELIGIAN 89KEY BW4P KB I140A 326 KB...

Page 227: ...DISH BW4P KB I140A 345 KB 9Z N6HPW 100 SWISS 89KEY BW4P KB I140A 346 KB 9Z N6HPW 103 THAI BW4P KB I140A 347 KB 9Z N6HPW 10T TURKISH 89KEY BW4P KB I140A 348 KB 9Z N6HPW 102 TAIWAN KB I140A 329 KB 9Z N6...

Page 228: ...OPHONE MICROPHONE BAD40HC MEMS ARRAY TRANSOUND RESERVE MISCELLANEOUS BAD40HC HDD DASP MYLAR 47 V7EN1 001 BEZLE SCREW RUBBER BAD50 47 V4B01 001 BAD40 RUBBER FOOT SCREW RUBBER 47 V4801 001 BAD40_DOCKING...

Page 229: ...CHAPTER 7 Test Compatible Components...

Page 230: ...7 2 Microsoft Windows 7 Environment Test 7 4...

Page 231: ...department All of its system functions are tested under Windows 7 environment Refer to the following lists for components adapter cards and peripherals which have passed these tests Regarding configur...

Page 232: ...smatic 3S2P SANYO 6 cell 1420mAh 2nd COMMON BT 00603 127 60001921 SANYO 6CELL3 0 Battery SANYO AS10D BQ8055 long cycle life Li Ion 3S2P SANYO 6 cell 6000mAh Main COMMON ID AS10D3E BT 00603 129 6000153...

Page 233: ...GB LMT 128M3M LF HF firmware VYC2 KF 1280L 001 10001079 SYNNEX FM0128S 3 Flash Disk SANDISK SSD NAND 128GB SD5SF2 128G X100 LF HF KN 1280D 002 60003544 LITE ON OPT FM0256S 3 Flash Disk LITE ON SSD NAN...

Page 234: ...4K HDD HGST 2 5 5400rpm 500GB HTS545050A7E380 Jaguar B7 0J23335 500G P SATA 8MB LF HF F W DA4837 KH 50007 023 60001994 WD N500GB5 4KS_4K HDD WD 2 5 5400rpm 500GB WD5000BPVT 22HXZT3 ML375M AF2 375G P 4...

Page 235: ...y LF HF KN 2GB00 004 60001993 NANYA SO2GBIII 13 Memory NANYA SO DIMM DDRIII 1333 2GB NT2GC64B88G0NS CG LF HF KN 2GB03 025 60002050 MICRON SG SO2GBIII 13 Memory MICRON SO DIMM DDRIII 1333 2GB MT8KTF256...

Page 236: ...HMT351S6CFR8C H9 LF HF 256x8 38nm KN 4GB0G 012 ODD 60001535 PANASONIC NSM8XS 9 5 ODD PANASONIC Super Multi DRIVE 9 5mm Tray DL 8X UJ8A2 LF W O bezel SATA with Zero Power HF Windows7 KU 00807 076 6000...

Page 237: ...Y2010 Acer Legend Painting KB I140A 265 LAN 60001948 BROADCOM BCM5776 1 Broadcom BCM57761 NI 22400 056 10001067 INTEL Lewisville LM Lan Intel LAN 82579LM vPro KI LWS01 LM1 WiFi Antenna 10000105 WNC PI...

Page 238: ...LAN 10001018 HON HAI 3rd WiFi 2x2 AGN BT4 0 Foxconn 3rd WiFi 2x2 AGN BT4 0 Broadcom 43228 20702 WiFi 43228 2x2 DB AGN BT4 0 20702 NI 23600 100 10001018 HON HAI 3rd WiFi 2x2 AGN BT4 0 Foxconn 3rd WiFi...

Page 239: ...1 MISC W7PR64 XEM Microsoft OS Win7 Pro W7PR64XEM CD W7P01 020 10000981 MISC W7PR64 XIN Microsoft OS Win7 Pro W7PR64XIN CD W7P01 012 10000981 MISC W7PR64 XRU Microsoft OS Win7 Pro W7PR64XRU CD W7P01 0...

Page 240: ...7 12 Test Compatible Components...

Page 241: ...CHAPTER 8 Online Support Information...

Page 242: ...8 2...

Page 243: ...section users can download information on all of Acer s Notebook Desktop and Server models including Service guides for all models Bios updates Software utilities Spare parts lists TABs Technical Ann...

Page 244: ...8 4 Online Support Information...

Reviews: