


Chapter 1
15
Using the System Utilities
Acer GridVista (dual-display compatible)
NOTE:
This feature is only available on certain models.
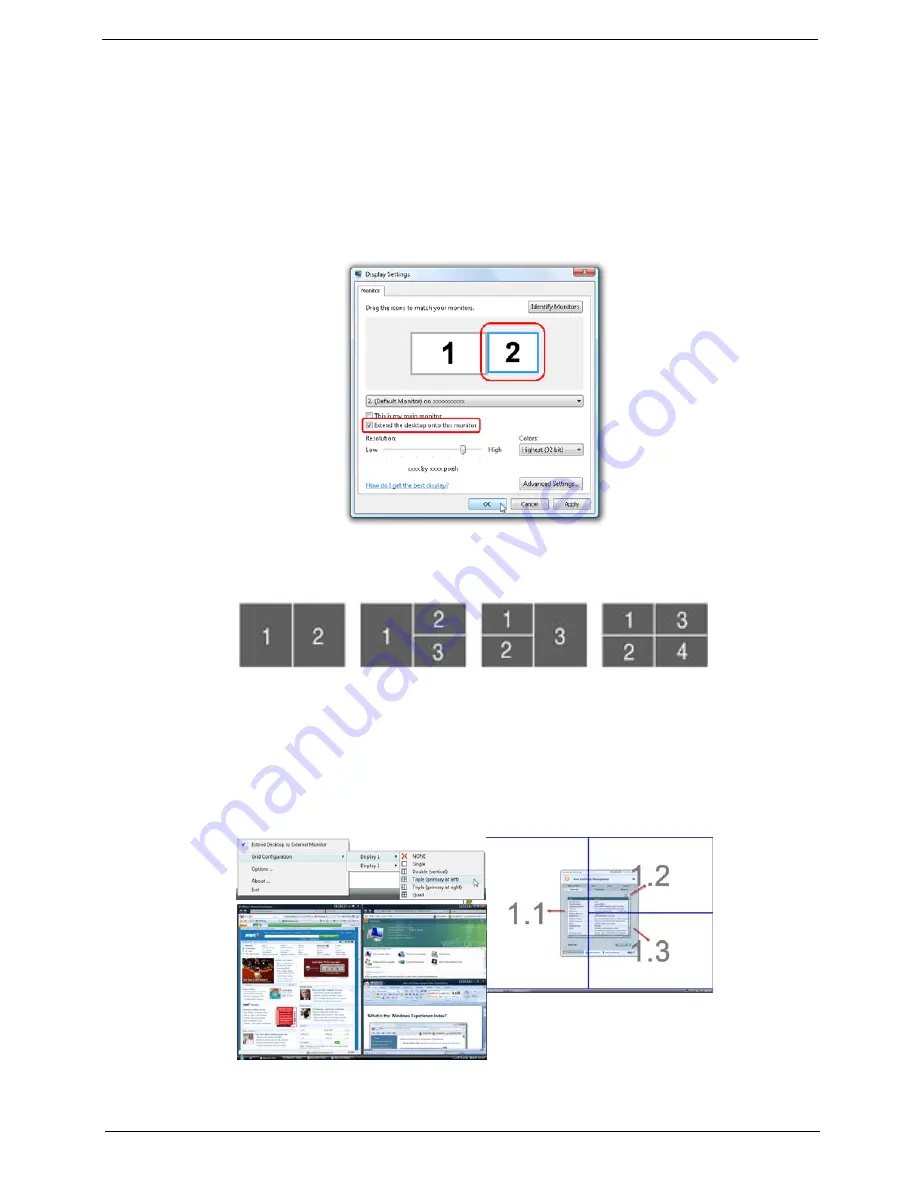
To enable the dual monitor feature of the notebook, first ensure that the second monitor is connected, then
select
Start, Control Panel, Display
and click on
Settings
. Select the secondary monitor
(2)
icon in the
display box and then click the check box
Extend my windows desktop onto this monitor
. Finally, click
Apply
to confirm the new settings and click
OK
to complete the process.
Acer GridVista is a handy utility that offers four pre-defined display settings so you can view multiple windows
on the same screen. To access this function, please go to
Start
´
All Programs
and click on
Acer GridVista
.
You may choose any one of the four display settings indicated below:
Double (vertical), Triple (primary at left), Triple (primary at right), or Quad Acer Gridvista is dual-display
compatible, allowing two displays to be partitioned independently.
Acer Gridvista is dual-display compatible, allowing two displays to be partitioned independently.
AcerGridVista is simple to set up:
1.
Run Acer GridVista and select your preferred screen configuration for each display from the task bar.
2.
Drag and drop each window into the appropriate grid.
3.
Enjoy the convenience of a well-organized desktop.
NOTE:
Please ensure that the resolution setting of the second monitor is set to the manufacturer's
recommended value.
Summary of Contents for Aspire 8935G
Page 6: ...VI ...
Page 44: ...34 Chapter 1 ...
Page 62: ...52 Chapter 2 ...
Page 78: ...68 Chapter 3 4 Remove the TV Tuner as shown ...
Page 80: ...70 Chapter 3 4 Detach the WLAN Module from the WLAN socket ...
Page 97: ...Chapter 3 87 5 Lift the board clear of the Upper Cover ...
Page 100: ...90 Chapter 3 5 Lift the Media Board clear of the Upper Cover ...
Page 106: ...96 Chapter 3 8 Lift the board clear of the Upper Cover ...
Page 109: ...Chapter 3 99 5 Remove the Bluetooth Board from the Lower Cover ...
Page 118: ...108 Chapter 3 4 Using both hands lift the Subwoofer clear of the Lower Cover ...
Page 155: ...Chapter 3 145 3 Press down around the perimeter of the bezel to secure it in place ...
Page 173: ...Chapter 3 163 4 Connect the Bluetooth cable to the Mainboard ...
Page 184: ...174 Chapter 3 4 Connect the Volume Control FFC to the Media Board and close the locking latch ...
Page 202: ...192 Chapter 3 2 Tighten the seven captive screws in the Lower Door ...
Page 204: ...194 Chapter 3 ...
Page 239: ...Chapter 6 229 ...
Page 316: ...306 Appendix C ...
Page 320: ...310 ...