background image

59

Meter Settings

5

Last Result

Last Result


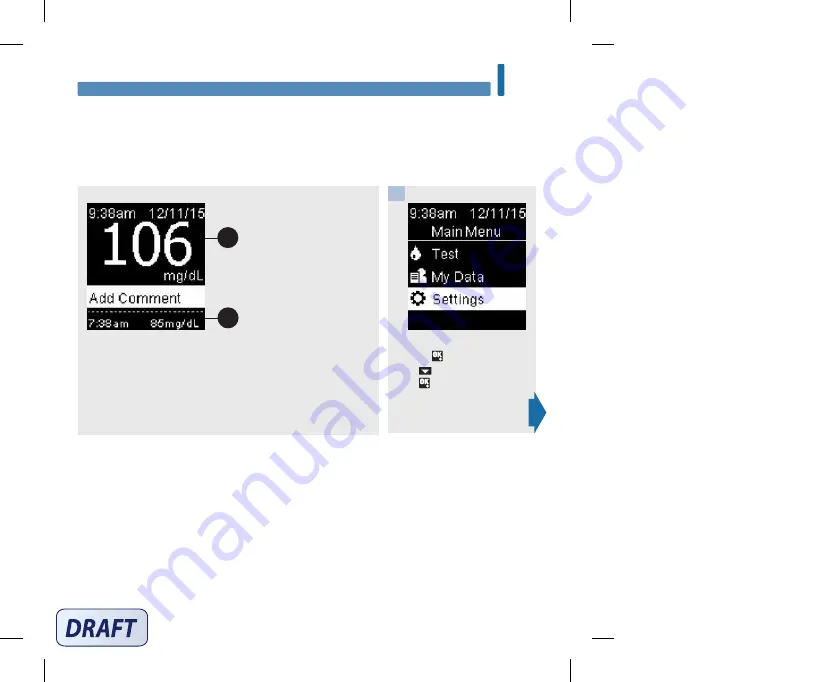
Select whether the previous blood glucose result appears with the current blood glucose result.  

Test results older than 24 hours do not appear. 

Turn the meter on by briefly 

pressing  . From 

Main Menu

press   to highlight 

Settings

Press  . 

Off – only the current blood glucose result 

appears. 

On – the previous blood glucose result 

2

 appears with the current 

blood glucose result. 

1

2

1

54988_08100918001_EN.indb   59

9/30/16   5:04 PM

Summary of Contents for Guide

Page 1: ...e may not print or view at 100 Die lines and color breaks do not print Holding Area text box and rules do not print Roche USA 54988 V2 1 08100918001 Black Roche USA 54988 V2 2 08100918001 PMS 307 Blood Glucose Monitoring System 54988_08100918001_EN indb 1 9 30 16 5 04 PM ...

Page 2: ...54988_08100918001_EN indb 2 9 30 16 5 04 PM ...

Page 3: ...m 9 Chapter 2 The Accu Chek FastClix Lancing Device 19 Chapter 3 Blood Glucose Tests 23 Chapter 4 Control Tests 37 Chapter 5 Meter Settings 43 Chapter 6 Review Your Data 63 Chapter 7 Wireless Communication and Meter Pairing 81 Chapter 8 Meter and Lancing Device Cleaning and Disinfecting 95 Chapter 9 Meter Maintenance and Troubleshooting 103 Chapter 10 Technical Information 113 Chapter 11 License a...

Page 4: ...54988_08100918001_EN indb 4 9 30 16 5 04 PM ...

Page 5: ...f diabetes mellitus nor for neonatal use Alternative site testing should be done only during steady state times when glucose is not changing rapidly Accu Chek Guide control solutions are for use with the Accu Chek Guide Blood Glucose Monitoring System to check that the meters and test strips are working together properly and that the test is performing correctly The system includes Accu Chek Guide...

Page 6: ...s of 5 mg dL may cause inaccurate results If you are not sure please check with your doctor Do not use the meter system to measure blood glucose in people who are experiencing cardiovascular collapse severe shock or decreased peripheral blood flow Do not use this system during xylose absorption test Not for use on critically ill patients patients in shock dehydrated patients or hyperosmolar patien...

Page 7: ...elf or Others WARNING DO NOT CHANGE YOUR THERAPY BASED ON A TEST RESULT THAT DOES NOT MATCH HOW YOU FEEL OR IF YOU BELIEVE THAT YOUR TEST RESULT COULD BE INCORRECT It is always a good idea to have a back up testing method available Failure to test could cause a delay in therapy decisions and lead to a serious medical condition Examples of back up testing methods include a back up meter or testing ...

Page 8: ...ing the meter and lancing device destroys most but not necessarily all bloodborne pathogens 3 If the meter is being operated by a second person who is providing testing assistance to the user the meter and lancing device should be cleaned and disinfected prior to use by the second person Disinfect the meter and lancing device before allowing anyone else to handle them Do not allow anyone else to t...

Page 9: ...d mean the same thing Special Information for Caregivers Consult your healthcare professional to determine if it is appropriate for your child to be taught how to use the meter system or any other medical products Some people with diabetes do not experience symptoms of low blood glucose hypoglycemia Others such as children or people who are unconscious or have certain disabilities may not be able ...

Page 10: ... cap from closing properly do not use the test strips Contact the Accu Chek Customer Care Service Center Damaged test strips can cause inaccurate results which could lead to improper therapy The meter test strips and control solution are only for use outside the body in vitro Do not eat the test strips Do not swallow or inject the control solution or use the control solution for any purpose other ...

Page 11: ...ecrease numbers 4 Power Set OK Button Turns meter on or off and sets options 5 Test Strip Slot with Light Insert test strip here 6 Battery Door Flip open to replace batteries 7 Micro USB Port Transfers data from the meter to a computer PC 8 Test Strip Ejector Press to remove test strip The Accu Chek Guide Meter Front View 2 Chapter 1 Your New System Back View Side View 3 1 6 7 8 4 5 54988_08100918...

Page 12: ... Yellow Edge Touch blood drop or control solution here 12 Control Solution Bottle 13 Batteries 14 USB Cable Connects the meter to a PC Some items may not be included in the kit They are a separate purchase for example Test Strip 9 10 11 12 14 13 54988_08100918001_EN indb 10 9 30 16 5 04 PM ...

Page 13: ...enetration depth 3 Penetration Depth Indicator Points to depth setting 4 Lever Advance to a new lancet 5 Lancet Counter Window Shows number of available lancets 6 Release Button Press to prime and prick 7 Lancet Drum Contains 6 lancets NOTE Some items may be sold separately 1 2 7 5 6 4 3 54988_08100918001_EN indb 11 9 30 16 5 04 PM ...

Page 14: ...ion Back Button Return to the previous display Return to the previous field Up Arrow and Down Arrow Buttons Navigate up and down in a menu Increase or decrease a number Power Set OK Button Press briefly to turn the meter on Press and hold to turn the meter off Press to select an option Press to move to the next field or display Press to save an option With the meter off press and hold to check the...

Page 15: ...menu options listed beneath the last option Press on the meter to view the options There are more menu options listed above the first option Press on the meter to view the options There are more menu options listed above and below the options Press or on the meter to view the options 1 2 3 4 54988_08100918001_EN indb 13 9 30 16 5 04 PM ...

Page 16: ...y Description Highlighted option Test Press to enter the Test menu Highlighted field Hour Press or to increase or decrease the hour Press to set the hour and move to the minutes field 54988_08100918001_EN indb 14 9 30 16 5 04 PM ...

Page 17: ...er display Symbols Description Above target range After meal Bedtime Before meal Below target range Blood glucose test Checkmark Control test OK Selected option or setting Control bottle Control test not OK Edit Error Fasting 54988_08100918001_EN indb 15 9 30 16 5 04 PM ...

Page 18: ...16 Your New System 1 Symbols Description Flight mode Help Low battery My data No comment Other Overall Settings Test reminder Warning Within target range 54988_08100918001_EN indb 16 9 30 16 5 04 PM ...

Page 19: ...the meter on by briefly pressing Language appears Press or to highlight the language 1 Press to set the desired language and return to Main Menu 2 NOTE If you select the wrong language and cannot correct it contact the Accu Chek Customer Care Service Center at 1 800 858 8072 54988_08100918001_EN indb 17 9 30 16 5 04 PM ...

Page 20: ...18 Your New System 1 54988_08100918001_EN indb 18 9 30 16 5 04 PM ...

Page 21: ...e white end You cannot reuse a used lancet drum Do not remove the lancet drum until you have used all 6 lancets The penetration depth indicator on the comfort dial shows the current depth setting The higher the number the deeper the penetration The best depth setting is the lowest number that lets you get enough blood for a test Try different depth settings to find the one that is right for you Fo...

Page 22: ...cet The lancet counter shows a number 6 meaning you have 6 new lancets remaining 3 NOTE Once the lancet drum is inserted into the lancing device do not remove the lancet drum until completely used The lancet drum cannot be reused once it has been removed from the lancing device WARNING You must not insert the lancet drum into the lancing device and simultaneously press the release button or hold t...

Page 23: ...liding the lever forward and back all the way The number in the lancet counter decreases by 1 The lancet counter window shows the number of remaining lancets 3 NOTE ALWAYS use a new sterile lancet each time you test to avoid infection For safety reasons once you advance to a new lancet you cannot go back to a used lancet NEVER reuse a lancet NEVER share your lancing device with anyone 54988_081009...

Page 24: ...has been used Throw the old lancet drum away Always discard according to local regulations 1 2 Insert a new lancet drum white end first until it clicks firmly into place Slide the cap back on until it stops by aligning the notch on the cap with the notch on the lancing device 3 Changing the Lancet Drum When you have used the sixth and last lancet change the lancet drum 54988_08100918001_EN indb 22...

Page 25: ...e back label of the meter shows the unit of measurement If the meter shows the wrong unit contact the Accu Chek Customer Care Service Center at 1 800 858 8072 The correct unit of measure in the US is mg dL If you do not know which unit of measurement is correct for you contact your healthcare professional Using the wrong unit of measurement may cause misinterpretation of your actual blood glucose ...

Page 26: ... test strips and produce incorrect results Store the unused test strips in their original container with the cap tightly closed Discard the test strips if they are past the Use By date printed on the test strip container If the Use By date is missing or cannot be read do not use the test strips Contact the Accu Chek Customer Care Service Center at 1 800 858 8072 Refer to the test strip package ins...

Page 27: ... Test with Blood from Your Fingertip Refer to the Important Safety Information section at the beginning of this manual NOTE Before you perform your first blood glucose test set up the meter correctly You need the meter a test strip and a lancing device with a lancet drum loaded to perform a blood test A blood glucose test cannot be performed while the meter is connected to a PC with a USB cable Th...

Page 28: ...the comfort dial Check the Use By date on the test strip container Do not use test strips past the Use By date Remove a test strip from the test strip container Close the cap tightly 2 3 4 Insert the metallic end of the test strip into the meter The meter turns on Preparing to test appears 5 54988_08100918001_EN indb 26 9 30 16 5 04 PM ...

Page 29: ...a blood drop 7 8 Touch the yellow edge of the test strip to the blood drop Remove your finger from the test strip when Analyzing appears Do not put blood on top of the test strip 9 The test result appears on the display You have the option of adding a comment to the test result by pressing OR proceed to Step 13 to complete the test 10 When Apply drop appears obtain a blood drop 6 54988_08100918001...

Page 30: ...s or to set the comment and return to Main Menu Or to change the comment press to select the comment Press to return to Add Comment 11 12 Remove and discard the used test strip by pulling the test strip out of the meter or by pushing the test strip ejector on the side of the meter 13 Press here to eject test strip Advance to the next lancet Wash hands thoroughly with soap and water 14 15 54988_081...

Page 31: ...gher than the measurement range of the system See the Unusual Blood Glucose Results section of this chapter Blood Glucose Warnings If your blood glucose result is outside the measurement range of the meter a warning is displayed Press to acknowledge the LO or HI warning OR the meter automatically moves to the LO or HI result display 54988_08100918001_EN indb 29 9 30 16 5 04 PM ...

Page 32: ...important to have the correct time and date set in the meter Having the correct time and date setting helps ensure accurate interpretation of information by you and your healthcare professional You may add comments to blood glucose results to help you and your healthcare professional analyze patterns detected by the meter see the Patterns section in the chapter Meter Settings for details If Patter...

Page 33: ...lect After breakfast lunch dinner or snack see the following page for adding comments with Patterns On Fasting Select Fasting for no caloric intake for at least 8 hours Bedtime Other comment You can use this comment to mark an event such as an AST result or exercise No entry 1 You do not want to add a comment 2 You want to remove a comment for the current blood glucose result American Diabetes Ass...

Page 34: ...lt is displayed on the screen with Add Comment highlighted Press to add a comment The Add Comment menu appears Press to highlight the desired comment The example here is Before meal Press to select the comment If Patterns feature is On If Patterns is On and you select Before meal or After meal press to select a specific meal Breakfast Lunch Dinner or Snack Press to set the selected meal for the te...

Page 35: ...nges faster in your fingertip than in the alternate sites These differences may cause you to misinterpret your actual blood glucose level leading to improper therapy and potential adverse health effects Read the next section before you try testing from alternate sites You may perform a palm or upper arm test immediately before a meal while fasting You may NOT perform a palm or upper arm test up to...

Page 36: ...llow your healthcare professional s instructions or call your healthcare professional immediately NOTE Always follow your healthcare professional s instructions For example if your healthcare professional has advised you to immediately treat a low blood glucose result such as by eating something then do that first WARNING Do not change your treatment because of one blood glucose result NEVER ignor...

Page 37: ...oes not match how you feel follow the steps in Unusual Blood Glucose Results Comparing Your Meter Result to a Laboratory Result A common question is how the blood glucose results on the meter compare to the laboratory results Your blood glucose can change quickly especially after eating taking medication or physical activity If you test yourself in the morning then go to your healthcare profession...

Page 38: ...36 Blood Glucose Tests 3 54988_08100918001_EN indb 36 9 30 16 5 04 PM ...

Page 39: ...after use Write the date you open the control solution bottle on the bottle label The control solution must be discarded 3 months from the date the control solution bottle was opened discard date or on the Use By date on the bottle label whichever comes first Do not use control solution that is past the Use By or discard date Refer to the control solution package insert for control solution storag...

Page 40: ...he test strip container Do not use test strips past the Use By date Remove a test strip from the test strip container Close the cap tightly 1 2 Insert the metallic end of the test strip into the meter Place the meter on a flat surface The meter turns on Preparing to test appears Apply drop appears 3 54988_08100918001_EN indb 38 9 30 16 5 04 PM ...

Page 41: ... Wipe the tip of the bottle with a tissue Squeeze the bottle until a tiny drop forms at the tip 5 Touch the drop to the yellow edge of the test strip Do not put control solution on top of the test strip Analyzing appears when there is enough control solution in the test strip 6 54988_08100918001_EN indb 39 9 30 16 5 04 PM ...

Page 42: ...the control level you tested If you do not select a level the control result is saved without a control level Press 7 Within range and appear if the control result is within range Out of range and appear if the control result is out of range 8 or 54988_08100918001_EN indb 40 9 30 16 5 04 PM ...

Page 43: ...ou can also test a Level 2 control A set of Level 1 and Level 2 control solutions is available for purchase The ranges for Level 1 and Level 2 control solutions are printed on the test strip container label The meter turns off 90 seconds after a successful test or 15 seconds after the test strip is removed provided no other action is taken 54988_08100918001_EN indb 41 9 30 16 5 04 PM ...

Page 44: ...t strip and a fresh drop of control solution Were the caps on the test strip container and the control solution bottle always closed tightly Replace the test strips or control solution if you think either was uncapped for some time Repeat the control test Was the test strip used immediately after it was removed from the test strip container Repeat the control test with a new test strip and a fresh...

Page 45: ...althcare professional for the appropriate target range for you Off no target range arrow symbols appear with blood glucose result Patterns is Off see the Patterns section of this chapter for details 70 160 mg dL pre set target range Single Range blood glucose results are marked as above within or below range based on the single target range set in the meter Before Meal Range 70 110 mg dL pre set t...

Page 46: ...d you to test Post Meal On Off Edit time On reminds you to perform an after meal blood glucose test Last Result On Off Select whether the previous blood glucose result within the past 24 hours appears with the current blood glucose result On the previous blood glucose result appears with the current blood glucose result Off only the current blood glucose result appears Language Select the language...

Page 47: ...n Menu press to highlight Settings Press 1 Time Date is highlighted Press 2 Press or to adjust each field Press to set and proceed to the next field Set am or pm if necessary Press to save and return to the previous menu 3 Time Date 54988_08100918001_EN indb 45 9 30 16 5 04 PM ...

Page 48: ...lution to the test strip when enough blood or control solution is drawn into the test strip when the blood glucose or control test is complete when the meter is turned on when a button is pressed when it is time to perform a test if Reminders or Post Meal reminders are On when the batteries are inserted when there are no stored blood glucose results or there is an invalid record in the logbook whe...

Page 49: ...r details 2 Ranges Set lower limits and upper limits for Before meal and After meal target ranges You must mark your blood glucose results with a comment for the meter to detect above within or below Before Meal or After Meal test results see the Adding Comments to Blood Glucose Results section in the chapter Blood Glucose Tests for details You will be prompted to turn on Patterns if desired see t...

Page 50: ... and move to the next field Continue to set the upper limit for the Before Meal target range and the lower and upper limits for the After Meal target range Press Press or to highlight Off Single Range or 2 Ranges Press to select an option the example here is 2 Ranges 3 5 4 Turn the meter on by briefly pressing From Main Menu press to highlight Settings Press 1 Press to highlight More Options Press...

Page 51: ...return to the previous menu 6 The meter may prompt you to turn on Patterns Press or to highlight Yes or No Press to set the option and return to the previous menu see the Patterns section of this chapter for details Target Ranges 54988_08100918001_EN indb 49 9 30 16 5 04 PM ...

Page 52: ...tern test results with the same comment are detected within a 7 day period The meter does NOT detect a pattern for the Other comment added to blood glucose results It is very important to have the correct time and date set in the meter Having the correct time and date setting helps ensure accurate interpretation of information by you and your healthcare professional Only blood glucose results mark...

Page 53: ...ht Settings Press 1 This message appears if Target Ranges is Off Press to highlight Yes Press To turn Patterns Off select No Press to return to Patterns Target Ranges appears on the display see the Target Ranges section of this chapter for details on setting target ranges Press to highlight On Press to move to the option Press 4 54988_08100918001_EN indb 51 9 30 16 5 04 PM ...

Page 54: ...detected with a blood glucose result a message appears on the display Press to select Details to view the blood glucose results that make up that pattern Press to highlight View Later Press to return to the previous screen or 54988_08100918001_EN indb 52 9 30 16 5 04 PM ...

Page 55: ...icating to a Continua Certified manager do not beep if the meter s beeper is set to off do not appear beep if the batteries need to be replaced Set Reminders Reminder times are pre set in the meter for 8 00 am 12 00 pm 6 00 pm and 10 00 pm You may change reminder times by following the instructions below If a general test Reminder is set for the same time as a Post Meal reminder the Post Meal remi...

Page 56: ...pre set reminder time appears Press or to select On or Off Press to move to the option To change the Reminder time shown Press to highlight Edit time Press Press or to adjust each field Press to move to the next field Press to return to the previous menu 4 5 Patterns 54988_08100918001_EN indb 54 9 30 16 5 04 PM ...

Page 57: ... and automatically set to On To turn the reminder off press to highlight Off Press to return to Reminders The reminder time appears Press to continue to set additional reminders or press to return to More Options 6 7 Reminders 54988_08100918001_EN indb 55 9 30 16 5 04 PM ...

Page 58: ... USB cable do not appear beep if the meter is connected and communicating to a Continua Certified manager do not beep if the meter s beeper is set to off do not appear beep if the batteries need to be replaced Set Post Meal Reminders Adding a Before Meal comment to a blood glucose result sets a Post Meal reminder in the meter Marking blood glucose results with a Post Meal comment provides more inf...

Page 59: ... Meal Reminders Turn the meter on by briefly pressing From Main Menu press to highlight Settings Press Press to highlight More Options Press Press to highlight Post Meal Press 1 2 3 54988_08100918001_EN indb 57 9 30 16 5 04 PM ...

Page 60: ...Press to highlight Edit time Press Press or to highlight 1 hour 1 5 hours or 2 hours after a meal for Post Meal reminders to occur Press to move to the option Press to set and return to the previous menu 4 5 6 Post Meal Reminders 54988_08100918001_EN indb 58 9 30 16 5 04 PM ...

Page 61: ...se result Test results older than 24 hours do not appear Turn the meter on by briefly pressing From Main Menu press to highlight Settings Press Off only the current blood glucose result 1 appears On the previous blood glucose result 2 appears with the current blood glucose result 1 2 1 54988_08100918001_EN indb 59 9 30 16 5 04 PM ...

Page 62: ...ht More Options Press Press to highlight Last Result Press 2 3 Press or to highlight On or Off Press to move to the option Press to set the option and return to the previous menu 4 Last Result 54988_08100918001_EN indb 60 9 30 16 5 04 PM ...

Page 63: ...g From Main Menu press to highlight Settings Press Press to highlight More Options Press Press to highlight Language Press 1 2 3 Press or to highlight the desired language Press to move to the option Press to set the language and return to the previous menu 4 Language 54988_08100918001_EN indb 61 9 30 16 5 04 PM ...

Page 64: ...62 Meter Settings 5 54988_08100918001_EN indb 62 9 30 16 5 04 PM ...

Page 65: ...ment All test results are included in the overall 7 14 30 and 90 day averages regardless of what comment is added Control results are stored in memory but cannot be reviewed on the meter To view stored control results transfer them to a compatible software application Control results are not included in the averages or blood glucose reports Once 32 control results are in memory adding a new contro...

Page 66: ...ressing From Main Menu press to highlight My Data Press 1 Logbook is highlighted Press 2 Press or to scroll through Logbook The most recent test result 1 The 2nd most recent test result 2 3 Logbook Logbook 2 1 54988_08100918001_EN indb 64 9 30 16 5 04 PM ...

Page 67: ...ss or to highlight the test result Press Test result details shown below only appear if Target Ranges is On or comments were added to a test result The most recent test result The 2nd most recent test result 1 2 Logbook 54988_08100918001_EN indb 65 9 30 16 5 04 PM ...

Page 68: ... is 90 days Press 4 Turn the meter on by briefly pressing From Main Menu press to highlight My Data Press 1 Press to highlight Averages Press 2 Press to return to the previous menu if you want to review a different time period OR press or to move through different averages 5 Averages Averages 54988_08100918001_EN indb 66 9 30 16 5 04 PM ...

Page 69: ...t ranges Target results can be viewed for 7 14 30 or 90 day time periods Target Ranges must be set in the meter to review Target results Turn the meter on by briefly pressing From Main Menu press to highlight My Data Press 1 Press to highlight Target Press 2 Press to highlight a category the example here is Before meal Press to select the option 3 Target Percent 54988_08100918001_EN indb 67 9 30 1...

Page 70: ...xample here is 90 days Press 4 The Target appears for the Before meal example The number of total tests included in the Target appears at the bottom of the display Press to return to the previous menu 5 Target Percent 54988_08100918001_EN indb 68 9 30 16 5 04 PM ...

Page 71: ...patterns to be detected by the meter if Patterns is On Low High Data Your healthcare professional can tell you what blood glucose range is appropriate for you It is very important to stay within your target range Target Ranges must be set in the meter to track Low High Data test results see the Target Ranges section in the chapter Meter Settings for details Low BG or High BG Data includes only res...

Page 72: ... Before lunch Before dinner and Before snack blood glucose results After meal You may view low or high test results marked with an After Meal comment for Overall After breakfast After lunch After dinner and After snack blood glucose results Fasting Includes high or low fasting blood glucose results marked as Fasting in comments Bedtime Includes high or low bedtime blood glucose results marked as B...

Page 73: ... Target Ranges is set to On Press to select Low or High BG Data the example here is High BG Data Press If Target Ranges have NOT been On within the last 30 days This message appears on the meter to turn on Target Ranges see the Target Ranges section in the chapter Meter Settings for details 3 or Low High Data 54988_08100918001_EN indb 71 9 30 16 5 04 PM ...

Page 74: ... the Logbook The meter may prompt you to select detailed categories to view Press to highlight a category the example here is before Breakfast Press 4 The selected data appears the example here is High BG Data Press to scroll through the test results Press to return to the previous menu 5 Low High Data 54988_08100918001_EN indb 72 9 30 16 5 04 PM ...

Page 75: ...etected by the meter if Patterns is On Patterns Patterns displays only active Low Patterns or High Patterns based on comments added to blood glucose results within the last 7 days A Pattern is generated when 2 below target or 3 above target test results with the same comment are detected within a 7 day period Patterns may be viewed on the meter in 3 ways when a Patterns option is displayed at the ...

Page 76: ...nack Fasting or Bedtime see the Adding Comments to Blood Glucose Results section in the chapter Blood Glucose Tests High Pattern s One or more high patterns have been detected Low Pattern s One or more low patterns have been detected No Patterns No active pattern based on results from last 7 days Blank Patterns feature is set to Off Patterns detected by the meter may be displayed on the Main Menu ...

Page 77: ...n Menu press to highlight the Patterns option at the bottom of the screen the example here is Patterns Press Press to highlight a category to review the example here is Before breakfast Press 1 3 Press or to highlight Low Patterns or High Patterns the example here is Low Patterns Press to select the option 2 54988_08100918001_EN indb 75 9 30 16 5 04 PM ...

Page 78: ...ighlight My Data Press 1 Press to highlight Data Transfer Press Press to select Wireless Press 2 3 Data Transfer Using Wireless Data Transfer Using Wireless This feature allows you to transfer data wirelessly from your meter to another device 54988_08100918001_EN indb 76 9 30 16 5 04 PM ...

Page 79: ...rst Time Pairing section in the chapter Wireless Communication and Meter Pairing for details If the meter has already been paired with at least one device Press or to choose a wireless device for data transfer The meter transfers the data to the device 4 5 or Data Transfer Using Wireless 54988_08100918001_EN indb 77 9 30 16 5 04 PM ...

Page 80: ...ows you to transfer data from your meter to special software for diabetes management on a PC using a USB cable Plug the small end of the USB cable into the meter 1 Plug the large end of the USB cable into a USB port on the PC If the meter is off it turns on 2 3 Data Transfer Using USB Cable 54988_08100918001_EN indb 78 9 30 16 5 04 PM ...

Page 81: ...79 Review Your Data 6 The meter transfers the data to the software 4 Data Transfer Using USB Cable 54988_08100918001_EN indb 79 9 30 16 5 04 PM ...

Page 82: ...80 Review Your Data 6 54988_08100918001_EN indb 80 9 30 16 5 04 PM ...

Page 83: ...ect the device with which the Auto Send and Sync Time features will communicate Auto Send On Off Select whether data is automatically sent to the default paired device after each test On data is automatically sent to the default paired device Off data is not automatically sent to the default paired device Sync Time On Off Select whether to synchronize the time and date to the default paired device...

Page 84: ... with the meter one at a time The meter and the device to be paired should be within 1 meter of each other Prepare the device for pairing Refer to the device s instructions for information about pairing 1 Turn the meter on by briefly pressing From Main Menu press to highlight Settings Press 2 Press to highlight Wireless Press 3 First Time Pairing 54988_08100918001_EN indb 82 9 30 16 5 04 PM ...

Page 85: ... device displays a list of found devices including the meter Select the meter from the list When prompted enter the code displayed on the meter from Step 5 into the device to be paired 6 When pairing is complete and the name of the paired device appear Press to return to the previous menu 7 First Time Pairing 54988_08100918001_EN indb 83 9 30 16 5 04 PM ...

Page 86: ...e title bar and wireless communication is not available Turn the meter on by briefly pressing From Main Menu press to highlight Settings Press 1 Press to highlight Wireless Press 2 Flight Mode is highlighted Press 3 Press or to highlight On or Off Press to move to the option Press to set the option and return to the previous menu 4 Flight Mode 54988_08100918001_EN indb 84 9 30 16 5 04 PM ...

Page 87: ...y briefly pressing From Main Menu press to highlight Settings Press 1 Press to highlight Wireless Press 2 Press to highlight Default Device Press A list of paired devices appears Press to highlight the device you want as the default device Press to move to the option Press to set the option and return to the previous menu 3 4 Default Device 54988_08100918001_EN indb 85 9 30 16 5 04 PM ...

Page 88: ...test Turn the meter on by briefly pressing From Main Menu press to highlight Settings Press 1 Press to highlight Wireless Press 2 Press to highlight Auto Send Press 3 Press or to highlight On or Off Press to move to the option Press to set the option and return to the previous menu 4 Auto Send 54988_08100918001_EN indb 86 9 30 16 5 04 PM ...

Page 89: ...Turn the meter on by briefly pressing From Main Menu press to highlight Settings Press 1 Press to highlight Wireless Press 2 Press to highlight Sync Time Press 3 Press or to highlight On or Off Press to move to the option Press to set the option and return to the previous menu 4 Sync Time 54988_08100918001_EN indb 87 9 30 16 5 04 PM ...

Page 90: ...s If you have 5 paired devices you must delete a pairing before you can add another device The device you choose remains the default until you change it Turn the meter on by briefly pressing From Main Menu press to highlight Settings Press 1 Press to highlight Wireless Press 2 Press to highlight Pairing Press 3 Pairing Additional Devices 54988_08100918001_EN indb 88 9 30 16 5 04 PM ...

Page 91: ... or to highlight Yes Press Press or to highlight the device to delete Press Proceed to Step 5 4 Prepare the other device for pairing Refer to the other device s instructions for information about pairing 5 The meter displays its code 6 The mobile device displays a list of found devices including the meter Select the meter from the list When prompted enter the code displayed on the meter from Step ...

Page 92: ...want the new device to be the default device Press or to highlight No or Yes Press to set the option and return to Pairing Press to return to the previous menu 9 When pairing is complete and the name of the paired device appear Press 8 Pairing Additional Devices 54988_08100918001_EN indb 90 9 30 16 5 04 PM ...

Page 93: ... If you have 5 paired devices you must delete a pairing before you pair to another device The device you choose remains the default until you change it Turn the meter on by briefly pressing From Main Menu press to highlight Settings Press 1 Press to highlight Wireless Press 2 Press to highlight Pairing Press 3 Delete Pairing 54988_08100918001_EN indb 91 9 30 16 5 04 PM ...

Page 94: ...ss Communication and Meter Pairing 7 Press or to highlight Delete Pairing Press 4 Press or to highlight the device to delete Press to set the option 5 Delete Pairing 54988_08100918001_EN indb 92 9 30 16 5 04 PM ...

Page 95: ...lected device is the default device The meter prompts you to select a new default device If there is only 1 device remaining it becomes the default device The list of paired devices appears Highlight the new default device and press The name of the deleted device and appear along with the new default device 6 Delete Pairing 54988_08100918001_EN indb 93 9 30 16 5 04 PM ...

Page 96: ...94 Wireless Communication and Meter Pairing 7 54988_08100918001_EN indb 94 9 30 16 5 04 PM ...

Page 97: ...rchased from Amazon com Officedepot com and Walmart com Do not use any other cleaning or disinfecting solutions Using solutions other than the Super Sani Cloth could result in damage to the meter and lancing device The effect of using more than one product interchangeably to clean and disinfect the meter and lancing device has not been tested Always use Super Sani Cloth to clean and disinfect the ...

Page 98: ...er at least once per week and when blood is present on the surface of the meter Clean and disinfect the meter before allowing anyone else to handle the meter Do not allow anyone else to use the meter on themselves for testing purposes NOTE Using cleaning and disinfecting products could result in damage to the meter If you notice any of the following signs of deterioration after cleaning and disinf...

Page 99: ...iquid Always use the same product for both cleaning and disinfecting Wash hands thoroughly with soap and water Turn the meter off and wipe the entire meter surface with a Super Sani Cloth Carefully wipe around the test strip slot and other openings Make sure that no liquid enters any slot or opening A separate Super Sani Cloth should be used for cleaning and disinfection For disinfecting the meter...

Page 100: ...98 Meter and Lancing Device Cleaning and Disinfecting 8 Wash hands thoroughly with soap and water 4 54988_08100918001_EN indb 98 9 30 16 5 04 PM ...

Page 101: ...he approved cleaning and disinfecting product on the cap Always remove the lancet drum before cleaning or disinfecting the lancing device Using cleaning and disinfecting products could result in damage to the lancing device If you notice any of the following signs of deterioration after cleaning and disinfecting your lancing device stop using your lancing device and contact the Accu Chek Customer ...

Page 102: ...nings Always use the same product for both cleaning and disinfecting Wash hands thoroughly with soap and water Wipe the entire surface of the lancing device and the inside of the cap with a Super Sani Cloth A separate Super Sani Cloth should be used for cleaning and disinfection For disinfecting the lancing device use a new cloth and repeat step 2 making sure the surface stays wet for 2 minutes 1 ...

Page 103: ...101 Meter and Lancing Device Cleaning and Disinfecting 8 Wash hands thoroughly with soap and water 4 54988_08100918001_EN indb 101 9 30 16 5 04 PM ...

Page 104: ...102 Meter and Lancing Device Cleaning and Disinfecting 8 54988_08100918001_EN indb 102 9 30 16 5 04 PM ...

Page 105: ...e battery door on the back of the meter by pushing the tab in the direction of the arrow and pulling the door up 1 Release the old batteries by pressing the button Remove the old batteries 2 Slide the new batteries under the black tabs and button with the side facing up Put the battery door back in place and snap it closed 3 NOTE The meter uses two 3 volt lithium batteries coin cell type CR2032 Th...

Page 106: ...ervice Center at 1 800 858 8072 Extreme temperatures Move the meter to a more temperate area The connection between the meter and PC was lost Disconnect and reconnect the USB cable and retry the connection Contact the Accu Chek Customer Care Service Center at 1 800 858 8072 if the connection is lost again Error Messages w WARNING Never make therapy decisions based on an error message If you have a...

Page 107: ...erred from the meter to the PC Check the PC or USB cable Data cannot be sent to a paired device because the meter is in Flight Mode Retry the data transfer when the meter is not in Flight Mode One or more blood glucose results are excluded from the selected averages because the results are invalid or outside the system measurement range One or more blood glucose results are excluded from the selec...

Page 108: ... Flight Mode The setting change will not take effect until Flight Mode is turned off Pairing to a device cannot be performed while in Flight Mode Retry pairing when the meter is not in Flight Mode The blood glucose result has not been sent to the default paired device The transfer is still pending Place meter and paired device closer together The meter was unable to pair with a device Retry the pa...

Page 109: ...ontrol Results section in the chapter Control Tests In rare cases an E 3 error code may indicate that your blood glucose is extremely high and above the system s reading range If you do not feel like your blood glucose is extremely high repeat the blood glucose test See the Unusual Blood Glucose Results section in the chapter Blood Glucose Tests If the E 3 code still appears for your blood glucose...

Page 110: ...Power Set OK button for at least 2 seconds and reinsert the batteries Perform a blood glucose or control test The temperature is above or below the proper range for the system Refer to the test strip package insert for system operating conditions Move to an area with the appropriate conditions and repeat the blood glucose or control test Do not artificially heat or cool the meter The batteries are...

Page 111: ...of ascorbate Contact your healthcare professional Fluid or foreign material may be present in the test strip slot Remove and reinsert the test strip or repeat the blood glucose or control test with a new test strip If the problem persists contact the Accu Chek Customer Care Service Center at 1 800 858 8072 An electronic error has occurred Contact the Accu Chek Customer Care Service Center at 1 800...

Page 112: ...e meter time and date have been changed to match the paired device There are no results in the Logbook There is an invalid result in the Logbook There are no test results in range for the selected data 54988_08100918001_EN indb 110 9 30 16 5 04 PM ...

Page 113: ...ff and there are no results for the Target data stored in the meter Target Ranges is Off and there are no results for the low high data stored in the meter There are no results stored in the meter for the selected data 54988_08100918001_EN indb 111 9 30 16 5 04 PM ...

Page 114: ...lucose may be higher than the measurement range of the system See the Unusual Blood Glucose Results section in the chapter Blood Glucose Tests Blood glucose may be lower than the measurement range of the system See the Unusual Blood Glucose Results section in the chapter Blood Glucose Tests 54988_08100918001_EN indb 112 9 30 16 5 04 PM ...

Page 115: ...off 90 seconds Power supply Two 3 volt lithium batteries coin cell type CR2032 Display LCD Dimensions 80 47 20 mm LWH Weight Approx 40 g with batteries Construction Hand held Protection class III Meter type The Accu Chek Guide meter is suitable for continuous operation Control solution storage conditions Refer to the control solution package insert Interfaces USB micro B connector Bluetooth Low En...

Page 116: ...he following conditions 1 This device may not cause harmful interference and 2 must accept any interference received including interference that may cause undesired operation Compliance with these guidelines means that under normal daily circumstances the device should not affect the operation of other devices In addition the device should operate normally in the presence of other devices In the e...

Page 117: ...nt has been tested and found to comply with the limits for a Class B digital device pursuant to Part 15 of the FCC Rules These limits are designed to provide reasonable protection against harmful interference in a residential installation This equipment generates uses and can radiate radio frequency energy and if not installed and used in accordance with the instructions may cause harmful interfer...

Page 118: ...116 Technical Information 10 Performance Analysis Refer to the test strip package insert Test Principle Refer to the test strip package insert 54988_08100918001_EN indb 116 9 30 16 5 04 PM ...

Page 119: ...t use the meter in a very dry environment especially one in which synthetic materials are present Travel Documentation If you are traveling on a commercial airline you may be required to provide documentation certifying that this meter meets environmental conditions and test procedures for Airborne Equipment RTCA DO 160 section 21 Emission of Radio Frequency Energy Visit accu chek com or contact t...

Page 120: ...the disposal of sharps and or contaminated products Contact your local health department or other appropriate authorities for proper handling and disposal of used meters used test strips used lancets and used batteries Consider the following points when discarding used testing materials Consider recycling the meters and batteries at an appropriate facility Be aware the meter is potentially hazardo...

Page 121: ...n One Person Poses Risk for Transmitting Bloodborne Pathogens Initial Communication 2010 Update 11 29 2010 http www fda gov MedicalDevices Safety AlertsandNotices ucm224025 htm Accessed June 1 2016 2 CDC Clinical Reminder Use of Fingerstick Devices on More than One Person Poses Risk for Transmitting Bloodborne Pathogens 2010 http www cdc gov injectionsafety Fingerstick DevicesBGM html Accessed Jun...

Page 122: ...120 Technical Information 10 54988_08100918001_EN indb 120 9 30 16 5 04 PM ...

Page 123: ...ill expire on the date of the original warranty expiration or 90 days after the shipment of a replacement system whichever period is longer The purchaser s exclusive remedy with respect to the Accu Chek Guide meter shall be replacement This warranty does not apply to the performance of an Accu Chek Guide meter that has been damaged by accident or has been altered misused tampered with or abused in...

Page 124: ...ice Instructions All requests for return of Accu Chek Guide meters under the above warranty or service policy must be made to the Accu Chek Customer Care Service Center You will be mailed a return authorization label which must be affixed to your carton for shipping the system to Roche Cartons received without this label will be returned to you at your expense Customers experiencing difficulties s...

Page 125: ...icense to use the Accu Chek Guide system is required until the expiration of the last to expire patent listed above and is only granted when the Accu Chek Guide meter is used with the Accu Chek Guide test strips Accu Chek Guide test strips are specifically manufactured for operation with the Accu Chek Guide meter Use of other test strips supplied by another manufacturer may prevent or impair the p...

Page 126: ...ation with the Accu Chek FastClix device Use of other lancet drums with the Accu Chek FastClix device may prevent or impair proper function of the Accu Chek FastClix device Using the Accu Chek FastClix device indicates your acceptance of the restricted license to use the Accu Chek FastClix device only with Accu Chek FastClix lancet drums If you do not agree to the terms and conditions of the restr...

Page 127: ... glucose 35 low high data 69 M maintenance meter 103 meter cleaning and disinfecting 96 P patterns 73 product limitations 113 product safety information 117 product specifications 113 S safety information 3 settings meter 43 beeper 46 language 61 last result 59 patterns 50 post meal 56 reminders 53 target ranges 47 time date 45 supplies 119 symbols blood glucose results 31 symbols explanation of 1...

Page 128: ...126 Notes 54988_08100918001_EN indb 126 9 30 16 5 04 PM ...

Page 129: ...127 Notes 54988_08100918001_EN indb 127 9 30 16 5 04 PM ...

Page 130: ...128 Notes 54988_08100918001_EN indb 128 9 30 16 5 04 PM ...

Page 131: ...54988_08100918001_EN indb 129 9 30 16 5 04 PM ...

Page 132: ...s of the Continua Health Alliance CONTINUA is a registered trademark in some but not all countries in which this product is distributed The Bluetooth word mark and logos are registered trademarks owned by Bluetooth SIG Inc and any use of such marks by Roche is under license All other product names and trademarks are the property of their respective owners 2016 Roche Diabetes Care 08100918001 0916 ...

Reviews: