background image

Administration Manual – Terxon L 


11


Reset only 

Users of this type have access to user options 1 and 2. They can reset 24-hour 
alarms from any operating panel. 

Panic Code 

This user type has no access to the menu and cannot activate or deactivate. 
When this code is entered, a panic alarm is triggered (the alarm sounders and 
the bell sound and the strobe flashes).  

Important: .................................................................................................................. 

To enable a panic code, set “Duress Allow” to Yes (see Installation Instructions, 
Option 45-24). 

Duress Code 

Users of this type have the same access rights as advanced users but can 
trigger a silent alarm by entering the code. This alarm can for example be 
transmitted to an emergency centre. In the event of a threat, the user can 
operate the alarm system normally and at the same time send an alarm. 

Important: .................................................................................................................. 

To enable a duress code, set “Duress Code” to Yes (see Installation 
Instructions, Option 45-24). 

Access 

This user type has no access to the menu and cannot activate/deactivate. 
Entering this user code causes a temporary switching of the outputs of type 
“Code accepted”, “Access”, or “Access code” (see Installation Instructions, 
Option 30), which can be used to activate an electric door lock or similar. 

Shunt 

Users of this type have no access to the menu and cannot activate or 
deactivate. When this code is entered, the corresponding zones are isolated 
(see Installation Instructions, Option 13). The isolated zones can be reactivated 
by entering the code again. 

Set Only 

Users of this type can activate specific partitions from any operating panel, but 
they cannot deactivate. 

Not in Use 

This user has no rights. Use this type to deactivate an existing user. 


2.8.2.  Option 8-1: User Code 

With this option, you define the user code, the user type and the partitions to which 
the user has access. 

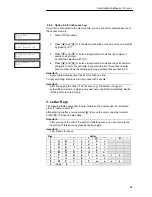
1. Press 

 to select this option. 


2. Press 

 to select “Code”. 


3.  The lowest available user number is displayed. Press 

 to select this 

user if desired. You can also enter a number or press 

 and 

 to 

select a different user.  

User Menu 

8:Set Up Users 

User Codes 1 

Code 

Define new users 

User no. 05 

Summary of Contents for Terxon LX

Page 1: ...Perfect security for home and office Inv 11738099 Terxon LX ADMINISTRATION MANUAL ...

Page 2: ......

Page 3: ...Date 9 2 7 Option 7 Custom Text 9 2 7 1 Option 7 1 Zone Text 9 2 7 2 Option 7 2 Partiton Text 9 2 8 Option 8 Set Up Users 10 2 8 1 User types 10 2 8 2 Option 8 1 User Code 11 2 8 3 Option 8 2 User Name 12 2 8 4 Option 8 3 Customise Menus 13 2 9 Option 9 Log 13 2 9 1 Option 9 1 View Log 13 2 9 2 Option 9 2 Print Log 14 2 9 3 Option 9 3 View Access Log 14 2 9 4 Option 9 4 Print Access Log 15 3 Lette...

Page 4: ... complete installation For example you can enter new user codes view the event memory or exclude zones from monitoring If you have any questions on activating deactivating or resetting the burglar alarm system refer to the operating instructions If you have any questions on installation or other problems contact your engineer or authorised dealer To ensure smooth operation discuss any system chang...

Page 5: ... of the zone omitted means that the zone will be omitted 4 Press to change to the next zone or to exit the menu 2 2 Option 2 Shunting 24hr Zones This option allows you to isolate all 24 hour zones in specific partitions The zones are then permanently excluded from system monitoring However these zones must have the Isolate attribute see Installation Instructions Option 11 Important Zones remain sh...

Page 6: ...displayed is released for the door chime A means that the partition is not released for the door chime and a means that you have no access to the partition 2 3 2 Option 3 2 Adjust volume Under this menu item you can set the volume of the additional alarm sounders connected to the alarm system 1 Press to select this option 2 Press and or 2 to select Adjust Volume and confirm by pressing 3 Press and...

Page 7: ...ss to exit the menu 2 3 4 Option 3 4 Auto Sets Here you can define up to three automatic time switches Each time switch can be linked to one or more partitions These partitions are then activated deactivated at the times you define Delay is possible until the deactivation time is reached A final cancellation of automatic activation is not possible For each automatic time switch you can define thre...

Page 8: ...u have no access to this partition Go to step 4 or press to exit Important If the engineer is in the installation menu the system is also automatically activated 2 4 Option 4 Test Options 2 4 1 Option 4 1 Walk Test Under this menu item you can test that zones are operating correctly You can only test partitions to which you have access Each tested zone is logged in the event memory To view the eve...

Page 9: ... alarm sounders trigger Press to run the next test 8 The strobe and the alarm sounders switch off Press to repeat the test or to exit the menu Important Each test can be selected individually 2 5 Option 5 Engineer Tools 2 5 1 Option 5 1 Engineer Access With this option you define the period in which the engineer can log into the system When this period expires the engineer can continue working but...

Page 10: ... requested by your engineer Important Your engineer can establish the connection dependent on the access mode set see Installation Instructions Option 51 3 1 Press to select this option 2 Press and or 2 to select remote access and confirm with 3 Press and or a number key 1 4 to dial a number see Installation Instructions Option 51 4 Confirm with to start dialling 4 After the connection is made the...

Page 11: ...d confirm with 4 Enter a text by pressing the number keys containing the letters you want see chapter 3 Letter Keys on page 15 Confirm the displayed value with or press to exit the menu without changing the text 2 7 2 Option 7 2 Partiton Text Select this option to adapt the partition texts to the user s wishes In this way partitions can be better identified by the user 1 Press to select this optio...

Page 12: ...ns In the basic setting user 001 is defined as the manager and has the default password 1234 4 digit or 123400 6 digit Standard Global This user type has access to functions 1 2 4 and 5 of the administrator menu see Option 8 3 Customise Menus on page 13 Activation deactivation is possible from every operating panel Standard User Like advanced users users of this type have access to functions 1 2 4...

Page 13: ...nu and cannot activate deactivate Entering this user code causes a temporary switching of the outputs of type Code accepted Access or Access code see Installation Instructions Option 30 which can be used to activate an electric door lock or similar Shunt Users of this type have no access to the menu and cannot activate or deactivate When this code is entered the corresponding zones are isolated se...

Page 14: ...signed and a means that you have no access to this partition Important If the Local Setting option is selected Installation Instructions Option 45 11 the user can activate the system only if the operating panel is assigned to the respective partition 7 Go to step 3 or press to exit the menu 2 8 3 Option 8 2 User Name Select this option for entering a name for each user If you view the event list s...

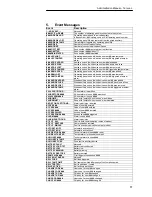
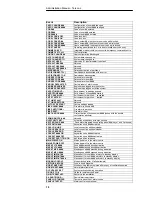
Page 15: ...the 2000 events in the event memory The memory contains date and time specifications of system events such as activation deactivation of partitions isolating of zones triggering of a duress code or communications problems For further information on event messages see chapter 0 on page 16 1 Press to select this option 2 Press to select View Log 3 Press and to scroll through the events displays earl...

Page 16: ...ant Every printed event needs more than one line To cancel printing start a new print process with 0 events Important After once using the option Print Log the system changes to automatic print mode in which every new event is printed immediately Switch off the printer to stop printing 2 9 3 Option 9 3 View Access Log This option enables you to view the contents of the access memory This records e...

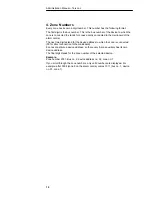
Page 17: ...ting start a new print process with 0 events Important After once using the option Print Access Log the system changes to automatic print mode in which every new event is printed immediately Switch off the printer to stop printing 3 Letter Keys The following table shows how to enter letters on the number pad For example press 2 twice to enter B After entering a letter you can press to move the cur...

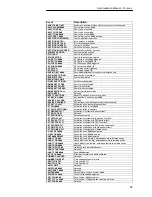
Page 18: ... next two digits stand for the device address to which the zone is connected 00 for direct connection to the mainboard 8 zones constitute a device address so that every 8 zone auxiliary has its own device address The final digit stands for the zone number of the selected device Example Zone number 2031 Bus no 2 device address no 03 zone no 1 If you scroll through the zone numbers only valid number...

Page 19: ...y on bus with device number triggered a tamper alarm 24 Hr PARTITIONS 24 hour alarm in partition 24H RESTORE 24 hour alarm of zone was reset 24Hr ALARM 24 hour alarm in zone 24HR OMIT Zone with isolate 24 hour zones was hidden 24HR REINST Zone with isolate 24 hour zones was reinstated ABORT ON PARTITIONS Alarm in partition aborted ACCESS Code of user entered ACCESS Code of user entered ACCESS Code...

Page 20: ...d EXT LINE FAULT Not used EXT LINE RESTORE Not used FACTORY RESTART Factory settings loaded FIRE ALARM Fire alarm in zone FIRE PARTITIONS Fire alarm in partition FIRE RESET Fire alarm reset FIRST KNOCK First activation of zone number zones with the double confirmation attribute FROM REMOTE Not used HI SECURITY SET Activation of partitions with high security KEYPAD PANIC Panic alarm triggered on op...

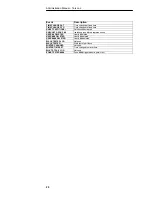
Page 21: ...ber SERVICE CALL END Not used SERVICE REQUIRED System requires maintenance service time expired SET EXT L FAULT Activation with external telephone fault SET FAIL Activation failed in zone SET FAIL PARTITIONS Activation failed in partitions SET GENERAL FLT Activation of system with general fault SET NO ACTIVITY Not used SET PARTITIONS Partitions activated SET PSTN FAULT Activation of system with te...

Page 22: ...ONS Partitions deactivated UNSHUNT GROUP Isolation group reintegrated zones USER DELETED User deleted USER DELETED User deleted USER DELETED User deleted WALK TESTED LOG Not used WALK TESTED Walk test of partitions WINTER CHANGED Not used WINTER TIME SET Time changed to winter time WLK TST FAIL LOG Not used ZONE TESTED Zone triggered during walk test ...

Page 23: ...istration Manual Terxon L 21 6 System Plan 6 1 General System Data Timer Partition 1 2 3 4 5 6 7 8 Entry timeout Exit timeout Exit mode Alarm timeout Alarm duration Isolated groups Zone Group 1 2 3 4 5 6 7 8 ...

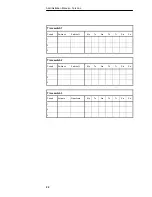
Page 24: ...al Terxon L 22 Time switch 1 Period Switch on Switch off Mo Tu We Th Fr Sa Su 1 2 3 Time switch 2 Period Switch on Switch off Mo Tu We Th Fr Sa Su 1 2 3 Time switch 3 Period Activate Deactivate Mo Tu We Th Fr Sa Su 1 2 3 ...

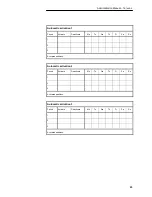
Page 25: ... Activate Deactivate Mo Tu We Th Fr Sa Su 1 2 3 Activated partitions Automatic activation 2 Period Activate Deactivate Mo Tu We Th Fr Sa Su 1 2 3 Activated partitions Automatic activation 3 Period Activate Deactivate Mo Tu We Th Fr Sa Su 1 2 3 Activated partitions ...

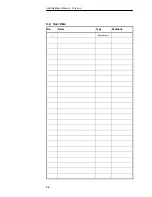
Page 26: ...Administration Manual Terxon L 24 6 2 User Data No Name Type Partitions 1 Administrator ...

Page 27: ...Administration Manual Terxon L 25 6 3 Zone Data No Location Door chime Partition ...

Page 28: ...Administration Manual Terxon L 26 6 4 Maintenance Date Name Work ...

Page 29: ...Administration Manual Terxon L 27 6 5 Engineer Data Engineer Name Engineer Company Address Telephone Engineer reset message Emergency command centre Telephone ...

Page 30: ...0 Sun 01 JAN Set Partitions Ptns User Menu 1 Omit Zones User Menu 2 Shunt 24hr Zns User Menu 3 System Options System Options 1 Enable Chime System Options 2 Adjust Volume System Options 3 Time Switches System Options 4 Auto Sets User Menu 4 Test Options Test Options 1 Walk Test Test Options 2 Bell Test User menu 5 Engineer Tools Engineer Tools 1 Engineer Access Engineer Tools 2 Call Service Time a...

Page 31: ... Page 13 Page 13 Page 14 Page 14 Page 15 User Menu 8 Set Up Users User Codes 1 Code User Codes 2 User Name User Dodes 3 Customise Menus User Menu 9 Log Log Functions 1 View Log Log Functions 2 Print Log Log Functions 3 View Access Log Log Functions 4 Print Access Log ...

Page 32: ...4 viewing 13 messages see event messages remote access 8 system plan 21 test bell test 7 walk test 6 time setting 8 time switch 4 user access 11 chip key 12 code 11 customise menus 13 duress code 11 easy set 10 manager 10 name 12 not in use 11 panic code 11 prox tag user 10 reset only 11 set only 11 shunt 11 standard global 10 standard user 10 user code 11 user menu access 2 exiting 3 user types 1...

Reviews: