background image

SOTOX A™ MOBILE ANALYSER | USER GUIDE

 8  |  EN

2. GET TING STARTED

2.2 

User interface and symbols

The SoToxa Mobile Analyser has a colour screen which will display graphics and text to guide the user through the test process, give feedback on the status of 

the test and the analyser and alert the user to any errors that may occur during use. The analyser also has a speaker and will produce various sounds as alerts or 

to tell the user when a test is complete. See section 

9 Analyser Settings

, for more information on how to alter the screen backlight and volume settings of the 

analyser.
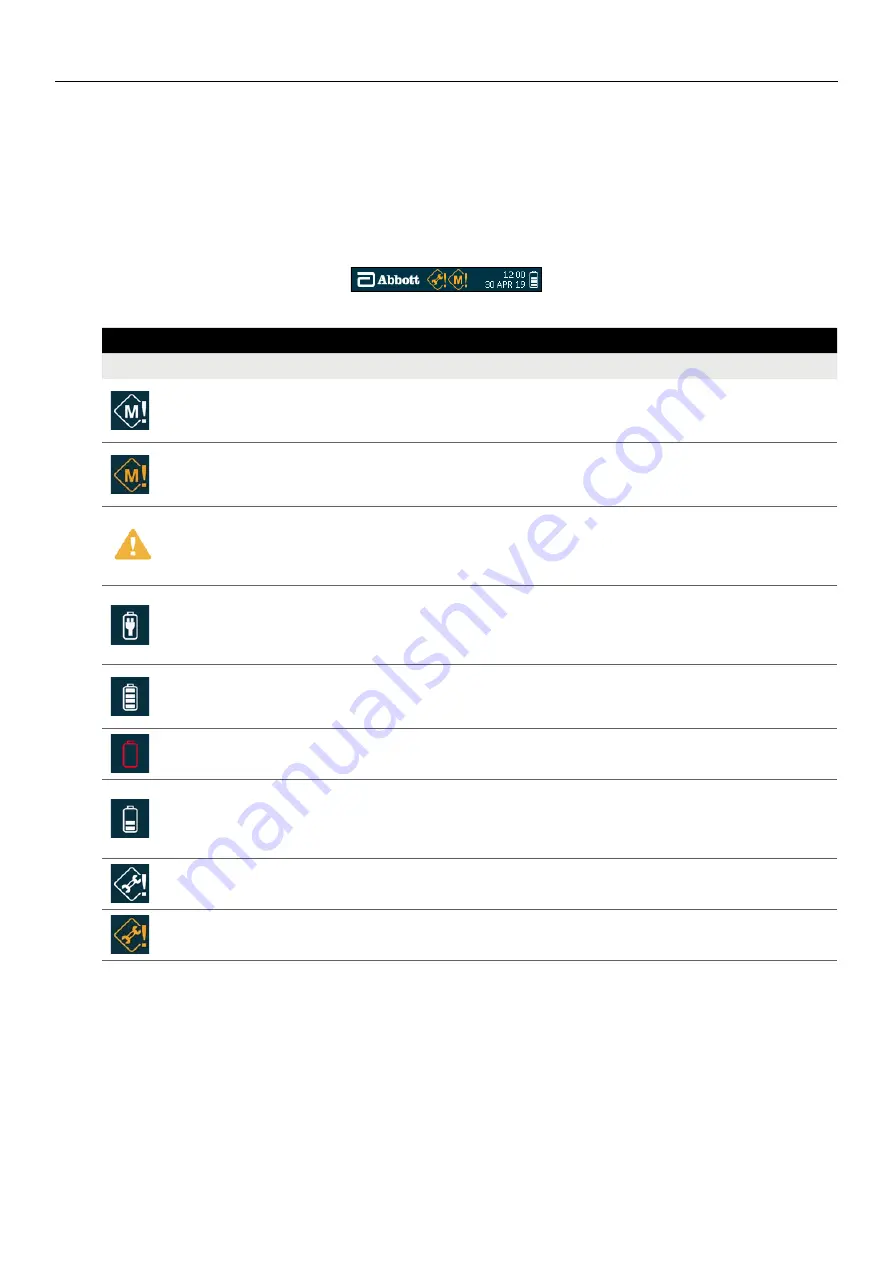
The Analyser screen displays date and time at all times. You will also see symbols appearing on the screen from time to time giving more information on the 

status of the analyser. These symbols will be displayed in the status line at the top of the screen, alongside the date and time.

The symbols used by the analyser and their meaning, are shown below:

SOTOXA MOBILE ANALYSER SYMBOLS

Symbol

Meaning

Memory symbol (white): The appearance of this symbol indicates that the analyser is close to reaching maximum storage capacity for stored test 

results. Refer to section 

10.3 Exporting diagnostic data

 for instructions on how to download test data to make more memory space available. To 

view how much memory space is remaining, refer to section 

8.4 Results storage capacity

.

Memory symbol (orange): When memory storage capacity is reached, the white memory symbol will turn orange. The oldest tests stored on 

the analyser will be overwritten with new test results. To back up stored test data and make more space available, refer to section 

10.3 Exporting 

diagnostic data

. If the Software Application Suite is not being used, please contact Product Support for advice.

Tilt warning symbol: The appearance of this symbol means that the analyser has been tilted beyond the acceptable range for testing. This symbol is 

accompanied by a beeping sound (if the analyser sound is switched on). The analyser must be returned to horizontal immediately and kept flat during 

testing. If the analyser is tilted beyond the acceptable range for too long, this may result in a test error or damage to the analyser. Refer to section 

2.8 Tilt 

sensor

 for more information.

Mains connected symbol: This symbol will appear when the analyser is connected to the mains power via the power cable. If this symbol does 

not appear when connected to the mains, check that the power cable connections are secure and that the mains power is on. If the analyser 

is charging from the mains power, the battery charging symbol will be displayed. When charging is complete, the mains connected symbol will 

appear. Refer to section 

2.5 Mains power 

for more information.

Battery status symbol: This symbol is displayed to show that the analyser is operating from battery, rather than the mains power. If the analyser 

is not connected to the mains, the battery status symbol will be displayed. The level of battery power remaining is indicated by the number of 

shaded blocks. When all the blocks are shaded, the battery is full.

Critical battery level: The battery status symbol will change to a red outline with the last block shaded red when the battery reaches a critical 

level. The analyser will need to be connected to the mains power and charged.

Battery charging symbol: This is the same symbol as the battery status symbol but the number of shaded blocks will increase and decrease to 

indicate charging. This symbol will be displayed when the analyser is connected to the mains power and is charging. The analyser will automatically 

begin to charge when connected to the mains power, if the battery is not full. Once the battery is charged, this symbol will be replaced by the 

mains connected symbol. Refer to section 

2.7 Charging the analyser

 for more information.

Service symbol (white): This symbol will appear on the status line when the annual service date for the analyser is due in less than one month.

To view the service due date, refer to section 

1.11 Servicing

. Contact Customer Service to arrange a service for the SoToxa Mobile Test System.

Service symbol (orange): When service is overdue, the service symbol will turn orange. Contact Customer Service to arrange a service for the

SoToxa Mobile Test System. Accuracy of test results may be reduced if a service is overdue.

Summary of Contents for SoToxa TOX400PHO

Page 1: ...USER GUIDE EN SoToxa MOBILE ANALYSER...

Page 2: ...gel packs 11 3 Printer 3 1 Connecting the printer 11 3 2 Loading paper 11 3 3 Charging the printer 11 4 Start up 12 5 Using the Help Function 12 6 Running a Drug Test 6 1 Initiating a drug test 13 6 2...

Page 3: ...Turning the analyser off 24 11 2 Automatic shutdown 24 12 Technical Support Codes and Troubleshooting 12 1 Technical support 24 12 2 Codes and troubleshooting 25 12 3 Symbols Glossary 26 13 End of Ope...

Page 4: ...eagents and a liquid buffer solution 1 2 4 The test cartridge is inserted into the analyser and is warmed by the analyser to optimum testing temperature 1 2 5 Oral fluid is collected using the collect...

Page 5: ...al operating temperature of the reader is 0 C to 40 C but tests must be run between 5 C to 35 C Test cartridges must not be at 5 C for more than 10 minutes Relative humidity 20 to 80 non condensing St...

Page 6: ...rom the analyser to an SD card if required and instructed to by Product Support on behalf of the manufacturer Please refer to section 10 3 Exporting diagnostic data for further information Firmware up...

Page 7: ...ntenance is required then please contact Product Support Only use the printer and USB cables supplied with the analyser do not attempt to connect any other equipment to the analyser as this may damage...

Page 8: ...ER SD CARD COVER PANEL RJ12 PRINTER CONNECTOR RUBBER FLAP USB CONNECTOR POWER SUPPLY CONNECTOR RESET BUTTON RIGHT SELECTION KEY CHARGING STATUS LIGHT LCD SCREEN RIGHT SELECT KEY FIVE WAY NAVIGATION KE...

Page 9: ...alyser is tilted beyond the acceptable range for too long this may result in a test error or damage to the analyser Refer to section 2 8 Tilt sensor for more information Mains connected symbol This sy...

Page 10: ...ter and to a PC using the cables provided in the system case Use only the connections and printer provided Alternative connections and printers should not be used as these may be unsafe or incompatibl...

Page 11: ...nnect the power supply unit to the power supply connector port located at the top of the analyser Step 3 Connect to the corresponding AC power socket Upon connecting the mains AC the charging status l...

Page 12: ...tridge and contact Product Support Slight discolouration of the silica beads is normal When the majority of the beads within the pack are green the test cartridge should not be used 3 Printer 3 1 Conn...

Page 13: ...for running a test is between 5 C to 35 C Outside of this range the following message will be displayed Allow the SoToxa Mobile Analyser to reach ambient temperature before use If moving the analyser...

Page 14: ...ection 4 Start up to switch on the analyser Check that both QC cartridges are clean and undamaged If the QC cartridges are marked please contact Product Support Step 2 When the analyser is ready to be...

Page 15: ...el is green discard the test as the performance of the product may have been compromised See section 2 10 Silica gel packs for more information Step 3 Insert the test cartridge into the cartridge slot...

Page 16: ...must actively swab the collection device around the gums tongue and inside the cheek until the sample presence indicator starts to turn blue Step 3 Insert the collection device into the test cartridge...

Page 17: ...ent for a maximum of 60 seconds 6 6 Printing results If the results have been accepted the analyser will give the option to print results Step 1 If not already connected attach the printer to the SoTo...

Page 18: ...emoving the test cartridge as the underside of the cartridge may be hot Handle the test cartridge by the side edges 7 Main Menu The SoToxa Mobile Analyser main menu screen shown on the right below can...

Page 19: ...screen highlight and select View Results to see test results Step 5 The results for the selected test are then displayed this is an example test If an error has occurred during the test the results wi...

Page 20: ...al test storage capacity See section 8 4 Results storage capacity for further information Battery Level Current battery level in mV Firmware Version that is loaded on the analyser See section 10 1 Upd...

Page 21: ...alyser time and date are set to Greenwich Mean Time GMT by the manufacture and will automatically adjust for British Summer Time BST We advise before each test the date and time are checked To alter t...

Page 22: ...elected Select Analyser Settings from the main menu then in the Analyser Settings screen select Auto Shutdown In the Auto Shutdown screen use the five way navigation key to highlight the required sett...

Page 23: ...a folder highlight the folder using the five way navigation key then press the Enter button To exit a folder select the top folder marked with an arrow then press the Enter button Step 5 Select the de...

Page 24: ...yser to an SD if required and instructed to by Product Support on behalf of the manufacturer This data can be used to aide with troubleshooting of a particular issue or as part of routine monitoring o...

Page 25: ...f The analyser cannot be switched off if a test is in progress of if a test cartridge is inserted 11 2 Automatic shutdown In order to save power the analyser can be set to automatically shutdown after...

Page 26: ...rs not to be calibrated or has lost its calibration settings Tests cannot be completed until the analyser is calibrated Contact Product Support for assistance 3 4 X X and 3 5 X X Test result inconclus...

Page 27: ...ard SD card has been removed or the card could be faulty Restart analyser and reinsert the SD card 4 16 X X Cartridge analysis disrupted Analyser was tilted beyond the acceptable range Retry using a n...

Page 28: ...rical or electronic equipment may be disposed of in conventional domestic or commercial waste systems 14 Privacy Policy We have a privacy statement that is available on request and provides informatio...

Page 29: ...osecution and will void analyser warranty Disclaimer At Abbott we believe in the constant development and improvement of our products and services We reserve the right to alter modify and upgrade our...

Reviews: