background image

SOTOX A™ MOBILE ANALYSER | USER GUIDE

 23  |  EN

10. USING THE SD C ARD

Step 4:   The analyser will display the list of files and folders carried on the inserted SD card. To open a folder, select the folder, then press the OK button. To exit a 

folder, select the top folder marked with an arrow, then press the 
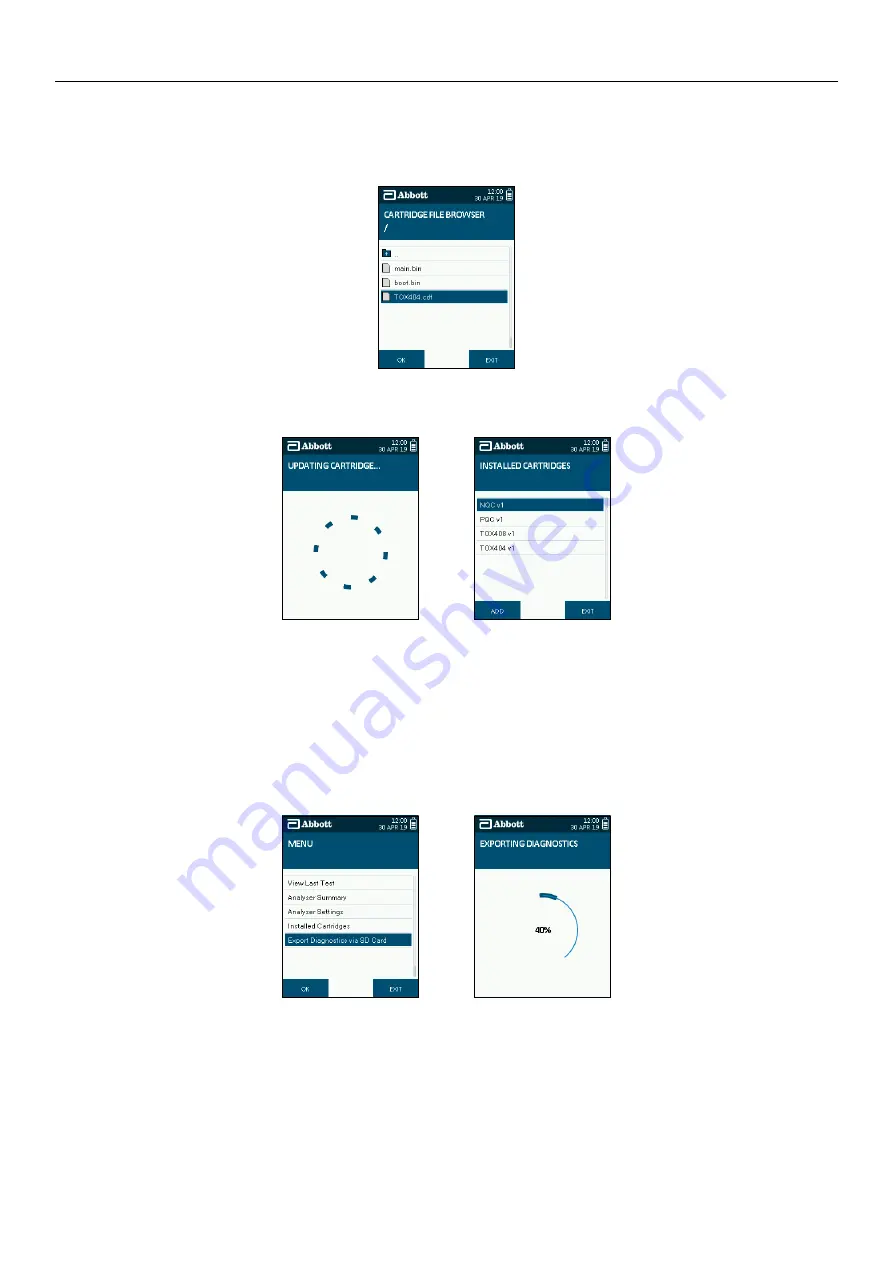
OK button.

Step 5:   Select the desired test cartridge file and press the Enter button. 

Step 6:   If the test cartridge file is valid, the analyser will update its test cartridge library and navigate back to the installed test cartridge screen. The new test cartridge 

will now appear on the list of installed cartridges. 

10.3  Exporting diagnostic data

Diagnostic data can be exported from the analyser to an SD, if required and instructed to by Product Support on behalf of the manufacturer. This data can be 

used to aide with troubleshooting of a particular issue or as part of routine monitoring of how the system is working.
To export the diagnostic data to an SD card, follow these steps. 

Step 1:   Insert the SD card into the analyser before starting this procedure. 
Step 2:   From the main menu, select the Export Diagnostics via SD Card option.
Step 3:   A progress wheel will be displayed while the data is being exported. It may take several minutes to complete as it is dependent on the number of tests 

completed on the analyser. 

Step 4:   On completion of the export the main menu will be displayed.
Step 5:   Turn the analyser off and remove the SD card from the slot and return to Product Support as instructed.
Step 6:   Re-screw the card cover into place.

Step 5

Step 6

Step 6

Step 2

Step 3

Summary of Contents for SoToxa TOX400PHO

Page 1: ...USER GUIDE EN SoToxa MOBILE ANALYSER...

Page 2: ...gel packs 11 3 Printer 3 1 Connecting the printer 11 3 2 Loading paper 11 3 3 Charging the printer 11 4 Start up 12 5 Using the Help Function 12 6 Running a Drug Test 6 1 Initiating a drug test 13 6 2...

Page 3: ...Turning the analyser off 24 11 2 Automatic shutdown 24 12 Technical Support Codes and Troubleshooting 12 1 Technical support 24 12 2 Codes and troubleshooting 25 12 3 Symbols Glossary 26 13 End of Ope...

Page 4: ...eagents and a liquid buffer solution 1 2 4 The test cartridge is inserted into the analyser and is warmed by the analyser to optimum testing temperature 1 2 5 Oral fluid is collected using the collect...

Page 5: ...al operating temperature of the reader is 0 C to 40 C but tests must be run between 5 C to 35 C Test cartridges must not be at 5 C for more than 10 minutes Relative humidity 20 to 80 non condensing St...

Page 6: ...rom the analyser to an SD card if required and instructed to by Product Support on behalf of the manufacturer Please refer to section 10 3 Exporting diagnostic data for further information Firmware up...

Page 7: ...ntenance is required then please contact Product Support Only use the printer and USB cables supplied with the analyser do not attempt to connect any other equipment to the analyser as this may damage...

Page 8: ...ER SD CARD COVER PANEL RJ12 PRINTER CONNECTOR RUBBER FLAP USB CONNECTOR POWER SUPPLY CONNECTOR RESET BUTTON RIGHT SELECTION KEY CHARGING STATUS LIGHT LCD SCREEN RIGHT SELECT KEY FIVE WAY NAVIGATION KE...

Page 9: ...alyser is tilted beyond the acceptable range for too long this may result in a test error or damage to the analyser Refer to section 2 8 Tilt sensor for more information Mains connected symbol This sy...

Page 10: ...ter and to a PC using the cables provided in the system case Use only the connections and printer provided Alternative connections and printers should not be used as these may be unsafe or incompatibl...

Page 11: ...nnect the power supply unit to the power supply connector port located at the top of the analyser Step 3 Connect to the corresponding AC power socket Upon connecting the mains AC the charging status l...

Page 12: ...tridge and contact Product Support Slight discolouration of the silica beads is normal When the majority of the beads within the pack are green the test cartridge should not be used 3 Printer 3 1 Conn...

Page 13: ...for running a test is between 5 C to 35 C Outside of this range the following message will be displayed Allow the SoToxa Mobile Analyser to reach ambient temperature before use If moving the analyser...

Page 14: ...ection 4 Start up to switch on the analyser Check that both QC cartridges are clean and undamaged If the QC cartridges are marked please contact Product Support Step 2 When the analyser is ready to be...

Page 15: ...el is green discard the test as the performance of the product may have been compromised See section 2 10 Silica gel packs for more information Step 3 Insert the test cartridge into the cartridge slot...

Page 16: ...must actively swab the collection device around the gums tongue and inside the cheek until the sample presence indicator starts to turn blue Step 3 Insert the collection device into the test cartridge...

Page 17: ...ent for a maximum of 60 seconds 6 6 Printing results If the results have been accepted the analyser will give the option to print results Step 1 If not already connected attach the printer to the SoTo...

Page 18: ...emoving the test cartridge as the underside of the cartridge may be hot Handle the test cartridge by the side edges 7 Main Menu The SoToxa Mobile Analyser main menu screen shown on the right below can...

Page 19: ...screen highlight and select View Results to see test results Step 5 The results for the selected test are then displayed this is an example test If an error has occurred during the test the results wi...

Page 20: ...al test storage capacity See section 8 4 Results storage capacity for further information Battery Level Current battery level in mV Firmware Version that is loaded on the analyser See section 10 1 Upd...

Page 21: ...alyser time and date are set to Greenwich Mean Time GMT by the manufacture and will automatically adjust for British Summer Time BST We advise before each test the date and time are checked To alter t...

Page 22: ...elected Select Analyser Settings from the main menu then in the Analyser Settings screen select Auto Shutdown In the Auto Shutdown screen use the five way navigation key to highlight the required sett...

Page 23: ...a folder highlight the folder using the five way navigation key then press the Enter button To exit a folder select the top folder marked with an arrow then press the Enter button Step 5 Select the de...

Page 24: ...yser to an SD if required and instructed to by Product Support on behalf of the manufacturer This data can be used to aide with troubleshooting of a particular issue or as part of routine monitoring o...

Page 25: ...f The analyser cannot be switched off if a test is in progress of if a test cartridge is inserted 11 2 Automatic shutdown In order to save power the analyser can be set to automatically shutdown after...

Page 26: ...rs not to be calibrated or has lost its calibration settings Tests cannot be completed until the analyser is calibrated Contact Product Support for assistance 3 4 X X and 3 5 X X Test result inconclus...

Page 27: ...ard SD card has been removed or the card could be faulty Restart analyser and reinsert the SD card 4 16 X X Cartridge analysis disrupted Analyser was tilted beyond the acceptable range Retry using a n...

Page 28: ...rical or electronic equipment may be disposed of in conventional domestic or commercial waste systems 14 Privacy Policy We have a privacy statement that is available on request and provides informatio...

Page 29: ...osecution and will void analyser warranty Disclaimer At Abbott we believe in the constant development and improvement of our products and services We reserve the right to alter modify and upgrade our...

Reviews: