2 8
S P I R I T
I T
F L O W - X
I N S T R U C T I O N M A N U A L | I M / F L O W X - E N
Flow-X
Tx+
Tx-
Rx+
External
Tx/Rx-
Tx/Rx+
Rx+
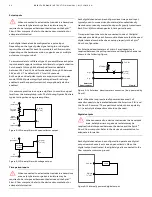
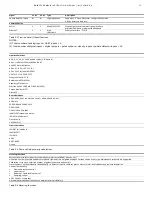
Figure 6-30 2-wire RS-485 connection
For a
2-wire RS-485
connection the Tx+ and Tx-
terminals must be connected, while the Rx+ and Rx-
terminals may remain unconnected (no need for jumpers).
Flow-X
Tx+
Tx-
Rx+
External
Rx-
Rx+
Rx+
Tx-
Tx+
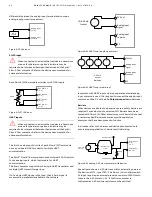
Figure 6-31 4-wire RS-485 connection
RS-485
connections need terminating resistors to
reduce voltage reflections that can cause the receiver to
misread the logic level.
Proving signals
The connection of the prover signals depends on the Spirit
IT
Flow-X type and the prover set-up.
Flow-X/P
Ball prover / Compact prover
Connect the flow pulse signals to the corresponding modules
Connect all detector signals to
all
run modules
All applicable prove signals (except the detector signals) may
be distributed over the available modules (they only have to be
connected once):
–
prover pressure(s)
–
prover temperature(s)
–
prover densitometer
–
4-way valve commands and statuses
–
prover commands and statuses
Master meter proving based on pulses
Connect the flow pulse signals to the corresponding run
module(s) and master meter module
Connect a digital output of the “Master Meter” module to a
digital input (prove detector in) of itself and
all
run modules
Master meter proving based on totals
No connections to be made (except from the pulse inputs in
case of pulse meters)
X/P
Ball / Compact prover
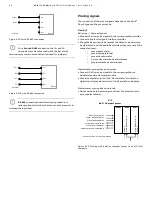
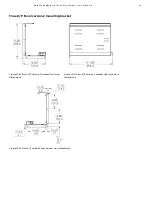
Figure 6-32: Proving with a ball or compact prover on an X/P flow
computer.
Prover pressure(s)*
Prover temperature(s)*
Prover densitometer*
4-way valve commands*
Prove start command*
Plenum pressure commands*
* Connect to one of the run modules
PANEL
RUN X
RUN Y
Pu
ls
e
in
Pu
ls
e
in
Pr
ov
e
de
te
ct
or
(s
)
in
Pr
ov
e
de
te
ct
or
(s
)
in

