


Page 2
© 2021 ABB. All rights reserved.
Version 1.0
Contents
Introduction
······························································································································
4
Mounting Dimensions
··············································································································
5
Safety statement
······················································································································
7
Precautions
·······························································································································
8
Equipment Identification
·········································································································
9
Information
-
Tools Required
··································································································
10
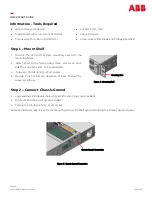
Step 1 –
Mount Shelf
·················································································································
10
Step 2 –
Connect chassis Ground
····························································································
10
Step 3 –
Connect AC Input
········································································································
11
Step 4 –
Connect Battery
·········································································································
11
Step
5
–
Connect DC Output & Output Return
········································································
12
Step 6
-
Set Controller Jumpers
·······························································································
12
Step 7 –
Install Controller
·········································································································
13
Step 8 –
Install Alarm and LAN Cable
·······················································································
13
Step
9
–
Install wire Battery Temp and Voltage monitor
························································
14
Step 10
-
Install Rectifiers
········································································································
14
Step 11
-
Verify Shelf ID Setting
·······························································································
14
Step
12
–
Initial Converter Modules
··························································································
14
Step
13
–
Initial Start Up
···········································································································
14
Step 14 –
controller per galaxy pulsar edge controller
··························································
15
Information: Alarm Card (LEDs and Alarm)
············································································
15
Information: Converter Module LEDs
·····················································································
15
Information: Circuit ON/OFF and Load Detection Circuit ON
··············································
16
Information: Manual Module Operations
···············································································
16
Information: Fault Detection Circuit ON
················································································
17
Information: Alarm Connections
····························································································
17
Information: Rectifier Basic Information
···············································································
17
Spare List
··································································································································
18
Specifications and Applications
·····························································································
18
Change History (excludes grammar & clarifications)
····························································
19
Disclaimer
··································································································································
20
QUICK START GUIDE


