Note
Action
This is a complex task to be performed
with utmost care in order to avoid injury
or damage!
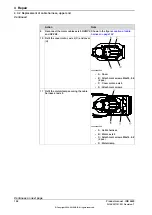
Look through the empty mounting hole of
motor 1 to assist in aligning the assembly
during refitting of the arm system.
9
Use a crank to turn the gearbox in order
to find the right position for the holes.
xx0600003094
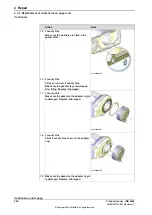
Lower the arm system with guidance from
the guide pins previously fitted to the axis-
1 gearbox axis 1. Fit the guide pins in the
corresponding holes in the frame as shown
in the figure to the right.
Note
The refitting must be made completely level!
Make sure the lifting accessory is adjusted
prior to refitting of arm system.
•
A : Holes in frame for guide pins,
shown from below.
xx0600003093
•
A : Holes in frame for guide pins,
shown from above.
Shown in the figure
Remove the guide pins and secure the arm
system to the base with its 16
attachment
screws and washers.
10
M12 x 80, 12.9 quality gleitmo. Tightening
torque: 105 Nm.
Reused screws may be used, providing
they are lubricated as detailed in section
before fitting.
Refit the
axis-1 motor
.
11
Detailed in section
.
Perform a
leak-down test
of the axis-1
gearbox.
12
Detailed in section
harness, lower end (axes 1-2) on page 185
Refit the
cabling
in the base.
13
Detailed in section
.
Refill the gearbox with lubricating oil.
14
Continues on next page
Product manual - IRB 6620
211
3HAC027151-001 Revision: T
© Copyright 2006-2018 ABB. All rights reserved.
4 Repair
4.3.3 Replacement of complete arm system
Continued
Summary of Contents for IRB 6620
Page 1: ...ROBOTICS Product manual IRB 6620 ...
Page 8: ...This page is intentionally left blank ...
Page 176: ...This page is intentionally left blank ...
Page 338: ...This page is intentionally left blank ...
Page 350: ...This page is intentionally left blank ...
Page 352: ...This page is intentionally left blank ...
Page 358: ......
Page 359: ......


