


Note
Action
xx2200000050
Route and secure the cabling with cable straps.
CAUTION
Correct cable routing is highly important.
If the cables are routed and secured incorrectly
the cables can be damaged.
7
Refitting the wrist unit
Note
Action
Connect the power supply to axis-3 motor and
release the axis-3 brake to move the axis 3 to -
90°. Then, disconnect the power supply.
Note
The robot is not connected to the controller during
replacement, power must be supplied to the con-
nector R1.MP according to the section
power to connector R1.MP on page 56
.
1
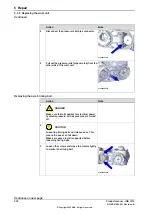
Route the cable package into the wrist unit.
2
xx2200000539
Carefully align the wrist unit to the axis 3-4 as-
sembly unit by the screw holes.
3
Flange socket head screw, M3x16
12.9 Lafre 2C2B/FC6.9+PrO-
COat111, 3HAB3412-316 (8 pcs)
Refit the wrist unit.
4
Tightening torque: 1.2 Nm
xx2200000047
Continues on next page
Product manual - IRB 1010
217
3HAC081964-001 Revision: B
© Copyright 2022 ABB. All rights reserved.
5 Repair
5.4.3 Replacing the axis 3-4 assembly unit
Continued
Summary of Contents for IRB 1010
Page 1: ...ROBOTICS Product manual IRB 1010 ...
Page 8: ...This page is intentionally left blank ...
Page 14: ...This page is intentionally left blank ...
Page 36: ...This page is intentionally left blank ...
Page 46: ...This page is intentionally left blank ...
Page 80: ...This page is intentionally left blank ...
Page 306: ...This page is intentionally left blank ...
Page 312: ...This page is intentionally left blank ...
Page 326: ...This page is intentionally left blank ...
Page 328: ...This page is intentionally left blank ...
Page 332: ......
Page 333: ......