background image

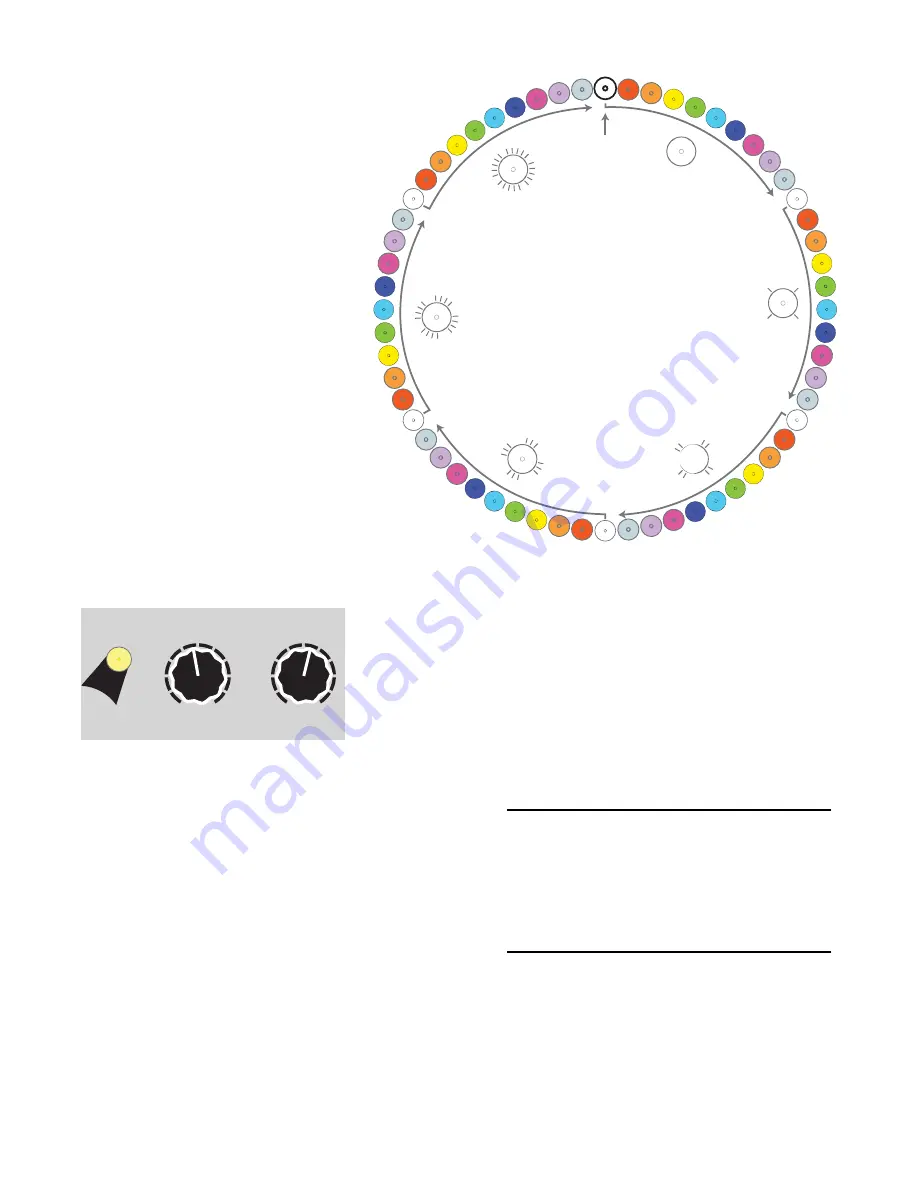
As you tap the 

Bank

 button, you move 

through banks in order from White to 

Pearl. When you reach Pearl, it loops 

back around to White, but this White is 

different—it blinks off every second or 

so. If you keep going, you’ll see 

another White bank that blinks off 

twice every second. If you’re using a 

new STS with the default sample 

pack, the banks are only full up until 

Green with two flashes (we call this 

“Green 2 blinks” or “Green-2” for 

short). After that, it wraps back around 

to solid White. 

As you add samples to your card, you 

can fill up a maximum of 60 banks. 

Since there are 10 colors, that means 

each color can have 0 (solid) to 5 

flashes. At 5 flashes, the bank button 

is flashing almost constantly. Empty 

banks will be skipped as you cycle 
through banks with the 

Bank

 button.

What if you’ve filled up your banks 

with samples and you want to go from 

the solid Red bank to Blue-3 (blue with 
3 blinks)? Well, you could tap the 

Bank

 button a few dozen times, but there’s a faster way.

Quick Bank Select

To quickly change to a particular bank, just hold down the 

Bank


button while you turn the 

Sample

 knobs. The left 

Sample

 knob 

selects the bank color, and the right 

Sample

 knob selects the bank 

blinks. The bank button will change colors and blinks as you turn 

the knob, but the bank won’t actually change until you release the 

Bank

 button.

For example, to go directly to Yellow-2 on the left side of the STS, 

hold down the left 

Bank 

button and turn the left 

Sample

 knob to until the light is yellow. Then turn the 

right 

Sample

 knob until the left 

Bank

 button is blinking 2 times. Release the left 

Bank 

button and it’ll 

jump to Yellow-2. If Yellow-2 didn’t exist, then you’ll end 

up in the last valid bank that the knobs pointed to.

If you want the right side’s bank to change to a specific 

bank, do the same procedure but hold down the right 
side 

Bank

 button. 

A quick way to go back to the first bank is to hold the 

Bank

 button and spin both 

Sample

 knobs to 0%.

Empty Banks

Tapping 

Bank


moves you to the next bank that has 

samples in it, skipping empty banks. If you hold 

Edit


while tapping 

Bank

, you can browse all banks 

including the empty banks. Another way to go to an empty bank is with the 

Bank Rec

+

Bank


trick (see 

Tutorial 3). Since the STS boots up with the 

Bank Rec


button set to the first empty bank, this is a fast 

way to immediately jump to an empty bank. See the Copying, Creating Slices, and Assigning Samples 

sections for examples of why you might want to go to an empty bank.

Page   of 

7

24

Starting

bank

Solid

1 blink

2 blinks

3 blinks

4 blinks

constant

blinking

Bank

+

Sample

(Left side)

1

10

2

9

3

8

4

7

5

6

and turn…

Sample

(Right side)

1

10

2

9

3

8

4

7

5

6

…and/or turn

Hold…

/

Gotcha!


While  holding  down  a 

Bank

  button, 

the  left 

Sample

  knob  always  selects 

the bank color, and right 

Sample

 knob 

always selects the bank blink number
—  this  can  be  a  bit  confusing  at  first 
when  you  switch  between  changing 
the left and right side’s banks. 

Summary of Contents for STS

Page 1: ...reverse allow for synchronization On board editing tools allow you to set loop trim points and gain as well as assigning samples to banks and slots Two independent stereo playback channels can play any of 600 samples simultaneously Recording channel creates stereo WAV files directly onto microSD Card for immediate use Extremely low noise high fidelity design Plays a variety of WAV files up to 32 b...

Page 2: ... This will be useful if the card ever becomes damaged or you wish to restore the STS to the original factory settings and samples 4 Securely screw the STS to the rails of your case Power the system on 5 Begin with Tutorial 1 Basic Playback on page 5 of this manual Never remove the microSD card when the Busy light is on Setting up your Stereo Triggered Sampler 2 Overview 3 Electrical and Mechanical...

Page 3: ...n the Sample knobs for fast selection of bank Edit button allows basic on board editing features Set loop trim points with Scrub Start and Scrub End Set Gain boost cut from 10 to 500 Re organize samples with Next File Move samples around within a bank Assign files from any folder on the microSD card into any sample slot sub folders are ignored Copy sample to multiple slots each with their own loop...

Page 4: ...le 0 98 25mm maximum depth 10 pin Eurorack power header Power consumption maximums 12V 145mA 12V 39mA 5V rail not used Audio OUT jacks Out File 1 8dB max deviation at 0Hz DC 22kHz 21V peak to peak full scale Audio Record jacks Out In max 1 0dB 3Hz 6kHz 3dB 6k 11k 7 6dB 11k 20k 21V peak to peak maximum before clipping End Out jack 10V trigger pulse 13ms pulse width typical sample loop time 17ms 2 7...

Page 5: ...utton for half a second and the button will turn blue to indicate it s looping blue loop You can let go of the PLAY button and it ll keep repeating the sample over and over At any time if you want to stop looping hold PLAY down again for about a second and it ll turn green or yellow green to indicate the channel is not looping Now let s play with Pitch Turn this knob up to make the sample play bac...

Page 6: ... and start playing backwards towards the start position You can even keep hitting Reverse rapidly to keep a sample up in the air When reversing and Length is less than 50 an attack only envelope will be applied to the playback as opposed to the decay only envelope applied to forward playback with Length under 50 Tutorial 2 Navigating Banks In the first tutorial you learned that tapping the Bank bu...

Page 7: ...Yellow 2 on the left side of the STS hold down the left Bank button and turn the left Sample knob to until the light is yellow Then turn the right Sample knob until the left Bank button is blinking 2 times Release the left Bank button and it ll jump to Yellow 2 If Yellow 2 didn t exist then you ll end up in the last valid bank that the knobs pointed to If you want the right side s bank to change t...

Page 8: ...control the volume of each playback channel This is especially important in stereo mode because the two channels get mixed together before reaching the output jacks There would be no way to use an external mixer to control the relative level of each sample To set the channel volume hold down Reverse while you turn the Start Pos knob directly above it The volume will not change until you turn Start...

Page 9: ...recording Teleport to the Rec Bank To hear the sample you just recorded we need to go to that bank in one of the play channels You already know a couple ways to browse banks tapping Bank or holding Bank while the turning the Sample knob but let s learn a new trick for this Hold down the REC Bank button and a play channel s Bank button for half a second The play channel Bank will teleport to the RE...

Page 10: ...les will be back to the way you had them before Tutorial 4 Loading Files onto the microSD Card The STS has an intelligent and intuitive sample file management system You can do everything in several different ways depending on your preferences use a computer OS to move files or use the STS s on board assignment feature or edit the index file with a text editor hackers only Unlike many other sample...

Page 11: ... it the new file s will automatically be loaded into that bank If you remove a file from a folder then the STS won t be able to find that file and will look for it If it finds the file in another folder it ll update the index to the new location But if the STS can t find the file anywhere then it ll try to find a new file to fill that slot The first place it will look is the original file s folder...

Page 12: ...de changes to the microSD card using a computer the next time you boot the STS with that card the module will create a file in the root level of the microSD card called __Sample List__ html This is a handy quick reference for seeing what files are in what banks and how long each sample is So if you ever are wondering which samples are assigned to which slots in which banks open this up and it ll t...

Page 13: ...ance while turning it slowly will scrub a small amount Release the Edit button when you re done scrubbing To hear how the newly trimmed sample sounds make sure you turn the left side s Start Pos knob to 0 and Length knob to 100 and then press the left side PLAY If you want to adjust them some more you can do Edit Scrub again as much as you like This is a very useful technique for creating loops or...

Page 14: ...another Copying doesn t actually copy the file on the microSD card it just assigns the file to multiple sample slots It also copies the gain and loop trim points but you can edit the gain or loop trim points on each copy independently To perform a copy 1 On the left side go to the sample bank you want to copy from 2 On the right side select the bank and sample you want to copy into whatever sample...

Page 15: ...again Repeat until you created enough copies Now we re going to set the loop trim points on each copy 6 On the left side go to the same bank the right side is in 7 Set the left Sample knob to the slot you want to edit 8 Use Edit Scrub Start right Start Pos knob and Edit Scrub End right Length knob to scrub the beginning and end points 9 When you found the start end points you like set the left Sam...

Page 16: ...to the Start Pos CV jack Each step of the sequencer can thus play a different slice of the original sample STS as the clock source End Out Clock In One variation of this patch is to use the STS itself to clock for the sequencer by patching the End Out to the Sequencer s clock input Make sure to set the sequencer to run on external clock To start the patch hit PLAY on the STS once The End Out will ...

Page 17: ...s Scale knob to 3 00 and Bi Polar off Attenuate or shift as needed any voltage under 0V or over 5V will make playback hang When the LFO is exactly 0V to 5V you should hear the entire sample being played forwards Adjust the LFO speed to adjust the playback speed Also you can attenuate the LFO and or adjust the Start Pos knob to select certain portions of the sample to playback 7 Try different LFO w...

Page 18: ...m recording before perfecting your patch in order to avoid feedback completely A future firmware update may include a feature to automatically record the outputs without requiring a manual patch Example Patch Clock Sync and Shifting Ping Pong Loops Find a sample with rhythmic elements Hold PLAY to make it loop Turn down Length to between 50 and 90 to make a shorter loop that you like Clock Sync Ru...

Page 19: ... and you go back it ll go to this bank and if you go back from this bank it ll go to the last bank that has samples in it The color of the Next File button helps you know where you are in the diagram above In the first column all files in the folder the button will flash the current bank s color In the second column all unassigned files the button will be flash dim white In the last group each ban...

Page 20: ...ontinue the walk through and browse all the samples on the microSD Card 7 Go to a sample slot you haven t re assigned yet Hit Edit Next File until the Next File button changes color from flashing red to flashing dim white The flashing dim white indicates it s no longer scanning the folder and instead is now scanning the entire microSD card for WAV files that aren t being used in a bank somewhere T...

Page 21: ...separately or together whichever channel s are currently playing will be adjusted when you do the following button presses Edit REC decreases the tracking factor by 0 001V oct whichever channel s are currently playing will be calibrated Edit REC Bank increases the tracking factor by 0 001V oct whichever channel s are currently playing will be adjusted To calibrate a channel s 1V OCT jack to a part...

Page 22: ... plugging in 6 Connect the OUT L jack to an amp speakers so you can listen You may hear some background noise that comes and goes that s normal Turn the amp speaker volume down this is going to be LOUD 7 Set the computer phone s volume to 100 and the audio player software to 100 volume Turn off all audio and vibrate notifications use Airplane mode Close any applications that make notification soun...

Page 23: ... the sample window is longer than 30 seconds You can hot swap cards this way but you must do a Revert All Banks button action if you insert a completely new card How to prepare a new microSD Card Purchase a UHS Class 3 card see above Format the card as ExFAT preferred or FAT32 acceptable See screenshot right for how to set MacOS standard Disk Utility program Verify all sample files are valid WAV f...

Page 24: ...Edit Sample Hold both 0 5 sec Reverse Revert Revert Undo Changes one sample Revert to Saved one bank Edit Sample Edit Sample Hold 2 seconds Reverse Revert Revert Bank Edit Sample Edit Sample REC 1V OCT tracking adjust 0 001V oct Bank Edit Sample Edit Sample 1V OCT tracking adjust 0 001V oct Revert to Saved everything Hold 4 seconds Edit Sample Edit Sample Reverse Revert Revert Bank Bank PLAY Copy ...

Reviews: