background image

3M 3 in. Random Orbital Buffer 

Revision 06009

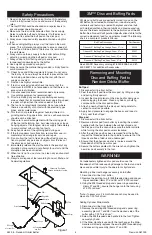
Safety Precautions

. Read all instructions before using this tool. All operators 

must be fully trained in its use and aware of these safety 

rules. 

2. The tool RPM should be checked on a regular basis to 

ensure proper operating speed.

3. Make sure the tool is disconnected from the air supply.  

Select a suitable buff pad and secure it to the disc pad.  

Be careful to center the buff pad on the disc pad.

. Always wear required safety equipment when using this 

tool.

5. When sanding/buffing always start the tool on the work-

piece.  This will prevent gouging due to excess speed of 

the buff pad. Stop air flow to the tool as it is removed from 

the workpiece.

6. Always remove the air supply to the buffer before fitting, 

adjusting or removing the buff pad or disc pad.

7. Always adopt a firm footing and grip and be aware of 

torque reaction developed by the buffer.

8. Use only 3M approved spare parts.

9. Always ensure the material being sanded is firmly fixed to 

avoid movement.

0. Check hose and fittings regularly for wear. Do not carry 

the tool by its hose; always be careful to prevent the tool 

from being started when carrying the tool with the air 

supply connected.

. Dust can be highly combustible.

2. If tool is serviced or rebuilt check to ensure that the 

maximum tool RPM is not exceeded and that there is no 

excessive tool vibration.

3. Do not exceed maximum recommended air pressure.  

Use safety equipment as recommended.

. Prior to installing any sanding or polishing accessory, 

always check that it’s marked maximum operating speed 

is equal or higher than the rated speed of this tool.

5. The tool is not electrically insulated. Do not use where 

there is a possibility of contact with live electricity, gas 

pipes, and/or water pipes.

6. This tool is not protected against hazards inherent in 

grinding and cutting operations, and no such accessories 

should ever be attached.

7. Take care to avoid entanglement with the moving parts 

of the tool with clothing, ties, hair, cleaning rags or loose 

hanging objects. If entangled, stop air supply immediately 

to avoid contact with moving tool parts.

8. Keep hands clear of the spinning pad during use.

9. If the tool appears to malfunction, remove from use im-

mediately and arrange for service and repair.

20. Do not allow the tool to free spin without taking precau-

tions to protect any persons or objects from the loss of 

the abrasive or pad ruptures. 

2. Immediately release the start handle in the event of any 

disruption of pressure; do not attempt to re-start until the 

disruption has been corrected. 

22. When tool is not in use, store in a clean, dry environment 

free of debris.

23. Recycle or dispose of tool according to Local, State, and 

Federal regulations.

3M™ Disc and Buffing Pads

3M disc and buff pads are perfectly mated for use on the 
3M Buffer. Constructed from premium, industrial-quality 
materials and featuring a riveted fiberglass and steel hub 
with molded urethane, their durability and precise construc-
tion are the ideal complement to the performance of the 3M 
Buffer. See Product Configuration/Specifications table for the 
correct replacement pad for a particular model. The following 
chart is a sample of products offered.

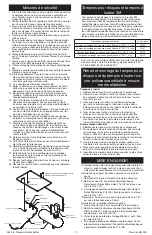
Figure 

Closed Loop Pipe System

Sloped in the direction of air flow

Drain Leg

Ball Valve

To Tool Station

Filter

Drain Valve

Regulator

Lubricator

Ball

Valve

Ball Valve

Air Flow

Air Dryer

Air Compressor

and Tank

Air Hose

To Coupler

at or near Tool

Removing and Mounting

Disc and Buffing Pad to

Random Orbital Buffer

Buff pad

. Disconnect air line from buffer.
2. Peel the old buff pad from the disc pad, by lifting an edge 

and puling firmly upward.

3. Inspect the Hook material on the disc pad for damage or 

debris clogging the hooks. Clean any debris or buffing 
compound from the disc pad surface.

. Attach a new buff pad to the disc pad, being careful to 

center it as well as possible.

5. Apply hand pressure to engage the hooks and loops to 

firmly seat the buff pad.

Disc pad

. Disconnect air line from buffer.
2. Remove old disc pad from buffer by inserting the wrench, 

supplied with the tool, between the rubber shroud and 
the disc pad. Use the wrench to secure the buffer spindle 
while turning the disc pad counter clockwise.

3. After the old disc pad has been removed from the buffer, 

inspect the threaded hole in the spindle to ensure that the 
threads are free of debris and undamaged.

. Ensure that the phenolic washer is in place around the 

threaded shaft of the new disc pad.

5. Secure the buffer spindle with the wrench and tighten the 

new disc pad securely to the tool.

See 3M ASD Accessory catalog 6-5002-8098-9 and 6-
5002-8097- for additional Accessories.

WARNING!

An inadequately tightened disc pad could cause the 
threaded shaft to break causing damage to the tool and work 
piece and possible injury to the operator or bystanders.

Mounting rubber tool hanger accessory onto buffer
. Disconnect air line from buffer;
2. Remove the existing two (2) M8 threaded plug and spacer 

ring assemblies (items 27 and 28) with T-20 Torx driver*,

3. Using the M8 threaded plug and spacer ring assemblies 

(items 27 and 28), secure the hanger onto the tool using 
a T-20 Torx driver*.

 
*Note: if necessary a 2.5mm Allen wrench may be used in 
place of a T-20 Torx driver

Adding Optional Side-Handle
. Disconnect air line from buffer.
2. Remove the existing M8 threaded plug and spacer ring 

assembly (items 27 and 28) from the desired side of the 
buffer with a T-20 Torx driver*.

3. Screw the M8 threaded side handle into the tool. Tighten 

securely by hand.

. If the Side–Handle is used with the tool hanger, the Side–

Handle will directly replaces the existing M8 threaded plug 
and spacer ring assembly (items 27 and 28).

Buff Pad Description

Part Number

Finesse-it™ Buffing Pad, Orange Foam, 3

1

/

4

 in.

02648

Finesse-it™ Buffing Pad, Orange Foam, 3

3

/

4

 in,

02637

Finesse-it™ Buffing Pad, Grey Foam, 3

1

/

4

 in.

25134

Finesse-it™ Buffing Pad, Grey Foam, 3

3

/

4

 in,

25135

Summary of Contents for 28333

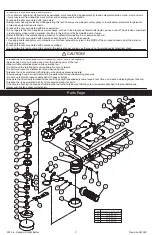
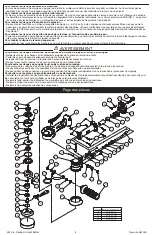
Page 1: ...ear protection for eyes ears and respiratory protection when in the work area or while operating this product Follow your employer s safety policy for PPE s and or ANSI Z87 1 or local national standards for eyewear and other personal protective equipment requirements Wear protective apparel taking into consideration the type of work being done Never exceed marked maximum input pressure 90psi 62Mpa...

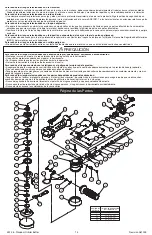
Page 2: ...s with loose or damaged air hoses or fittings Be aware that incorrectly installed hoses and fittings might unexpectedly come loose at any time and create a whipping impact hazard To reduce the risk associated with fly off of abrasive product or parts Use care in attaching backup pad following the instructions to ensure that they are it is securely attached to the tool before use Never over tighten...

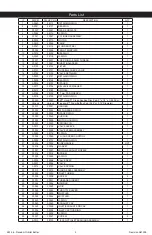
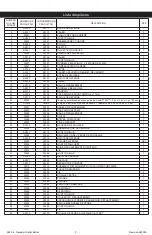
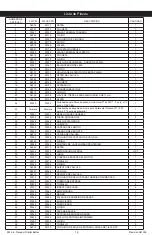
Page 3: ...m Buffing Pad 3 25 or 3 75 Diameter 1 26 30331 30331 HANGER 1 27 30332 30332 M8 THREADED PLUG 2 28 30328 30328 SPACER RING 2 29 30362 30362 SHROUD 1 30 30359 30359 MOTOR HOUSING 1 31 30300 30300 SPRING PIN 1 32 A0015 28102 VALVE SLEEVE 1 33 30338 30338 VALVE STEM ASSEMBLY 1 34 A0043 28116 O RING 1 35 30348 30348 FLUSH SPEED CONTROL 1 36 A0039 28112 RETAINING RING 1 37 30334 30334 SIDE HANDLE OPT 3...

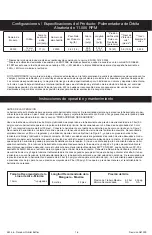
Page 4: ...ean lubricated air supply that will give a measured air pressure at the tool of 6 2 bar 90 psig when the tool is running with the lever fully depressed It is recom mended to use an approved 10 mm 3 8 in x 8 m 25 ft maximum length airline Connect the tool to the air supply as shown in Figure 1 Do not connect the tool to the airline system without an easily accessible air shut off valve It is strong...

Page 5: ...al quality materials and featuring a riveted fiberglass and steel hub with molded urethane their durability and precise construc tion are the ideal complement to the performance of the 3M Buffer See Product Configuration Specifications table for the correct replacement pad for a particular model The following chart is a sample of products offered Figure 1 Closed Loop Pipe System Sloped in the dire...

Page 6: ...cordance with all applicable operating instruc tions safety precautions and other procedures stated in the operating manual to be entitled to warranty coverage 3M shall have no obligation to repair or replace any tool or part that fails due to normal wear inadequate or improper maintenance inadequate cleaning nonlubrication improper operating environment improper utilities operator error or misuse...

Page 7: ... Ne jamais excéder la pression d alimentation maximale indiquée 90 psi 0 62 Mpa 6 2 bars Toujours porter une protection pour les yeux L outil ne doit pas être utilisé en présence de tiers En cas de vibrations ou bruit inhabituels de l outil en service cesser immédiatement son utilisation et vérifier si des composantes sont usées ou endommagées Corriger l anomalie ou remplacer la composante défectu...

Page 8: ...ncore les normes locales nationales sur la protection des yeux et autres exigences de protection individuelle Pour réduire les risques d incendie ou d explosion Ne pas manier l outil dans un milieu susceptible d explosion c à d là où il y a des liquides ou matières combustibles des gaz ou de la poussière Les abrasifs qui travaillent le métal produisent des étincelles risquant d enflammer la poussi...

Page 9: ...ètre de 3 25 po ou de 3 75 po 1 26 30331 30331 ANNEAU DE SUSPENSION 1 27 30332 30332 BOUCHON FILETÉ M8 2 28 30328 30328 BAGUE D ESPACEMENT 2 29 30362 30362 COIFFE 1 30 30359 30359 BOÎTIER DU MOTEUR 1 31 30300 30300 TIGE À RESSORT 1 32 A0015 28102 MANCHON DE SOUPAPE 1 33 30338 30338 ENSEMBLE TIGE DE SOUPAPE 1 34 A0043 28116 JOINT TORIQUE 1 35 30348 30348 RÉGULATEUR DE VITESSE DE POLISSAGE 1 36 A003...

Page 10: ... longueur maximale de 8 m 25 pi Se référer à la figure 1 pour brancher l outil à la source d air Ne pas brancher l outil au circuit d air comprimé en l absence d un robinet de sectionnement d accès facile Il est en outre fortement recommandé de poser un filtre à air un régulateur et un lubrificateur FRL Figure 1 pour alimenter l outil en air propre lubrifié et à la bonne pression Toujours utiliser...

Page 11: ...lass and steel hub with molded urethane their durability and precise construction are the ideal complement to the performance of the 3M Polisseuse Consulter le tab leau Configuration spécifications du produit pour connaître le bon tampon de rechange à utiliser pour un modèle donné Le tableau ci dessous est un exemple des produits offerts Retrait et montage du tampon pour disques et du tampon à lus...

Page 12: ...ésentée dans les 12 mois suivant la date d achat Réparation du produit après l expiration de la garantie 3M ne fournit pas de service de réparation après l expiration de la garantie Soumettre une réclamation au titre de la garantie Communiquer avec le distributeur de sa région pour une réclamation au titre de la garantie en conformité avec les restrictions énoncées plus haut Prendre note que toute...

Page 13: ...o de protección personal Use ropa protectora tomando en consideración el tipo de trabajo que se va a realizar Nunca exceda la presión máxima de entrada especificada 90 lb pulg2 0 62 Mpa 6 2 bar Siempre debe usarse protección ocular adecuada La herramienta nunca debe operarse en presencia de observadores Si al operar este producto nota ruido o vibración anormales interrumpa su uso inmediatamente e ...

Page 14: ... gafas protectoras y otros requisitos de equipo de protección personal Para reducir los riesgos relacionados con fuego o explosión No opere la herramienta en atmósferas explosivas como aquéllas en las que hay presencia de líquidos gases o polvos inflamables Los elementos abrasivos pueden crear chispas al trabajar el material dando como resultado la ignición de polvo o vapores inflamables Remítase ...

Page 15: ... pulg ó 3 75 pulg de diámetro 1 26 30331 30331 GANCHO PARA COLGARLA 1 27 30332 30332 TAPÓN ROSCADO M8 2 28 30328 30328 ANILLO ESPACIADOR 2 29 30362 30362 CUBIERTA 1 30 30359 30359 CARCASA DEL MOTOR 1 31 30300 30300 PASADOR DE RESORTE 1 32 A0015 28102 CAMISA DE VÁLVULA 1 33 30338 30338 CONJUNTO DE VÁSTAGO DE VÁLVULA 1 34 A0043 28116 O RING 1 35 30348 30348 CONTROL DE LA VELOCIDAD PROTEGIDO 1 36 A00...

Page 16: ...la herramienta a la fuente de suministro de aire como se ilustra en la Figura 1 No conecte la herramienta al sistema de la línea de aire sin tener una válvula de cierre de aire fácilmente accesible Se recomienda ampliamente usar un filtro un regulador y un lubricador de aire como se ilustra en la Figura 1 ya que eso proporcionará a la her ramienta aire limpio y lubricado a la presión correcta En t...

Page 17: ...y construcción precisa los convierten en el complemento ideal para el desempeño de la 3M Pulimentadora Consulte la tabla de Configuración Especificaciones de Productos para obtener la información del montaje para un modelo en particular El siguiente cuadro es una muestra de los productos ofrecidos Extracción y colocación de la almoh adilla para Disco y de Pulimentado en la Lijadora de Órbita Aleat...

Page 18: ...te a su distri buidor al presenter una reclamación de garantía de acuerdo con las restricciones señaladas antes Nótese que todas las reclamaciones de garantía están sujetas a la aprobación del fabricante Asegúrese de conservar su comprobante de compra en un lugar seguro Este comprobante debe presentarse junto con la reclamación de garantía dentro del plazo de 1 año a partir de la fecha de compra R...

Page 19: ...e trabalho a ser feito Nunca exceda a pressão máxima de entrada indicada 90 psi 0 62 Mpa 6 2 bar Sempre use uma proteção visual adequada A ferramenta não deve ser operada na presença de observadores Se perceber qualquer ruído ou vibração anormal ao operar o produto interrompa imediatamente a sua utilização e inspecione quanto a desgaste ou componentes danificados Corrija ou substitua o componente ...

Page 20: ... nacionais em relação aos requisitos para óculos e outros equipamentos de proteção individual Para reduzir os riscos associados a fogo ou explosão Não opere a ferramenta em atmosferas explosivas como por exemplo na presença de líquidos gases ou poeiras inflamáveis Os abrasivos podem crier faíscas ao se trabalhar com o material resultando na ignição da poeira ou dos vapores inflamáveis Consulte a M...

Page 21: ... pol ou 3 75 pol 1 26 30331 30331 ALÇA 1 27 30332 30332 PLUGUE CHANFRADO M8 2 28 30328 30328 ANEL ESPAÇADOR 2 29 30362 30362 ENVOLTÓRIO 1 30 30359 30359 ALOJAMENTO DO MOTOR 1 31 30300 30300 PINO DA MOLA 1 32 A0015 28102 LUVA DE VÁLVULA 1 33 30338 30338 CONJUNTO DA HASTE DA VÁLVULA 1 34 ANEL O 28116 ANEL TIPO O 1 35 30348 30348 CONTROLE DE VELOCIDADE DE JATO 1 36 A0039 28112 ANEL DE RETENÇÃO 1 37 3...

Page 22: ... ferramenta à alimentação de ar conforme mostrado na figura 1 Não conecte a ferramenta ao sistema da linha de ar sem uma válvula de bloqueio facilmente acessível É altamente recomendado que sejam usados um filtro de ar regulador e lubrificador FRL conforme mostrado na figura 1 pois este conjunto fornecerá ar limpo e lubrificado na pressão correta para a ferramenta Em qualquer caso sempre devem ser...

Page 23: ... 3M são perfeitamente ajustada para uso na Lixadeira da 3M Feito com materiais de qualidade industrial superior e apresentando um centro de fibra de vidro e aço preso rebitado com uretano moldado sua durabilidade e construção exata são o complemento ideal para o desempenho da lixadeira 3M Veja a tabela das Configura ções do Produto Especificações para o suporte de substituição correto para um mode...

Page 24: ...icação de garantia Entre em contato com o seu fornecedor ao enviar uma reivindicação de garantia de acordo com as restrições listadas acima Observe que todas as reivindicações de garantia estão sujeitas à aprovação do fabricante Certifique se de manter todos os recibos de vendas em local seguro Este deve ser apresentado ao preencher uma reivindicação de garantia no prazo de 1 ano a partir da data ...

Page 25: ... 或砂纸材料产生的粉 尘 可能导致肺部伤害及 或其他身体的 伤害 请依照MSDS规定 使用集尘器或现场 抽风装置 并请戴上政府单位核准的口 罩及眼部与皮肤防护装置 警告 为了减少与研磨产品 砂碟或工具断裂 锐边 危险高压 破裂 振动和噪声所致影响有关的危险 在使用本工具之前 请阅读 理解并遵守这些用法说明所包含的安全信息 保留这些用法说明 以备将来查阅 只允许经过正确训练的人员来维修本工具 操作的安全要求 工作时要清醒 正确着装 而且不要在酒精或毒品的影响下操作工具 当身处这种工作区域或者在操作这种产品时 操作者和其它人员必须总是穿戴眼睛 耳朵以及呼吸方面的保护器材 遵守贵公司的 PPE安全政策和 或ANSI Z87 1或者当地 国家的防护眼镜标准及其它个人防护设备要求 根据将要完成的工作类型 穿戴好防护服 决不要超过标示的最大输入压力 90psi 62Mpa 6 2Bars 必须总是佩戴...

Page 26: ... 1 5 0 A P X 7 4 H T 1 7 0 0 A P X 8 4 A H 5 2 3 0 C P X 9 4 R G 7 6 0 0 D P X 0 5 51 XPA2079 3M U M 3 4 0 2 A P X 2 5 U M 4 7 1 2 A P X 3 5 R O 1 8 0 2 A P X 4 5 X E 5 4 4 0 B P X 5 5 L N I 2 5 9 1 A P X 6 5 L N I 0 1 5 0 A P X 7 5 12 55 65 6 2 7 3 40 21 30 2 4 3 4 47 20 25 2 2 2 8 59 27 30 3 0 3 4 60 60 72 6 8 8 1 40 41 42 43 44 46 45 56 22 1 2 3 5 4 7 6 8 9 10 11 12 13 14 15 16 17 18 19 38 20 3...

Page 27: ... 20外部尺寸 1 25 各种 各种 Finesse it泡沫磨光盘 3 25英寸或者3 75英寸的直径 1 26 30331 30331 挂钩 1 27 30332 30332 M8攻纹插头 2 28 30328 30328 垫圈 2 29 30362 30362 护罩 1 30 30359 30359 电机箱 1 31 30300 30300 弹簧定位销 1 32 A0015 28102 阀套 1 33 30338 30338 阀杆组件 1 34 A0043 28116 O形圈 1 35 30348 30348 冲洗速度控制 1 36 A0039 28112 挡圈 1 37 30334 30334 侧手柄 OPT 38 30336 30336 衬垫 1 39 30357 30357 电机排气咀 1 40 30314 30314 螺丝 3 41 30344 30344 O形圈 1 42 ...

Page 28: ... this will supply clean lubricated air at the correct pressure to the tool In any case appropriate air pressure regulators shall be used at all times while operating this tool where the supply pressure exceeds the marked maximum of the tool Details of such equipment can be obtained for your tool distributor If such equipment is not used the tool should be manually lubricated To manually lubricate ...

Page 29: ...用匹配完美 本工具都是 用特级工业优质材料制成的 特征性地拥有用模塑聚氨酯铆合 的玻璃棉和钢毂 而且其耐用性和精确的构制都理想地补足了 3M磨光器的性能 欲知特定型号的正确更换砂碟 请参看配 置 规格表 下表是所供产品的样本 将砂碟和磨光盘从Rand轨道砂光机 上取下或者将其固定到Rand轨道砂 光机上 磨光盘 1 断开磨光器的空气管路 2 将旧磨光盘的一缘提起 并稳定地向上拉 从而将其从砂 碟上剥离下来 3 检查砂碟上的钩料是否受损或者钩上是否有碎屑堵塞 清 洁砂碟表面上的任何碎屑或者磨光剂 4 将一块新的磨光盘安装到砂碟上 注意使其尽可能好地同 心对齐 5 用手压啮合钩和环 使磨光盘稳固到位 砂碟 1 断开磨光器的空气管路 2 通过将本工具随附的扳钳插入橡胶罩和砂碟之间来取下磨光 器上的旧砂碟 在逆时针转动套爪螺母的同时 使用扳钳 加固磨光器主轴 3 在已经从磨光器上取下旧砂碟之后 检...

Page 30: ...mining whether the 3M tool is fit for a particular pur pose and suitable for user s application User must operate the tool in accordance with all applicable operating instruc tions safety precautions and other procedures stated in the operating manual to be entitled to warranty coverage 3M shall have no obligation to repair or replace any tool or part that fails due to normal wear inadequate or im...

Page 31: ...3M 3 in Random Orbital Buffer 31 Revision 061009 ...

Page 32: ...3M 3 in Random Orbital Buffer 32 Revision 061009 ...

Reviews: