background image

11

10

3DISON H700

 User Manual V.1

3DISON H700

 User Manual V.1

C2.  Setting up your 3DISON H700

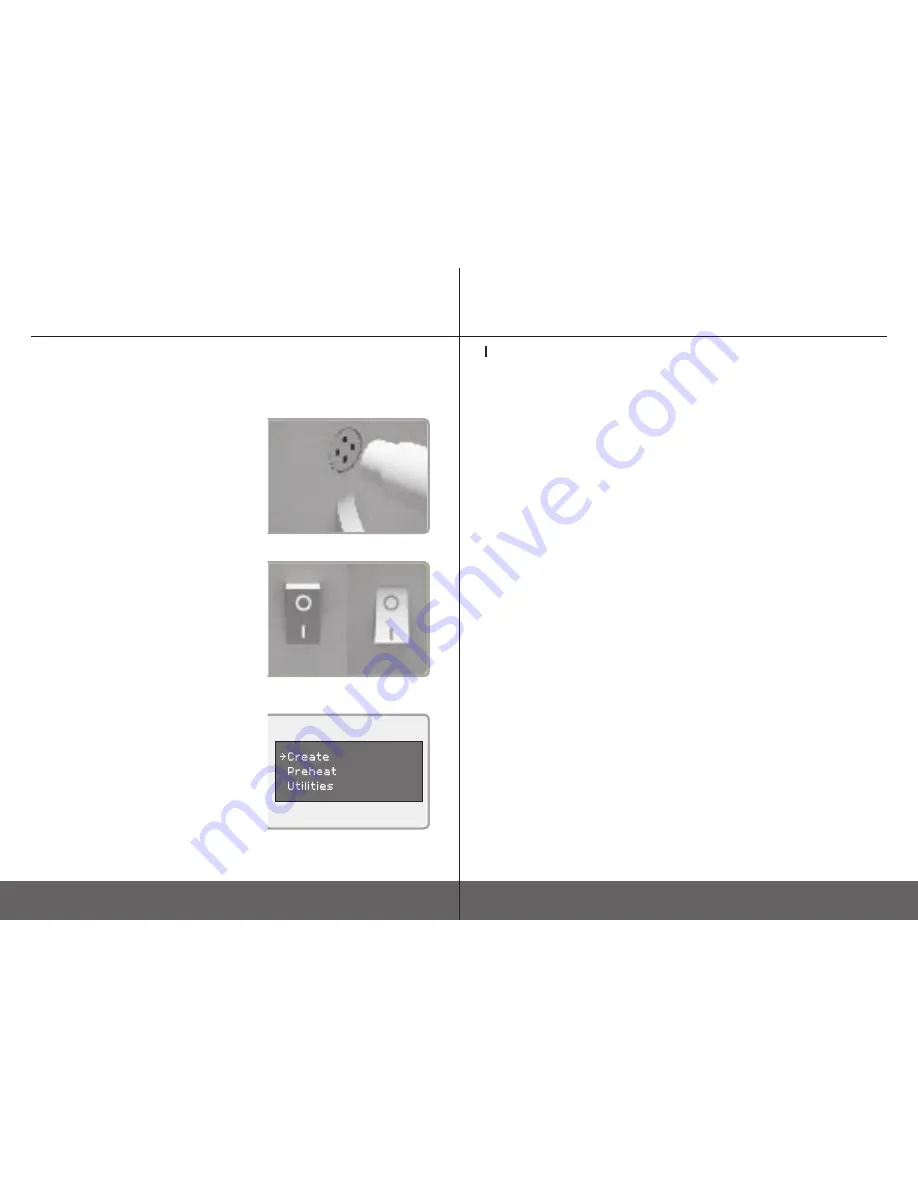
1. Make sure the power switch is Off. Locate the 
power cord and plug it into the power input port at 
the back of the 3DISON H700. Plug the power cord 
into an electrical outlet.

NOTE: The socket outlet must be located near the 

equipment and must be easily accessible. 

2. The on/off button (‘– | O’) of the 3DISON H700 is
located in the upper part on the back of the machine. 
The ’O’ represents off and the ‘–’ represents on. 
When the switch ON ‘–’ the 3DISON H700 is turned 
on and should start up. Press the power button to 
start.   

NOTE: It is recommended to turn off the 

3DISON H700 when it is NOT in use. 

3. Once you see the LCD display as shown in the
picture, load filament and then level your the print-
ing bed for the first time. You can load or unload fila-
ment, or adjust the horizontality of the printing bed 
by selecting the concerned menu Utilities.

Tip. LCD Display

●   

Four Arrow buttons surround a central OK button. 

Use the arrows to navigate through the LCD menus 

●  

OK button is to make selections.

●  

The left arrow often allows you to go back or 

cancel an action.

C. Unpacking and Setting up ∃DISON H700

Display Menu Introduction

1. Create from SD : To load a file from SD Card

2. Preheat : To preheat the hot-end(nozzle) 


- Extruder : by setting On/Off you can start preheating of the extruder


- Platform : by setting On/Off you can start preheating of the print bed

3. Utilities : It will lead to 12 different options for hardware. You do not want to change the 

settings without any specific explanation because they are only for developers or after-

sales service


- Monitor mode : it shows current temperature of the extruder and printing status


- Filament loading : to put the filament into the extruder or pull it out of the extruder 


- Preheat settings : to set up temperature and the printing bed 


- Level Build Plate : to manually level the printing bed 


- Pre-leveling : to level the printing bed before starting Auto-leveling 


- Home Axes : To default the position of X, Y, Z axis 


- Bot Statistics : Shows the operation time spent printing. 


- Life Time: Total operation time of 3DISON H700 


  - Last Print: Last build time 


  - Filament: Total amount of filament used (in meter) 


  - Fil. Trip: Amount of filament used for the last build (in meter) 


- Filament Odometer : Not only this shows the filament information, but also you can de 


fault the trip value here.


- Life: Total amount of filament used (in meter, unable to reset) 


  - Trip: Amount of filament used for the last build   (in meter) 


- General Settings : To configure sound, LED color or etc 


  - Ditto Printing Off 


  - Override GCTemp OFF 


   - Pause with heat OFF 


   - Sound ON/OFF


  - Heat LEDs ON/OFF 


   - LED Color :to change LED colors. 


   - Accelerate : To accelerate the extruder speed  


   - Extruders : To choose SINGLE or DOUBLE depending on 3DISON H700 


  - Extruder Hold ON/OFF 


  - HBP Installed NO 


  - Tool Offset Sys NEW 


   - Check SD Reads YES 


   - P-Stop Control OFF 


- Profile 


- Home Offsets 


- Jog Mode : To control manually the location of the extruder and the build platform 


 * Press the 3D button to go back to the main menu 


- Disable Steppers : To stop the motor. 


-  Enable Steppers : To start the motor.


- Blink LEDs : To make LED lamp flickering 


- Calibrate Nozzles 


- Restore Settings :To initialize 3DISON H700


- Eeprom 


- Version Information : It shows the firmware version. 

C. Unpacking and Setting up ∃DISON H700

Summary of Contents for H700

Page 1: ...rt your experience with 3DISION H700 In order to achieve great results you will need to ex periment and tinker That s why it s so crucial to take the time to learn about your new machine In this User Manual you will learn the ba sics of the 3DISON H700 as well as howtounpackitsafelyandgetitsetup Okay Let s get it started E ...

Page 2: ...oading and Leveling the printing bed D1 Filament Loading and Unloading D2 Leveling the printing bed E Making a print with CreatorK 8 E1 CreatorK 8 Overview E2 How to use CreatorK 8 F Troubleshooting F1 Troubleshooting FAQ F2 Support Contact Annex1 Exchanging the Extruder for the Metal Clay Printing Installation of the Universal Extruder After treatment for Metal Print out Annex2 Extra Features Las...

Page 3: ...abrication FFF meth od 3DISON H700 is a world class Desktop 3D printer boasting up to 25 micron 0 025 mm of superfine layer and speed of 1000mm sec 3DISON H700 features versatility when it comes to wider options of materials such as metal paste as well as filament types just by interchanging its extruder Besides 3DISON H700 performs the function of cutting or carving with the laser engrav er This ...

Page 4: ...ompatible File Format Input Output Connectivity Average Operational Noise Dual Extruder System Universal Extruder X 8mm Y Z 12mm 2GT Belt Pulley O O for checking the working status O O O O Hardware Storage Temperature Extruder Temperature 10 40 190 300 or more Physical Dimensions Frame Dimension Total shipping weight 511mmX402mmX1030mm 32 5 kg CreatorK Windows Mac OS X STL OBJ 100 220v 50 60Hz 24v...

Page 5: ...anual on our website 2 Carefully remove a cardboard and protective air bag covering the body of 3DISON H700 and now you should see a glimpse of your 3DISON H700 Take the box with the accessories out and check what is in the box 3 Now you finally set it down on a stable surface NOTE Do not discard the box and protective air bags Save these they will be handy if you ever need to transport the printe...

Page 6: ...u do not want to change the settings without any specific explanation because they are only for developers or after sales service Monitor mode it shows current temperature of the extruder and printing status Filament loading to put the filament into the extruder or pull it out of the extruder Preheat settings to set up temperature and the printing bed Level Build Plate to manually level the printi...

Page 7: ... Pushthefilamentintothebluecapontheextruder bypressingthespringblockuntilyoufeelthemotor pulling in it Wait until you see the filament coming out from the extruder nozzle NOTE Please make sure to keep the end of curved filament straight before inserting 5 Press OK button to stop loading When loading D Getting started Filament Loading and Leveling the Printing Bed D1 Filament Loading and Unloading ...

Page 8: ...and slides with feeling of a little bit scratching leveling has been completed Press OK button to finish the leveling NOTE In CreatorK uncheck the mark in the Auto leveling item when generating Gcode 1 Press the power button to start to adjust the horizontality of the printing bed Open the front door and put a sheet of A4 paper onto the printing bed before manual leveling NOTE The thickness of A4 ...

Page 9: ...2 How to use CreatorK 8 Installing CreatorK 8 1 Run CreatorK V8 Install setup file E Making a print with CreatorK 8 2 Follow the directions to install the software The installation of Python 2 7 6 and USB driver is automatically implemented at the same time Python It is one of the widely used program ming languages which enable the slicing program named Skeinforge to activate 3 Go to the Desktop a...

Page 10: ...mmands reverses the undo Mirror function Ifyouwanttochangex y z smirror clickandputthemousepointeronthe box Click right mouse button and you can adjust x y z mirrors Rescale You can adjust the size using this magnifying glass icon By dragging up and downmouse youcanrescaletheobject Andwhenyouclickontheplatform you can rescale the object to the maximum size If you enter one the others willchangeinp...

Page 11: ...k acryl and 2 mm thick plywood Metal Silver Metal bronze Metal Cooper Metal Steel When generating Gcode before starting metal printing be sure to choose the corresponding printing option depend ing on materials These settings are optimized to the material and theses are provided by the developers of ROKIT Inc E Making a print with CreatorK 8 E2 How to use CreatorK 8 Continued None 3DISON H700 woul...

Page 12: ...700 applies 3 different nozzle diameters 0 2mm 0 4mm and 0 6mm You should select corresponding diameters when using different nozzles Extruder 4 After setting all the options click generate G code button which is at the bottom of the pop up And then you can see G code build process screen This process is a slicing process enabling 3DISON to 3D print the STL 3D image 5 Once finished this work SD ca...

Page 13: ...ment is not properly operated If malfunc tion occurs dismantle the extruder and remove the wastes accumulated on the gear using a brush such as tooth brush then the problem can be solved A3 It is also important to set the extruder temperature according to material If the extruder temperature is too high or too low the material may hold together or may not be properly solved to prevent a smooth out...

Page 14: ...mpanies Q Isitpossibletoprintinfilamentformatusingametalmaterial Annex1 Exchanging the Extruder for the Metal Clay Printing 3DSION Metal Clay Printing What s in the METAL KIT METAL KIT This metal kit comes with the printer Final product is made by the process of 3D printing the metal clay through the nozzle and then firing the metal clay For this interesting 3D printing you should first open the m...

Page 15: ...of clay Turn the biggest gear to the front as shown in the image so that the belt will be as tight aspossible Annex1 Exchanging the Extruder for the Metal Clay Printing 3DSION Metal Clay Printing Attach the Extended Stopper to the lower part of Z axis to make the printing bed stop at the fixed distance for metal printing Use stopper in the image1 for 3DISON Multi and use stopper in the image2 for ...

Page 16: ...ng the Extruder for the Metal Clay Printing 3DSION Metal Clay Printing 2 Copper Bronze Steel paste Take out output clay with the tile and dry it for 24 hours by natural drying or dry it by warming for at least 1 hour using a dryer Print out has been completely dried can be detached from the tile easily Prepare firing for dried sample using cube and carbon which are optional items Build up about 3c...

Page 17: ...nt and fix it using a connecting bolt Laser Engraver Switch on power after connecting the laser connector to the PCB connector Insert the laser nozzle bar into the laser mount and fix it WARNING Do NOT disassemble the laser mounted in the aluminum socket This is de signed for user ssafety A laser is a light source that can be dangerous to people exposed to it Even low power lasers can be hazardous...

Page 18: ...r WiFi Camera Embedded Battery WiFi Camera It is now now more convenient to check on the printing progress with the Wifi camera You can promptly take action to solve any kind of trouble using smart phone application VS Cam Following is the instruction on how to utilize WiFi Camera monitoring through your mobile or computer Click an added camera to set IPCAM for wireless connect ion Camera settings...

Page 19: ...ra Embedded Battery Connect the camera to the program by double clicking IP Camera on the right Once you have checked the connection Click a button at right of mouse to select Camera Options Embedded battery prevents emergent situation which is unexpected stopping supply of electricity during printing Continuous printing without stopping is possible even if the power cord is pulled off by mistake ...

Page 20: ...38 3DISON H700 User Manual V 1 Memo Memo ...

Page 21: ...ER c ROKIT Inc B 1106 Kabul Great Valley 60 5 Gasan dong Geumcheon gu Seoul Korea E http en 3disonprinter com T 02 867 0182 F 02 865 0182 E mail 3dison rokit co kr Multiple Perfection Desktop 3D Printer DISON H700 E ...

Reviews: