21
20
3DISON H700
User Manual V.1
3DISON H700
User Manual V.1
E. Making a print with CreatorK 8
E2. How to use CreatorK 8 (Continued)
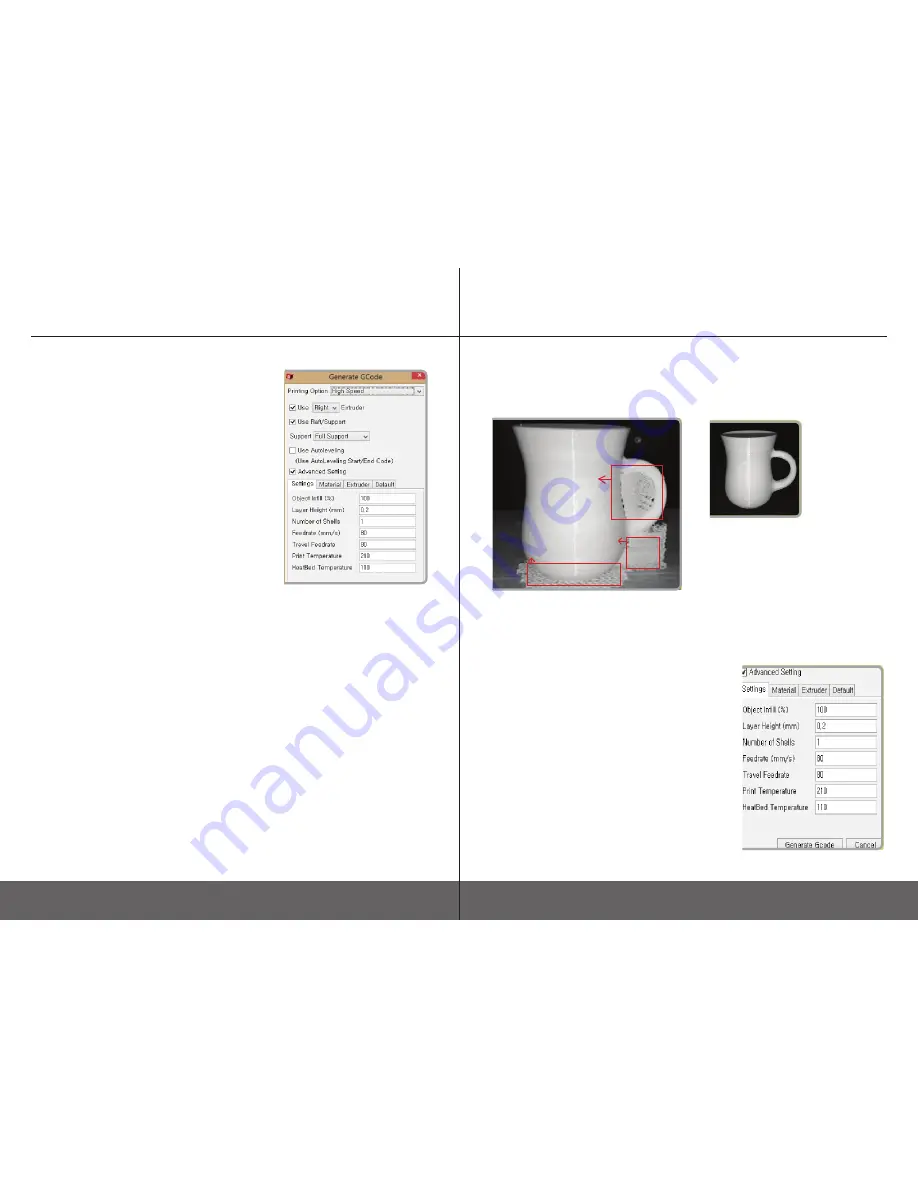
3. Once you finished, click on the G-code icon on the
far left to generate G-code. Then a pop-up window will
show up to save or not to save the .stl file which you
have edited in location or size etc. After this, you can
see this display.
Tip. 3DISON’s software CreatorK 8 is based on the Skeinforge,
which has a plenty of settings. We are providing about 9
appropriate printing options so that any users can set up the
profile easily.
But, please note that you should enter each settings unless
you choose a specific printing option. (Uncheck the mark in the
Advanced Setting item.)
Following are specific explanations about the items
you should set up before generating G-code. Your
print-out’s quality and time will be affected.
1) Printing Option
There are basic profiles optimized to print out what you want conveniently.
(suggested but not required)
※
If you don’t want to use these printing option, generate your own printing
option by selecting
GCode-Edit Slicing Profiles
and clicking any profile and
Copy.
①
High Speed : 0.2 mm layer height for big-sized object
- 700 mm/sec on 3dison Pro and 3dison H700
- 300 mm/sec on 3dison Multi
②
Standard : 0.2 mm layer height for mid-sized object
- 100 mm/sec on 3dison Pro and 3dison H700
- 100 mm/sec on 3dison Multi
③
High-Precision : 0.05 mm layer height for small-sized object
- 40 mm/sec on 3dison Pro and 3dison H700
- 40 mm/sec on 3dison Multi
④
Supreme-Precision : 0.025 mm layer height for small sized and smooth surface
- 40 mm/sec on 3dison Pro and 3dison H700
- 40 mm/sec on3dison Multi
※
The thinner the layer height the more the time is required to finish 3D printing
⑤
Laser : to cut 3 mm-thick acryl and 2 mm-thick plywood
⑥
Metal(Silver),
⑦
Metal (bronze),
⑧
Metal (Cooper),
⑨
Metal (Steel)
※ When generating Gcode before starting metal printing, be sure to choose the corresponding ‘printing option’ depend
-
ing on materials. These settings are optimized to the material and theses are provided by the developers of ROKIT Inc.
E. Making a print with CreatorK 8
E2. How to use CreatorK 8 (Continued)
None :
3DISON H700 would not build support, but only raft.
Exterior Support :
Choose if there is a space between the bottom surface of the ob-
ject and the plate.
Full Support :
Choose if there is a space in the middle of the object.
(Right after
removing a raft
and supports)
(Before removing a raft and supports)
Tip. According to how you locate the
object, different shape of supports will be
printed. Minimizing supports as possible
leads to better results as well as saving
the material used for support.
3) Use Auto Leveling
You can choose auto leveling function optionally. If you want to
adjust the printing bed manually, don’t check the box.
4) Advanced Settings
If you check advanced setting box, you can find several setting
options for printing. There are four categories in this advanced setting.
2) Support
Settings
①
Object Infill (%)
You can enter a number between 10 and 100 to fill inside.
Tip. It determines the density. If the density is not an important
factor, you may set it up to less than 50 to save the overall printing
time and material.
②
Layer Height (mm)
You can enter a number between 0.05 and 0.3 for layer height.
Tip. The higher the layer is, the less the printing time. It is recom-
mend-able for you to enter the number of over 0.1 mm in this item.
③
Number of Shells
You can enter a number from 0 to 3 to determine the thickness
of outer cover and it depends on the object infill settings. When
you don’t want to make a shell, you should fill 100% inside.
Tip. When you want to enter ‘0’ for shell, you should fill ‘100%’ inside.
Full Support
Exterior Support
Raft(Base)


