background image

3DGence ONE   |   15

version 1.0/08.2017

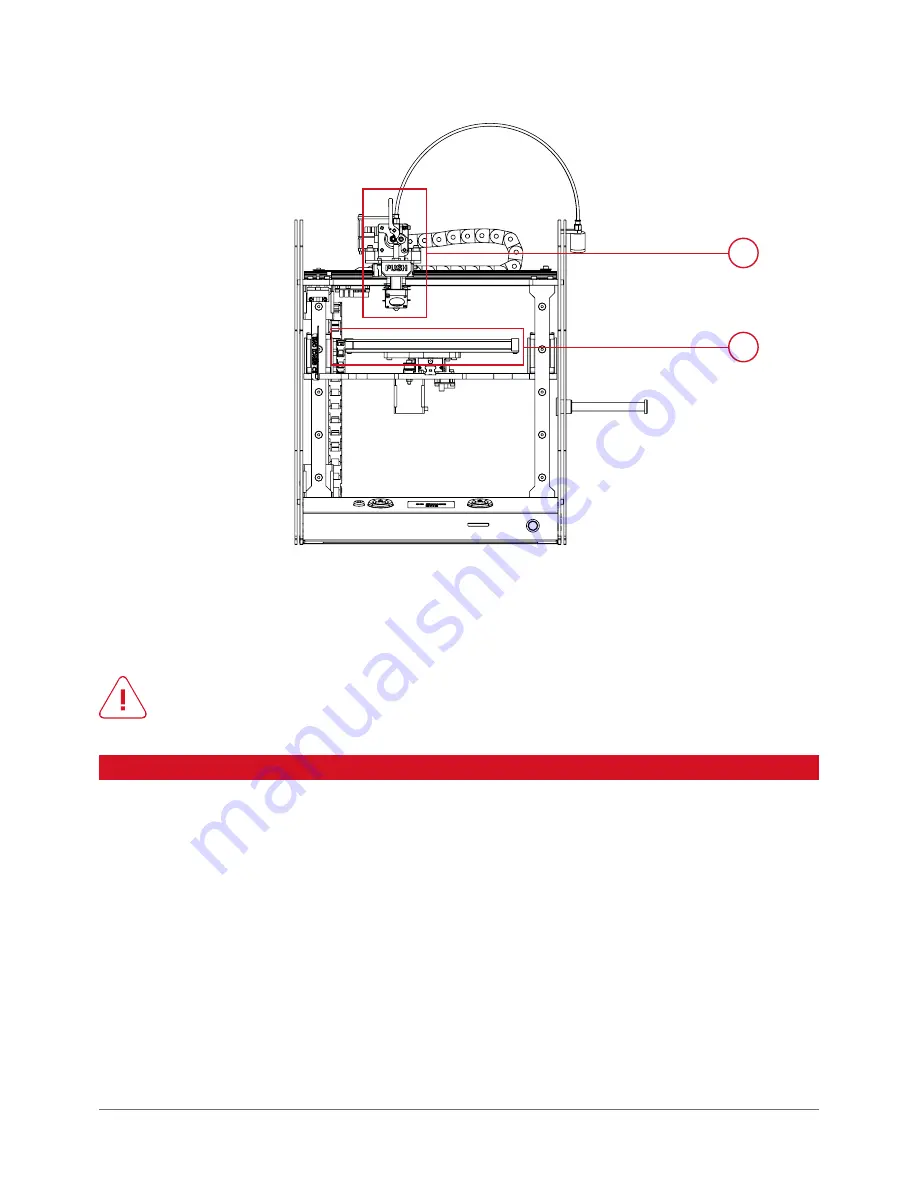
Figure 12 shows locations of hot zones marked in red, where the operating machine reaches a high temperature. Touch-
ing any elements placed in hot zones before their complete cooling may result in burns!

Zone 1: hotend and extruder zone. Working temperature to 265°C. 
Zone 2: heatbed zone; working temperature to 160°C. 

2. CONTENTS OF EQUIPMENT

The complete 3DGence ONE set includes the following items. Most of them is placed in the flat box shown in fig. 13.

•  3DGence ONE Printer, 

•  spatula for removing printouts (1), 
•  USB Cable (2),
• 

filament spool holder (Note: left-hand thread!) (3), 

•  tweezers (4), 
•  SD memory card (5), 
•  USB memory stick with software (6), 
• 

cleaner with handle and teflon wire (7), 

•  power cable (8), 
•  protective gloves (9), 
• 

filament spool,

•  hotend with nozzle with a diameter of 0.4 mm (already installed), 
• 

panels made of polycarbonate (fig. 14) (sides, depending on the color version: red, blue or orange) (11), 

•  additional hotends (optional) (10),
•  3DGence Slicer.

Fig. 12. Extruder and cooling fans.

2

1

Summary of Contents for ONE

Page 1: ...USER MANUAL 3DGence ONE ...

Page 2: ......

Page 3: ...driver 2 Connecting and starting printer 3 Calibration of heatbed 3 1 Indications for calibration of heatbed 3 2 Heatbed calibration procedure 4 Printing material application procedure 4 1 Mounting filament 4 2 Filament removal 4 3 Changing filament during printing IV FIRST PRINTOUT 1 Launching SD card code 2 Evaluation of operational quality of printer V SOFTWARE 1 Introduction 1 1 Quality guaran...

Page 4: ...ettings 6 2 Setting edition window 6 3 Profile sharing 6 4 Advanced profiles step by step 7 Support and updates 7 1 Support 7 2 Updating print profiles 7 3 Software update 7 4 Update statuses VI POST PRINTING OPERATIONS 1 Removing the printout from the device 2 Cleaning 2 1 Cleaning the print head 2 2 Cleaning work table 3 Switching off printer VII HEAD REPLACEMENT VIII CALIBRATION OF AXES IX MAIN...

Page 5: ...vice Before operating the printer care fully read all instructions for proper and safe use of the device It is forbidden to operate the printer without prior reading this manual Inappropriate use can damage the unit cause phys ical injuries or threaten life and safety of its user Starting work with 3DGence ONE printer is tantamount to reading the full content of this manual understanding and full ...

Page 6: ...following criteria the diameter of the filament should be 1 75 mm with a tolerance of 0 05mm the suggested printing temperature should not exceed 265 C The use of 3DGence original printing materials ensures obtaining repeatable results 3DGence shall not be held liable for any aggravation of quality of print resulting from the application of other manufactur ers filaments and consumables The use of...

Page 7: ...temperature is safe below 40 C red Heatbed temperature exceeds 40 C Do not touch the table there is a risk of burns white Printing in progress Hot table Do not touch Serious risk of burns yellow Heating appliances failure If the print head is installed properly imme diately disconnect the device from power supply and contact 3DGence technical service Color of lighting informs on the temperature of...

Page 8: ...ce ensure that the supplied voltage complies with demands stated in specification of the device protect the power plug and cord from damage disconnect the power plug if moving the device disconnect the power plug if the device is not used for an extended period of time periodically clean the nozzle to remove the external contamination use non combustible cleaner wear protective gloves when working...

Page 9: ... machine should be operated at room temperature the machine is not designed to work in dusty environments working room should have proper ventilation the printer should be placed on a hard stable surface the printer must not be exposed to direct sunlight around the working location the machine should have sufficient free space which should be measured based on machine s external dimensions and ope...

Page 10: ... Maximum external dimensions of the device taking into account maximum leaning positions of the worktable Fig 5 Maximum external dimensions of the printer accessories included and markings of X Y Z axes X Y Z 376 00 120 00 380 00 460 00 160 00 ...

Page 11: ... there are no items or leftover prints that could cause a jam or damage the machine check the X and Y axes and make sure that nothing is blocking their movement Check that the toothed belts are pulled tight and have no damage check whether Z axis stopwatch fig 6 is not damaged broken or bent and if it matches Z axis limit switch aims at the notch in limit switch check the correct operation of ther...

Page 12: ...ng the figures and terms can help in understand ing terminology widely used in 3D printing II DESCRIPTION OF PRINTER 1 CONSTRUCTION OF PRINTER Fig 7 3DGence ONE printer view left side 1 Extruder 2 Z axis limit switch 3 Z axis timer stopwatch 4 Heated table 5 Filament spool holder 6 Filament cleaner 1 2 6 3 4 5 7 8 9 11 10 7 Control buttons 8 LCD screen 9 MENU buttons 10 SD card slot 11 Power butto...

Page 13: ...er front view right side 12 X axis guide 13 Ball screws 12 13 14 15 16 17 18 Fig 9 3DGence ONE printer view left side 16 USB port A flash drive 17 USB port B computer 19 14 Y axis guide 15 Extruder elements 18 Power inlet socket 19 Fan warning do not obstruct ...

Page 14: ... adjustment screw 22 Knurl 23 Extruder clamp 24 Tensometers 25 Button releasing the hotend 26 Printing head 27 Printout cooling fan 20 21 22 26 27 25 23 24 NOTE Figure 11 presents the print head The nozzle element 26 accumulates contaminations in the process the printing Deposits accumulated on the nozzle should be regularly removed with the use of non combustible cleaning substance For more infor...

Page 15: ... ONE set includes the following items Most of them is placed in the flat box shown in fig 13 3DGence ONE Printer spatula for removing printouts 1 USB Cable 2 filament spool holder Note left hand thread 3 tweezers 4 SD memory card 5 USB memory stick with software 6 cleaner with handle and teflon wire 7 power cable 8 protective gloves 9 filament spool hotend with nozzle with a diameter of 0 4 mm alr...

Page 16: ...16 3DGence ONE 1 2 3 4 5 6 7 8 9 10 11 Fig 13 Distibution of accessories in the package Fig 14 Panels made of polycarbonate sides depending on the color version red blue or orange ...

Page 17: ...their values Function of buttons fig 15 1 Navigation key OK entering MENU and confirming selection 2 Upwards Menu navigation button and values changer 3 Instant file preview on SD card 4 Key down navigation menu and values changer 5 Menu Navigation button and menu return Left panel WARNING Left control panel operates outside of traffic restrictions by micro switches damage caused by improper use i...

Page 18: ...tate the use of the printer 3D Gence ONE unit has been equipped with PAUSE button fig 17 1 that has the following functions a single press will stop the printing process a double press will hold the printing process and the departure of the nozzle to X and Y axes base position This function allows modifying the printed object e g inserting a cap or other object to a specially prepared socket and f...

Page 19: ...nd as indicated by temperature sensor 3 Heatbed temperature 4 Current temperature of heatbed as indicated by temperature sensor 5 Blow power of cooling fans After starting printing LCD panel displays the following information fig 19 Fig 18 3DGence LCD display after turning on Fig 19 3DGence LCD display while printing Information currently displayed 1 The introduced hotend temperature 2 Current tem...

Page 20: ...row down button 4 Fig 14 on the right side of the panel from the main MENU 3 4 MENU 3DGence ONE has an extensive user interface allowing full control of the printer without connecting it to a computer For accessing MENU press OK button on the main panel button 1 Fig 14 To navigate MENU use navigation buttons on the right side of the panel see chapter Main Panel buttons 2 3 4 5 Fig 14 Diagram of th...

Page 21: ...evel you can enter a given selection settings Prepare Home all Load filament Unload filament Preheat Cooldown Hotend change Park heatbed Preheat PLA Preheat ABS Up Middle Bottom Fig 21 PREPARE menu Print Print file Content SD Card Fig 22 PRINT menu ...

Page 22: ...0 Set fan 75 Fig 23 TUNE menu Nozzle Set fan 100 Callibration XY callibration Autocomp settings Probe position Heatbed scan Org X 150 00 mm Print X 150 00 mm Org Y 150 00 mm Print Y 150 00 mm RESET CALCULATE SAVE Z offset 0 00 mm Pressure 80 RESET SAVE Pos X 2 20 mm Pos Y 2 20 mm RESET SAVE Fig 24 CALLIBRATION menu ...

Page 23: ...NFO menu In active mode the printer s menu displays different information A printed model can be instantly modified by changing parameter settings during printing Instant parameter correction may be necessary when the amount of material fed is too small or the cooling is not effective OK button Speed multipiler Flow multipiler Temperatures Fan speed Filament change Lights Abort print Heatbed Fan s...

Page 24: ...e Upload key Loading the new software may take a few minutes During the loading process printer display can show colorful artifacts graphical noise this is however completely normal Update success will be confirmed by an appropriate message displayed on the computer screen 9 Now you can remove the USB cable from the printer and turn off the printer 10 Load the init g file into memory card and inse...

Page 25: ...othed belts are not frayed or damaged Check if Z axis stopwatch is not damaged broken or bent and if it matches Z axis limit switch if it aims at the notch of Z axis limit switch 2 Any filament leftovers should be removed see Removing filament and the head should be cooled down to tempera ture below 50 C 3 Remove all dirt and leftover material from the nozzle of print head and clean the table with...

Page 26: ...calibration which is displayed as an error HEAT BED SCAN ABORTED This message may also appear if the instruction from point 3 was not followed The calibration process can take up to 25 minutes In the event of hearing a loud clicking sound coming from the engine or if one of axes did not stop immediately turn off the device and contact 3D Gence technical service department support 3dgence com 2 1 F...

Page 27: ...4 push the filament wire through a tube Bowden 1 straighten the end of it and insert it into the cleaner s pneumatic con nector 2 6 Select Load Filament in Prepare menu and follow instructions on LCD panel 1 2 3 4 4 1 Mounting filament 1 Install in the spool holder on the right side of the device turn counterclockwise fig 32 The device will heat up the hotend to 240 C and start extruding the print...

Page 28: ...g and closing filament change assistant Before starting printing the system displays the amount of material required to complete a particular printing object Make sure that you have enough printing material 1 Go to the printer s menu menu is recalled by pressing OK button during printing Choose Filament Change and press OK to confirm Printing will be paused and all mechanisms will go to their safe...

Page 29: ...button 3 Select Print File and press OK to confirm 4 Now you have access to all G code files and subfolders on SD card G code files are instructions for the printer only these files can be used for starting printing 5 Confirm selection of one of the files by pressing OK button The printer starts heating the hotend and heatbed After reaching the exact temperature the device will measure the paramet...

Page 30: ...s pushed out of the hotend while printing the first layer It leads to deformation of the base of the printed model It s an indication to recalibrate the heatbed Hotend in correct position The material is laid out regularly Whole surface of the model s base is covered with plastic and the upper surface of the first layer is a regular flat and lithe plane Hotend too high The distance between the hea...

Page 31: ...s way will be assessed and or printed in the company s headquarters The produc er will suggest a solution advice initiate maintenance activities if required prepare gcode executable file or update printing profiles accordingly The software should be downloaded from the producer s website The recommended hardware requirements to initialize the software are as follows Windows 7 or later screen resol...

Page 32: ...he material you want to use to make your model 5 Select the visual quality expected better quality means longer printing time 6 Select your models desired durability 7 Prepare your file with the Prepare to print button 8 Save the executable gcode file to SD card with the Save File button which replaces the Prepare to print button in the bottom right corner 9 The file can be read out in the printer...

Page 33: ... at a given time e g as you have not selected any model are greyed out Add Model enables to locate and import a file in stl format to the software You can select several files to be imported simultaneously You can also use the function of dragging stl files onto the main software window The models can be removed from the workspace by left clicking them and using Delete Model button or pressing Del...

Page 34: ...lects or deselects the model The right mouse button enables to rotate the camera The right mouse button with the keyboard Shift pressed enables to move the camera The mouse scroll wheel enables zooms the view in or out Move enables the user to move the selected model in the virtual workspace Text fields marked X Y and Z move the model by 1 mm each press when using the buttons or any distance when ...

Page 35: ...is may result in the software producing invalid files and a resulting errors Scale changes the model size Text fields marked X Y and Z enable to scale the model 1 mm or 1 using the buttons or any value when you enter the desired value in the text fields The size in millimetres may be irrational e g 3 33 3 mm but it is displayed rounded to two decimal places The Uniform button when activated will a...

Page 36: ...ode preview mode the status bar changes the information displayed as described later in a relevant chapter Pressing this button undoes most recent operations related to the models If no operations on the solids were carried out after the model was loaded pressing the button will remove the stl model loaded most recently In the gcode preview mode the button enables to return to the main software in...

Page 37: ...work mode if available and material to be used for the model The work modes also known as Print Profiles enable to print using one or more print heads The materials or combina tions thereof depend on the selected machine and work mode New materials are added by the producer on an ongoing basis and are being published via software updates To use the latest profiles and full material base we recomme...

Page 38: ...eve the required result The selectable options in this menu change dynamically depending on the selected material and the Visual Quality option Increased durability means more material will be used for the printout and the model will have higher overall strength It will be more susceptible to deformation related to material shrinkage and will have longer printing duration The Solid durability also...

Page 39: ...n a very small buildplate area it may break off which is why this parameter should be decreased in such a case More supports mean longer printing time and more stable printout while fewer supports mean shorter printing time and less print stability Values 0 and 90 will disable supprt generation The Lighter Support option enables the user to force the support generation algorithm change The Auto va...

Page 40: ...he software will enter the path preview mode to display the paths to be carried out by the printer as de scribed in the subsequent chapter The solid appearance in the main software window shows the graphic representation of the printhead movements This view enables to preview the generated layers verify print settings and save the gcode executable file The model and print profile modification opti...

Page 41: ...rs The preview is used to check if the model will be printed correctly For example if the entire large model rests solely on a few square millimetres of its base it is likely to overturn in the course of printing In such circumstancesyou should go back to the main interface and increase the amount of supports generated In this mode the status bar displays the following information 1 Model name or ...

Page 42: ...ns The currently loaded advanced profile is displayed on the status bar Please remember that using any materials and printsettings not provided by the producer makes the user fully liable The producer shall not be held liable for any failures resulting from such activities especially with respect to the printhead and material guiding system The producer discourages from using printing materials wh...

Page 43: ...hared freely Please note that the profiles created by means of different software versions may not be compatible In such circumstances please verify the print settings as this may entail the risk of machine damage or print quality deterioration The profiles may be shared also with the producer via the service request form If the user has created a profile for any non certified material the activit...

Page 44: ...ONE 6 4 Advanced profiles step by step 1 Select Custom profile from the profile list 2 Confirm the threat warning message 3 Select your advanced setup file Make sure the profile is prepared for the printer you own ...

Page 45: ...7 4 Settings edition window will appear To save and activate press Save and Activate 5 Activating the Custom profile will prevent you from changing predefined print quality settings 6 Prepare your file with the Prepare to print button ...

Page 46: ...mpany s headquaters The producer will suggest a problem solution advice start maintenance activities whenever required prepare an error free gcode executable file or updatie print profiles If the user needs any settings for a specific material or any other quality settings they may request them using the tech nical support form If the user created an initial profile corresponding to their needs th...

Page 47: ... upon each boot up On the same station several software versions may be installed simultaneously with no adverse effects The print profile updates are always going to be published for the latest software version The update status appears on the progress bar immediately after the software is started beside the Prepare to print button Checking for updates the software checks for any available update...

Page 48: ...ve the printout from the table use the attached spatula to gently pry the object up from several sides Never use sharp corners of spatula use only the flat edge of the tool fig 34 Never remove the printout by force as this may damage the work table In case of problems with separating the printout from the table it is recommended to reheat the work table and cool it down again Reheating the table c...

Page 49: ...cording to the instruction below 1 Turn off all heating elements and wait until they are completely cooled down Use Cooldown option from the menu 2 Turn the device off by pressing the power button and unplug the printer from the power source 3 Wear protective gloves 4 Use the spatula to clean the surface of the work table from any residual material Then moisten a cotton cloth not synthetic with th...

Page 50: ... the printer in a humid room never leave the printer in a dusty room never place the printer on high shelves never place the printer in a cardboard box bag or closet before the device heaters are completely cooled down place the printer out of reach of children protect the filament and the device against humidity dust and other soiling when storing disconnect power cable from the device WARNING Ne...

Page 51: ...ize it for the time of replacement Fully press down and hold the red PUSH button fig 36 Slide the head out with the other hand Pay special attention not to drop the head on the work table 5 At the exact place of the old one insert the new clean printing head The cavity marked on the drawing must face your direction towards the front of the printer fig 37 The PUSH key must remain pressed otherwise ...

Page 52: ...ion should be made for the exact material that is to be used for printing To perform a precise calibration of X and Y axes it is necessary to make a print of a special object Calibration file is on SD memory card CalibrationXY_1h45min gcode The printing of calibration object takes about 1 hour and 45 minutes After printing cooling and careful removal of calibration object the cross take measures o...

Page 53: ...e up and down buttons to introduce the value obtained from X axis measurements 3 Use up and down buttons from the right panel to select Print Y value and press OK Use up and down buttons to introduce the value obtained from Y axis measurements 4 After entering all values confirm changes by selecting CALCULATE SAVE The algorithm will calculate printing parame ters according to the measurements made...

Page 54: ...an be changed only after the next scanning of the table Autocompensation of the work field consists of single point measurement of the distance to the work field and setting the correct distance for starting printing operation Autocompensation process is performed each time before printing After setting the correct height over the chosen single point the printing operation is performed pursuant to...

Page 55: ...he print these incorrect readings may cause lifting up of the head as a result of adding the thickness of material leaking under the head holding the head up in the process of height calculation Position of measurement is another important parameter in the process of autocompensation This parameter can be regulated by selecting Probe position in Calibration main menu By editing values in Pos X and...

Page 56: ...urface to the bed by generating additional external brims of the solid at the level of the first layer of the print The more brim lines will be added the larger will be the adhesion surface Typically from 5 to 20 brim lines are used The brim should be used in case of problems with detaching prints from the bed CAD Computer Aided Design collective term for various computer aided design processes Th...

Page 57: ...igh temperature mechanical resistance the motor can skip operation steps This can be noticed after moving the printing plane in the axis in which the motor skipped steps The visual effects of this failure depend on the path the head moves along in relation to the table To make it better imaginable let s assume that the print is a cube and the printer skipped steps in the middle of the print The pr...

Page 58: ...ion control Skirt additional material printed around the model at a distance of a few millimeters from it at the very beginning of the print The Skirt does not make an integral part of a model Its function is to initialize and stabilize the flow of plastics through the head By observing the way the printer lays skirt on the table we can assess if the table is correctly leveled and if the print adh...

Page 59: ...3DGence ONE 59 version 1 0 08 2017 ...

Reviews: