UAG5100 User’s Guide
32
C
H A P T E R
2
Hardware Installation and Connection
2.1 Rack-mounting
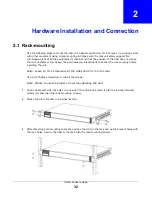
Use the following steps to mount the UAG on an EIA standard size, 19-inch rack or in a wiring closet
with other equipment using a rack-mounting kit. Make sure the rack will safely support the
combined weight of all the equipment it contains and that the position of the UAG does not make
the rack unstable or top-heavy. Take all necessary precautions to anchor the rack securely before
installing the unit.
Note: Leave 10 cm of clearance at the sides and 20 cm in the rear.
Use a #2 Phillips screwdriver to install the screws.
Note: Failure to use the proper screws may damage the unit.
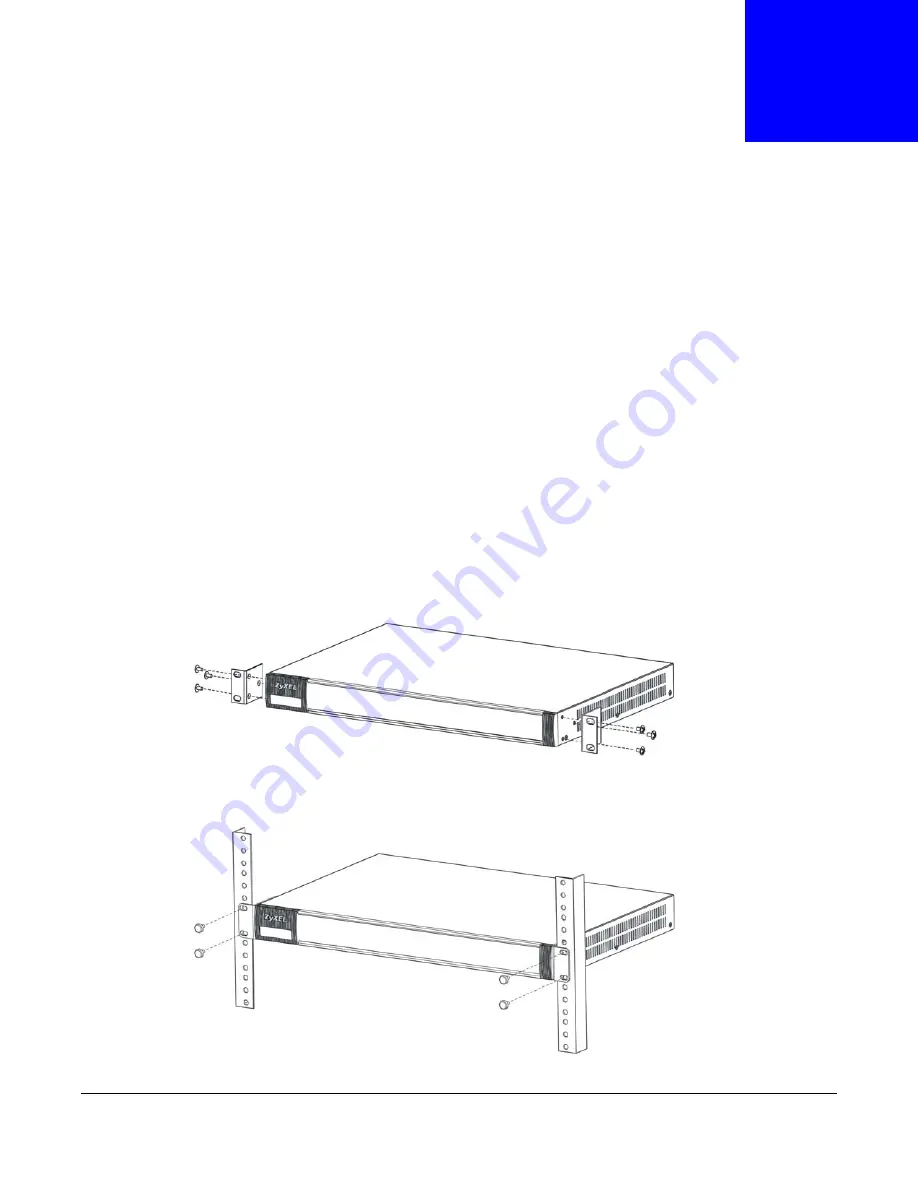
1
Align one bracket with the holes on one side of the UAG and secure it with the included bracket
screws (smaller than the rack-mounting screws).
2
Attach the other bracket in a similar fashion.
3
After attaching both mounting brackets, position the UAG in the rack and up the bracket holes with
the rack holes. Secure the UAG to the rack with the rack-mounting screws.
Содержание UAG5100
Страница 42: ...Chapter 3 Printer Deployment UAG5100 User s Guide 42 ...
Страница 124: ...Chapter 10 Interfaces UAG5100 User s Guide 124 Figure 82 Configuration Network Interface Ethernet Edit External Type ...
Страница 125: ...Chapter 10 Interfaces UAG5100 User s Guide 125 Figure 83 Configuration Network Interface Ethernet Edit Internal Type ...
Страница 135: ...Chapter 10 Interfaces UAG5100 User s Guide 135 Figure 88 Configuration Network Interface PPP Add ...
Страница 213: ...Chapter 20 UPnP UAG5100 User s Guide 213 Figure 139 Network Connections My Network Places Properties Example ...
Страница 227: ...Chapter 24 Web Authentication UAG5100 User s Guide 227 Figure 152 Configuration Web Authentication Web Portal ...
Страница 228: ...Chapter 24 Web Authentication UAG5100 User s Guide 228 Figure 153 Configuration Web Authentication User Agreement ...
Страница 273: ...Chapter 26 Billing UAG5100 User s Guide 273 Figure 190 Configuration Billing Payment Service Custom Service ...
Страница 292: ...Chapter 30 IPSec VPN UAG5100 User s Guide 292 Figure 201 Configuration VPN IPSec VPN VPN Connection Add Edit ...
Страница 298: ...Chapter 30 IPSec VPN UAG5100 User s Guide 298 Figure 203 Configuration VPN IPSec VPN VPN Gateway Add Edit ...
Страница 314: ...Chapter 30 IPSec VPN UAG5100 User s Guide 314 ...
Страница 387: ...Chapter 39 Certificates UAG5100 User s Guide 387 Figure 256 Configuration Object Certificate Trusted Certificates Edit ...
Страница 436: ...Chapter 42 Log and Report UAG5100 User s Guide 436 Figure 302 Configuration Log Report Email Daily Report ...
Страница 440: ...Chapter 42 Log and Report UAG5100 User s Guide 440 Figure 304 Configuration Log Report Log Settings Edit System Log ...
Страница 445: ...Chapter 42 Log and Report UAG5100 User s Guide 445 Figure 306 Configuration Log Report Log Settings Edit Remote Server ...
Страница 491: ...Appendix A Legal Information UAG5100 User s Guide 491 Environmental Product Declaration ...

