background image


VoIP Parameters 

Click the 

VoIP Parameters

 menu to display the Audio Settings 

and RTP Protocol Parameters configuration pages. 
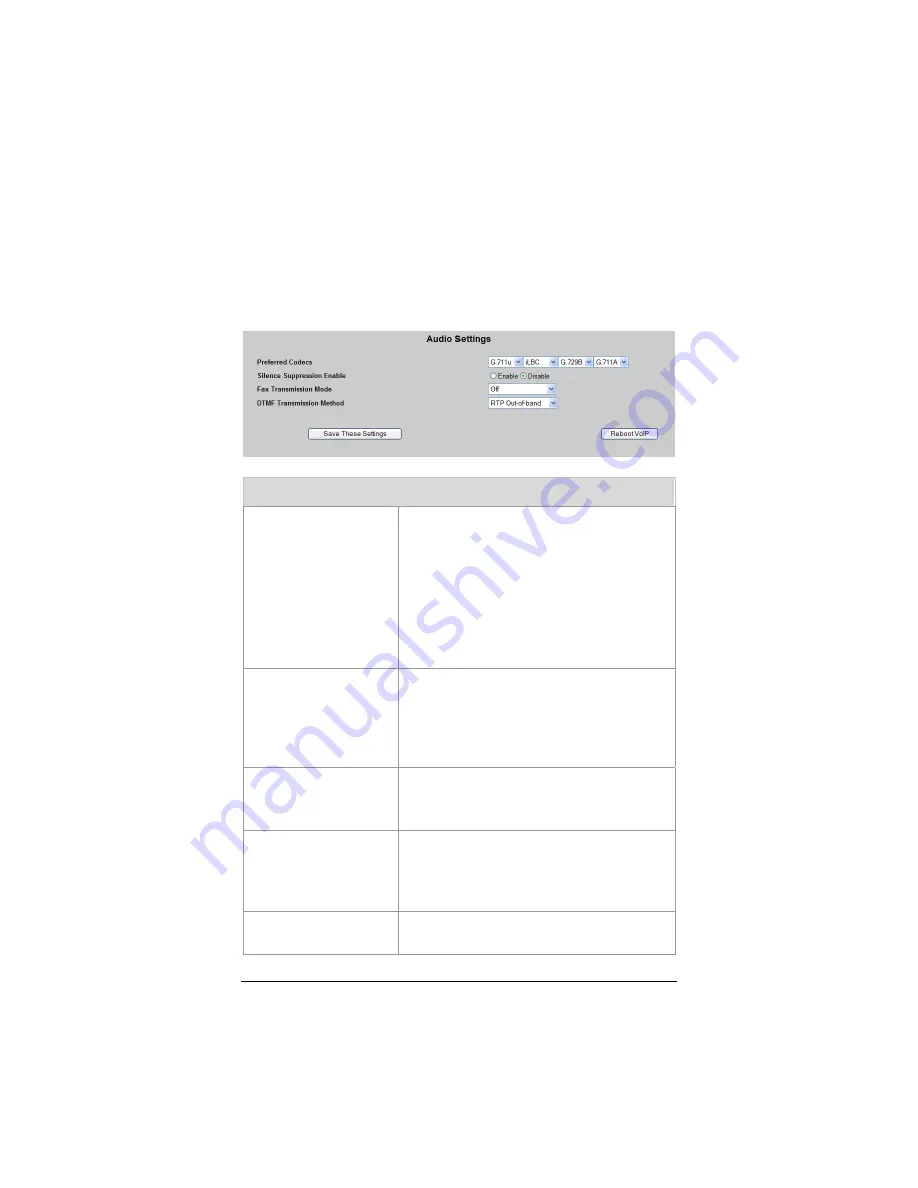
Audio Settings 


Setting 

Description 

Preferred Codecs 

Lets you arrange the Codec names in 
order of preference. The default 
sequence is G.711u, iLBC, G.729B, 
G.711A. 
If your upstream bandwidth is 

256 

kbps, set your first preference for 
G.729B or iLBC. Otherwise, for better 
voice quality, use G.711u or G.711A. 

Silence Suppression 
Enable 

Prevents audio frames from being sent 
during periods of silence, thus reducing 
the network traffic necessary for making 
calls. (Note: This feature is useful only 
with G.729B.) The default is 

Disabled

Fax Transmission 
Mode 

Select the FAX processing method: Off, 

μ

Law Passthrough or ALaw 

Passthrough. The default is 

Off

DTMF 
Transmission 
Method 

Select the DTMF processing method: 
Off, Audio Passthrough, RTP Out-of-
Band, SIP Out-of-Band. The default is 

RTP Out-of-Band

Save These Settings

Click to save your changes to flash 
memory. 


ADSL X6v User Guide 

54 

Содержание ADSL X6v

Страница 1: ...ZOOM ADSL X6v U S E R G U I D E ...

Страница 2: ...to a swimming pool Avoid using a telephone other than a cordless phone during an electrical storm Do not use the telephone to report a gas leak while you are in the vicinity of the leak WARNING If your modem has a removable antenna attach only the antenna that was provided or an equivalent indoor antenna meeting local RF transmission regulations DO NOT attach any antenna or antenna cable that has ...

Страница 3: ...work Device 20 Universal Plug and Play 21 If You Need Help 21 Setting Up Your Wireless Network 22 Connecting a Windows Vista Computer with Built in Wireless Capabilities 23 Connecting a Windows XP Computer with Built in Wireless Capabilities 25 Connecting a Wireless Enabled Computer to the X6v 26 Checking Your Settings 28 Setting Wireless Security 29 Overview 29 Setting Up Security Using WEP 29 Se...

Страница 4: ... System Settings 50 Date Time 50 VoIP Subsystem Network Configuration 51 Static IP DNS Configuration 51 HTTP Telnet FTP Server 52 STUN Settings 53 VoIP Parameters 54 Audio Settings 54 RTP Protocol Parameters 55 SIP Parameters 55 Regionalization Settings 56 SLAC Configuration 56 CODEC Configuration 57 Subscription Services 58 Dialing Parameters 58 Bridging from VoIP to PSTN 59 Bridging from PSTN to...

Страница 5: ...n Settings 91 Using the Ethernet Configuration Settings 97 Setting Up a Static Routing Table 98 Adding Extra Security with Advanced Firewall Filtering 100 Setting Security Logging 105 Configuring Intrusion Detection 106 Adding a DNS Server Name 109 Creating a Virtual Server or a DMZ 110 Using the ADSL Settings 112 Changing Your LAN Settings 113 Creating a Fixed Static IP Address 116 Assigning a Ha...

Страница 6: ...k Settings 146 Macintosh TCP IP Settings 147 Mac OS X 147 Mac OS 7 6 1 9 2 2 148 Linux TCP IP Settings 149 RedHat 149 SuSE 149 Debian 149 Windows TCP IP Settings 150 Windows XP 150 Windows 2000 151 Windows 98 Me 152 Appendix D Troubleshooting 153 Appendix E Configuring Your Web Browser 158 Configuring Internet Explorer 159 Configuring Mozilla Firefox 161 Appendix F Wireless Channels by Country 162...

Страница 7: ...Chapter 2 applies if you want to set up a network Chapter 3 provides security information Chapter 4 covers VoIP setup and Chapter 5 provides what you need for gaming Chapter 6 Router Setup is primarily for System Administrators This chapter explains how to use features such as adding extra security to the X6v with firewall filtering backing up and restoring the X6v configuration updating the firmw...

Страница 8: ...tions to install the X6v manually If you already installed and connected your X6v using the separate Quick Start booklet provided for Windows users you can skip this chapter and begin with Chapter 2 Package Contents Your package contains the following items Zoom ADSL X6v modem Ethernet cable Phone cord Power cube CD The CD contains the installation software documentation warranty and Customer Supp...

Страница 9: ...tems A Web browser The minimum browser requirements on Windows are Internet Explorer v6 Firefox v1 0 3 Netscape v7 2 Opera v8 54 or Chrome v0 3 154 9 on Macintosh Safari v3 0 4 or Firefox v2 0 3 For wireless connections the computer s must have built in wireless capability or be equipped with a wireless adapter The X6v supports 802 11b and 802 11g compatible adapters For direct wired connections t...

Страница 10: ... is set up and your Internet connection is working you can unplug the computer from the unit and move the X6v to a more central location Windows Installation Windows users can quickly install the software and hardware then configure the X6v using Zoom s Install Assistant on the CD If you have already run the Install Assistant please go to Setting Up a Network on page 19 If you encountered a proble...

Страница 11: ...creen opens select Install Assistant from the menu The Install Assistant displays a series of screens that guide you through the installation process For Windows Vista and XP users If a message appears telling you that the Windows Firewall has blocked some features of this program select Unblock and continue with the installation 6 On the Install Assistant screen select your modem from the list of...

Страница 12: ...ternet If you will not be using the VoIP feature and you want to connect other computers to the X6v continue with Setting Up a Network starting on page 19 If you are or will be using the VoIP feature first set up a network if desired as described on page 19 then go to Chapter 4 Setting Up VoIP Service on page 39 Macintosh and Linux Installation Windows users If you did not run the Install Assistan...

Страница 13: ... Ethernet 4 and plug the other end into your computer s Ethernet port 4 Plug the power cube into a power strip or wall outlet and then plug the power cube s other end into the modem s POWER jack Important Only use the power cube shipped with the X6v Other power cubes might damage your hardware 5 After you plug in the power cube the POWER and WLAN lights on the front panel of the modem should becom...

Страница 14: ...ug in a standard telephone We recommend that you put an ADSL filter on every phone connected to the ADSL phone line If you received a filter or filter splitter from Zoom you can use that You can also purchase an ADSL filter from a retailer of telephone accessories ADSL filters and filter splitters come in a variety of styles and sizes and might not look identical to the filter splitters shown here...

Страница 15: ...eld as shown here User Name user Password password Note The User Name user and Password password that you type in this dialog are used by the Zoom Configuration Manager for non administrative users and must be typed as shown using lower case characters The User Name and Password for administrative users are described in Using Router Setup on page 86 These identifiers are not the user name and pass...

Страница 16: ... finds a 1483 Bridged or 1483 Routed connection you have the option of using either dynamic or static IP addressing Depending on your situation select the appropriate option button MOST USERS Ensure that Obtain an IP address Automatically is selected if you are using Dynamic Host Configuration Protocol also known as DHCP or dynamic IP addressing This option is selected by default because most Inte...

Страница 17: ...vent that you want to assign different public IP addresses to each network user Depending on the Protocol setting you selected the bottom half of the page will change so that you can enter additional information If you selected PPPoA or PPPoE enter your ADSL Username and Password in the appropriate boxes Your Internet Service Provider should have given this information to you Your Username is typi...

Страница 18: ...ress If you connect successfully you are ready to set up the rest of your network If you cannot connect to the Internet see Troubleshooting on page 153 Tip If you configured the X6v using a notebook computer you can keep it plugged in or you can disconnect it from the unit s ETHERNET port As long as the X6v remains plugged into an ADSL wall jack and a power source the X6v can function as a stand a...

Страница 19: ...r all of the following in any order that you choose If you want to connect additional computers directly to the X6v see To Connect Additional Wired Computers below If you want to connect a hub switch or router directly to the X6v see To Connect a Network Device on page 20 If you want to connect additional computers using a wireless network see Chapter 2 Setting Up Your Wireless Network on page 22 ...

Страница 20: ... how to configure a static IP 1 Plug one end of an Ethernet cable into one of the modem s ETHERNET ports and the other end into the network device s Ethernet port For a hub or a switch this is typically called an Uplink or Expansion port For a router this is typically called a WAN port 2 Set up your network Refer to the documentation provided with your particular network device for instructions on...

Страница 21: ...oom com and select Technical Support From there you can register your X6v contact our technical support experts use our intelligent database SmartFactstm and get warranty information Tip From time to time Zoom may release improved firmware This is also available at www zoom com along with upgrade instructions We recommend that you check our Web site periodically for updates Call our support office...

Страница 22: ...ta or XP connect utility See the sections below on connecting Windows Vista page 23 or XP page 25 computers with built in wireless capabilities 2 Some desktop and notebook computers may have built in wireless networking capabilities but do not use the Windows Vista or XP utility to configure their device If this is so set up your computer s wireless connection using the instructions on page 26 for...

Страница 23: ...etting Wireless Security on page 29 If you have difficulty connecting make sure you have entered the correct password Then perform a power cycle on your computer and the X6v as described in the Troubleshooting Tips on page 153 3 In the Successfully connected to desired network dialog you have three options You can Select Save the network and Start this connection automatically if you always want t...

Страница 24: ...Continue Click Close to complete the connection procedure Select this option if you are connecting to this network only one time To disconnect from the current network 1 From the Start menu select Connect to 2 In the Disconnect or Connect to another network dialog select the current network and click Disconnect 3 In the Are You Sure message box click Disconnect again 4 In the next dialog you can c...

Страница 25: ...igure my wireless network settings check box is selected by default 5 Select zoom from the Available networks list then click the Configure button to add it to the Preferred networks list The notebook will try to connect to the Internet using the wireless networks listed here in the order in which they appear If you already have networks listed here we recommend you either remove them or use the M...

Страница 26: ...er on a Windows XP computer Windows XP may try to automatically configure the adapter rather than let you use the software provided with the wireless adapter You will know this is happening because you will be prompted with a message about one or more wireless networks being available You will also be able to click a link to open the Wireless Network Connection Properties dialog If this happens cl...

Страница 27: ...To learn how see Setting Wireless Security on page 29 By default the wireless connections provided by the X6v do not have any security applied 2 Test your wireless connections From each desktop or notebook computer that you set up open your Web browser for instance Internet Explorer or Mozilla Firefox and try to connect to a familiar Web address If you connect successfully you are ready to browse ...

Страница 28: ...that you want Hide SSID Lets you specify whether or not to broadcast the SSID of your network If you do not want to broadcast the SSID set this option to True Default Channel The channel your wireless connection uses by default for your wireless connection The X6v is set for channel 10 Profile The standard used by your wireless adapters This drop down list contains 802 11b Only 802 11g Only or Mix...

Страница 29: ...ey or passphrase will be allowed to establish a connection to the network There are two basic ways to configure and implement a passphrase or key They are WEP Wired Equivalent Privacy and WPA WiFi Protected Access or WPA2 WPA2 is the most secure but you can use it only if all your wireless devices support the 802 11g profile If you are replacing an existing wireless router with the X6v you might w...

Страница 30: ...nd Password in lower case then click OK User Name user Password password You can safely ignore the warning message It is for informational purposes only The User Name and Password entered here are for the Configuration Manager only and are not the same as the user name and password that your Internet service provider might have given you 4 On the X6v ADSL Setup page click the Wireless icon at the ...

Страница 31: ... an existing wireless router with the X6v you might want to retain whatever security settings you use on your network Enter the SSID encryption type and the security key or passphrase that you previously defined for your network You must enter a dash between each pair of characters in a security key 9 If you are setting up a new wireless network select the check box marked Passphrase and then ente...

Страница 32: ...eless network connection c For a Windows computer click the Wireless Networking icon at the lower right corner of the screen d Select the Site Survey or Scan option to see a list of the access points in your area That list should include the SSID that you just set up on the X6v e Select that SSID and enter the WEP 64 Key 1 that you just wrote down in step 10 Omit the hyphens when entering the key ...

Страница 33: ...igure 802 1x Authentication a Wireless Distribution System and Wireless MAC Filtering Setting Up Security Using WPA2 or WPA WPA2 and WPA use a passphrase that you choose and enter on the X6v and other wireless devices on the network to set up security To use WPA2 or WPA all of the wireless devices on your network must support that encryption method 1 Check to make sure that all other clients that ...

Страница 34: ...mbers and letters The passphrase that you enter is case sensitive 6 Every wireless network client needs to be set individually by entering the Passphrase on all wireless devices on the network Open the software that came with the device which should be running on the computer where the device is installed Find the configuration menu for security choose WPA2 or WPA and enter the Passphrase exactly ...

Страница 35: ...x Authentication to open the 802 1x Authentication page The following table describes the values that you can select or enter Setting Description Auth Server Local No external Radius Server is used 802 1x not being used RADIUS External LAN Radius Server is used for authentication RADIUS server IP If you selected RADIUS enter the server s IP address Chapter 3 Setting Wireless Security 35 ...

Страница 36: ...02 1x Authenticator for wireless devices Identity String Identity String or IP address of the 802 1x Authentication Server Radius Server Rekey Timeout Default is 600 seconds Specifies time in which WEP keys for the current session will timeout and new ones are issued as a deterrent to any attacker Key Transmission Enabled Determines whether or not the Authenticator AP is configured to send WEP key...

Страница 37: ... a Wireless Distribution System make the following entries Setting Description WDS Status Select Enable to configure WDS AP 1 AP2 AP3 AP4 Enter the 12 digit MAC address of each Access Point AP that you want to include in the Wireless Distribution System After you enter your values click Save Changes and then Write Settings to Flash Chapter 3 Setting Wireless Security 37 ...

Страница 38: ...e devices in the Existing Wireless MAC Filtering list Black List allows network access to all devices except those in the Existing Wireless MAC Filtering list Existing Wireless MAC Filtering List of devices currently authenticated by MAC address Add Wireless MAC Filtering Enter the 12 digit MAC address of the device you want to add to your network and click Add Click Save Changes then Write Settin...

Страница 39: ...lace and receive phone calls Using the Zoom Configuration Manager to Set Up VoIP Service You may want to connect the X6v to your landline If you connect the X6v s TELCO i e Telephone Company port to a landline telephone service you can choose to make some calls through your landline and other calls over the Internet If the landline is also set for DSL service be sure to connect an ADSL filter betw...

Страница 40: ...rd password You can safely ignore the warning message If you are not prompted for a User Name and Password do the following in this order Recheck all connections restart the modem and computer and reset the modem by inserting a paper clip into the lower Reset pinhole in the modem s back panel and pressing it three times Important To protect your configuration choose your own password after the set...

Страница 41: ...count Status page will open Click VoIP Express Setup to display the parameters for your account on the My VoIP Account Express page Make the following entries Setting Description Turn my VoIP service Click the On button to enable VoIP 41 Chapter 4 Setting Up VoIP Service ...

Страница 42: ...he same as your VoIP phone number that your VoIP provider might have assigned Enter the ID if it does not appear in the field My VoIP Service Authentication Password The password that your VoIP provider might have assigned Enter the password if it does not appear in the field If My Call Starts With Specifies when to use the landline TELCO connection when you connect the X6v s TELCO port to a stand...

Страница 43: ...Select Enable the default or Disable Route VoIP calls via my TELCO line if Select Enable the default or Disable The X6v automatically sends all emergency calls 911 999 100 and 11x numbers over your landline Another advantage of connecting the TELCO port to your landline is that if the X6v s Internet connection is disrupted by default your phone calls are automatically switched to your landline ser...

Страница 44: ... To open the Speed Dials page where you can enter up to 28 numbers into your speed dial list click User Configuration Enter a complete phone number opposite a Speed Dial number For example opposite 20 enter 123 456 7890 Save your changes The next time you want to call 123 456 7890 for example just dial 20 Calls will be placed via VoIP or via your standard telephone service according to the setting...

Страница 45: ...nging Based on Caller ID On the User Configuration menu click Ringing Based on Caller ID to specify distinctive ring tones for up to 30 phone numbers Click Enable to turn on the distinctive ring feature and enter the numbers to which you want to assign a distinctive ring The ring patterns are the Bellcore r1 through Bellcore r8 tones 45 Chapter 4 Setting Up VoIP Service ...

Страница 46: ... the phone numbers on the Do Not Disturb Exceptions list Your phone will not ring unless you get a call from one of the phone numbers that you enter on the Exceptions list Call Waiting Caller ID This feature applies to VoIP calls only On the User Configuration menu click Call Waiting Caller ID to configure Call Waiting Inbound and Outbound Caller ID and Call Waiting Caller ID ADSL X6v User Guide 4...

Страница 47: ...ocking This feature applies to VoIP calls only On the User Configuration menu click Incoming Call Blocking to enable or disable blocking of anonymous calls calls that do not provide Caller ID and specify phone numbers from which you will not accept calls You can enter up to 30 phone numbers that will be blocked by the X6v By default Block Anonymous Calls and Block Listed Incoming Calls are both di...

Страница 48: ...s option select the Enable check box In the Blocked Call List enter up to 30 complete numbers or numbers starting with particular digits For example to block all 900 numbers enter 900x 7 This will block all numbers that start with 900 followed by 7 digits To remove a number from the Blocked Numbers List delete it To remove all entries from the list at the Block Listed Outgoing Numbers option selec...

Страница 49: ...e main window There are a number of highly technical Advanced VoIP Setup parameters that are available to VoIP providers only For information please see the X6v VoIP Features Technical Reference Note The discussion of advanced VoIP configuration uses the term PSTN Public Switched Telephone Network which is also described in this User Guide as TELCO or landline service 49 Chapter 4 Setting Up VoIP ...

Страница 50: ...Time The date and time are set automatically by the time server and the Daylight Savings adjustment is enabled by default You may need to change your Time Zone relative to Greenwich Mean Time For help please see http wwp greenwichmeantime com info timezone htm ADSL X6v User Guide 50 ...

Страница 51: ...m administrator or by Zoom Customer Support Static IP DNS Configuration Setting Description Static IP Address The VoIP System IP Address must always be in the same subnet as the modem router LAN IP Address The Host ID must always be 234 These are last three digits in the dotted decimal entry x x x 234 The default value is 192 168 0 234 51 Chapter 4 Setting Up VoIP Service ...

Страница 52: ...teway IP Address This is the LAN IP Address assigned to your modem router By default it is 192 168 0 1 Primary DNS Server This must always be the same as the Gateway IP Address HTTP Telnet FTP Server Setting Description HTTP Server Port The default is 8080 Telnet Server Port The default is 8023 FTP Server Port The default is 8021 ADSL X6v User Guide 52 ...

Страница 53: ...g If your VoIP service uses Outbound Proxy disable STUN your provider will tell you to do this Generally you should leave STUN enabled the default STUN Server Address Enter the Domain Name or IP address of your VoIP provider s STUN server By default the Zoom STUN server address is displayed here STUN Symmetric Deterministic Enable Not applicable Save These Settings Click to save your changes to fl...

Страница 54: ... quality use G 711u or G 711A Silence Suppression Enable Prevents audio frames from being sent during periods of silence thus reducing the network traffic necessary for making calls Note This feature is useful only with G 729B The default is Disabled Fax Transmission Mode Select the FAX processing method Off μLaw Passthrough or ALaw Passthrough The default is Off DTMF Transmission Method Select th...

Страница 55: ...ession Initiation Protocol Parameters menu to display the SIP Protocol Parameters configuration page 2 Change the SIP Local Port setting only if you have a conflict for example if you have multiple VoIP devices on your Local Area Network If this is the case change the port in even numbered increments 5062 5064 etc 3 Click Save These Settings 55 Chapter 4 Setting Up VoIP Service ...

Страница 56: ... will appear according to the X6v s region Setting Description Caller ID Type 1 Mode Select the on hook mode None Belcore MDMF Belcore SDMF ETSI WINK ETSI RING DTMF The default is Belcore MDMF Caller ID Type 2 Mode Select the off hook mode None Belcore MDMF Belcore SDMF ETSI WINK ETSI RING DTMF The default is Belcore MDMF The default is Belcore MDMF Message Waiting Mode Select None Belcore MDMF Be...

Страница 57: ...ppear Setting Description Caller ID Type 1 Mode Select the on hook mode None Belcore MDMF Belcore SDMF ETSI WINK ETSI RING DTMF The default is Belcore MDMF Caller ID Type 2 Mode Select the off hook mode None Belcore MDMF Belcore SDMF ETSI WINK ETSI RING DTMF The default is Belcore MDMF Message Waiting Mode Select None Belcore MDMF Belcore SDMF ETSI The default is Belcore MDMF Save These Settings C...

Страница 58: ...ecial strings that invoke telephone features By default the X6v is configured to handle number patterns in every country in the world Emergency calls are by default routed to the PSTN and all other calls are routed via VoIP To change which calls are sent to the PSTN your first option is to open the My VoIP Express page where you can simply define most numbers that you want to send to the PSTN If y...

Страница 59: ...is then they can make PSTN calls from your X6v Often this will save considerable amounts of money relative to making the call directly Suppose you are in Los Angeles and you have a friend in Hong Kong who needs to make frequent calls to local numbers in L A Your friend can make free or very low cost VoIP calls to your X6v Once she has connected to your X6v she can make local PSTN calls from your X...

Страница 60: ... those locations using standard local phones including cell mobile phones There are several options you can set when you configure a VoIP to PSTN bridge You can control which callers can access bridge mode You can allow all callers to access bridge mode You can restrict access only to callers with Caller ID You can restrict access only to particular callers based on their Caller ID For whichever c...

Страница 61: ...r VoIP Bridge Calls Enables auto answer of VoIP calls The default is Disabled VoIP Bridge Accept Any Call Enables answering calls with or without Caller ID The default is Disabled VoIP Bridge Accept Anonymous Calls Enables answering calls without Caller ID The default is Disabled Caller Password Enables a security code for access to the bridge The default is Disabled Password Dial String Enter any...

Страница 62: ...ge Calls select Enable 3 At VoIP Bridge Accept Any Call select Enable 4 Click Save These Settings With these settings if you call the X6v s VoIP account the X6v will answer the call and play the PSTN dial tone When you hear this tone you can call any number supported by your standard telephone service and the call will be bridged to the PSTN To add security to a VoIP to PSTN Bridge 1 At Bridge fro...

Страница 63: ...nter the security code they will receive a regular TELCO dial tone and they can dial the number they want to call over the VoIP network To enable single stage dialing to a VoIP to PSTN bridge If your service provider supports single stage dialing when the remote caller dials a PSTN number the VoIP service will direct that call to your X6v Your X6v will answer the call The service provider will inc...

Страница 64: ...have friends and family in Calcutta You don t have to be at home in order to call them You can call your X6v s PSTN phone number from any standard phone including your cell phone and make a low cost VoIP call to Calcutta Suppose your company has offices in Dubai and in Buenos Aires You can set the X6v so that when customers call the Dubai office after hours the X6v automatically bridges the call t...

Страница 65: ...callers who enter an incorrect code will ring through to the phone that is connected to the X6v This is convenient for someone who is traveling and who may some of the time want to use the bridge feature to make local calls but who other times may want to reach someone in their home or office To configure a bridge from PSTN to VoIP in the VoIP area of the Configuration Manager click the Advanced V...

Страница 66: ...ept Any Call Enables disables answering calls with or without Caller ID TELCO Port Accept Anonymous Calls Enables disables answering calls without Caller ID Caller Password Enables disables security code to access bridge feature Password Dial String Enter any sequence of up to 24 telephone pad digits and special characters 1 2 3 4 5 6 7 8 9 0 À TELCO Port Accept Only These Numbers 01 to 10 Enter u...

Страница 67: ...xes 01 to 10 enter numbers authorized to make bridge calls 5 Click Save These Settings To add a security code for making a bridge call you can add this feature whether or not you list numbers that you will accept 1 At Bridge from PSTN to VoIP select Enable 2 At Auto Answer PSTN Calls select Enable 3 At Caller Password select Enable 4 At Password Dial String enter any sequence of up to 24 telephone...

Страница 68: ...le If this parameter is disabled the X6v will send its own VoIP Caller ID as the Caller ID of the bridged call Miscellaneous TELCO Parameters If you are having problems with your Caller ID display Zoom Customer Support may ask you to modify one or more of the Caller ID settings on this page Emergency Services ADSL X6v User Guide 68 ...

Страница 69: ...ovider Emergency Numbers Routed via the PSTN Display only These numbers are automatically routed via the PSTN Emergency Numbers to be Routed via VoIP if Either the PSTN Line is Unavailable or These Numbers Are Not Configured to be Routed on the PSTN Enter emergency numbers here Emergency Numbers To Be Routed via the PSTN if the PSTN is Available Enter emergency numbers here ...

Страница 70: ... phone to go back and forth between your 2 callers 56 Disable Call Waiting on all calls 59 Disable Caller ID for call waiting calls 70 Turn off Call Waiting for the next call 71 Turn on Call Waiting for the next call 72 Forward all calls to phone number After you dial 72 dial 8 enter the phone number then press 73 Disable Call Forwarding 82 Enable Caller ID for all outbound calls 62 Block Caller I...

Страница 71: ...nfiguration put the end of a pin or paper clip into the VoIP RESET hole the top one of two reset holes in the back panel and hold the button down for 5 seconds or more To restore the X6v to the most recent settings given to you by your VoIP service provider press and hold the VoIP RESET button for 5 seconds or more and then release Wait two minutes then press and hold the button for at least 5 mor...

Страница 72: ...er the Internet you always have to set up the modem unless you linked up to your partner by going to a Web site A peer to peer game is a game where two players are competing directly against one another Popular peer to peer games include World in Conflict Madden NFL 08 Counterstrike Age of Mythology and Unreal Tournament 2004 If you are unsure whether your game is a peer to peer game check the gam...

Страница 73: ... to make sure that the computer or gaming system you use for playing games always has the same IP address By default the X6v assigns addresses dynamically using Dynamic Host Configuration Protocol or DHCP to the devices on the local area network whenever they reboot These addresses won t necessarily always be the same Therefore you need to assign a Static unchanging IP address to every computer or...

Страница 74: ...r MS DOS window In the Command Prompt or MS DOS window after C or C WINDOWS type ipconfig leave a space then type all It should look like this ipconfig all Press Enter The MAC address is displayed as the 12 digit Physical Address or Internet Adapter address Write this address down and keep it handy 2 Now that you have determined the MAC address you can assign your computer a Static IP address a In...

Страница 75: ... s MAC address Maximum Lease Time Leave the default setting d Click Save Changes and then Write Setting to Flash to save the IP address to permanent memory Now your computer will always be assigned this address e Now go to Setting Up a Virtual Server or DMZ on Your Computer on page 78 If you are using the Xbox or Xbox 360 to play an online game Follow these steps to assign a static IP to the Xbox ...

Страница 76: ... to page 81 for instructions on setting up a DMZ on the Xbox This will prevent the X6v s firewall from stopping connections to the Xbox If you are using PlayStation 3 to play an online game Follow these instructions to assign a Static IP address to your PlayStation 1 Insert your Network Access Disc into the PlayStation 2 On the home menu select Settings then Network Settings 3 Select Internet Conn...

Страница 77: ...ne has to your system A virtual server will allow access to your computer on certain ports A port is like a channel that is used by applications such as games to communicate on For example the directions for the game you want to play over the Internet might tell you to open up port 6000 A DMZ differs from a virtual server in that it allows access on all ports to the computer Because of this DMZ s ...

Страница 78: ...u may need to deactivate it before setting up the virtual server or DMZ Otherwise your computer may block the ports you want to open 1 Click the Router Setup icon Then click the Virtual Server DMZ button to display this page 2 On the Virtual Server DMZ page click the Add Virtual Server DMZ link to display the Add Virtual Server DMZ page ADSL X6v User Guide 78 ...

Страница 79: ...to all communication over the Internet Warning Setting up a DMZ removes the protection provided by the ADSL Ethernet s firewall We therefore recommend that a DMZ be used only when necessary Start Port If you designated your computer as a DMZ you do not have to enter anything here If you are playing another peer to peer or multi player game your game instructions should tell you what ports to enter...

Страница 80: ...col box If you only need to open one port enter the same port number for both Start Port and End Port If you need to open a range of ports enter the starting port number of the range here The highest supported port number is 65535 4 Click Save Changes and then Write Settings to Flash Important If you have not already configured the computer for wireless security see page 29 for instructions on set...

Страница 81: ...dd Virtual Server DMZ page 3 Make the following entries Setting Values Internal IP Address Enter the IP address that you specified on the Xbox IP Settings screen Protocol Select DMZ to enable your Xbox as a DMZ Start Port The field remains unavailable because you selected DMZ No entry is required End Port The field remains unavailable because you selected DMZ No entry is required Chapter 5 The X6v...

Страница 82: ...e account The Xbox Live CD should still be in your Xbox We recommend that you watch a video that explains the installation process Select Xbox Live from the menu Then from the Dashboard select Xbox Live and follow the prompts Note You will need your subscription code to activate your account this number is located on the CD s sleeve If you require more detailed instructions please refer to your Xb...

Страница 83: ...play the Add Virtual Server DMZ page 3 Make the following entries Setting Values Internal IP Address Enter the IP address that you specified on the PlayStation s IP Address setting screen Protocol Select DMZ to enable your PlayStation as a DMZ Start Port The field remains unavailable because you selected DMZ End Port The field remains unavailable because you selected DMZ Chapter 5 The X6v and Onli...

Страница 84: ... Write Settings to Flash Important If you have not already configured wireless security on the PlayStation see page 29 if your network uses WEP or page 33 if your network uses WPA If your security has been configured your online gaming setup is complete ...

Страница 85: ...m to your network The information in this chapter applies to you if Your Internet service provider instructs you to enable disable or change the default settings for your X6v You need to change your Wide Area Network settings You want to change the default firewall settings to block particular IP addresses and intrusive hosts You want to change your ADSL password You have customized your configura...

Страница 86: ...Configuration Status and Administration Configuration Options When you click a Configuration button a page opens to the option you selected The following table describes each option and the tasks you can perform This button Opens a page that lets you WAN Configuration Specify how the Wide Area Network WAN setup is configured Some of the values need to be supplied by your ISP ADSL provider ADSL X6v...

Страница 87: ... on the Ethernet ports on your X6v Typically you should not need to change these settings DNS Allows you to specify multiple DNS servers Typically most users do not need to enter a DNS server unless instructed by their ISP LAN Configuration Specifies the settings that control the connection between the X6v modem and your Ethernet jack Sets a fixed IP address for your computer Do not change the LAN...

Страница 88: ...AN This avoids problems caused by certain applications having to work through NAT such as online games or FTP servers and avoids the need to run a PPP software stack on the PC UPnP Universal Plug and Play Connect automatically with other UPnP enabled software and hardware The Internet Gateway Device IGD protocol makes it possible for applications running on the network to automatically configure N...

Страница 89: ...ves to give you the most current information Typically these reports are used for maintenance purposes and troubleshooting The following table describes each report in the Status group This button Opens a page that lets you ADSL Status View information such as the ADSL Line State and Upstream and Downstream speeds Wireless Status View information such as your Link Speed SSID Default Channel and Ma...

Страница 90: ...y the path to the upgrade file you need to update your firmware Use the Browse button on this page to navigate to the file then click the Upload button to perform the firmware update System Log View data generated or acquired by routine system communication with other devices This information does not necessarily represent unexpected or improper functioning and is not captured by the system traps ...

Страница 91: ...DSL setup and Internet access Some of these values are provided by your ISP ADSL provider and need to be entered on this page To determine if you need to add other values read the table descriptions that follow the picture Note that Protocol Encapsulation VPI VCI PPP and NAT also appear on the ADSL Setup page Most likely you have already entered values for these settings and only need the WAN Conf...

Страница 92: ...alues that you can enter After you enter your values click Save Changes and then Write Settings to Flash Note The table shows settings in addition to the ones shown in the picture Depending upon your protocol setting your WAN configuration might have all or only some of the settings ADSL X6v User Guide 92 ...

Страница 93: ...a is passed over the Internet An example value is LLC Logical Link Control Your ADSL provider supplies this value when you sign up for ADSL service VPI Virtual Path Identifier ranges from 0 256 Your ADSL provider supplies the VPI when you sign up for ADSL VCI Virtual Circuit Identifier ranges from 0 65536 Your ADSL provider supplies the VCI when you sign up for ADSL service Username Your ADSL prov...

Страница 94: ...Protocol does not NAT Network Address Translation By default this setting is Enabled NAT keeps a table of individual private IP addresses in your network and refers to the table when incoming requests are made If no matches are found the incoming data cannot come into your network An Enabled setting keeps your IP addresses hidden from outside users Disabled is some times used if you want to use Pu...

Страница 95: ...er Type Specifies the type of Ethernet filtering that is performed by the bridge interface All Allows all types of Ethernet packets through the port Ip Allows only IP ARP types of Ethernet packets through the port PPPoE Allows only PPPoE types of Ethernet packets through the port ATM Traffic Class Peak Cell Rate Burst Tolerance Max Cell Rate Max Burst Rate Sustainable Cell Rate These settings allo...

Страница 96: ...SP gateway You may want to configure RIP if any of the following circumstances apply to your network Your home network setup includes an additional router or RIP enabled PC or device These routers will need to communicate via RIP to share their routing table information Your network connects via the ADSL line to a remote network such as a corporate network In order for your modem to learn the rout...

Страница 97: ...bout the Ethernet ports on your ADSL modem Typically you should not need to change these settings However if you are having problems establishing your Ethernet connection you may need to change the Speed Duplex value to match that of the Ethernet NIC in your computer Here is a picture of the Ethernet Configuration page The following table describes the Ethernet Configuration settings If you change...

Страница 98: ...ward all packets correctly However if you set up your network with different subnets you can use static routing to ensure your packets are handled correctly You can manually create a static route to tell the modem how to reach a specific IP network The route entry specifies a destination network or single host together with a mask to indicate what range of addresses the network covers and a next h...

Страница 99: ...L Modem Destination Enter the Subnet IP address of the destination Gateway Enter the Gateway IP address of your destination s subnet The HOP gateway must be on the same subnet as the modem Mask Enter the subnet mask range of IP addresses of the destination IP addresses based on the above subnet IP address of the destination Metric The number of hops This should usually be left at 1 Advertise Enabl...

Страница 100: ...protocols from reaching the DMZ machine When you use the Advanced Firewall Filtering feature you will move through multiple screens Follow the steps below to set up this feature 1 Open the Advanced Firewall Filter page by clicking Advanced Firewall Filter on the Router Setup page Important Do not enable Advanced Firewall Filtering on the Advanced Firewall Filter page until you create your security...

Страница 101: ...Policy Rules link You can set one of three Policy Types Choose the External Internal Filter Rules policy to allow or block what is sent from the WAN to the LAN Choose the External DMZ Filter Rules policy to allow or block what is sent from the WAN to the DMZ machine or the Virtual Server Choose the DMZ Internal Filter Rules policy to allow or block what is sent from a DMZ machine to your LAN Chapt...

Страница 102: ...ple if you selected the External Internal Filter Rules policy and you have a VoIP setup the Configuration Manager would display a page similar to this Important If your setup includes VoIP services do not edit the default settings that are listed in the above figure 5 To add a new policy click the Add Policy Rule link The Add Firewall Policy Rule page opens ADSL X6v User Guide 102 ...

Страница 103: ...ou choose Block for Traffic Inbound choose Assign for Src Address and specify a range of IP addresses This sets the firewall to block all traffic that has the IP addresses you specified The following table shows you the criteria that you can enter Setting Description Source Address Lets you specify Any for all IP addresses or a specific range of IP addresses from a particular source to be blocked ...

Страница 104: ...les you set up in the policy Status Specifies if the filter will Allow traffic 6 Click Save Changes then Write Settings to Flash 7 Return to the Advanced Firewall Filter page and select Enable as the value for Advanced Firewall Filtering Then click Write Settings to Flash ADSL X6v User Guide 104 ...

Страница 105: ...on You can set the level of importance of the logged event and receive alerts if particular IP addresses are trying to gain access to your network To set security logging on follow these steps 1 Click Advanced Firewall Filter on the Router Setup page Then click the link to Configure Security Logging The Security Logging Configuration page opens 2 Enable the Logging Types that you want and set the ...

Страница 106: ...re is additional functionality that you can set up Your modem offers protection from various Denial of Service DOS attacks prevents users from scanning your ports to try to access your computer and can blacklist any host trying to damage your network Follow these steps to enable additional intrusion detection From the Router Setup page click Firewall Then click the link to Configure Intrusion Dete...

Страница 107: ...r sends out a ping with a broadcast destination address and a spoofed source address Packets destined for the victim of a spoofing attack are blocked for a specified duration DOS Attack Block Duration The duration that hosts are blocked once a Denial of Service DOS attack is detected Scan Attack Block Duration The length of time that traffic from IP addresses doing the port scan are blocked once a...

Страница 108: ...orm is a DOS attack where the attacker sends oversized ICMP datagrams to the network using the ping command Maximum ICMP Count Sets the maximum number of ICMP packets per second before an ICMP Flood is detected ICMP Flood is a DOS attack where the attacker tries to flood the network with ICMP packets in order to prevent legitimate network traffic ...

Страница 109: ...re you add the IP address Note If a DNS server IP address is currently assigned it will be displayed on the page You must delete it before adding the new IP address The following table shows you the values to enter After you enter the value click Add then Write Settings to Flash Setting Description DNS Server List Shows the list of currently configured DNS servers New DNS Server IP Address Enter t...

Страница 110: ...et games or running a web server For more information about the Virtual Server DMZ feature and the differences between a virtual server and a DMZ see page 77 For information about setting up a Virtual Server or DMZ for gaming see Setting Up the X6v for Online Gaming on page 73 Here is a picture of the Virtual Server DMZ page Click the Add Virtual Server DMZ link to open the Add Virtual Server DMZ ...

Страница 111: ... to allow through to the computer Select DMZ if you want to allow all protocols and all ports to be open on the computer Start Port If you selected TCP or UDP you must specify the port s where you want to allow access If you need to open a range of ports enter the first port number here If you need to open only one port enter the port you wish to open as both the Start Port and End Port End Port I...

Страница 112: ... on the ADSL Configuration page Here is a picture of the ADSL Configuration page where you change your settings The following table shows you the values to enter After you enter the values click Save Changes then Write Settings to Flash Setting Description BitSwap Enables or disables bit swapping in both upstream and downstream directions If you experience frequent connection drops it may help to ...

Страница 113: ... on the ADSL Status page Select Start to restart the connection Changing Your LAN Settings When would I need to change my LAN settings DHCP Dynamic Host Configuration Protocol is a protocol that enables your modem to manage the assignment of IP addresses to computers and devices on your Ethernet LAN network as well as to the internal VoIP system on the X6v Enabling DHCP on your modem allows it to ...

Страница 114: ... and other devices in your network will contact your modem Subnet Mask The modem s subnet mask address Status You should leave this setting on Enable Disable would require you to set up fixed IP addresses for all of the devices in your network Maximum Lease Time The maximum amount of time in seconds that a device in your network will have the temporary IP address before a new one is issued by the ...

Страница 115: ... that the Start and End IP Addresses must both be in the same subnet as the IP Address above End IP Address The last IP address of a range that you specify using the Start and End IP Address settings Your modem s DHCP server will assign numbers from this range at random to the computers and devices in your network By default the DHCP server has 21 addresses available to assign If you plan on attac...

Страница 116: ...AN Configuration page This is not strictly speaking a static IP Address since it is served via DHCP However the effect is the same You are uniquely assigning a particular IP Address to a particular device on your network You will want to create a fixed IP Address if you are setting up a computer Xbox or PlayStation for gaming To create a fixed IP address see steps 2 through 6 in Step 1 Choosing an...

Страница 117: ...rts on a computer in your network Some examples are video conferencing applications gaming applications and instant messaging Here is a picture of the Half Bridge Configuration page To configure a half bridge set the Half Bridge status to Enable From the drop down list choose the computer that you want to share the public IP address This default setup for the PPP Half Bridge works for most applica...

Страница 118: ...eason to do so To change the status of Universal Plug and Play on the Router Setup page click UPnP Setting Description Enable UPnP IGD Function Select this check box to enable or disable Universal Plug and Play with Internet Gateway Device IGD protocol By default UPnP is enabled Click Save Changes and then Write Settings to Flash to save your UPnP setting to permanent memory ADSL X6v User Guide 11...

Страница 119: ... assign Ethernet ports to the additional PVC s Per Port PVC is typically used to assign different video streams to particular Ethernet ports To assign ports to a PVC on the Router Setup page click Per Port PVC Click Edit to assign a port or ports to Vlan Group 2 To assign a port to PVC 1 in the Add column for Vlan2 see above click Edit to display the Assign Ports screen Chapter 6 Using Router Setu...

Страница 120: ...t or ports These ports will no longer be assigned to PVC 0 PVC Select the PVC number Note While you can create up to eight separate PVCs 0 to 7 by assigning different VPI and VCI settings see page 16 only four can be used for Per Port PVC Return to Per Port PVC screen Click this link to return to the main Per Port PVC screen If you assigned Ethernet LAN ports 3 and 4 to PVC 1 note that those ports...

Страница 121: ...ult is 80 Telnet Port Enter a port number The default is 23 Click Save Changes and then Write Settings to Flash to save the new port settings to permanent memory Reboot your PC to make the settings active When the new port settings are saved network users who want to access the X6v via the Internet must add a colon plus the new port number after the X6v s IP address For example in their browser s ...

Страница 122: ...h as printers To block Internet access on the Router Setup page click MAC Filtering Setting Description Status Select Enabled to deny Internet access to the specified MAC address The default is Disabled Name Enter the name associated with the MAC address MAC Address Enter the 12 digit address without separators Save Changes Click this button to display the MAC address information in the MAC Filter...

Страница 123: ... it from the MAC Filters List MAC Filters List Edit Delete Click this link to edit or delete the associated MAC address information To delete click the Reset button in the top half of the screen Click Save Changes and then Write Settings to Flash to save the MAC Filters List to permanent memory Chapter 6 Using Router Setup 123 ...

Страница 124: ...lected the associated service is enabled for local network users The default for all services is Enabled WAN Access Select a check box to enable the associated service for remote network users By default all the services are Disabled for remote users Click Save Changes and then Write Settings to Flash to save the service availability configuration to permanent memory ADSL X6v User Guide 124 ...

Страница 125: ...dium priority ports share a lower guaranteed percentage typically 20 Standard priority ports share the remaining upstream bandwidth that is guaranteed to them If ports aren t using their guaranteed bandwidth the excess bandwidth becomes available to other ports in order of priority For VoIP you normally assign a High Priority QoS port For a game console you may want to assign a High or Medium prio...

Страница 126: ...lt VoIP and ETHERNET port 1 are set to High Priority ETHERNET port 2 is set to Medium Priority and ETHERNET ports 3 and 4 as well as the wireless port are set to Standard priority These default settings can be changed The default is NO Which ports should be High Priority Select one to three ports By default these ports will together share 70 of the upstream bandwidth You can configure a different ...

Страница 127: ...hese ports will together share 20 of the upstream bandwidth You can configure a different percentage on the Advanced QoS page shown below Advanced QoS page Click this link to specify a different upstream bandwidth percentage for High Medium and Standard priorities Chapter 6 Using Router Setup 127 ...

Страница 128: ...ority ports must have at least 1 of the upstream bandwidth What guaranteed bandwidth should Medium Priority Ports share The default is 20 You can enter a different whole number percent The Medium Priority and High Priority percentages together must be 100 Note Standard Priority ports must have at least 1 of the upstream bandwidth Return Main QoS page Click to return to the main QoS page After you ...

Страница 129: ...vider and should be used only if the provider instructs you to enable it Setting Description CWM Status When set to true enables the CWM protocol When set to false the default disables CWM Configure Management Server Page Opens the page where you set parameters for the ACS server you are connecting to After you make changes on the Configure Management Server Page click Save Changes then Write Sett...

Страница 130: ...ue or false the X6v must periodically send information to the ACS server Periodic Inform Interval in seconds Specifies the time interval between X6v information calls to the ACS Periodic Inform Time Specifies the reference time plus or minus an integer multiple of the Inform Interval of the Inform call Connection Request URL Specifies the X6v URL to be used by the ACS server The default is cwm CRN...

Страница 131: ...the X6v The default is user Connection Request Password Specifies the X6v password that will authenticate an ACS making a connection request to the X6v The default is welcome Upgrades Managed If set to true specifies that the ACS server will manage upgrades for the X6v After you make your entries click Save Changes and then click Return to Configure CWM Parameters Page ...

Страница 132: ... is contained in the reports Wireless Status Report Here is a picture of a typical Wireless Status Report The Wireless Status Report shows you the modem speed Link Speed the SSID your Default Channel the Mac address of the modem and the number of packets that are being received and transmitted Rx and Tx Packets You can also tell if your modem has wireless encryption enabled To encrypt your informa...

Страница 133: ...as established a physical connection to the DSLAM DSL Access Multiplexer a device used in the process of connecting your computers and or network to the Internet Training is at the beginning of the connection and Handshake is right after Training The Downstream and Upstream values tell you the speed at which information is being downloaded from the Internet Downstream and uploaded to the Internet ...

Страница 134: ...Ethernet Status Report Here is a picture of the Ethernet Status Report The Ethernet Status Report gives you information about the receive Rx and transmission Tx rates of packets ADSL X6v User Guide 134 ...

Страница 135: ... to Flash and to remember your new password CAUTION If you change the password and then forget it you will be unable to log onto the Configuration Manager You will need to restore the modem to the original factory settings and will lose any changed configuration data You can later restore changed configuration data assuming that you backed it up previously See Backing Up and Restoring Your Configu...

Страница 136: ...on Manager on your computer You can then log in using the admin zoomadsl login Here is a picture of the Reboot Restore Router page Click the Check to Restore Factory Settings check box click Reboot then follow the instructions to reset your ADSL modem to its original firmware Please see Backing Up and Restoring Your Configurations on page 137 for information about restoring a stored X6v configurat...

Страница 137: ...ations you can put them back using the Backup Restore Config option You may also want to back up your configurations so you can use them to set up the same configurations in other modems To back up and restore your configuration 1 Click Backup Restore Config in the Administration section of the Router Setup page The Backup Restore Configuration page opens 2 Follow the instructions on the page to b...

Страница 138: ...pdate option to upload the file to your modem Important It is recommended that you backup your modem s configurations before you upload the firmware See Backing Up and Restoring Your Configurations on page 137 Also do not turn off the modem or unplug it while the upload is in progress Here is a picture of the Firmware Update page Click Browse to go to the firmware update file Then click Image Uplo...

Страница 139: ...t updated tables on our Web site If your service provider or country is not listed in the tables below please consult www zoom com Note to USA customers If your ADSL service provider is not shown below use the settings for Service Provider Not Shown at the bottom of the table If those settings do not work use the settings for the company that provides local telephone service in your area Table A U...

Страница 140: ... IP LLC Socket 1 8 35 1483 Bridged IP LLC Socket 2 0 35 1483 Bridged IP LLC Socket 3 0 35 PPPoE LLC Sonic 0 35 1483 Bridged IP LLC Sprint Embarq 1 0 35 PPPoA LLC Sprint Embarq 2 8 35 PPPoE LLC Uniserve 0 33 1483 Bridged IP LLC Verizon 1 0 35 PPPoE LLC Verizon 2 0 35 1483 Bridged IP LLC Service Provider Not Shown 0 35 PPPoE LLC Table B Countries Other Than the USA Service Provider VPI VCI Encapsula...

Страница 141: ...PPoA VC MUX France 1 8 35 PPPoE LLC France 2 8 67 PPPoA LLC France 3 8 35 PPPoA VC MUX France 4 0 35 1483 Bridged LLC France 5 8 35 1483 Bridged LLC Germany 1 32 PPPoE LLC Greece 8 35 PPPoA VC MUX Hungary 1 32 PPPoE LLC Hungary Sci Network 0 35 PPPoE LLC Iceland Islandssimi 0 35 PPPoA VC MUX Iceland Siminn 8 48 PPPoA VC MUX Israel 8 48 PPPoA VC MUX Italy 8 35 PPPoA VC MUX Jamaica 1 8 35 PPPoA VC M...

Страница 142: ...A VC MUX Spain Colt Telecom Ola Internet 0 35 PPPoA VC MUX Spain EresMas Retevision 8 35 PPPoA VC MUX Spain Knet Comunicaciones S L 8 32 PPPoA VC MUX Spain Servidores Voz 0 33 PPPoA VC MUX Spain Telefonica 1 8 32 PPPoE LLC Spain Telefonica 2 Terra 8 32 1483 Routed IP LLC Spain Wanadoo 1 8 35 PPPoA VC MUX Spain Wanadoo 2 8 32 PPPoE LLC Spain Wanadoo 3 8 32 1483 Routed IP LLC Sweden Telenordia 8 35 ...

Страница 143: ...when data is sent Additional lights for each Ethernet port are on the back of the X6v WLAN Lights when the Wireless Local Area Network is running and enabled Flashes when data is sent DSL Flashes when the X6v is performing its startup sequence Steady on when the unit has synched up with its DSL connection Note If the light fails to switch from flashing to steady after a minute or two check with yo...

Страница 144: ...es during an outgoing or incoming call over your standard telephone line or when the X6v is bridging a call PHONE Flashes whenever the telephone connected to the PHONE port is in use for either a VoIP or a standard landline call MSG Flashes when a recorded VoIP message is waiting Steady on if the X6v cannot communicate with the VoIP update server X6v Back Panel Connectors Port or Button Descriptio...

Страница 145: ...to the previous settings To reset insert a paper clip and hold it down for 5 seconds To force the X6v to download the latest settings from the VoIP server wait 2 minutes after the reset insert the paper clip again and hold it down for 5 more seconds RESET ROUTER Resets the modem to its factory settings To reset insert a paper clip and press the button three times DSL Connects the modem to the ADSL...

Страница 146: ...figure the TCP IP settings This is because your Windows computer will automatically configure them for you Only Windows users who are troubleshooting the X6v will need to verify the TCP IP settings Depending on your operating system follow the steps in the appropriate section to ensure your TCP IP settings are correct If you are using Macintosh see Macintosh TCP IP Settings on page 147 If you are ...

Страница 147: ...d then Network to display the Network pane For OS X 3 you also have to click the Configure button 2 Ensure that Automatic is selected from the Location list box 3 Under the Show drop down tab choose Built in Ethernet 4 Under the TCP IP tab make sure that Using DHCP is highlighted in the Configure list box Do not enter anything into the DHCP Client ID field 5 Click Apply Now or Save if prompted and...

Страница 148: ...o display the TCP IP Window 2 Under Connect via select Ethernet built in 3 Under Configure select Using DHCP Server Do not enter anything in the DHCP Client ID field 4 Close the TCP IP Window You will be asked if you want to save the changes Click Save 5 Continue with Establishing Communication on page 15 ...

Страница 149: ...each eth0 eth1 eth2 and so forth If you select an identifier other than eth0 for your ADSL modem use that identifier throughout RedHat Edit or create etc sysconfig network scripts ifcfg eth0 so that it contains the following three lines DEVICE eth0 ONBOOT yes BOOTPROTO dhcp SuSE Edit the file etc rc config search for the variables NETCONFIG NETDEV_0 and IFCONFIG_0 Set them as follows see the instr...

Страница 150: ...oint to Control Panel and then click Network and Internet Connections b Right click the Local Area Connection icon and select Properties c Select your NIC card s TCP IP entry it should include TCP IP in it but not AOL Dial up or Adapter and click the Properties button 2 Ensure the following is selected depending on whether you are using dynamic DHCP or static IP addressing a If you are using DHCP ...

Страница 151: ... or Adapter and click the Properties button 2 Ensure the following is selected depending on whether you are using dynamic DHCP or static IP addressing If you are using DHCP most users Ensure that Obtain an IP address automatically is selected and that either Obtain a DNS server address automatically or Enable DNS is selected All fields should be blank If you are using a static IP address Ensure th...

Страница 152: ...hether you are using dynamic DHCP or static IP addressing If you are using DHCP most users Ensure that Obtain an IP address automatically is selected and that either Obtain a DNS server address automatically or Enable DNS is selected All fields should be blank If you are using a static IP address Ensure that Specify an IP address is selected and that the correct IP Address and Subnet Mask values a...

Страница 153: ...f that doesn t work check these items Ensure that you are using the correct VPI VCI and Encapsulation settings See Appendix A on page 139 If your Encapsulation begins with PPP ensure that you have typed your DSL Username and Password correctly Note that this is NOT the username and password you used to log into the Zoom Configuration Manager on page 15 a If you had the modem automatically configur...

Страница 154: ...n this might be called a Local Area Network or broadband connection If you need help configuring your Web browser refer to Appendix E Configuring Your Web Browser on page 158 Verify that your TCP IP network settings are properly configured on your computer To do this refer to the appropriate section If you are using Macintosh see Macintosh TCP IP Settings on page 147 If you are using Linux see Lin...

Страница 155: ...configured See page 146 for more information If you are using Mac OS X 10 3 and above renew your IP address Point to System Preferences then choose Network Click the Configure button and then the Renew DHCP Lease button If you are using a Windows computer perform a Release Renew operation Windows 2000 XP From the desktop click the Start button then point to Programs point to Accessories and then s...

Страница 156: ...ems Check that there s a good connection between an X6v ETHERNET port and the computer that can t access the Internet Try rebooting the computer that can t access the Internet This will allow for the computer to release and renew its IP address Try the following for any computer that can t access the Internet Ensure that the computer is connected using its Ethernet port and one of the X6v modem s ...

Страница 157: ...ple if you are using a router reboot each computer that is connected to the router This will allow for the computers to release and renew their IP addresses If you are using a wireless access point or a router verify that the device is using Dynamic Host Configuration Protocol DHCP This is also known as dynamic IP addressing Depending on your device this may be controlled by an Obtain an IP addres...

Страница 158: ...ld have been done automatically when you installed the software If you find that you need to configure your Web browser this section includes instructions for recent versions of two popular Web browsers Internet Explorer Version 6 0 or later and Mozilla Firefox Version 2 0 or later The configuration is done on the same computer on which you installed the X6v software Depending on the browser you h...

Страница 159: ...and then depending on your computer either click Control Panel or click Settings and then Control Panel In the Control Panel double click the Internet Options icon If this icon does not appear double click the Network and Internet Options icon and then double click the Internet Options icon 2 On the Internet Properties dialog box select the Connections tab then click the Setup button 3 The setup p...

Страница 160: ...lick Finish Windows 98 Me 2000 On the Internet Connection Wizard dialog select I want to set up my Internet connection manually or I want to connect through a local area network LAN then click Next On the Setting up your Internet connection dialog select I connect through a local area network LAN then click Next On the Local area network Internet configuration dialog uncheck the Automatic discover...

Страница 161: ...re not sure what version you have open Mozilla Firefox and choose About Firefox from the Help menu The version number is at the top of the screen 1 Double click the Mozilla Firefox icon on your desktop to open the browser 2 From the Tools menu choose Options to open the Options page 3 On the Options page click Advanced click the Network tab and then click Settings 4 On the Connections Setting page...

Страница 162: ... For most countries channels 1 13 are normal for private wireless networks The following table shows countries known to use channels other than 1 13 for private wireless networks Country Channels France 10 13 Israel 4 9 Japan 1 13 14 802 11b only Taiwan 1 11 USA 1 11 ...

Страница 163: ...required to provide you with advance notice so you can make the modifications necessary to obtain uninterrupted service There are no user serviceable components within this equipment See Warranty flyer for repair or warrantee information It shall be unlawful for any person within the United States to use a computer or other electronic device to send any message via a telephone facsimile unless suc...

Страница 164: ...istration number The abbreviation IC before the registration number signifies that registration was performed based on a Declaration of Conformity indicating that Industry Canada technical specifications were met It does not imply that Industry Canada approved the equipment The Ringer Equivalence Number REN for this terminal equipment is identified on the bottom label of the equipment The REN assi...

Страница 165: ... relevanten Festlegungen der Richtlinie 1999 5 EC Dieses Produkt ist das gekennzeichnete CE Ο κατασκευαστής δηλώνει με αποκλειστική του ευθύνη ότι αυτό το προϊόν συμμορφώνεται με την Οδηγία 1999 5 ΕC μέσω των παρακάτω Αυτό το προϊόν φέρει τη Σήμανση CE Il fornitore dichiara sotto la sola responsabilità che questa apparecchiatura è compliant a 1999 5 EC direttivo via quanto segue Questo prodotto è ...

Страница 166: ...hardware will work properly in all environments and applications and makes no warranty or representation either expressed or implied with respect to the quality performance merchantability or fitness for a particular purpose of the software or documentation The manufacturer reserves the right to make changes to the hardware software and documentation without obligation to notify any person or orga...

Отзывы: