10
© Copyright 2022 Zoeller
®
Co. All rights reserved.
2. Standing near the Fit, use your phone, tablet, or computer to look for the Fit’s SSID in your WiFi settings (see Figure B). It will look like
“ZCTL_Fit_xxxx” where “xxxx” is the first 4 digits of your Fit’s Device ID. Select this, and be sure your device displays a check mark or
similar indicator that you are connected to the Fit’s local network. If so, 2 things will happen:
1. The Z Control
®
LED will flash quickly.
2. A Z Control
®
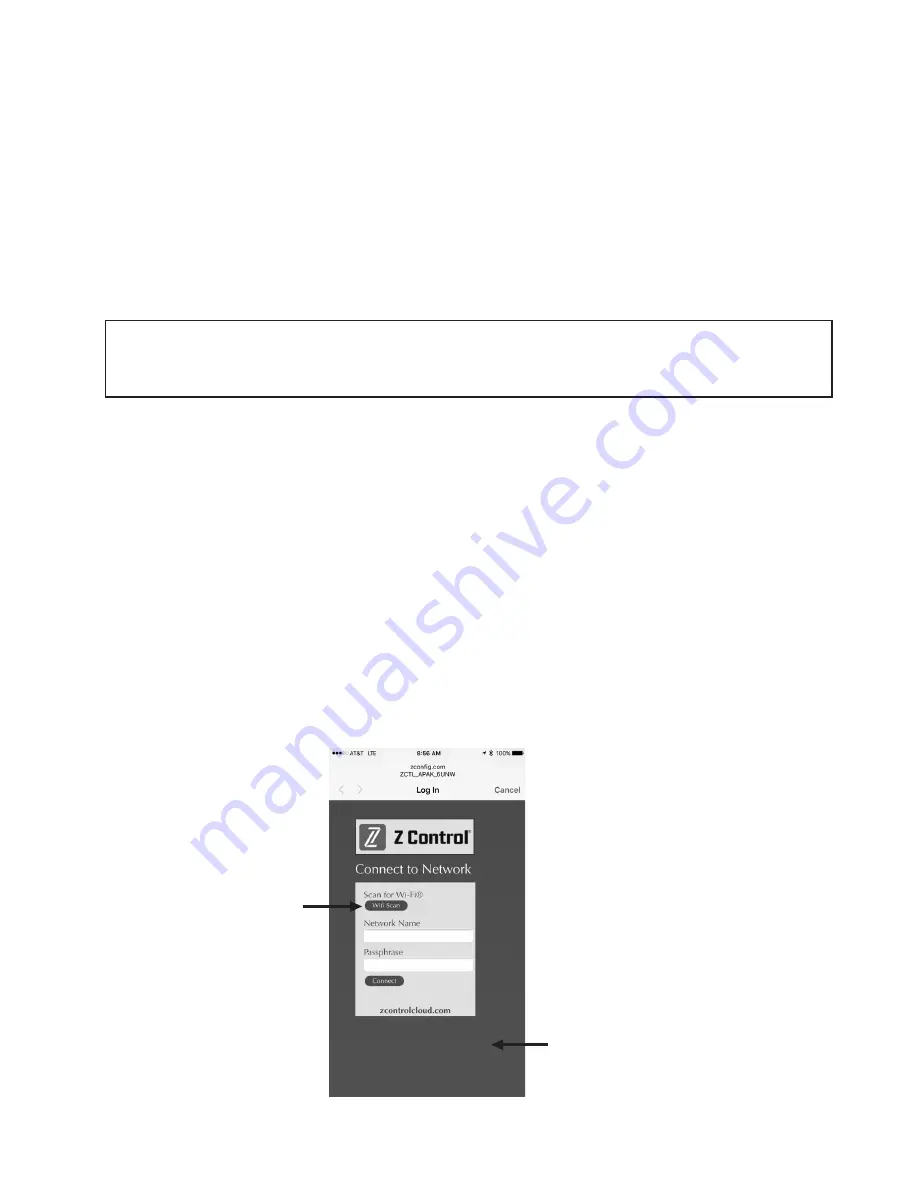
setup screen (See Figure C) will open. This may take up to 30 seconds.
If the setup screen does not appear, open a browser on the same device and type “192.168.125.1” in the address bar. If the setup screen
appears but is not used (cancelled or otherwise closed), the Fit
will return to AP mode and the Z Control
®
LED will turn off until the next
WiFi setup attempt. If the setup screen still does not appear, verify your device is still connected to the Fit’s SSID. If it isn’t, repeat Step
2 and be sure your device’s Wifi stays connected to the Fit. If your device shows a warning message about no internet or no security on
the Fit’s network, ignore this and connect to it anyway.
3. On the setup screen (see Figure C), press the WiFi Scan button, scroll down to see the list of WiFi signals found, and choose the WiFi
network you want the Fit to use for internet connectivity. Enter the passphrase for the network you chose in the field indicated. If the
passphrase is correct, the Fit will connect to the network and start sending status updates to zcontrolcloud.com. You will see the Z
Control
®
LED go from blinking to solid. This could take up to a minute or so.
If the LED does not turn solid, then the passphrase entered is incorrect, the router’s security is insufficient (see note below**), or some
other network restriction is in place (see your network administrator). The Fit will return to standby mode if the connection to router is not
successful. If you need to force the Fit
into AP mode again, press the Z Control
®
button for 12 seconds (See Figure A). This will cause the
Fit to re-enter AP mode and begin transmitting its SSID again. Repeat Steps 2 and 3.
*AP Mode
is when the Fit is broadcasting its “name”, or SSID. The SSID is in the format ZCTL_Fit_xxxx where “xxxx” is the
first 4 digits of your Fit’s Device ID (See Figure B). The Fit’s SSID will show up in your phone/tablet/computer’s list of available
WiFi networks, and selecting it will give you direct connectivity to the Fit. This is required in order to give your Fit the password
credentials needed to connect to the WiFi network of your choice.
•
The 2.4Ghz network must use WPA or WPA2 security. WEP and Open networks are not compatible with the Fit.
•
Any VPNs or other network controls may need to be temporarily turned off during setup.
•
Create a free account at zcontrolcloud.com.
•
Locate the Fit’s Device ID on the top sticker.
•
The above list also helps to troubleshoot connectivity issues.
•
If the Fit controller still will not connect after trying the above suggestions, follow the same steps to connect the Fit to a mobile phone
hotspot instead of the home's wifi router. If the Fit successfully connects to the cloud through the hotspot, then the conflict likely has
something to do with the router settings.
Connection Steps:
1.
Apply AC Power to the Fit. The Z Control
®
LED will blink and then turn off, indicating the Fit is in AP Mode* and is transmitting an SSID
(see Figure B). If the LED is blinking and not in AP mode, press the Z Control
®
button for 12 seconds and let go. The LED will now be off,
indicating the Fit is in AP Mode. A pen or toothpick or similar is required to press the Z Contol
®
button (See Figure A).
Click WiFi Scan button
Available WiFi networks will be listed here. You
may need to scroll down. Select the one you want
FIT to use to connect to the internet. Then fill in the
Passphrase.
** Note that the Fit will not connect to routers with “WEP” or “OPEN” security. Security must be WPA or WPA2 or similar variant.
Figure C


