10
ClearStream CS615 User Manual - Copyright © 2008, 2007 Ziova Corporation
Connection Guide
Installing Your Hard Disk (Optional)
To use an optional Hard Disk you will need to install a Hard Disk in the Caddy.
Always ensure the unit is switched off when removing or installing the disk caddy.
Hard Disks are static electricity sensitive devices, it is recommended to wear an anti-static
device while installing your Hard Disk.
Only IDE Hard Disks are supported in the Hard Disk Caddy.
Make sure you have correctly configured your Hard Disk to the Master setting before
installing. Check your Hard Disk documentation for more information.
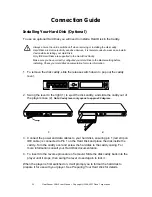
1. To remove the disk caddy, slide the release switch down to pop out the caddy
lever.
2. Swing the lever to the right (1) to eject the disk caddy, and slide the caddy out of
the players case (2).
Note: Caddy lever only opens to approx 60 degrees.
1. 2.
3. Connect the power and data cables to your hard disk, ensuring pin 1 (red strip on
IDE cable) is connected to Pin 1 on the Hard Disk and place the disk inside the
caddy. Turn the caddy over and screw the hard disk to the caddy casing. For
more information consult your Hard Disk documentation.
4. To insert do the reverse procedure of removal. Slide the disk caddy back into the
player until it stops, then swing the lever closed again to lock it.
When the player is first switched on, it will prompt you to format the hard disk to
prepare it for use with your player. See
Preparing Your Hard Disk
for details.


