background image

Installation and Operating Instructions V04                                                                        60


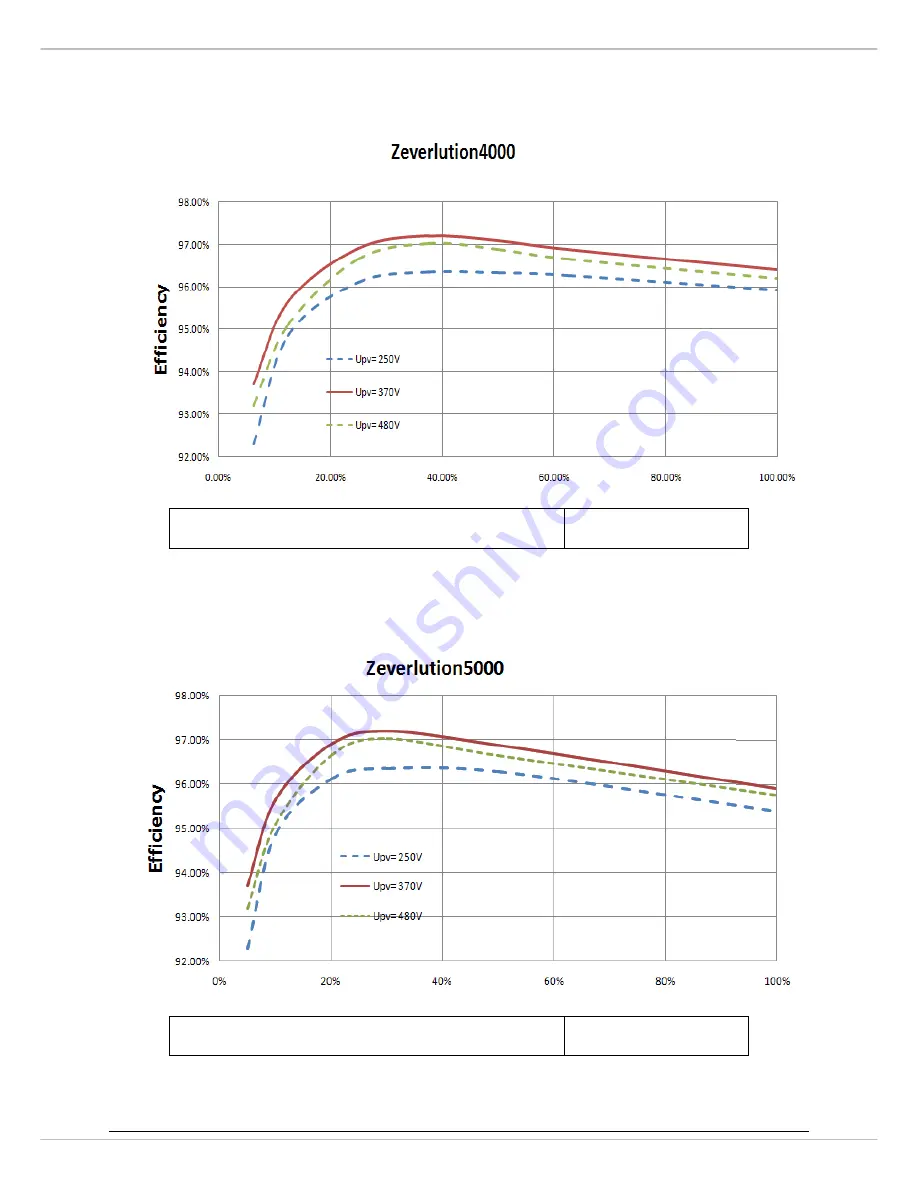
Efficiency curve Zeverlution4000 


Max. efficiency,

η

max


97.2% 


Efficiency curve Zeverlution5000 


Max. efficiency,

η

max


97.2% 


Содержание Zeverlution 3680

Страница 1: ......

Страница 2: ...e label 7 2 5 Basic safety protection 8 3 Unpacking 9 3 1 Scope of delivery 9 3 2 Checking for transport damage 9 4 Mounting 10 4 1 Ambient conditions 10 4 2 Selecting the mounting location 12 4 3 Mounting the inverter with the wall bracket 13 5 Electrical connection 15 5 1 Safetyduring Electrical Connection 15 5 2 System layout ofunits without integrated DC switch 16 5 3 Overview of the connectio...

Страница 3: ...5 5 4 Connecting the PV array 29 6 Communication 30 6 1 System monitoring via RS485 30 6 2 System monitoring via Ethernet 33 6 3 System monitoring via WiFi 35 6 4 Inverter demand response modes DRED 37 6 5 Active power control with smart meter ComBox 39 6 6 Communication with third party devices 40 7 Commissioning 41 7 1 Electrical checks 41 7 2 Mechanical checks 42 7 3 Start up 43 8 Disconnecting...

Страница 4: ...10 1 DC input data 54 10 2 AC output data 55 10 3 General data 56 10 4 Safety regulations 57 10 5 Efficiency 59 10 6 Power reduction 61 10 7 Tools and torque 63 11 Troubleshooting 64 12 Maintenance 66 12 1 Cleaning the contacts of the DC switch 66 12 2 Cleaning the heat sink 66 13 Dismantling the Inverter 67 14 Disposing the Inverter 68 15 EU Declaration of Conformity 68 16 Warranty 69 17 Contact ...

Страница 5: ......

Страница 6: ... all documentation that accompanies the inverter Keep them in a convenient place and available at all times 1 2 Target group This document is for qualified electriciansonlywho must perform the tasks exactly as described All persons installing inverters must be trained and experienced in general safety which must be observed when working on electrical equipments Installation personnel should also b...

Страница 7: ... will result in death or serious injury WARNING indicates a hazardous situation which if not avoided can result in death or serious injury CAUTION indicates a hazardous situation which if not avoided can result in minor or moderate injury NOTICE indicates a situation which if not avoided can result in property damage INFORMATION provides tips which are valuable for the optimal installation and ope...

Страница 8: ...er than PV modules to the inverter 5 PV modules with a high capacity to ground mustonlybe used if their coupling capacitydoes not exceed 1 0μF 6 When exposed to sunlight the PV array generates dangerous DC voltage which is present in the DC conductors and the live components of the inverter Touching the DC conductors or the live components can lead to lethal electric shocks 7 All components must r...

Страница 9: ...Touching the DC conductors or the livecomponents can lead tolethal electric shocks If you disconnect the DC connectors from theinverter under load an electric arc may occur leading to electric shock and burns Do not touch non insulated cable ends Do not touch the DC conductors Do not touch any live components of the inverter Have the inverter mounted installed and commissioned only by qualified pe...

Страница 10: ...o hot heat sink The heat sink may get hot during operation Do not touch Possible damage to health as a result of the effects of electromagnetic radiation Please maintain a distance of at least 20cm from the inverter when it is inoperation Grounding the PV array Comply with local regulations for grounding the PV array We suggest the frames of PV modules must be reliably grounded Do not ground any o...

Страница 11: ...inverter at ambient temperatures lower than 5 If a layer of ice has formed on the seal of the cover in sub zero conditions remove it prior to opening the inverter e g by melting the ice with warm air Observe the applicable safety regulation Damage to the inverter due to electrostatic discharge Touching electronic components can cause damage to or destroy the inverter through electrostatic discharg...

Страница 12: ...d contact during operation Allow the product to cool down sufficiently before carrying out anywork WEEE designation Do not dispose of the product together with the household waste butinaccordance with the disposal regulations for electronic waste applicableat the installation site CE marking The product complies with the requirements of the applicable EUdirectives Certified safety The product is T...

Страница 13: ...rotection We provide the following safety protection 1 Overvoltage undervoltage protection 2 Overfrequency underfrequency protection 3 Overtemperature monitoring 4 Residual current monitoring 5 Isolationmonitoring 6 Anti islanding protection 7 DC feed in monitoring ...

Страница 14: ...connector 2 E WiFi antenna 1 optional F Smart meter connector 1 optional G Sealing plug 2 H Documentation 1 One spare part for cover mounting Please carefully check all of the components in the carton If anything is missing contact your dealer at once 3 2 Checking for transport damage Thoroughly inspect the packaging upon delivery If you detect any damage to the packaging which indicates the inver...

Страница 15: ...ible service 4 Ambient temperature should be below 40 C to ensure optimal operation 5 Observe the recommended clearances to walls other inverters or objects as follows to ensure sufficient heat dissipation Clearances for multiple inverters 6 In order to avoid power reduction caused byoverheating do not mountthe inverter in a location that allowslong term exposure to direct sunlight Direction Recom...

Страница 16: ...method location and surface must be suitable for the inverter s weight and dimensions 9 If mounted in a residential area we recommendmounting the inverter on a solid support surface Drywallandsimilarmaterialsare not recommended due to audible vibrationsduring operation which could be perceived as annoying 10 Do not put any objects on the inverter 11 Do not cover the inverter ...

Страница 17: ...er horizontally 4 Mount the inverter vertically or tilted backwardby a max of 15 5 Mount the inverter at eye level to make it easy to operate andread the display 6 The electrical connection area must point downwards Danger to life due to fire or explosion Do not mount the inverter in areas whereflammablematerialsarestored Do not mount the inverter in areas where there is a risk of explosion ...

Страница 18: ...e holes then attach the wall bracket to the wall using the hexagon head screw delivered with the inverter Risk of injury when lifting the inverter or if it is dropped The inverter weighs approximately 11kg There is risk of injury if the inverter is lifted incorrectly or dropped while being transported or when attaching it to or removing it from the wall bracket Transport and lift the inverter care...

Страница 19: ... edges and attach it onto the wall bracket tilted slightly downwards 4 Check both sides of the heatsink to ensure that it is securely in place 5 Pushthe inverter inwards as far as possible and attach it to both sides of the wall bracket using the M5 screws screwdriver type T25 torque 2 2Nm ...

Страница 20: ...connect the DC connectors from theinverter under load an electric arc may occur leading to electric shock and burns Do not touch non insulated cable ends Do not touch the DC conductors Do not touch any live components of the inverter Have the inverter mounted installed and commissioned only by qualifiedpersons with the appropriate skills If an error occurs have it rectified by qualified persons on...

Страница 21: ...nection Risk of injury due to electric shock The external protective grounding conductor is connected to the inverter s protective grounding terminal through the AC screw terminal block Make sure the groundingconnection is reliable When connecting connect the AC connection first to ensure the inverter grounding reliably and then connect the DC inputs When disconnecting disconnect the DC inputs fir...

Страница 22: ...itch optional switch on or off forPV load B DC input plug in connector to connect the PV string C COM connect the monitoring device with communication cable D ANT optional antenna transmit and receive WiFi signal E AC output connect the grid F Earthing terminal connect a second protective earthing conductor F ...

Страница 23: ... AC cable approx 120mm The PE conductor must be 10mm longer than the L and N conductors Cable design The cable must be dimensioned in accordance with the local and national directives for the dimensioning of cables The conductor cross section should be dimensioned to avoid power loss in cables exceeding 1 of rated output power The higher grid impedance of the AC cable makes the inverter easier to ...

Страница 24: ... 4 2 Grid connection Risk of injury due to electric shock and fire caused by high leakage current The inverter must be reliably grounded in order to protect property and personal safety Damage to the seal of the cover in sub zero conditions If you open the cover in sub zero condition the sealing of the cover can be damaged This can lead moisture entering the inverter Do not open the inverter at am...

Страница 25: ...mm each Strip the insulation of L N and PE conductors by 12 mm 4 Insert the conductor into the suitable ferruleacc to DIN 46228 4 and crimp the contact 5 Route the AC cable into the inverter through the cable gland If necessary slightly loosen the swivel nut of the cable gland loosen the screws of the cover During loosening the screws of the cover it is not necessary to take off the screws and con...

Страница 26: ...e screw terminal with the grounding sign and tighten the screw Insert theneutral conductor blue into the screw terminal with N sign and tighten the screw Insert the L conductor brown or black into the screw terminal with L sign and tighten the screw 7 Check to ensure that all conductors are securely in place by pulling lightly on all conductors 8 Tighten the swivel nut of the cable gland 9 Secure ...

Страница 27: ...nductor and the ground washer on the screw The teeth of the ground washer must be facing the housing 3 Tighten it firmly into the housing screwdriver type T25 torque 2 5Nm Grounding parts information Object Description 1 Housing 2 Ground washer 3 Terminal lug M5 with protective conductor 4 M5 pan head screw In case of operation on a Delta IT Grid type in order to ensure safety compliance in accord...

Страница 28: ...etects the current difference between the neutral conductor and the line conductor If the current difference increases suddenly the inverter disconnects from the grid The function of the all pole sensitive residual current monitoring unit RCMU has been tested in accordance with IEC 62109 2 Tip about the external residual current device RCD Where an external residual current device RCD is required ...

Страница 29: ... AC circuitbreakerwith load switch functionality for load switching The selection of the AC circuit breaker rating depends on the wiring design wire cross section area cable type wiring method ambient temperature inverter current rating etc Derating of the circuit breaker rating may be necessary due to self heating or if exposed to heat The maximum output current of the inverters and recommended A...

Страница 30: ... the connectors included in the scope of delivery The positive connection cables of the PV modules must be equipped with the positive DC connectors The negative connection cables of the PV modules must be equipped with the negative DC connectors Danger to life due to high voltages in the inverter Before connecting the PV array ensure that the DC switch is switched off and that it cannot be reactiv...

Страница 31: ...roperties External diameter 5 mm to 8 mm Conductor cross section 2 5 mm to 6 mm Qty single wires minimum7 Nominal voltage minimum 600V Proceed as follows to assemble each DC connector 1 Strip 12 mm off the cable insulation Danger to life due to high voltages on DC conductors When exposed to sunlight the PV array generates dangerous DC voltage which is present in the DC conductors Touching the DC c...

Страница 32: ...rectly positioned Result Measure If the stranded wires are visible in the chamber of the clamping bracket the cable is correctly positioned Proceed to step 5 If the stranded wires are not visible in the chamber the cable is not correctly positioned Release the clamping bracket To do so insert a flat blade screwdriver blade width 3 5 mm into the clamping bracket and lever it open Remove the cable a...

Страница 33: ...connector apart 4 Release the clamping bracket To do so insert a flat blade screwdriver blade width 3 5 mm into the clamping bracket and lever it open 5 Remove the cable Danger to life due to high voltages on DC conductors When exposed to sunlight the PV array generates dangerous DC voltage which is present in the DC conductors Touching the DC conductors can lead to lethal electric shocks Cover th...

Страница 34: ... exceed the maximum DC input voltage of the inverter 6 Connect the assembled DC connectors to the inverter until they audibly snap into place Ensure that all DC connectors are securely in place 7 For unused DCconnectors push down the clamping bracket and push the swivel nutup to thethread Insert the sealing plug into the DC connector Tighten the DC connector torque 2 0Nm Finally insert the DC conn...

Страница 35: ...ter_1 Inverter_2 Inverter_n iPhone Android Web browser Wireless Router RS485 RS485 Inverter_1 Inverter_2 Inverter_n Internet Internet Internet ZeverCloud RS485 RS485 RS485 RS485 WiFi Ethernet ZeverCom WiFi ZeverCom ZeverManager The ZeverCom ZeverManager connects to the inverter via the RJ45 interface and it connects to the router via Ethernet We offer a remote monitoring platform called ZeverCloud...

Страница 36: ...can be destroyed by wrong communication wiring Internal components of the inverter can be irreparably damaged due to incorrect wiring between the power wire and signal wire All the warranty claim will be invalid Please check the wiring of the RJ45 connector before crimping the contact Damage to the inverter due to moisture and dust penetration If the cable gland are not mounted properly the invert...

Страница 37: ...able into the inverter through the M25 cable gland and connect it to the RJ45 keystone socket on the upper cuicirt board 4 Connect the inverter to ZeverCom ZeverManager or another communication device via the above mentioned communication cable 5 Press the sealing ring with the network cable into the cable gland and then tighten the swivel nut firmly torque 2 5 3 0Nm Make sure the cable gland is m...

Страница 38: ...net Internet ZeverCloud The inverter has integrated ComBox with Ethernet module The inverter is connected to the network by simply connecting the network cable with wiring standard of EIA TIA 568B from the router to the Ethernet port on the ComBox inside the inverter please refer to the relative instruction at section 6 1 Possible reason of communication failure due to closed port The ComBox uses ...

Страница 39: ...m the router via DHCP automatically and shows it on the display The time it takes to connect to the network depends on the network communication conditions Possible reason of communication failure due to DHCP The router needs to support DHCP services if the ComBox use the DHCP function ...

Страница 40: ... Mounting the antenna Take the antenna included in the scope of delivery Tighten the antenna into the WIFIconnection port by hand Make sure the antenna is securely connected 1 Open your mobile device or laptop s WLAN page The new access point called ZEVERSOLAR XXXX is displayed Note XXXX stands for the last four digits in the Registry ID Figure A 2 Connect to the access point using your mobile dev...

Страница 41: ...age www zeversolar com 6 This page shows the WiFi SSID and password information you can change the SSID and WiFi password accordingly default password is zeversolar To ensure highest security of your system please change the default password zeversolar and keep the new password confidential If you do not change to a secure password you expose your system to a risk of unauthorized access by persons...

Страница 42: ...wer if capable DRM 4 Increase power consumption subject to constraints from other active DRMs DRM 5 Do not generate power DRM 6 Do not generate at more than 50 of rated power DRM 7 Do not generate at more than 75 of rated power ANDnot more than 60 reactive power DRM 8 Increase power generation subject to constraints from other active DRMs The RJ45 socket pin assignments for demand response modes a...

Страница 43: ...pper circuit board ComBox 4 Connect the inverter to DRED via the abovementioned network cable 5 Press the sealing ring with the network cable into the cable gland and then tighten the swivel nut firmly Make sure the cable gland is mounted properly The cable gland must be adequately locked to prevent any movement of the cable 6 Secure the cover screw driver type T25 torque 2 5Nm Damage to the inver...

Страница 44: ...t the smart meter to the inverter 1 Cable requirements 2 Route the cable into inverter through the cable gland referring to the cable connection Section 6 1 ObjectDescription Value A External diameter 5 to 8 mm B Conductor cross section 0 14 to 1 5 mm C Stripping length of the insulated conductors approx 9 mm D Stripping length of the outer sheath of the cable approx 30 mm Possible reason of commu...

Страница 45: ... then tighten all 4 screws with a Torx screwdriver screw driver type T25 torque 2 5Nm 6 6 Communication with third party devices Zeverlutioninverters can communicate with Solarlog or Meteocontrol in other words you can use Solarlog or Meteocontrol to monitor Zeverlution inverters For more information please refer to their user manual Possible reason of communication failure due to the wrong meter ...

Страница 46: ... correct polarity Check the PV array s insulation to ground with a multimeter make sure that the insulation resistance to ground is greater than 1 Mohm Check and make sure that the AC circuit breaker must be correctly rated and mounted Risk of injury due to incorrect installation We strongly recommend carrying out preliminary checks before commissioning to avoid possible damage to the device cause...

Страница 47: ...uts on the inverter have been inserted by DC plug connectors with sealing plugs Make sure the communication wires has correctly connected Make sure the communication cable gland has been correctly mounted and tightened Make sure theAC conductors have correctly connected Make sure the AC cable gland has been correctly mounted and tightened Make sure the cover has been correctly mounted Make sure th...

Страница 48: ...he minimum DC input voltage but lower than the start up DC input voltage the inverter is waiting for sufficient DC input voltage and cannot feed power into the grid Checking When the initial voltage of the PV strings exceeds the start up DC input voltage the inverter will check feeding conditions at once If there is anything wrong during checking the inverter will switch to the Fault mode Normal A...

Страница 49: ...DC cables 4 Release and remove all DC connectors Insert a flat blade screwdriver or an angled screwdriver blade width 3 5 mm into one of the slide slots and pull the DC connectors out downwards Do not pull on the cable 5 Ensure that no voltage is present at the DC inputs on the inverter using a suitable measuring device 6 Loosen the 4 screws of the cover using a screwdriver T25 and remove the cove...

Страница 50: ...d PE 8 Loose the screws of the screw terminal blocks and the swivel nut of the M20 cable gland remove the AC cable 9 Secure the cover screw driver type T25 torque 2 2Nm Damage to the inverter due to electrostatic discharge Touching electronic components can cause damage to or destroy the inverter through electrostatic discharge Ground yourself before touching any component ...

Страница 51: ...s control button display messages and the language and safety regulation settings 9 1 Overview of the control panel The inverter is equipped with a text display three LED indicators and one control button Object Description A Normal Green LED B Fault Red LED C Communication Yellow LED D Control button E Display A B C E D ...

Страница 52: ...n the top line is displayed thecommunicationconnection state withZeverCould Disconnected or Connected will be displayed on bottom line Line 1 Runninginformation E today Daily energy E total Energy generated since the inverter has been installed Vpv DC input voltage Ipv DC input current Vac Grid voltage Iac Present output current Frequency Grid frequency Model Type name Set Language Selected langua...

Страница 53: ...d User Manual The item IP Addr on the top linewill show the relative IP addressonlywhen user monitor the inverterwiththe Ethernet moduleorWiFi module which is integrated inside the inverter otherwisethe item IP Addr on the top line will show 0 0 0 0 If the inverter is monitored with external communication devices e g ZeverCom Solar Log or other 3rd party devices read the IP address on these device...

Страница 54: ... see LOCK The display will always show the selected item until you press the button again or the operating state of the inverter changes To save power the backlight of the display turns off automatically after 10s Press the button again to activate it 9 1 3 LEDindicators The inverter is equipped with three LED indicators green red and yellow which provide information about the various operating st...

Страница 55: ...r the occured fault has been solved Normal Normal The inverter is feeding power into grid normally Fault 1 SCI Fault Communication between the master and slave CPU has failed 2 EEPROM R W Fault Reading or writing of EEPROM has failed 3 Rly Check Fault Output relay has failed 4 DC INJ High Output DC feed in exceeds the permitted upper limit 6 High DC Bus The voltage of DC bus exceeds the permitted ...

Страница 56: ...or M S A different value of grid voltage has been detected by the master and slave MCU 42 Fac differs for M S A different value of grid frequency has been detected by the master and slave MCU 43 Residual current differs for M S A different value of residual current has been detected by the master and slave MCU 44 DC Inj differs for M S A different value of DC feed in has been detected by the maste...

Страница 57: ...ile the inverter should be reliably grounded 9 3 1 Language setting The inverter provides two languages English and German Keep pressing the button for approx 5s at the item of Set Language to enter the language menu and select the language The display will switch to current state information automatically and the language setting will be saved at the same time unless you press the button again wi...

Страница 58: ...nter the safety regulation setting menu Step 3 Press the buttononceper second to scroll the safety regulations IF you want to choose the safety regulation for the Netherlands press the buttononce per seconduntilthedisplay shows NL NEN50438 If the display shows DEFAULT keep on pressing the button until the displayshows the desired safety regulation After waiting for10 seconds the safety regulation ...

Страница 59: ...00 Zeverlution 5000 Max PV array power STC 4780Wp 5720Wp 6500Wp Max DC power cosφ 1 3900W 4650W 5300W Max input voltage 600V MPP voltage range 100V 520V Rated input voltage 360V Min start voltage 80V Min feed in power 30W Max input current per MPP input 11A 11A Number of independent MPP inputs 2 Strings per MPP input 1 1 ...

Страница 60: ...0VA 1 5000VA Nominal AC voltage range 220V 230V 240V 180V 280V AC power frequency range 50 60 5Hz Max output current 16A 20A 23A Power factor rated power 1 Adjustable displacement power factor 0 95 inductive 0 95 capacitive only for VDE AR N 4105 0 8 inductive 0 8 capacitive for others Feed in phase connection phase 1 1 Harmonic distortion THD at rated output 3 1 For Belgium Sac max 4000VA ...

Страница 61: ...2 mm Weight 11kg Cooling method convection Noise emission typical 25 dB A 1m Installation indoor outdoor Mounting information wall mounting bracket DC connection SUNCLIX AC connection screw terminalterminal Operating temperature range 25 60 Relative humidity non condensing 0 100 Max operating altitude 4000m 3000m derating Degree of protection according to IEC 60529 IP65 Climatic category according...

Страница 62: ...vercurrent protection Residual current monitoring GFCI Protection class according to IEC 62103 Ⅰ Overvoltage category according to IEC 60664 1 Ⅱ DC Ⅲ AC Internal overvoltage protection Integrated DC feed in monitoring Integrated Islanding protection Integrated EMC immunity EN61000 6 1 EN61000 6 2 EMC emission EN61000 6 3 EN61000 6 4 Utility interference EN61000 3 2 EN61000 3 3 Standard Optional ...

Страница 63: ...ted in theintegrated network and system protection can be changed but a password is required It is not necessary to adjust the value of the displacement power factor cos phi if the power generation system isΣSAmax 3 68KVA and was set to 1 as default in the embedded inverter software However if the power generation system is 3 68KVA Σ SAmax 13 8KVA the standard cos phi characteristic curve defined ...

Страница 64: ...oltages Vmppmax Vdc r and Vmppmin graphically In all cases the efficiency refers to the standardized power output Pac Pac r According to EN 50524 VDE 0126 13 2008 10 cl 4 5 3 Notes Values are based on rated grid voltage cos phi 1and an ambient temperature of 25 Efficiency curve Zeverlution3680 Max efficiency ηmax 97 2 ...

Страница 65: ...Installation and Operating Instructions V04 60 Efficiency curve Zeverlution4000 Max efficiency ηmax 97 2 Efficiency curve Zeverlution5000 Max efficiency ηmax 97 2 ...

Страница 66: ...e and input voltage grid voltage grid frequency and power available from the PV modules This device can decrease power output during certain periods of the day according to these parameters Notes Values are based on rated grid voltage and cos phi 1 Power reduction with increased ambient temperature Zeverlution3680 0 500 1000 1500 2000 2500 3000 3500 4000 25 35 40 41 42 43 44 45 50 55 60 65 70 75 8...

Страница 67: ... increased ambient temperature Zeverlution5000 0 500 1000 1500 2000 2500 3000 3500 4000 4500 25 35 40 41 42 43 44 45 50 55 60 65 70 75 80 85 output power W Ambient temperture Vpv 250 Vpv 360 Vpv 480 0 1000 2000 3000 4000 5000 6000 25 35 40 41 42 43 44 45 50 55 60 65 70 75 80 85 output power W Ambient temperture Vpv 250 Vpv 360 Vpv 480 ...

Страница 68: ...nector Antenna Hand tight Socket wrench Open end of 30 Swivel nut of M25 cable gland Hand tight Open end of 15 Swivel nut of sunclix connector 2 0Nm Open end of 10 Hex bolts for wall bracket Wire stripper Peel cable jackets Crimping tools Crimp power cables Hammer drill drill bit of Ø10 Drill holes on the wall Rubber mallet Hammer wall plugs into holes Cable cutter Cut power cables Multimeter Chec...

Страница 69: ...e service 33 Check the grid frequency and observe how often major fluctuations occur If this fault is caused by frequent fluctuations try to change the operating parameters after informing the grid operator first 34 Check the grid voltage and grid connection of the inverter Check the grid voltage at the connection point of the inverter If the grid voltage is outside the permissible range due to lo...

Страница 70: ...to ground is greater than 1 MOhm Otherwise make a visual inspection of all PV cables and modules Make sure the grounding connection of the inverter is reliable If this fault occurs often contact the service 40 Check whether the airflow to the heat sink is obstructed Check whether the ambient temperature around the inverter is too high 41 42 43 44 45 Disconnect the inverter from the grid and the PV...

Страница 71: ...ytoextend itsservicelife Perform cleaning by cycling the switch to positionand position 10timesin a row The DC switch is located at the lower left of the housing 12 2 Cleaning the heat sink Clean the heat sink with compressed air or a soft brush Do not use aggressive chemicals cleaning solvents or strong detergents For proper function and long service life ensure free air circulation around the he...

Страница 72: ... theinverter Reclose the cover and tighten the 4 fixing screws Unscrew and remove the 2 blocking screws located on the sides of the inverter Raise the inverter to remove it from the wall bracket Remove the wall bracket If the inverter is disassembled due to a device replacement it is not necessary todismantle the wall bracket If the inverter is to be stored or shipped in packaging pack the inverte...

Страница 73: ... Low Voltage Directive 2014 35 EU L 96 357 374 March 29 2014 LVD Radio Equipment Directive 2014 53 EU L 153 62 106 May 22 2014 RED SMA New Energy Technology Jiangsu Co Ltd confirms herewith that the inverters described in this document are in compliance with the fundamental requirements and other relevant provisions of the abovementioned directives The entire EU Declaration of Conformity can be fo...

Страница 74: ... with the relevant warranty service 17 Contact If you have any technical problems concerning our products please contact zeversolar service We require the following information in order to provide you with the necessary assistance Inverter device type Inverter serial number Type and number of connected PV modules Error code Mounting location Warranty card Service Contact Our regional services cont...

Страница 75: ......

Отзывы: