

Leg de kabels welke op het knoppen-
paneel bij de radio aangesloten waren
door de opening van het aircopaneel
heen. Leg deze door naar de midden-
console.
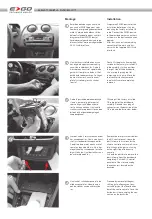
Route the cables which were con-
nected to the button bar below the
factory installed OE radio originally,
through the opening slot for the
A/C control panel to the installation
site of the lower button bar in the
centre console.
6
6
7
7
Neem nu de losse ZENEC Z-EACC-S6J
kabel en verbind deze met de stekker
van het knoppenpaneel. Verbind dan
de ZENEC adapter met de nieuwe scha-
kelaar waar de knoppen in verwerkt
zijn welke in het radiopaneel komen
te vervallen. Monteer deze schakelaar
dan terug in de middenconsole bij de
versnellingspook.
Use the separately available ZENEC
adapter Z-EACC-S6J and connect the
cables, which were connected to the
two button bars before, with it.
Then connect the ZENEC adapter with
the new button bar, which contains
the buttons of the no longer existing
upper and lower button bars.
Mount the shifting gate and the new
button bar to finish this work step
finally.
8
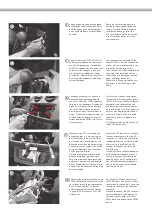
Voor deze handeling is er een hand-
boormachine nodig en een boortje
van 3mm. Plaats het ZENEC apparaat
volledig in het inbouwgat. Dit apparaat
heeft vier schroefgaten aan de zijkan-
ten zitten. Gebruik deze als mal om
de vier gaten in het kunststof voor te
boren. Neem nu het apparaat weer uit
het inbouwgat en boor de vier gaten
verder door om de ZENEC later vast te
kunnen zetten.
For this work step you need a peen-
ing tool and a twist drill with a diame-
ter of 3 mm. Insert the ZENEC device
completely into the mounting slot.
The device has four mounting holes
on the front side. Use these mounting
holes as a drilling template to add a
graining to the plastic parts behind
the mounting holes to prepare the
drilling.
Drill the four holes for the fixation of
the ZENEC device later.
8
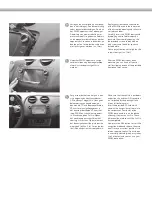
Mount the GPS receiver at a suitable
location and make sure that the GPS
reception isn’t adversely affected by
shadowing effects of car parts made
of metal. Lay the cable of the GPS
receiver to the opening slot of the
ZENEC device.
If you want to use the provided exter-
nal Bluetooth microphone, mount it
and lay the connection cable to the
opening slot as well. A suitable loca-
tion for the Bluetooth microphone is
near to the driving mirror or behind
the steering wheel.
9
Monteer nu de GPS antenne op een
deugdelijke plaats in het voertuig on-
der het dashboard. Zorg er wel voor
dat er geen metalen onderdelen van
de auto boven zitten die het ontvangst
kunnen verstoren. Leg de aansluitstek-
ker in het inbouwgat waar straks de
ZENEC geplaatst wordt.
Als ervoor gekozen word om ook de
externe microfoon te plaatsen dan
zorg ervoor dat deze ook op een goe-
de plaats in het voertuig gemonteerd
wordt. Goede plaatsen hiervoor zijn in
de buurt van de binnenverlichting of op
de stuurwielkap.
9
Connect the Quadlock connector of
the ZENEC main wire harness with its
counterpart in the vehicle. Secure the
locking mechanism of the Quadlock
connector.
Proceed to connect the GPS antenna,
external Bluetooth microphone (if in
use) and the connector of the FM/
AM antenna one by one to the ZENEC
device.
bl
Verbind nu de quadlock stekker van de
ZENEC hoofdaansluitkabel aan de stek-
ker in de auto en klik de vergrendeling
dicht. Sluit nu ook de GPS stekker,
externe bluetooth microfoon ( indien
in gebruik) USB stekker en FM / AM
antenne aan.
bl


