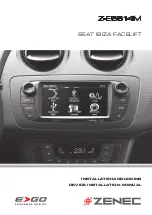


SEAT IBIZA FACELIFT
Bereid de bekabeling en aansluitin-
gen van het ZENEC apparaat voor,
voordat het originele gedemonteerd
wordt. Verbind de hoofdaansluitka-
bel zoals afgebeeld op het aansluit-
diagram met het ZENEC toestel.
Verbind vervolgens de enige overge-
bleven stekker met de meegeleverde
CAN/ Stalk-interface.
Prepare the ZENEC device for the
installation before you start dis-
mounting the factory installed OE
radio. Connect the ZENEC device
to the provided main wire harness
as shown in the device connection
diagram.
After that, connect the remaining
connector of the main wire har-
ness with the supplied CAN/Stalk
interface.
1
1
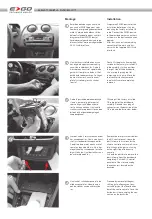
Montage:
Installation:
2
2
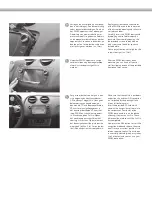
Haal het kunststof afdekraam van
het originele apparaat voorzichtig
vanuit de rechterkant los. Gebruik
hiervoor een kunststof spatel welke
geschikt is om plastic delen uit het
dashboard te demonteren. Ga tegen
de klok in te werk, nu zal de com-
plete lijst volledig los zijn van het
toestel.
Gently lift the plastic frame which
surrounds the factory installed OE
radio carefully, starting out from
the right side of the dashboard.
Use a suitable prying tool for
removing plastic parts. Move the
tool counter clockwise around
the plastic frame to completely
remove it.
3
Gebruik passende radiodemontage
sleutels om het originele toestel
voorzichtig uit zijn inbouwframe
los te kunnen trekken. Haal nu alle
stekkers achterop de unit los en doe
dit ook bij het daaronder gelegen
knoppenpaneel.
Lift and pull the factory installed
OE radio out of the dashboard
carefully. Proceed to unplug all
connectors on the backside of the
OE radio and the button bar below.
3
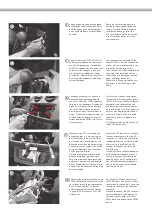
Proceed by removal of the gear
shifting gate, allowing you to ac-
cess and pry out the lower button
bar of the centre console. Once the
button bar is loose, unplug the con-
nectors on the backside.
5
Remove the two torx screws below
the A/C control panel. Loose the
plastic frame that surrounds the
climate control panel as well, care-
fully lifting up the plastic starting
on the right side of the centre
console.
It should be possible to remove the
plastic frame from the dashboard
completely. Pull the A/C control
panel out of the slot and unplug
the connectors located on the
backside.
4
Schroef nu de 2 torxschroeven onder
het aircopaneel los. Haal nu de kunst-
stof lijst rondom dit aircopaneel los.
Doe dit wederom met een kunststof
spatel en tegen de klok in. Nu is het
mogelijk om het aircopaneel er volle-
dig uit te halen. Haal de stekkers aan
de achterzijde ook los.
Haal nu het schakelaarpaneel in de
middenconsole los. Neem daarna
ook de stekker aan de achterzijde
los.
4
5