background image

VM9212N

Installation and Operation Manual

160

Watts Peak

40W x 4

Summary of Contents for VM9212N - Multimedia CD/DVD Receiver

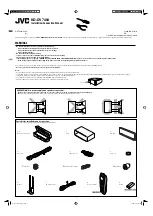
Page 1: ...VM9212N Installation and Operation Manual 160Watts Peak 40W x 4...

Page 2: ......

Page 3: ...it you ll learn how to use all the features of your new Jensen VM9212N Mobile Multimedia Receiver for maximum enjoyment Preparation 1 Installation 2 Controls and Indicators 5 Remote Control 7 Using t...

Page 4: ...ii VM9212N...

Page 5: ...put Subwoofer Phase Control 0 180 degrees Programmable Volume Control Rear Camera Input Normal and Mirror Image View Touch Screen Calibration Mode 100 Ohm Preamp Line Output All Audio Channels 2VRMS L...

Page 6: ...he unit more stable CAUTION Be careful not to damage the car wiring 3 Place the radio in front of the dashboard opening so the wiring can be brought through the mounting sleeve Wiring Complete wiring...

Page 7: ...on 1 Remove trim ring 2 Mount factory brackets on new radio using existing screws from old radio 3 Slide radio chassis into dash opening and secure 4 Reinstall dash panel 2 1 3 4 5 FINAL INSTALLATION...

Page 8: ...YELLOW RED FUSE 15A Battery Ignition Switch BATTERY BATTERY Ground BATT ACC GND WHITE YELLOW RED External AV System AUX IN 1 AUX IN 2 WHITE YELLOW RED PINK Rear Video 2 Rear Video 1 Rear View Video Ca...

Page 9: ...setting for the selected option With the monitor closed press AS PS to automatically store strong radio stations in the six preset channels in the current band 4 TILT BAND Press to activate the tilt f...

Page 10: ...the cursor down 12 RESET Press to reset system settings to factory default except the password and parental lock setting 13 Pause Play Enter Press to pause or resume plaback or to confirm current sele...

Page 11: ...ates the preset station list ANGLE 13 Plays back disc in different angle for a scene Plays back Picture CD with different angle of picture dis played 14 Fast forwards the disc content Fast forwards th...

Page 12: ...ic Keypad 29 Directly accesses chapter 1 6 selects preset for current band Directly accesses track CLEAR 30 Delete entry or move back wards to correct error in Direct Access mode Delete entry or move...

Page 13: ...lect BRIGHT or CONTRAST 3 Set Parameters Press the buttons 15 16 on the remote or turn the rotary encoder 5 on the control panel 4 Exit Picture Quality Setting Mode Press the PIC button 24 on the remo...

Page 14: ...for 3 seconds Steering Wheel Control SWC The VM9212N is compatible with the PAC Pacific Accessory Corporation steering wheel control adapter SWI PS A 3 5mm female connector labeled SWC Interface on t...

Page 15: ...reset button 12 located on the front bottom right corner of the unit After a system reset the unit restores all factory default settings NOTE If the unit is reset while a DVD is playing the DVD resume...

Page 16: ...sing AM and PM 24Hr Clock displays 24 hour time up to 23 59 Clock HH MM Clock appears in the top right corner of the screen and on the LCD screen during certain operations NOTE The AM PM indication wi...

Page 17: ...r each quadrant until the calibration is completed Exiting the System Setup Menu To exit setup mode and resume normal playback press the SETUP button 31 on the remote control or touch the BACK button...

Page 18: ...Seek Tuning To seek the next station Touch the button on screen 12 Press the button 19 on remote control Press the button on the joystick 14 To seek the previous station Touch the button on screen 11...

Page 19: ...the screen section B Touch the 1 2 button to view a second page of controls Stopping Playback Touch the stop button on the screen or press the BAND button 20 on the remote control to stop DVD play Pa...

Page 20: ...isplay the direct entry menu Enter the desired chapter track using the on screen number pad Press the enter button arrow to tune to the selected station To exit the screen without changing the station...

Page 21: ...ide single layer DVD 5 Single side double layer DVD 9 Double side single layer DVD 10 Double side double layer DVD 18 MPEG 2 Method 133 minutes 242 minutes 266 minutes 484 minutes Single side single l...

Page 22: ...rough Tracks Press the button 19 on the remote control or on screen or use the button on the joystick 14 to advance to the next track on the disc Press the button 17 on the remote control or on screen...

Page 23: ...are expected to be played may not match the order in which they are actually played You may be able to set the order in which MP3 WMA files are to be played by writing them onto a medium such as a CD...

Page 24: ...en press the joystick button 13 on the front panel or press the button on the remote control 18 to suspend or resume disc play Moving Through Tracks Press the button 19 on the remote control or on scr...

Page 25: ...ute malfunction MUTE wire is grounded Check that MUTE connection is not grounded and that it s properly insulated Unit resets itself when engine is off Incorrect connection between ACC and positive ba...

Page 26: ...playing VCD PCB is on Turn PCB off MP3 Interruption occurred during playback Disc is dirty or scratched Clean disc or replace File is damaged bad recording Recreate disc with good files Incorrect play...

Page 27: ...damaged by foreign objects 5 Do not attempt to use a 3 8 cm CD Single disc in this unit either with or without an adaptor as damage to the player and or disc may occur Such damage is not covered by t...

Page 28: ...to Noise Ratio 1 kHz 50dB Image Rejection 60dB Frequency Response 50Hz 2 kHz 3dB Monitor Screen Size 7 0 Measured diagonally 16 9 Widescreen 6 06 154 1mm W X 3 42 87mm H Screen Type TFT Liquid Crysta...

Page 29: ...tenance section of your Installation and Operation Manual for additional information regarding the proper use of your product Limitations THE EXTENT OF THE COMPANY S LIABILITY UNDER THIS WARRANTY IS L...

Page 30: ...Audiovox Electronics Corporation Hauppauge NY 11788 Technical Assistance 1 800 323 4815 www jensen com 2008 Audiovox Ver 041008 Printed in China...

Page 31: ......

Page 32: ...e and are subject to eMusic s Terms of Use eMusic is a registered trademark of eMusic com Inc in the U S A and other countries iPod is a registered trademark of Apple Inc Apple is not a partner sponso...

Reviews: