


EN 18
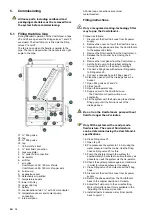
Install all parts in reverse
order (from point 4 back to point 1) and switch
the power supply to the ComfoAir Luxe back on.
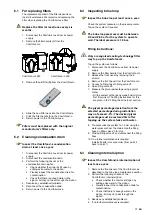
6.5 Maintenance of Comfofond-L casing
Inspect the Comfofond-L casing at least
once a year.
1. Remove the front panel of the Comfofond-L as
described in the brine loop maintenance section.
2. Perform the following checks:
• Check the seals for damage.
• Check the inside and outside for dirt and
damage.
• Check the duct connections for dirt and
damage.
Any signs of corrosion and other damage
must be treated directly and appropriately.
To clean the whole ventilation system, we
recommend hiring a specialized cleaning firm.
3. If no further maintenance is required:
Install all parts in reverse order and switch the
power supply to the ComfoAir Luxe back on.
(as described in the maintenance section for the
brine loop)
6.6 Maintenance of Comfofond-L battery
Inspect the Comfofond-L battery once every
2 years.
1. Remove the front panel of the Comfofond-L as
described in the brine loop maintenance section.
2. Check the fins in the Comfofond-L
battery for dirt and damage.
– Use a fin comb to restore the fins.
– Rinse the battery with lukewarm tap water.
Do not use aggressive cleaning agents or
solvents to clean the Comfofond-L.
3. If no further maintenance is required:
Install all parts in reverse order and switch the
power supply to the ComfoAir Luxe back on.
(as described in the maintenance section for the
brine loop)
6.7 Replacing fluid pump
1. Remove the front panel of the Comfofond-L as
described in the brine loop maintenance section.
2. Close taps V2 and V4.
3. Connect a drainage hose to filling valve V3 to
drain the fluid.
4. Open filling valve V3 slowly until the system is
depressurised.
5. Replace the fluid pump.
6. Top up the system to the nominal pressure of 1.5
bar in accordance with the filling instructions in
the brine loop maintenance section.
7. If no further maintenance is required:
Install all parts in reverse order and switch the
power supply to the ComfoAir Luxe back on.
(as described in the maintenance section for the
brine loop)
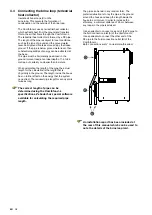
The lowest point of the power cable for the
pump must be below the pump level. This
prevents condensation water from running
to the pump via the power cable.
6.8 Replacing expansion vessel
1. Remove the front panel of the Comfofond-L as
described in the brine loop maintenance section.
2. Close taps V2 and V4.
3. Connect a drainage hose to filling valve V3 to
drain the fluid.
4. Open filling valve V3 slowly until the system is
depressurised.
5. Replace the expansion vessel.
6. Top up the system to the nominal pressure of 1.5
bar in accordance with the filling instructions in
the brine loop maintenance section.
7. If no further maintenance is required:
Install all parts in reverse order and switch the
power supply to the ComfoAir Luxe back on.
(as described in the maintenance section for the
brine loop)
6.9 Replacing filling valve
1. Remove the front panel of the Comfofond-L as
described in the brine loop maintenance section.
2. Close tap V4 only.
3. Connect a drainage hose to filling valve V1 or V3
to drain the fluid.
4. Open the selected filling valve slowly until the
system is depressurised.
5. Replace the filling valve.
6. Top up the system to the nominal pressure of 1.5
bar in accordance with the filling instructions in
the brine loop maintenance section.
7. If no further maintenance is required:
Install all parts in reverse order and switch the
power supply to the ComfoAir Luxe back on.
(as described in the maintenance section for the
brine loop)
Содержание ComfoFond-L
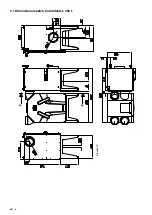
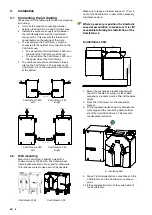
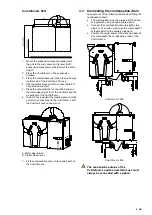
Страница 8: ...EN 4 3 1 Dimensional sketch Comfofond L 350 L Elevation P...
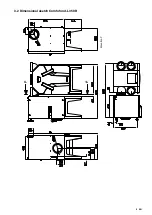
Страница 9: ...EN 5 3 2 Dimensional sketch Comfofond L 350 R Elevation P...
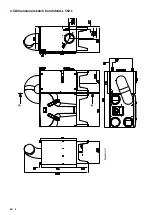
Страница 10: ...EN 6 3 3 Dimensional sketch Comfofond L 550 L Elevation P...
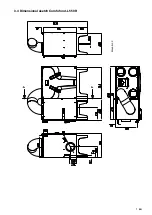
Страница 11: ...EN 7 3 4 Dimensional sketch Comfofond L 550 R Elevation P...
Страница 31: ...EN 27 II Maintenance log Date Activity Initials...