EN 12
5. Commissioning
All loose parts, including cardboard and
packaging materials must be removed from
the system before commissioning.
5.1 Filling the brine loop
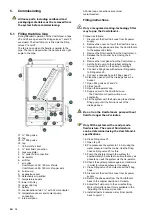
During standard operation of the Comfofond-L, taps
V2 and V4 are open and the filling valves V1 and V3
are closed. The Comfofond-L is filled via the filling
valves V1 and V3.
The tap is open when the handle is parallel to the
pipe. The tap is closed when the handle is at a right
angle to the pipe.
5
4
3
1
2
15
7
6
8
9
10
V1
V3
V2
V4
16
12
14
13
11
17
V1. ¾” filling valve
V2. tap
V3. ¾” filling valve
V4. tap
1. 180 mm Ø air inlet
2. ¾” inlet fluid connection
3. pressure meter
4. ¾” outlet fluid connection
5. de-aerator
6. air filter
7. air outlet
Comfofond-L 350: 160 mm Ø side
Comfofond-L 550: 180 mm Ø upper side
8. fluid pump
9. expansion vessel
10. detachable air partition
11. temperature sensor
12. lower drip tray
13. upper drip tray
14. battery
15. condensation drain 1 ¼” with 32 mm adapter
16. temperature sensor and coolant pump
connection
17. internal siphon
All brine loop connections are conical
male-threaded.
Filling instructions
Only a recognized cooling-technology fitter
may top up the Comfofond-L.
Proceed as follows:
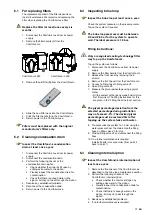
1. Disconnect the ComfoAir Luxe from its power
supply.
2. Remove the cover on top of the ComfoAir Luxe.
3. Reposition the phase wire from the Comfofond-L
to the adjacent E clamp.
4. Remove the filter handle from the Comfofond-L.
5. Release the front panel by removing the 6
screws.
6. Remove the front panel from the Comfofond-L.
7. Set the fluid pump to the highest setting by
turning the switch on the pump to setting 7.
8. Connect a filling hose with external filling pump
to filling valve V3.
9. Connect a drainage hose to filling valve V1.
10. Place the open end of the drainage hose in a
bucket.
11. Open filling valves V1 and V3.
12. Close tap V2.
13. Open the de-aerator cap.
14. Supply power to the ComfoAir Luxe.
- The Comfofond-L pump will now run
constantly.
15. Fill the system with the fluid using the external
filling pump until the fluid runs out of the
drainage hose.
Do not run the Comfofond-L pump without
fluid for longer than 2 minutes.
Only fill the system with a ready-made
fluid mixture. The correct fluid mixture
can be determined using the Comfofond-L
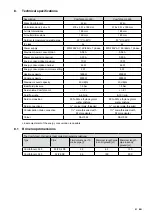
specifications.
16. Close filling valve V1.
17. Open tap V2.
18. Pre-pressurise the system to 1.5 bar using the
water pressure from the mains. Use the filling
hose on filling valve V3 for this.
19. Pump the mixture through the system for
approximately 30 minutes to ensure that any air
pockets can exit the system via the de-aerator.
20. Check the system pressure again and add more
in order to increase pressure if necessary.
21. Close filling valve V3 and disconnect the filling
hose.
22. Disconnect the ComfoAir Luxe from its power
supply.
23. Return the phase wire from the Comfofond-L
back to the original position on C clamp.
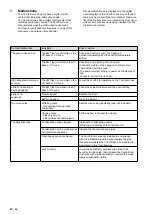
24. Adjust the fluid pump to the correct setting.
More information about this is available in the
'Adjusting the fluid pump' section.
25. Install all parts in reverse order. (from point 6
back to point 1)
Содержание ComfoFond-L
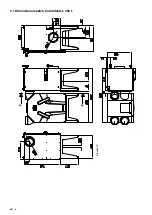
Страница 8: ...EN 4 3 1 Dimensional sketch Comfofond L 350 L Elevation P...
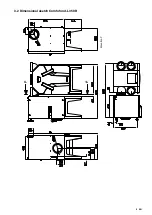
Страница 9: ...EN 5 3 2 Dimensional sketch Comfofond L 350 R Elevation P...
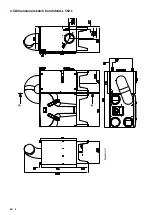
Страница 10: ...EN 6 3 3 Dimensional sketch Comfofond L 550 L Elevation P...
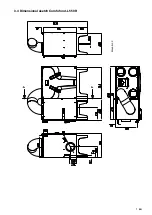
Страница 11: ...EN 7 3 4 Dimensional sketch Comfofond L 550 R Elevation P...
Страница 31: ...EN 27 II Maintenance log Date Activity Initials...


