13 - EN
Enthalpy exchanger
When the ComfoAir is fitted with an enthalpy
exchanger the humidity from the extracted air is
partly transferred to the fresh supply air. In this case
you delay the process of drying out the house in dry
winter months, additionally there is no condensate
that must be drained from the ComfoAir. Therefore
a condensation drain is not necessary with an
enthalpy exchanger.
Ensure that the condensation drain is sealed.
This prevents the ComfoAir from sucking in
any leakage air.
The condensation drain can be sealed with a
standard screw-cap.
2.7 Commissioning the ComfoAir
After installation, the ComfoAir must be
commissioned.
This can be done via the P menus on the digital
operating device. These P menus can be used to
enter various settings (ventilation programmes,
in particular) for the ComfoAir. An overview of the
available P menus is given below:
Menu
Options
P1
Reading statuses (from menu P2)
P2
Setting time delays
P3
Setting and reading the ventilation levels
P4
Setting and reading the temperatures
P5
Setting additional programmes
P6
Setting additional programmes
P7
Reading and resetting malfunctions (and system
information)
P8
Setting the RF input and analogue
inputs (0-10V)
P9
Reading statuses (from menu P5 and P6)
P menus P1, P2 and P9 can be accessed by the
user, mainly to read statuses and set time delays.
The remaining P menus P3 to P8 are intended
solely
for the installer.
The ComfoAir's bypass valve will not work for
the first 4 minutes after a power cut unless
the programme mode is activated.
2.7.1 Display on the unit
The ComfoAir can be operated and commissioned
by means of a display. The display is a digital
operating device which is mounted on the
ComfoAir.
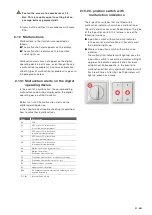
select menu
up
OK
down
supply off
supply on
(led green)
(led green)
comfort temperature
Shown in display
Ventilation setting absent
Ventilation setting low
Ventilation setting medium
Ventilation setting high
Menu symbol
Malfunction code (flashes)
Bypass
Access to the menus
Sequence
Press
Display
Description
1
MENU
P2
Time delay
2
q + q
(3 seconds)
P3
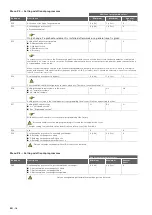
Press the buttons
simultaneously.
3
q
P4
Temperatures
4
q
P5
Settings
5
q
P6
Settings
6
q
P7
Malfunction / Reset /
Self-test
7
q
P8
0 - 10V Inputs
8
q
P9
Status
Example
Setting the MEDIUM POSITION of the supply fan to
40%.
Sequence
Press
Display
Description
1
MENU
P2
Time delay
2
q + q
(3 seconds)
P3
Press the buttons
simultaneously.
3
OK
P30
Exhaust fan
Position A
4
q (6x)
P36
Select P36
5
OK
50
Current setting
6
q (10 x
or press
continuously)
40
Select 40
7
OK
P35
Value is 40
8
MENU
P3
9
MENU
1
Fan setting
Some P menus (such as P1 and P9) can only
be read.
Leaving Reading menu
■
At action point 6 press "MENU" (instead of "OK").
The display can not be used for setting the
ventilation positions of the ComfoAir. The
arrowkeys are only for setting the additional
programmes.
OK
MENU
·
·
·
OK
MENU
·
·
·
OK
MENU
·
·
·
OK
MENU
·
·
·
OK
MENU
·
·
·
1
A
2
3
X X
X X
•
1
A
2
3
X X
X X
•
1
A
2
3
X X
X X
•
1
A
2
3
X X
X X
•
1
A
2
3
X X
X X
•
1
A
2
3
X X
X X
•
1
A
2
3
X X
X X
•
Содержание ComfoAir 350
Страница 1: ...ComfoAir 350 Installer manual Cooling Fresh Air Clean Air Heating...
Страница 4: ...EN 4...
Страница 33: ...33 EN...
Страница 34: ...EN 34...
Страница 35: ...35 EN...


