background image

44

3

OPERATING INSTRUCTIONS

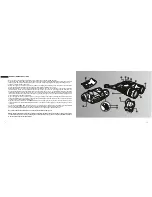
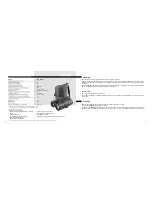
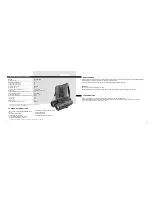
Remove the lens caps from the objective lens (4) and from the long-range IR-illuminator (5).

Press the button marked  ON  (6) to turn on the device. A stable green light indicates that the device is ready for use. A  

flashing green light indicates that the battery power level is low.  A flashing red light indicates that the battery is empty. 

«

»

Locate an object within 20 to 30 meters.

Rotate the eyepiece (7) until you 

see the frame of the display and black fine grid on it. Adjust the sensitivity of the 

device (visually it is determined as image brightness) by turning the adjustment wheel (11).

clearly 

Rotate the objective (4) until you see a sharp image of the object. When you turn the device on, the stealth short-range 

IR-illuminator is turned on automatically. Press the «IR» button (8) to turn the main long-range IR-illuminator on. 

Choose the operation modes of the IR-illuminator: press and hold the «+» (9) or «-» (10) buttons to increase or decrease 

respectively the power of the IR-illuminator. The use of the IR-illuminator in the optimal mode prolongs operating time. If 

the device is focused on an object closer than 15 metres, the emission spot of the main IR-illuminator (bright light circle) 

will be shifted to the right side of the display.

When changing the viewing distance, try to see a sharp and high-quality image by rotating the objective (4) and the 

sensitivity adjustment wheel (11) and by changing the operating modes of the IR-illuminator. Do not rotate the eyepiece 

(7)  the device is already individually adjusted. 

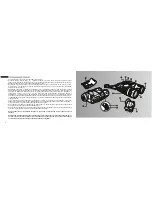
Plug the output video cable into the RANGER 

PRO

's video-output jack (12) to transmit the observed image to an 

external LCD monitor. When the RANGER 

PRO 5x42 

is coupled with video equipment, the observed image can be 

recorded. 

To connect the RANGER 

PRO 5x42 

to a vehicle's 12V auxiliary power port, plug the 

car adapter

 into the RANGER


PRO

s power input jack (13) and connect the other end of the cable to the vehicle's auxiliary power port. 

To connect the RANGER 

PRO 


to a household outlet, use a variable power switching adapter.  

5x42

Be careful, observe the polarity shown  on the inner side of the battery cover. 

NOTE.  When the batteries are in the container and the external power source is turned on, the device operates 

on the external power source. If you unplug the external power source, you have to press the «ON» button to 

make the device operate on the batteries. 

Содержание Ranger Pro 5x42

Страница 1: ...www sotmarket ru Yukon Ranger Pro 5x42 8 800 775 98 98...

Страница 2: ...I N S T R U C T I O N S www yukonopticsglobal com Digital Night Vision RANGER PRO 5x42 Digital Night Vision RANGER PRO 5x42...

Страница 3: ...48 version 0311...

Страница 4: ...de noctovision digital RANGER PRO 5x42 9 16 Monocolo digitale di visibilita notturna RANGER PRO 5x42 33 40 RANGER PRO 5x42 41 48 ITALIANO Monocular digital de vision nocturna RANGER PRO 5x42 25 32 Di...

Страница 5: ...tion Card Car Adapter Model Visual Magnification x Objective Lens mm Resolution lines mm Angular Field of View degree Camera Resolution pixel Max Detection Range m Operation Voltage V Power Supply Tri...

Страница 6: ...operates for up to 10 hours using 6 AA batteries The has an ergonomically designed water resistant durable plastic body that helps protect the unit and creates versatility Ranger Pro 5x42 Ranger Pro 5...

Страница 7: ...sed on an object closer than 15 metres the emission spot of the main IR illuminator bright light circle will be shifted to the right side of the display When changing the viewing distance try to see a...

Страница 8: ...43 4 5 ON 6 20 30 7 11 4 5 8 9 10 15 4 11 7 12 13 ON 4...

Страница 9: ...ay you can see the fine black net 7 light or dark spots on the whole field of view in the image plane are acceptable The main IR illuminator can not be focused Sum Light function and its peculiarities...

Страница 10: ...dry well ventilated area away from heating air conditioning vents and other o o heating devices Temperature should be greater than 50 F 10 C and humidity should not exceed 70 STORAGE Do not scratch t...

Страница 11: ...activate IR Illuminator fails to activate Poor image quality TEST OF INSPECTION Visual Check for defective missing or improperly installed batteries or the battery container The button 10 is in its ex...

Страница 12: ...Assicurarsi che la lente non ha la condensa ne contaminata CORREZIONE Spegnere e riaccendere l apparecchio Sostituire le batterie o montarle correttamente Premere il pulsante 9 tenere premuto circa 5...

Страница 13: ...E Monoculaire digital RANGER PRO 5x42 Etui Bretelle porte appareil Compartiment des piles Alimentation externe non fournie C ble d enregistrement vid o Mod le Grossissement x Diam tre de la lentille m...

Страница 14: ...on nocturne Ranger 5x42 Compare au model de base le Ranger Pro presente un plus grand champ de vision jusqu a 450m gr ce un ensemble CCD plus sensible et a l utilisation d une technologie issue d un p...

Страница 15: ...frarouge prolonge la dur e d utilisation Si l appareil fait un zoom sur un objet situ 15 m tres maximum le point d mission de la torche IR principale cercle lumineux puissant sera d plac vers le c t d...

Страница 16: ...luminatore IR in maniera ottimale prolunga il tempo di funzionamento Nel caso in cui si osservi uno oggetto a meno di 15 metri il fascio circolare emesso dall illuminatore IR principale risultera spos...

Страница 17: ...l tempo di funzionamento dello strumento si riduce drasticamente 13 Si l appareil a t exploit en froid et plac dans un local chaud laissez chauffer l appareil dans son tui au moins depuis 5 heures pou...

Страница 18: ...as gratigner ou toucher avec les doigts les surfaces ext rieures des lentilles Nettoyez les lentilles de l appareil avec un tissu con u pour nettoyer les objectifs des appareils photo ou avec un tissu...

Страница 19: ...des piles dans le container et le container dans le compartiment de batteries Assurez vous de la capacite des piles Le bouton 10 est dans sa position extr me La molette d ajustement 11 est dans sa po...

Страница 20: ...el instrumento Lleva a cabo la revisi n y la correcci n recomendadas de acuerdo al orden indicado en la tabla En la tabla est n indicados no todos los problemas que puedan surgir Las acciones de revis...

Страница 21: ...en aparecer unos puntos luminosos p xeles Esto es explicado por particularidades de operaci n que de esta funci n Este no es un defectotampoco 17 Modell Visuelle Vergr erung x Objektivlinsendurchmesse...

Страница 22: ...18 Das digitale Nachtsichtger t Ranger Pro 5x42 wurde auf der Basis des Nachtsichtger tes Ranger 5x42 konstruiert Im Vergleich zu dem Grundmodell sichert das Ranger Pro 5x42 eine gr ere Beobachtungsd...

Страница 23: ...alten des Ger tes wird der Latentinfrarotbeleuchter von kurzer Reichweite automatisch eingeschaltet Dr cken Sie die Taste IR 8 um den Hauptinfrarotbeleuchter ferner Reichweite einzuschalten W hlen Sie...

Страница 24: ...en el modo ptimo aumenta el tiempo de trabajo permanente Si el aparato est dirijado a un objeto que se encuentra a la distancia menos de 15 m la mancha de emisi n del iluminador principal circulo bri...

Страница 25: ...contenedor 3 6 acumuladores o 6 baterias del tipo AA Introduzca el contenedor 3 en la secci n de bater as de tal manera que los contactos el ctricos externos del contenedor 3 coincidan con los contac...

Страница 26: ...NG Nehmen Sie vor der Lagerung die Speiseelemente heraus und trocknen Sie das Ger t Bewahren Sie das Ger t in der Aufbewahrungstasche entfernt von Heizger ten und Luftungsschachten bei o Temperaturen...

Страница 27: ...n der Endlage Pr fen Sie ob das Okular und Objektiv entsprechend der Betriebseinleitung eingestellt sind Vergewissern Sie sich dass die Linsen nicht angelaufen und verschmutzt sind In der Tabelle 2 is...

Страница 28: ...2 Yukon Ranger Pro 5x42...

Отзывы: