background image

10

IM 04L55B01-02EN


Basic Operation

The basic operation of the GM is explained briefly here. For 

details, see the user’s manuals.

Names of the GM10 Parts

START/STOP key

USER key

SD card slot

SD card

USB port

Ethernet port

RS-422/485

Serial port

 (/C3 option)

Status display area

7 segment LED×2

7 segment LED:

  Displays the operation mode, system No., self-check 

operation, key lock, operation error, process running, and 

module installation information.

Status display area:

Item

LED color

Description

RDY

Green

System normal indication

REC

Green

Recording status

SD

Orange

SD card access status

FAIL

Red

System error indication

MATH

Green

Computation status

SER

Orange

Serial communication status

BT

Orange

Bluetooth communication status

ALM

Red

Alarm status

START key: Starts recording and computation

STOP key: Stops recording and computation, clears errors

USER keys (USER1/USER2): Executes specified actions 

(event action function)

Setting a SD Card

Open the SD card slot cover on the GM10 front panel, and 

insert an SD card (see the names of the parts).

Note

On models with the advanced security function (/AS option), 

an SD memory card must be installed.

Configuring the GM via Ethernet 

Communication

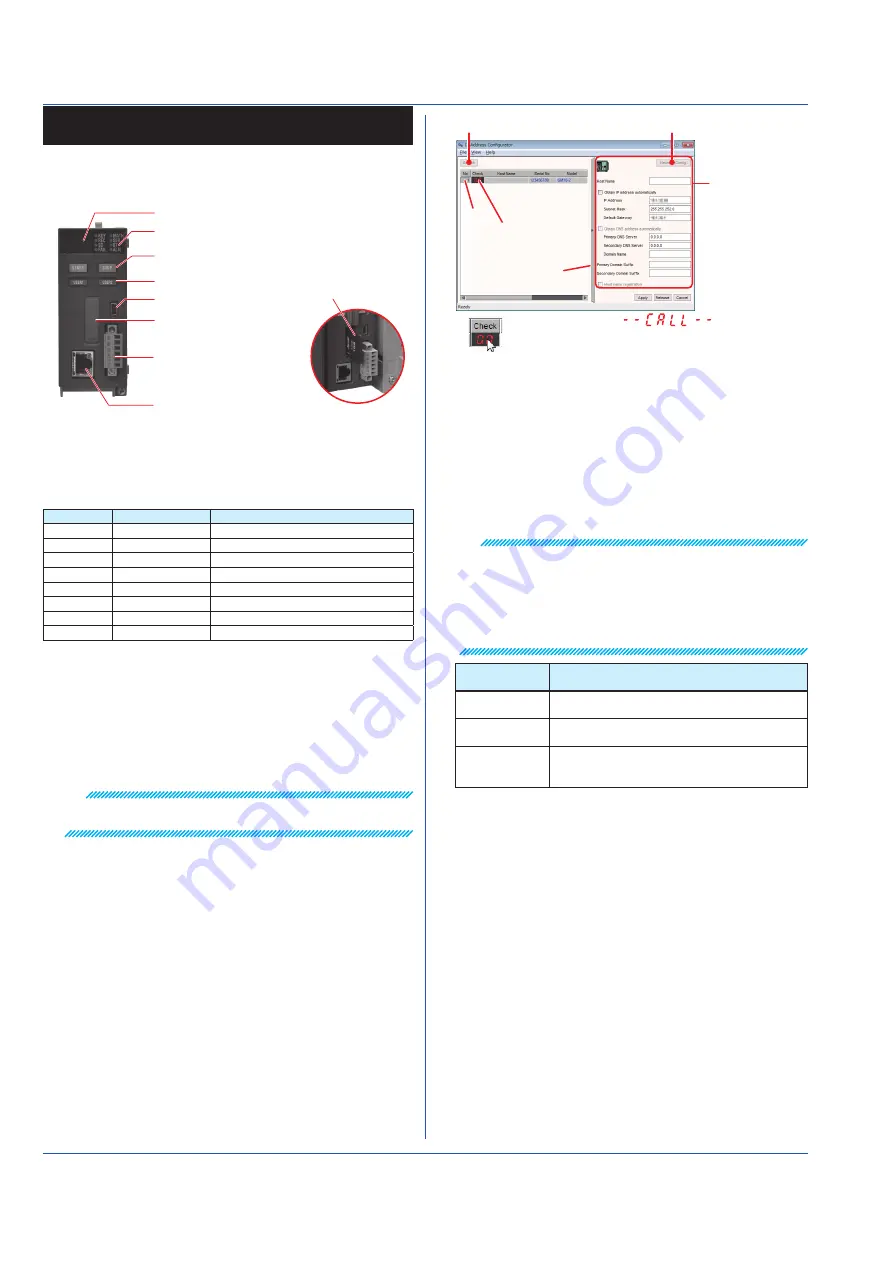
Setting the GM10’s IP address with the IP Address 

Configurator

1.  Start the IP Address Configurator, and click 

Search

. A list 

of GM10s in the segment appears.

Search button

Network Config. button

Address setting 

screen

[No.]

See below.

Set the IP address, 
subnet mask, default 
gateway, and so on.

Clicking here will display  


on the 7 segment LED of the GM10. This is 
convenient to check the corresponding device.

Expand/reduce 

button

2.  Click a 

No.

.

  The corresponding GM10 is enabled.

3. Click 

Network Config.

, and set the items on the address 

setting screen.

  For details on the settings, see the IP Address Configurator 

User’s Manual.

Setting the Measurement Mode

Set the measurement mode to Normal, High speed, or Dual 

interval. The factory default setting is Normal.

Note

When you change the measurement mode, the following data 

is initialized.

• All internal data
• All setting parameters except the IP address and other 

communication settings (including security settings)

• System configuration data

Measument 

mode

Description

Normal

A mode in which the shortest measurement 

interval is 100 ms

High speed

A mode in which the shortest measurement 

interval is 1 ms

Dual interval

A mode in which measurement is possible by 

setting different scan intervals on the two scan 

groups.

1. Start the Web browser (IE11 or later).

2. In the Address box, enter “http://” followed by the GM10 IP 

address. The Web application starts.

3. On the content selection tree, click the Calib tab.

4. On the content selection tree, click Measurement mode.

5. Select a measurement mode, and click Update 

Configuration in the lower right of the screen.

Reconfiguring (Module identification)

Reconfiguration is used to identify the connected I/O modules 

to align the system environment to the actual module 

configuration.

Reconfiguration is necessary in the following situations.

  When the system is used for the first time, when modules 

are changed (changed to different types of modules), 

when modules are added or removed, or when the system 

configuration is changed (connecting a GX90EX)

  Do not carry out the following operations while a 

reconfiguration is in progress.

  Turn the power on or off, remove or insert a module

1.  Start the Web browser (IE8 or later).

Содержание SMARTDAC+ GM10

Страница 1: ...ail 14 Mounting on a Wall 14 Wiring 15 Precautions to Be Taken While Wiring 16 Removing andAttaching a Terminal Cover 16 Removing andAttaching a Terminal Block 16 Wiring Procedure 17 Internal dimensio...

Страница 2: ...out prior notice as a result of continuing improvements to the instrument s performance and functions Every effort has been made in the preparation of this manual to ensure the accuracy of its content...

Страница 3: ...ration or shock or pull out the card Data can become corrupt or permanently lost Only use Yokogawa SD cards Operation cannot be guaranteed with other brands of card When inserting the SD card into the...

Страница 4: ...iption GM90PS Power Supply Module for SMARTDAC GM Type 1 Always 1 Area N General Supply voltage 1 100 240V AC 2 12 28 V DC 1 Power supply connection D Power inlet with UL CSA cable F Power inlet with...

Страница 5: ...01 1 1GB Shunt resistor for M3 screw terminal 415940 1 250 0 1 415941 1 100 0 1 415942 1 10 0 1 Shunt resistor for clamp terminal 438920 1 250 0 1 438921 1 100 0 1 438922 1 10 0 1 GM10 Style Number Re...

Страница 6: ...system A unit consisting of a GM10 a GM90PS and a GX90EX Up to six I O modules can be connected to a unit Up to six sub units can be connected via the GX90EX Sub Unit multi unit system A unit consist...

Страница 7: ...not be detected GM10 1 If you want to use the DI of a GX90XD or GX90WD only a single module installed in the GM main unit can be used Do not link modules in a way that violates the specifications Doi...

Страница 8: ...or both do so before setting the date and time Download the following software applications SMARTDAC Standard Hardware Configurator SMARTDAC Standard IP Address Configurator See the list of electroni...

Страница 9: ...e IM 04L55B01 01EN The multi unit system support only cascaded connections If connected in a ring none of the sub units will be identified Link the GX90EX to the left end on a main unit and next to th...

Страница 10: ...e Expand reduce button 2 Click a No The corresponding GM10 is enabled 3 Click Network Config and set the items on the address setting screen For details on the settings see the IP Address Configurator...

Страница 11: ...er 1 and click the button under Channel set Channel number display The Group number 1 Channel set dialog box appears 3 Set AI channel 001 to 0010 to On and click OK The selected channels appear under...

Страница 12: ...unication Reconfiguration dialog box appears click OK The setup data of the connected GM will appear 3 Set the items 4 On the menu bar click the Setting tab and then Send Settings 5 When a Communicati...

Страница 13: ...hese kinds of circumstances wait for at least an hour before using the GM to acclimate it to the surrounding environment Well Ventilated Location To prevent overheating install the GM in a well ventil...

Страница 14: ...ront DIN rail DIN rail Rear of GM Click Check that all the latches are securely fastened to the DIN rail Removing from the DIN Rail 1 Lower the latch on the rear panel of the GM using a flat blade scr...

Страница 15: ...ed For all other signal cables use basic insulated cables dielectric strength of 1390 VAC To prevent electric shock attach the terminal cover after wiring and make sure not to touch the ter minals App...

Страница 16: ...n the thermocouple input take measures to stabilize the temperature at the input terminal Always use the terminal cover Do not use thick wires which may cause large heat dissipation we recommend a cro...

Страница 17: ...ection port and tighten the screw terminal Wiring to a GX90XA Analog Input Module Universal Low withstand voltage relay Electromagnetic relay Current mA type Terminal Diagram CH1 301 201 101 101 102 1...

Страница 18: ...A B B b A 5 DC current input with an external shunt resistor Be careful because the DI wiring is different between level and contact Terminal Arrangement M3 screw terminal CH No Term No Symbol Term N...

Страница 19: ...DI8 COM COM DI9 DI16 COM DI9 DI16 DI1 DI8 COM Wiring direction Wiring direction 11 19 11 19 21 29 21 29 Terminal Arrangement Term No Symbol Term No Symbol 21 DI9 11 DI1 22 DI10 12 DI2 23 DI11 13 DI3...

Страница 20: ...CH2 CH3 CH4 CH5 CH1 CH2 CH3 CH4 CH5 CH6 CH7 CH8 CH9 CH10 CH6 CH7 CH8 CH9 CH10 11 20 11 20 21 30 21 30 M3 screw terminal Clamp terminal Wiring direction Wiring direction Terminal Arrangement Term No S...

Страница 21: ...on Internal circuit Connecting to the RS 422 485 Connector C3 option Two wire system Four wire system Electric potential of the shield Shield FG SDB SG SDA RDB RDA Electric potential of the shield Shi...

Страница 22: ...rovide a power switch double pole type on the power supply line to separate the GM from the main power supply Use labels to indicate that this switch is for cutting off the power supply to the GM and...

Страница 23: ...Power On and Off If the power switch of GM GX60 systems under operation be turned on or off carelessly it may result the system down or injury Check the following points before turning on the power s...

Страница 24: ...L Red Lights during an error Setting Switches Dipswitches Use the dipswitches to set the unit number of the expansion module 10 Mbps fixed mode and operation mode master slave Dipswitch Settings Dipsw...

Отзывы: