YMGI SYMPHONY CHOIR (59)2 EL Series Скачать руководство пользователя страница 32

YMGI, Engineered Comfort Products for A Sustainable and Efficient Green World!


YMGI: Your Modern Green Idea


32 

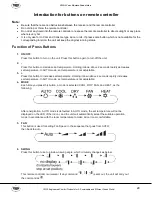
Guide for General Operation 

1. 

Combination of “+”and “-” buttons: About lock 

2.   

Press “+” and “-” buttons simultaneously to lock or unlock the keypad. If the remote controller is 

locked,

 is displayed. In this case, pressing any button caused the 

 icon to blink three 

times. 

3.  Combinati

on of “MODE “ and “-” buttons switch between Fahrenheit and Celsius. With the unit 

OFF, press “MODE” and “-” buttons simultaneously to switch between C and F. 

4. 

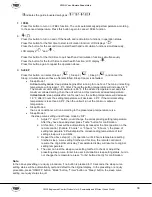
Combination of “ TEMP “ and “CLOCK” buttons : About Energy-saving Function 

5. 

Press “TEMP” and “CLOCK” simultaneously in COOL mode to start energy-saving function.  

6.  Nixie tube on the remote controller dis

plays “SE”. Repeat the operation to quit the function. 4) 

Combination of “TEMP “ and “CLOCK” buttons: About 46F Heating Function 

7. 

Press “TEMP” and “CLOCK” simultaneously in HEAT mode to start 46F Heating Function Nixie 
tube on the remote controller display

s “        ” and a selected temperature of “46F”.  

8.  (46F if Fahrenheit is adopted). Repeat the operation to quit the function.  5) 

About Back-lighting Function 

9.  The unit lights for 4s when energizing for the first time, and 3s for later press. 

NOTICE


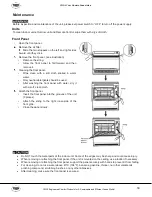
CHANGING BATTERIES AND NOTICES 

1)  Press slightly along the arrowhead direction to push the back cover open on the remote control. 
2)  Take out the old batteries. (As show in figure) 
3)  Insert two new AAA1.5V dry batteries, and pay attention to the polarity. (As show in figure) 
4)  Attach the back cover of wireless remote control. (As show in figure) 


NOTE: 


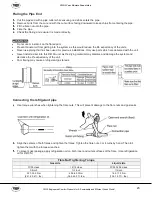
During operation, point the remote control signal sender at the receiving window on indoor unit. 


The distance between signal sender and receiving window should be no more than 8m, and there should be 
no obstacles between them. 


Signal may be experience interference in rooms where there are fluorescent lamps or wireless telephones. 
The remote controller should be kept close to indoor unit during operation. 


Replace new batteries of the same model when replacement is required. 


When you don’t use remote controller for a long time, please take out the batteries. 


If the display on remote controller is fuzzy or there’s no display, please replace batteries. 

 
NOTES: 


When changing the batteries, do not use old or different batteries that could cause the remote control to 
malfunction.   


Use the remote in its receiving range. Remote should be used 36 inches away from a TV set or stereo.  


If the wireless remote control cannot operate normally, please take the batteries out, wait 30 seconds and 
reinsert them.  If the remote still doesn’t operate normally, please replace the batteries.  


If the wireless remote control will not be used for an extended period, it is recommended to remove the 
batteries. Leaving the batteries in could cause them to leak. This can cause damage to the remote control.


The operation of the remote controller must be performed within its receiving range. 


 To control the main unit, point the remote controller at the signal receiving window on the main unit to 
improve the receiving sensitivity of main unit.  


If the remote control does not operate normally, take the batteries out for 30 seconds, and then reinsert 
them. If it still does not operate properly, replace the batteries.  


Содержание SYMPHONY CHOIR (59)2 EL Series

Страница 1: ...all related documents manuals provided by YMGI Failure to follow and adhere to all codes and documentation can cause damage to equipment property or even personal injury Installer Must be currently li...

Страница 2: ...tallation and Service to Be Performed 100 by Currently Licensed or Certified HVAC Technicians Contractors 11 Suggestions to Aid You in Hiring an HVAC Contractor 11 Safety Precautions 12 System Diagram...

Страница 3: ...rements for handling reclaiming recovering and recycling of certain refrigerants the equipment and tools necessary to perform these service procedures In addition some states or municipalities may hav...

Страница 4: ...stem installer or HVAC professional as soon as possible and provide the following information Data on the unit model number serial number and owner s name A detailed description of the unit s problem...

Страница 5: ...hich the manufacturer may not require certified and licensed personnel to install Reading and following YMGI Group recommendations and requirements contained in the following pages and other documents...

Страница 6: ...ling the piping through any structures at time of installation 2 Not installing an oil P trap in the copper suction line where the indoor unit is located 18 feet or more below the outdoor unit 3 Cross...

Страница 7: ...D or any other identifying marks on each pair of copper lines and wiring cable sets to keep from cross piping or cross wiring in multiple zone installations or where pipes for different single zone s...

Страница 8: ...ation or 90 days as of original shipping date from YMGI Group whichever comes first This is a standard limited liability warranty and DOES NOT cover the following Any damage or repairs to properties o...

Страница 9: ...st will be charged accordingly 3 YMGI will ground ship out the parts ASAP Expedited shipping is available at the customer s expense 4 Replacement parts that have an approved warranty registration are...

Страница 10: ...YMGI Engineered Comfort Products for A Sustainable and Efficient Green World YMGI Your Modern Green Idea 10...

Страница 11: ...ne if they are reputable 4 Use only a reputable licensed certified HVAC installation professional to prevent any unexpected charges because of unethical business practices 5 Check their references ver...

Страница 12: ...ts 17 While operating in cooling mode do not set the indoor unit s room temperature too low Keeping the temperature difference between indoor and outdoor unit within 41 18 YMGI Group recommends that o...

Страница 13: ...Make sure to disconnect the power supply and switch off all circuits prior to inspecting or servicing the unit Inspecting and servicing the unit while the power supply is connected and the circuits ar...

Страница 14: ...YMGI Engineered Comfort Products for A Sustainable and Efficient Green World YMGI Your Modern Green Idea 14 System Diagram...

Страница 15: ...e Level Flash Light Screw Driver Phillips and Flat Hammer Knife Scissors Goggled Glasses Mask Gloves Ladder Refrigeration Related Work Flat Surface Wrench Two Flare Nut Tool Set Hex Head Key Set Torch...

Страница 16: ...It receives signals from the remote controller b When the unit receives a signal you will hear a short beep c Settings change the beep Air outlet selection switch Titanium Apatite Photocatalytic Air...

Страница 17: ...are met Both the air intake and exhaust are unobstructed The unit will not be exposed to direct sunlight The unit is located away from an additional heat source s There is no machine oil vapor Cool Wa...

Страница 18: ...YMGI Engineered Comfort Products for A Sustainable and Efficient Green World YMGI Your Modern Green Idea 18 Location for securing the installation pane Schematic drawing of hooks...

Страница 19: ...t depending on which side of the unit the pipe is taken out For piping see connecting the refrigerant pipe Allow adequate space around the pipe of the indoor unit for easier connection The suggested s...

Страница 20: ...iping For the drain pipe use commercially available rigid polyvinyl chloride general VP 20 pipe with an outer diameter of 26mm or 1 inch and an inner diameter of 20mm or 13 16 inches The drain hose wi...

Страница 21: ...e front panel Remove the 4 screws Remove the front grille while pulling it forward Follow the arrows to disengage the clasps on the front case to remove it Follow the procedure shown when removing the...

Страница 22: ...Do not forget to secure the unit to the wall For wall installations secure the mounting plates using 4 screws and the indoor unit using 4 screws The mounting plates must be installed on a wall capabl...

Страница 23: ...delivered with the unit Never install a drier into this R410A unit as the drying material may dissolve and damage the system and decrease the life expectancy of the unit Poor flaring may cause a refri...

Страница 24: ...The table below shows the recommended dimensions Gas side Liquid side Gas pipe thermal insulation Liquid pipe thermal insulation 07 09 class 12 18 class 07 09 class 12 18 class O D 9 52mm 3 8 in O D...

Страница 25: ...e socket until it adheres and seals With a Multi indoor unit install as described in the installation manual supplied with the outdoor unit Lift the sensor securing plate remove the front metal plate...

Страница 26: ...block Doing so may cause electric shock or fire The power connection cord has been inserted on the mainboard through the piping hole of the chassis Please connect the power connection cord with the br...

Страница 27: ...nd wrinkles within the bend radius as this will damage the pipes Do not over tighten torque the flare nut Over tightening torqueing can cause the flare nut to leak Working Temperature Range Indoor sid...

Страница 28: ...cient Green World YMGI Your Modern Green Idea 28 Buttons on Remote Controller 1 ON OFF 2 MINUS 3 PLUS 4 MODE 5 FAN 6 SWING 7 I FEEL 8 FRESH AIR 9 SLEEP 10 TEMP 11 QUIET 12 CLOCK 13 T ON T OFF 14 TURBO...

Страница 29: ...ase set temperature Holding it down above 2 seconds rapidly decreases set temperature In AUTO mode set temperature is not adjustable 3 Press this button to increase set temperature Holding it down abo...

Страница 30: ...er run for one hour the setting temperature will decrease 1 8 F after 2 hours the setting temperature will decrease 2 6 F If the minimal setting temperature is less than 60 8 F then the unit will run...

Страница 31: ...T OFF Press T ON button to initiate the auto ON timer To cancel the auto timer program simply press this button again After pressing this button the icon will disappear and ON blinks 00 00 is displaye...

Страница 32: ...As show in figure NOTE During operation point the remote control signal sender at the receiving window on indoor unit The distance between signal sender and receiving window should be no more than 8m...

Страница 33: ...d in warm water Only neutral detergents should be used After washing the front panel with water dry it with a soft clean cloth Attach the front panel Insert the front panel into the grooves of the uni...

Страница 34: ...remove from the 4 retaining tabs 2 of the 4 tabs are larger and located at the top of the air filter frame and 2 of the 4 are smaller and are located near the middle of the air filter frame Clean or...

Страница 35: ...f paper Do NOT wring out the filter after washing or soaking Filter Replacement When disposing of the old filter treat as flammable waste Issues caused by dirty filters Cannot deodorize the air effect...

Страница 36: ...etween reset mode and standby mode after energizing This function is available without wired controller Standby after energizing Reset after energizing 2 L I Selection between the manual controller an...

Страница 37: ...Sustainable and Efficient Green World YMGI Your Modern Green Idea 37 PROTECTION AND ERROR CODES If an error occurs the error code will be displayed on the indoor unit display wall mounted controller...

Страница 38: ...YMGI Engineered Comfort Products for A Sustainable and Efficient Green World YMGI Your Modern Green Idea 38...

Страница 39: ...LH Low Air Quality Warning dA Indoor Unit Network Address Error L3 Water Full Protection LC Outdoor Indoor Incompatibility Error dH Wired Controller Circuit Board Error L4 Wired Controller Power Suppl...

Страница 40: ...non Normal or Abnormal The unit doesn t deliver cooling or heating immediately after the unit is restarted remote control or power resuming If the unit is powered off and then restored it will not run...

Страница 41: ...sh sound is heard 2 Bad odor is detected 3 Water is leaking out of the indoor unit 4 Circuit breaker trips or fuse is blown a few times 5 Wires or connections are very hot 6 Oil or refrigerant leakage...

Страница 42: ...nnected Is the circuit protector tripped Is the voltage too high or too low Was the OFF TIMER set on the wireless remote controller The cooling heating effect of the air conditioner is not as expected...

Страница 43: ...Notes Asked Technician for Help Contact YMGI Tech for Help USER NOTES Please list any questions or issues you may have with this unit No Date Installation Company Name Technician Phone HVAC License J...

Страница 44: ...8 16 and 24 Ton Symphony SOLO DC Inverter 57 2 3 Single Zone 16 SEER 09 36K Btu h 58 4 78 1 Single Zone 18 23 SEER 09 36K Btu h Symphony CHOIR DC Inverter 46 2 DC Inverter Multiple Zone 15 SEER 2x09K...

Отзывы: