background image


HTTPS://WWW.ELECTROPOLIS.ES 

25 


      English 


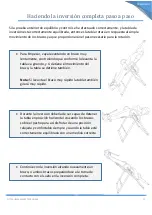
To start, lift your arm slowly, checking that as you lift 
it, the table will rotate, and if you stop the 
movement, the table will stop as well.  

Note:

 if the arm is lifted very fast, the table will also 

rotate very fast. 


During the inversion, you should be able to stop the 
table horizontally crossing your arm on your chest so 
you can enjoy a relaxed position as long as the table 
is correctly balanced at the right measure.  


Continue with the inversion by lifting your arm again, 
or both arms preparing to make contact with the floor 
during the complete inversion.  

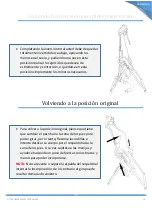
Step by Step Inversion


If the previous balancing test and control have been done correctly, and the inversion table 
is balanced correctly, then the table will rotate in response to simple arm movements since 
they will provide the weight needed to rotate the inversion table.  


Содержание ECO

Страница 1: ...Inversion Table Yatek ECO Owner s Manual Castellano English Italiano Fran ais Deutsch...

Страница 2: ...uestions 27 Warranty 28 Italiano Pezzi e parti della panca a inversione 30 Istruzioni di montaggio Da 31 a 37 Manuale dell utente Da 38 a 40 Domande frequenti 41 Garanzia 42 Fran ais Pi ces et parties...

Страница 3: ...deje de realizar el ejercicio inmediatamente Si necesita continuar su plan de ejercicio consulte a su m dico primero 4 Aseg rese de que los ni os y mascotas se mantengan alejados de este aparato este...

Страница 4: ...uma de poliestireno 4 12 Soporte de forma Z 2 13 Reposacabezas 1 N Descripci n Ilustr aci n Especificaciones Cant N Descripci n Ilustrac i n Especifica ciones Cant 14 Tornillo hexagonal exterior M8x55...

Страница 5: ...s 14 y arandelas 15 para ensamblar la barra de bloqueo delantero 3 y el soporte delantero 1 Segundo Paso Abra o despliegue las patas de la tabla de inversi n 1 y 2 hasta que consigan el ngulo adecuado...

Страница 6: ...ce 2x tornillos de cabeza plana en cruz 20 para montar el reposacabezas 13 en el soporte de respaldo 5 Segundo paso Utilice los 4 tornillos hexagonal externo 16 las 8 arandelas plana 15 las 4 tuercas...

Страница 7: ...miento N 19 Arandela plana Primer paso Inserte el tubo de acero del marco inferior de presi n en pies 8 en el agujero del marco de regulaci n de altura 6 la longitud debe ser igual en ambos lados util...

Страница 8: ...ntes para este paso Pieza montada en el paso 3 N 9 Soporte para pies 2 x N 14 Tornillo hexagonal exterior 2 x N 18 Tuerca de anti aflojamiento 4 x N 15 Arandela plana nico paso Utilice 2 tornillos hex...

Страница 9: ...ieza montada en el paso 2 Pieza montada en el paso 4 nico paso Saque el Pestillo con argolla 21 que dejamos colocado en el paso 2 luego tire del pasador de tracci n 22 y mant ngalo mientras inserte el...

Страница 10: ...x N 10 Manijas izquierda y derecha 4 x N 14 Tornillo hexagonal exterior 8 x N 15 Arandela plana 4 x N 18 Tuerca de anti aflojamiento Primer paso Utilice los tornillos hexagonales externos 14 las aran...

Страница 11: ...mprobar que la tabla ha sido montada correctamente hemos puesto dos im genes de ejemplo a continuaci n con los fallos m s comunes de mal montaje algunas piezas se aladas en las im genes se pueden mont...

Страница 12: ...ir de su medida real si usted es de constituci n media normalmente debe de poner 10 cm menos de su altura a la barra de regulaci n de altura 6 si es de constituci n corpulenta puede que necesite poner...

Страница 13: ...re el pecho para as disfrutar de una posici n relajada y confortable siempre y cuando la tabla est correctamente equilibrada con una medida correcta Contin e con la inversi n alzando nuevamente un bra...

Страница 14: ...posici n original piense que tiene que cambiar el peso hacia la zona de los pies para poder girar por lo tanto flexione las rodillas e intente deslizar su cuerpo por el respaldo hacia la zona de los p...

Страница 15: ...n colocar el soporte para pies si tras anclar la sujeci n para tobillos y pies le aprieta mucho o si est demasiado flojo aj stelo de forma que est c modo Piense que cuanto menos se mueva su cuerpo cua...

Страница 16: ...ajos de mantenimiento y limpieza necesarios Da os ocasionados por ca das golpes o impactos Se ocasione un desgaste derivado del uso normal del aparato Se utilicen herramientas de trabajo no autorizada...

Страница 17: ...ts shortness of breath daze dizziness and nausea please stop exercising immediately If you need to continue the exercise plan consult your doctor first 4 Make sure that children and pets are kept away...

Страница 18: ...handlebars 1 11 Polystyrene foam roller 4 12 Z shape support 2 13 Headrest 1 N Description Illustr ation Specifications Qty N Description Illustrat ion Specificati ons Qty 14 Hexagonal bolt M8x55 8 20...

Страница 19: ...ashers 15 to assemble the front locking bar 3 and the front support 1 Second step Open or unfold the inversion table leg supports 1 and 2 until they get the right angle then secure it with safety pin...

Страница 20: ...rst step Use 2x cross flat head screws 20 to assemble the headrest 13 on the backrest 5 Second step Use the 4 hexagonal bolts 16 the 8 flat washers 15 the 4 nuts 18 to assemble the metal plate of the...

Страница 21: ...step Use the nut 17 and the flat washer 19 to block the upper Adjustable Ankle Holding Tube 7 in the screw of the height adjustment frame 6 bottom up as shown in the figure the curved surface of the A...

Страница 22: ...sure to grab the following parts for this step Assembled piece in step 3 N 9 Footrest 2 x N 14 Hexagonal bolt 2 x N 18 Anti release nut 4 x N 15 Flat washer Single step Use 2 x hexagonal bolts 14 4 x...

Страница 23: ...wing parts for this step Assembled piece in step 2 Assembled piece in step 4 Single step Take out the safety pin 21 we left in place in step 2 then pull the pulling bolt 22 and hold it meanwhile inser...

Страница 24: ...Assembled piece in step 5 2 x N 10 Left and right handlebars 4 x N 14 Hexagonal bolt 8 x N 15 Flat washer 4 x N 18 Anti release nut First step Use the hexagonal bolts 14 the flat washers 15 and nuts...

Страница 25: ...ep we are going to check that the table has been assembled properly we have set two sample images below with the most common improper assembly mistakes some pieces indicated in the images can be mount...

Страница 26: ...ent if you are of medium complexity you should normally put 10 cm less of your height to the height adjustable bar 6 if you are of corpulent complexity you may have to put more measure than your heigh...

Страница 27: ...ur arm on your chest so you can enjoy a relaxed position as long as the table is correctly balanced at the right measure Continue with the inversion by lifting your arm again or both arms preparing to...

Страница 28: ...To return upright think that you have to shift your body weight toward foot end to be able to rotate therefore bend your knees while shifting your body weight toward the foot end At the same time rely...

Страница 29: ...e comfort dial Paso 4 you can choose in what position to place the foot support after setting the ankle comfort dial it is too tight or too loose adjust it so it is comfortable Think that the less you...

Страница 30: ...If necessary maintenance and cleaning Works are not performed Damages due to dropping shock or impacts Wear due to normal use of the device is caused Unauthorized working equipment is used Use of for...

Страница 31: ...igini o nausea fermatevi immediatamente Se avete necessit di continuare con il programma consultate prima il medico 4 Tenete i bambini e gli animali lontani dal dispositivo questo prodotto per uso esc...

Страница 32: ...11 Foam roller in polistirene 4 12 Supporto a Z 2 13 Poggiatesta 1 N Descrizione Illust razio ne Specifiche Qt N Descrizione Illustrazio ne Specifiche Qt 14 Bullone esagonale M8x55 8 20 Vite grande co...

Страница 33: ...loni esagonali 14 e le rondelle 15 per agganciare la barra di blocco anteriore 3 al telaio anteriore 1 Step 2 Aprite o allargate le due basi 1 and 2 fino al raggiungimento dell angolazione giusta poi...

Страница 34: ...di sicurezza N 22 Bullone a pressione Step 1 Usate le 2 viti con testa a croce 20 per avvitare il poggiatesta 13 allo schienale 5 Step 2 Usate 4 bulloni esagonali 16 8 rondelle piatte 15 e 4 dadi 18...

Страница 35: ...iatta Step 1 Inserite il tubo d acciaio della parte inferiore dell asta di supporto della caviglia 8 nel foro che si trova sull asta di regolazione dell altezza 6 tenendo presente che la lunghezza dev...

Страница 36: ...tto assicuratevi di avere a portata di mano le seguenti Struttura montata nel precedente STEP 3 N 9 Poggiapiedi 2 x N 14 Bullone esagonale 2 x N 18 Dado autobloccante 4 x N 15 Rondella piatta Step uni...

Страница 37: ...Parte assemblata nello Step 2 Parte assemblata nello Step 4 Step unico Rimuovete i perni di sicurezza che avete montato nella fase 2 21 poi tirate verso di voi il bullone a pressione 22 e tenetelo fer...

Страница 38: ...Parte assemblata nello Step 5 2 x N 10 Maniglia di destra e sinistra 4 x N 14 Bullone esagonale 8 x N 15 Rondella piatta 4 x N 18 Dado autobloccante Step 1 Usate i bulloni esagonali 14 le rondelle pi...

Страница 39: ...a fase consiste nel controllare che la panca sia stata montata correttamente e a questo scopo qui di seguito trovate due figure che illustrano i principali casi di assemblaggio improprio come il monta...

Страница 40: ...10 cm in meno rispetto alla vostra statura sulla barra di regolazione dell altezza 6 mentre se siete di corporatura corpulenta potreste aver bisogno di regolarla ad un altezza superiore 1 Inclinatevi...

Страница 41: ...in grado di fermare la panca incrociando le braccia sul petto per potervi rilassare in posizione orizzontale Continuate ad alzare il braccio o entrambe le braccia per completare l inversione preparand...

Страница 42: ...accia per ritornare in posizione verticale NOTA BENE non staccate mai la schiena dallo schienale altrimenti l inversione potrebbe essere troppo brusca Avrete eseguito un inversione complete se il corp...

Страница 43: ...del piede Se dopo averlo fissato il blocco caviglia vi sembra troppo stretto o troppo lento regolatelo di conseguenza Tenete presente che meno il corpo soggetto a spostamenti e meglio Fissaggio corret...

Страница 44: ...pulizia e manutenzione secondo le indicazioni riportate in questo manuale Danni causati da cadute traumi ed impatti di altro genere durante il trasporto Normale usura e logorio dovuti all utilizzo del...

Страница 45: ...ses et naus es veuillez cesser imm diatement vos exercices Si vous devez poursuivre le programme d exercices consultez d abord votre m decin 4 Assurez vous que les enfants et les animaux domestiques n...

Страница 46: ...che et droit 1 11 Rouleau en mousse de polystyr ne 4 12 Support en Z 2 13 Appui t te 1 N Description Illustr ation Specifications Qty N Description Illustrat ion Specificat ions Qty 14 Boulon hexagona...

Страница 47: ...r la barre de verrouillage avant 3 et le support avant 1 Deuxi me tape Ouvrir ou d plier les supports de pieds de la table d inversion 1 et 2 jusqu ce qu ils forment un angle droit puis les fixer avec...

Страница 48: ...onter l appui t te 13 sur le dossier 5 l aide des deux vis cruciformes 20 Deuxi me tape Utiliser les 4 boulons hexagonaux 16 les 8 rondelles plates 15 les 4 crous 18 pour assembler la plaque m talliqu...

Страница 49: ...e N 17 Ecrou anti d tachement N 19 Rondelle plate Premi re tape Ins rez le tube d acier dans le tube inf rieur ajustable pour cheville 8 Dans le trou du support de r glage de la hauteur 6 la longueur...

Страница 50: ...r les pi ces suivantes pour cette tape Pi ce assembl e l tape 3 N 9 Repose pieds 2 x N 14 Boulon hexagonal 2 x N 18 Ecrou anti d tachement 4 x N 15 Rondelle plate Une seule tape R gler le repose pieds...

Страница 51: ...ntes pour cette tape Pi ce assembl e l tape 2 Pi ce assembl e l tape 4 Une seule tape Retirer la goupille de s curit 21 laiss e en place l tape 2 puis tirer le boulon de traction 22 et le maintenir to...

Страница 52: ...stration Deuxi me tape Pendant l utilisation apr s avoir tenu les pieds ins rez la goupille de s curit 21 dans le trou du disque dent rotatif pour assurer le maintien des pieds TAPE 6 Dans cette tape...

Страница 53: ...tape nous allons v rifier que la table a t correctement mont e nous avons mis deux exemples d images ci dessous avec les erreurs d assemblage les plus courantes certaines pi ces indiqu es dans les ima...

Страница 54: ...plexit moyenne vous devriez normalement mettre 10 cm de moins de votre hauteur la barre de r glage de la hauteur 6 si vous tes de complexit corpulente vous devrez peut tre mettre plus de mesure que vo...

Страница 55: ...tre bras sur votre poitrine afin de pouvoir profiter d une position d tendue tant que la table est correctement quilibr e la bonne mesure Continuez l inversion en levant nouveau le bras ou les deux br...

Страница 56: ...ir la verticale pensez que vous devez d placer votre poids corporel vers l extr mit du pied pour pouvoir tourner donc fl chir vos genoux tout en d pla ant votre poids corporel vers l extr mit du pied...

Страница 57: ...ans quelle position placer le repose pied apr s avoir r gl le support de cheville il est trop serr ou trop rel ch r glez le pour le confort du corps Sachez que moins votre corps bouge lors de l invers...

Страница 58: ...sont pas effectu s Dommages dus des chutes des chocs ou des impacts L usure due une utilisation normale de l appareil est caus e Un quipement de travail non autoris est utilis Usage de la force manipu...

Страница 59: ...n Sie das Training sofort Wenn Sie den Trainingsplan fortsetzen m ssen wenden Sie sich zuerst an Ihren Arzt 4 Stellen Sie sicher dass Kinder und Haustiere von diesem Ger t ferngehalten werden Dieses G...

Страница 60: ...ze 4 12 St tze der Z Form 2 13 Kopfst tze 1 Nr Beschreibung Bild Spezifikationen Menge Nr Beschreibung Bild Spezifika tionen Nr 14 Sechskantschr aube M8x55 8 20 Gro e Kreuzschlitzschrau be M6x16 2 15...

Страница 61: ...kantschrauben 14 und Unterlegscheiben 15 den vorderen Riegel 3 und die vordere St tze 1 zusammenbauen Zweiter Schritt ffnen oder entfalten Sie die Beinst tzen des Inversionstisches 1 und 2 bis sie den...

Страница 62: ...lzen Erster Schritt Montieren Sie mit 2x Kreuzschlitzschrauben 20 die Kopfst tze 13 an der R ckenlehne 5 Zweiter Schritt Montieren Sie mit den 4 Sechskantschrauben 16 den 8 Unterlegscheiben 15 den 4 M...

Страница 63: ...ibe Erster Schritt Setzen Sie das Stahlrohr in das untere verstellbare Kn chelhalterohr 8 ein In der Bohrung des H henverstellrahmens 6 sollte die L nge auf beiden Seiten gleich sein Verwenden Sie die...

Страница 64: ...s Sie die folgenden Teile f r diesen Schritt greifen Zusammengesetztes Teil in Schritt 3 Nr 9 Fu rastenplatte 2 x Nr 14 Sechskantschraube 2 x Nr 18 Anti Release Mutter 4 x Nr 15 Unterlegscheibe Einstu...

Страница 65: ...fen Zusammengesetztes Teil in Schritt 2 Zusammengesetztes Teil in Schritt 4 Einstufig Nehmen Sie die in Schritt 2 belassene Sicherheitsnadel 21 heraus ziehen Sie den Spannbolzen 22 und halten Sie ihn...

Страница 66: ...ztes Teil in Schritt 5 2 x Nr 10 Linker und rechter Lenker 4 x Nr 14 Sechskantschraube 8 x Nr 15 Unterlegscheibe 4 x Nr 18 Anti Release Mutter Erster Schritt Montieren Sie mit den Sechskantschrauben 1...

Страница 67: ...fen ob der Tisch ordnungsgem zusammengebaut wurde Wir haben unten zwei Beispielbilder mit den h ufigsten Fehlern beim Zusammenbau einige in den Bildern angegebene Teile k nnen versehentlich verkehrt...

Страница 68: ...ichen Wenn Sie von mittlerem Aufbau sind sollten Sie normalerweise 10 cm weniger Ihrer H he auf die h henverstellbare Stange legen 6 wenn Sie von korpulentem Aufbau sind m ssen Sie m glicherweise mehr...

Страница 69: ...halten damit Sie eine entspannte Position einnehmen k nnen solange der Tisch im richtigen Ma korrekt ausbalanciert ist Fahren Sie mit der Inversion fort indem Sie Ihren Arm erneut anheben oder beide A...

Страница 70: ...ehen denken Sie dass Sie Ihr K rpergewicht in Richtung Fu ende verlagern m ssen um sich drehen zu k nnen Beugen Sie daher die Knie w hrend Sie Ihr K rpergewicht in Richtung Fu ende verlagern Verlassen...

Страница 71: ...erden soll Nachdem Sie den Kn chelkomfortknopf eingestellt haben ist er zu eng oder zu locker Stellen Sie ihn so ein dass er bequem ist Denken Sie je weniger sich Ihr K rper beim Umkehren bewegt desto...

Страница 72: ...s und Reinigungsarbeiten nicht durchgef hrt Sch den durch Herunterfallen St e oder Schl ge Verschlei durch normale Benutzung des Ger tes Es werden nicht autorisierte Arbeitsmittel verwendet Gewaltanwe...

Отзывы: