HTTPS://WWW.ELECTROPOLIS.ES
17
English
STEP 1:
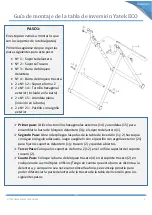
In this step we are going to assemble
the table supports (legs).
First make sure to grab the following
parts for this step:
•
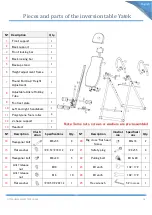
Nº 1
–
Front support
•
Nº 2
–
Back support
•
Nº 3
–
Front locking bar
•
Nº 4
–
Back locking bar
•
2 x Nº 12
–
Z shape support
•
2 x Nº 14
–
Hexagonal bolt
(included in the bar)
•
2 x Nº 15
–
Flat washer
(included in the bar)
•
2 x Nº 21
–
Safety pin
Inversion Table Assembly Instructions Yatek ECO
➢
First step:
Use the hexagonal bolts (14) and washers (15) to assemble the front
locking bar (3) and the front support (1).
➢
Second step:
Open or unfold the inversion table leg supports (1 and 2) until they get
the right angle, then secure it with safety pin (21) to fix the front (1) and back (2)
supports and remain open.
➢
Third step:
Place the Z shape supports (12) in the upper hole of the rear support (2).
➢
Fourth step:
Place the back locking bar (4) in the rear support (2) in any of the
multiple holes (Keep in mind that this bar is different from the front one, and
although it is not necessary to place it now, it is advised to place it to differentiate
the front part from the rear part of the inversion table for the following steps

