background image

RULES FOR SAFE OPERATION

3

1741078

General Information

This instruction book is written for a person with some mechanical ability.
Like most service books, not all the steps are described. Steps on how to
loosen or tighten fasteners are steps anyone can follow with some
mechanical ability. Read and follow these instructions before you use the
unit.

Know your product:

 If you understand the unit and how the unit

operates, you will get the best performance. As you read this manual,
compare the illustrations to the unit. Learn the location and the function of
the controls. To help prevent an accident, follow the operating instructions
and the safety rules. Keep this manual for future reference.

IMPORTANT:

 Many units are not assembled and are sold in cartons. It is

the responsibility of the owner to make sure the assembly instructions in
this manual are exactly followed. Other units are purchased in an
assembled condition. On assembled units, it is the responsibility of the
owner to make sure the unit is correctly assembled. The owner must
carefully check the unit according to the instructions in this manual before
it is first used.

This manual contains safety information to make you
aware of the hazards and risks associated with snow

throwers, and how to avoid them.  The snow thrower is designed and
intended for removal of snow, and should not be used for any other
purpose. It is important that you read and understand these
instructions, and anyone operating the equipment read and
understand these instructions.

The engine exhaust from this product contains chemicals known to the
State of California to cause cancer, birth defects, or other reproductive
harm.

WARNING

A signal word (DANGER, WARNING, or CAUTION) is used with the alert
symbol to indicate the likelihood and the potential severity of injury. In
addition, a hazard symbol may be used to represent the type of hazard.

DANGER

 indicates a hazard which, if not avoided, 

will result in

death or serious injury.

WARNING

 indicates a hazard which, if not avoided, 

could result

in death or serious injury.

CAUTION

 indicates a hazard which, if not avoided, 

might result

in minor or moderate injury.
CAUTION

, when used 

without

 the alert symbol, indicates a

situation that 

could result in damage to the equipment.

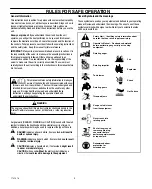
Hazard Symbols and the meanings

These symbols are used on your equipment and defined in your operating
manual. Review and understand the meanings. The use of one of these
symbols combined with a signal word will alert you to potential hazards
and how to avoid them.

Explosion

Toxic fumes

Shock

Hot Surface

Fire

Operator’s Manual 

 Read and understand

before performing any activity or running

equipment.

Safety Alert 

 Identifies safety information about

hazards that can result in personal injury.

Rotating auger

Rotating impeller

Rotating gears

Thrown objects

Keep a safe distance
from the equipment.

Shut off engine and

remove spark plug

connector before

performing maintenance

or repair work.

Never reach into

rotating parts.

Recommended ear

protection for

extended use.

Содержание 6331790-43 Series

Страница 1: ...mation on SAFETY ASSEMBLY OPERATION AND MAINTENANCE Lisez et conservez ce manuel pour r f rence Ce manuel contient des informations importantes concernant la SECURITE LE MONTAGE L UTILISATION ET L ENT...

Страница 2: ...ip e d un moteur combustion interne et ne doit pas tre utilis e sur un terrain forestier buissonnant ou herbeux non pr par moins que le dispositif d chappement soit pourvu d un pare tincelles conforme...

Страница 3: ...understand these instructions and anyone operating the equipment read and understand these instructions The engine exhaust from this product contains chemicals known to the State of California to cau...

Страница 4: ...g far away from front of snow thrower and auger Scarves mittens dangling drawstrings loose clothes and pants can quickly become caught in the rotating device and dismemberment will occur Tie up long h...

Страница 5: ...ster before using equipment on forest covered grass covered brush covered unimproved land The state of California requires this Section 4442 of the California Public Resources Code Other states may ha...

Страница 6: ...elds during operation or while performing an adjustment or repair to protect eyes from foreign objects that may be thrown from the machine Operation 1 Do not put hands or feet near or under rotating p...

Страница 7: ...dryers Allow the engine to cool before storing in any enclosure 3 Always refer to operator s manual for important details if the snowthrower is to be stored for an extended period 4 Maintain or repla...

Страница 8: ...NGINE 18 CHECK THE OIL 18 FILL GAS 18 TO STOP ENGINE 19 TO START ENGINE 19 HOW TO CLEAR A CLOGGED DISCHARGE CHUT 21 E HOW TO USE THE CLEAN OUT TOOL 21 OPERATING TIPS 22 SERVICE RECOMMENDATIONS 23 CUST...

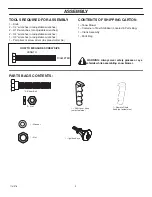
Страница 9: ...or screw driver to spread cotter pin HOW TO MEASURE SCREW SIZE LENGTH DIAMETER CONTENTS OF SHIPPING CARTON 1 Snow Blower 1 Container of Fuel Stabilizer Located in Parts Bag 1 Crank Assembly 1 Parts Ba...

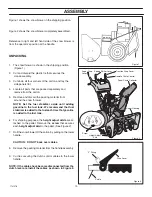
Страница 10: ...l adding gasoline to the fuel tank We recommend that fuel stabilizer is added to the fuel each time that gasoline is added to the fuel tank 6 For shipping purposes the height adjust skids are at tache...

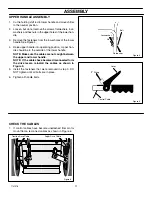
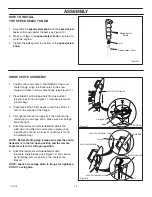
Страница 11: ...to the outside of the lower handle NOTE Make sure the cables are not caught between the upper and lower handle NOTE If the cables have become disconnected form the drive levers reinstall the cables as...

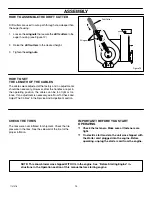
Страница 12: ...ers to discon nect the ball joint from the shift yoke assembly To lengthen or shorten the speed control rod turn the adapter to obtain the correct length 4 Make sure the speed select lever functions c...

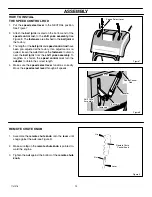
Страница 13: ...on the outside of the flange 4 First tighten the rear carriage bolt then tighten the remaining two carriage bolts Make sure all carriage bolts are tight 6 Attach the remote snow chute deflector cable...

Страница 14: ...e cables can be too tight or too loose If an adjustment is necessary see How To Check And Adjust The Cables in the Service And Adjustment section CHECK THE TIRES The tires were over inflated for shipm...

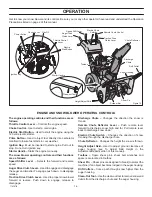
Страница 15: ...s the engine manually The snow blower operating controls and their functions are as follows Speed Shifter Lever Selects the forward and reverse speed Auger Drive Clutch Lever Used to engage and diseng...

Страница 16: ...nd As the snow thrower starts to move forward push the shift lever to the desired speed Maintain a firm hold on the handles and guide the snow thrower along the clearing path Do not attempt to push th...

Страница 17: ...ckout pin in the locked position For ease of maneuverability disconnect the lockout pin as follows 1 Pull the knob out to disengage the lockout pin 2 To lock in the disengaged position turn the knob 1...

Страница 18: ...ded to the fuel each time that gasoline is added to the fuel tank NOTE Winter grade gasoline has higher volatility to improve starting Be certain container is clean and free from rust or other foreign...

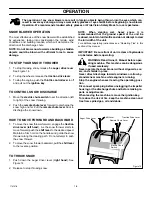
Страница 19: ...Note Do not use the choke to start a warm engine 6 Push the primer button C two times Note Do not use the primer to start a warm engine WARNING Rapid retraction of the starter cord kickback will pull...

Страница 20: ...After you start the engine first disconnect the extension cord from the wall receptacle and then from the power cord receptacle B CAUTION To extend the life of the starter use short starting cycles fi...

Страница 21: ...he snow thrower Never allow adults to operate the snow blower with out proper instruction S Keep the area of operation clear of all persons partic ularly small children and pets S Never leave the snow...

Страница 22: ...cleaning efficiency 6 On gravel or crushed rock surfaces the skids should be set at 1 1 4 inch 32 mm below the scraper bar see To Adjust Skid Height in the Adjustment Repair section in this manual Ro...

Страница 23: ...ceive full value from the warranty operator must maintain snow blower as instructed in this manual The following Ser vice Recommendations is supplied to assist operator to properly maintain snow blow...

Страница 24: ...briplate GR132 Grease or equivalent Maximum 3 1 4 ounces 92 grams should be used Remove filler plug D Figure 24 and Figure 25 once a year If grease is visible do not add If grease is not visible use a...

Страница 25: ...VISCOSITY GRADES 5W30 synthetic 0W30 FULL Oil Fill Cap Dipstick Figure 26 NOTE Oil level must be at FULL mark Oil Drain Plug Figure 27 The gross power rating for individual gas engine models is labele...

Страница 26: ...er bar TO ADJUST SKID HEIGHT This snow blower is equipped with two height adjust skids secured to the outside of the auger housing These elevate the front of the snow blower When removing snow from a...

Страница 27: ...sure that the primer button hose and the ignition wire are connected 6 Mount the snow hood to the engine and secure with the four mounting screws see Figure 31 7 Align the tab on the choke control kn...

Страница 28: ...ley The belt should de flect about 1 2 inch 12 5 mm with moderate pressure Figure 34 You may have to move idler pulley more than once to obtain the correct tension 7 Reinstall belt cover 8 Attach the...

Страница 29: ...auger idler pulley towards belt about 1 8 inch 3 mm see Figure 39 4 Tighten nut 5 Have someone engage auger drive clutch Check ten sion on belt opposite idler pulley Belt should deflect about 1 2 inc...

Страница 30: ...removal of the belt see Figure 38 9 Remove the old auger drive belt from the auger drive pulley Replace the auger drive belt with an original factory replacement belt available from an authorized serv...

Страница 31: ...ten the nut on the pulley 5 Remove the old traction drive belt from the smaller stack pulley Then remove the stack pulley and old traction drive belt Replace the traction drive belt with an original e...

Страница 32: ...ire Figure 40 Belt Guide 1 8 Inch 3 175 mm Auger Idler Pulley Engaged TRACTION DRIVE BELT GUIDE ADJUSTMENT 1 Remove spark plug wire 2 Have someone engage the traction drive 3 Measure the distance betw...

Страница 33: ...g to hole in clutch lever 2 The center of the Z fitting should be between the centre and top of the hole in the clutch lever Adjust either the auger drive cable or the traction drive cable as follows...

Страница 34: ...SPARK PLUG ADJUSTMENT NOTICE This spark ignition system meets all requirements of the Canadian Interference Causing Equipment Regulations Check the spark plug every twenty five 25 hours Replace the s...

Страница 35: ...r with fresh gasoline in a separate container and add some to the tank ALWAYS FOLLOW INSTRUCTIONS ON STABILIZER CONTAINER THEN RUN ENGINE AT LEAST 10 MINUTES AFTER STABILIZER IS ADDED TO ALLOW MIXTURE...

Страница 36: ...to Drive Belt Replacement in Adjustments Repairs section of this manual Incorrect adjustment of traction drive cable Adjust traction drive cable Refer to Cable Adjustment in Adjustments Repairs secti...

Страница 37: ...NOTES 37 1741078...

Страница 38: ...NOTES 38 1741078...

Страница 39: ...tructions et que toute personne qui doit faire fonctionner l quipement lise et comprenne ces instructions Les gaz chappement du moteur de cette machine contiennent des produits chimiques identifi s pa...

Страница 40: ...a r gion de fonctionnement Les enfants sont souvent attir s par l quipement Soyez conscient de toutes les personnes pr sentes Maintenir les v tements bouffants bonne distance de l avant de la souffleu...

Страница 41: ...s d marrer ou faire fonctionner un moteur dans un endroit ferm m me si les portes ou les fen tres sont ouvertes AVERTISSEMENT Laisser le pot d chappement le cylindre du moteur et les ailettes refroidi...

Страница 42: ...de commencer d blayer la neige 9 Toujours porter des lunettes de s curit ou des protecteurs oculaires en utilisant la machine ou en effectuant un r glage ou une r paration et ce afin de prot ger les y...

Страница 43: ...pr sentes telles que chauffe eau radiateur ou s che linge Laisser le moteur refroidir avant de le remiser dans un endroit clos 3 Toujours consulter le manuel d utilisation quant aux instructions impo...

Страница 44: ...bles pr sents proximit Une explosion ou un incendie peut survenir AVERTISSEMENT AVANT D EFFECTUER DES R GLAGES OU DES R PARATIONS D brancher le fil de la bougie et le maintenir hors de port e de la bo...

Страница 45: ...ression de gonflage des pneus RESPONSABILIT S DU CLIENT Lire et observer les r gles de s curit Respecter le calendrier d entretien r gulier Suivre les instructions donn es au chapitre Respon sabilit s...

Страница 46: ...V RIFICATION DE L HUILE 56 REMPLIR D ESSENCE 56 ARR DU MOTEUR 57 MISE EN MARCHE DU MOTEUR 57 D MARRAGE DU MOTEUR 58 D MARREUR GEL 59 NETTOYAGE D UNE GOULOTTE D JECTION ENGORG E 60 60 E G A Y O T T E...

Страница 47: ...les goupil les fendues COMMENT MESURER LES VIS Longueur Diam tre CARTON D EXPEDITION 1 chasse neige 1 R cipient de stabilisateur Situ dans le sac de pi ces 1 Ensemble de d versoir 1 Manivelle 1 Sac de...

Страница 48: ...dant de faire le plein Nous recommandons d ajouter du stabilisateur au carburant chaque remplissage 6 Pour faciliter le transport les patins de r glage de la hauteur sont fix s sur la palette Retirer...

Страница 49: ...gn e sup rieure devrait tre l ext rieur de la poign e inf rieure REMARQUE s assurer que les c bles ne se prennent pas entre la poign e inf rieure et la poign e sup rieure REMARQUE Si les c bles se son...

Страница 50: ...le de commande de vi tesse faire pivoter l adaptateur pour obtenir la longueur correcte 4 Veiller ce que le levier du s lecteur de vitesses fonc tionne correctement Mouvoir le levier du s lecteur de v...

Страница 51: ...5 16 18 sur l ext rieur de la bride 4 Commencer par serrer le boulon de carrosserie arri re puis serrer les deux autres boulons de carrosserie S assurer de bien serrer tous les boulons de carrosserie...

Страница 52: ...us ou trop l ches Dans le cas o un r glage s av re n cessaire consulter la rubrique V rification et r glage des c bles dans la section R glages R parations INSPECTION DES PNEUS Les pneus ont t surgonf...

Страница 53: ...ont expliqu es ci dessous Levier de changement de vitesses Pour la s lection des vitesses de marche avant et arri re Levier d embrayage de la vis sans fin Ce levier sert embrayer et d brayer la vis sa...

Страница 54: ...a vitesse d s ir e Maintenir une prise ferme sur les poign es et guider le chasse neige sur la bande d blayer Ne pas essayer de pousser le chasse neige 2 Pour d placer le chasse neige vers l arri re T...

Страница 55: ...ill e Pour assurer la facilit de manoeuvre d connecter la goupille de verrouillage comme suit 1 Tirer le bouton pour d sengager la goupille de verrouil lage 2 Pour engager la goupille tourner le bouto...

Страница 56: ...ssence nou velle formule d un minimum de 85 octane et ajouter un stabilisateur de carburant suivre les instructions pr sen tes sur l emballage du stabilisateur Nous recomman dons d ajouter du stabilis...

Страница 57: ...trique pouvant causer des blessures l utili sateur Suivez attentivement toutes les instructions ci dessous V rifiez que votre domicile est bien quip d un syst me d alimentation lectrique trifilaire re...

Страница 58: ...oid REMARQUE Ne pas utiliser le starter pour faire d marrer un moteur chaud 6 Appuyer sur le bouton d amorceur C deux reprises REMARQUE Ne pas utiliser l amorceur pour faire d marrer un moteur chaud F...

Страница 59: ...yer toute la neige et l humidi t du levier de couvercle du carburateur proximit du le vier de commande Man uvrer galement les leviers sur toute leur course plusieurs fois AVERTISSEMENT Ne jamais faire...

Страница 60: ...tre r duite Le moteur est pr vu pour fonctionner au mieux plein r gime et doit toujours tre maintenu au r gime maximum 2 Les meilleurs r sultats s obtiennent lorsque le travail s effectue imm diatemen...

Страница 61: ...bus ou qui ont t n glig es Pour b n ficier de la garantie I utilisateur doit entretenir son chas se neige selon les directives de ce manuel Le Calendrier d entretien suivant est destin aider l utilisa...

Страница 62: ...2 g D poser le bouchon de remplissage D Figure 25 Figure 24 une fois par an Si la graisse est visible ne pas en ajouter Si la graisse n est pas visible faire p n trer un morceau de fil de fer dans le...

Страница 63: ...0 5W30 S A E 0 F 18 C et dessus F 20 0 20 32 40 C 30 20 10 0 10 NIVEAUX DE VISCOSIT SAE de synth se 0W30 5W30 syntheses 0W30 PLEIN REMARQUE le niveau d huile doit se trouver au rep re FULL plein Bouch...

Страница 64: ...u s de chaque c t du bo tier de la vis sans fin Ces patins permettent de r gler la hauteur du bo tier Lorsque le travail s effectue sur une surface dure comme une all e pav e par exemple r gler les pa...

Страница 65: ...rce le fil d allumage sont bien attach s 6 Monter le carter neige sur le moteur et attacher l aide des quatre vis de fixation voir Figure 31 7 Aligner la patte du bouton de commande du starter avec le...

Страница 66: ...chir d envi ron 1 2 po 12 5 mm avec pression mod r e Figure 34 Il peut tre n cessaire de d placer la poulie libre plusieurs reprises pour obtenir la bonne tension 7 Remonter le carter de la courroie 8...

Страница 67: ...poulie d environ 1 8 po 3 mm en direction de la courroie voir la Figure 39 4 Resserrer l crou 5 Demander un assistant d engager la commande de la fraise du chasse neige V rifier la tension de la courr...

Страница 68: ...de la poulie d entra nement de la fraise Remplacer la courroie d entra nement de la fraise par une courroie d origine disponible dans votre centre de maintenance agr le plus proche 10 Monter la nouve...

Страница 69: ...poulie 5 Retirer la courroie d entra nement des roues usag e de la double poulie de plus petit diam tre Puis retirer la double poulie et la courroie d entra nement des roues usag e Remplacer la courr...

Страница 70: ...oulie de tension de la courroie de vis sans fin 1 8 po 3 175 mm R GLAGE DU GUIDE DE COURROIE D ENTRA NEMENT DES ROUES 1 D brancher le fil de la bougie 2 Demander un assistant d engager l entra nemnt d...

Страница 71: ...u du levier d embrayage Pour r gler le c ble de commande des lames chasse neige ou le c ble de com mande de la traction proc der comme suit R glage du c ble de commande des lames ATTENTION Vidanger le...

Страница 72: ...cisaillement crou de blocage R GLAGE DE LA BOUGIE REMARQUE Ce syst me d allumage bougie est conforme toutes les exigences des r glementations du Canada en mati re de mat riel brouilleur Check the spar...

Страница 73: ...rser une petite quantit du m lange dans le r servoir TOUJOURS RESPECTER LES DIRECTIVES QUI FIGURENT SUR LE BIDON DE STABILISATEUR FAIRE ENSUITE TOURNER LE MOTEUR PENDANT AU MOINS 10 MINUTES POUR PERME...

Страница 74: ...Se reporter au paragraphe Remplacement des courroies du chapitre R glages R parations de ce manuel Mauvais r glage du c ble de commande des roues R gler le c ble de commande de roues Se reporter la ru...

Отзывы: