


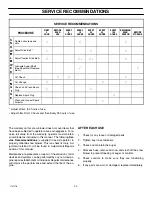

ASSEMBLY
13
1741078
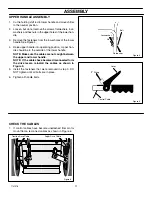
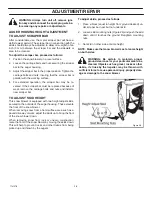
HOW TO INSTALL
THE SPEED SELECT KNOB
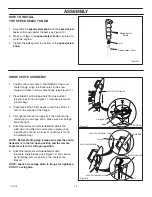
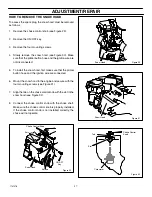
1. Assemble the
speed select knob
onto the
speed select
lever
until snug against the
nut
(see Figure 10).
2. Make sure
lip
on the
speed select knob
is pointed to-
ward the engine.
3. Tighten the
nut
against the bottom of the
speed select
knob.
Figure 10
Speed Select Lever
Speed Select
Knob
Nut
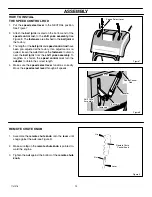
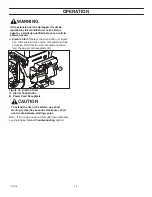
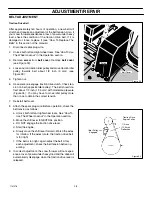
SNOW CHUTE ASSEMBLY
1. Position the snow chute to the INSIDE of the snow
chute flange. Align the three holes in the snow
chute with holes in snow chute flange (see Figure 11).
2. Place three 5/16-18 carriage bolts from the inside of
the chute as shown in figure 11 (hardware is found
in parts bag).
3. Place three 5/16-18 flat washers and three 5/16-18
nuts on the outside of the flange.
4. First tighten the rear carriage bolt, then tighten the
remaining two carriage bolts. Make sure all carriage
bolts are tight.
6. Attach the remote snow chute deflector cable
the cable chute bracket (see Figure 12) and secure
by tightening nuts (on cable) to the cable chute
bracket.
5. Attach the remote snow chute deflector cable to the
weld stud (on deflector) and secure in place using
a pushnut as shown in Figure 12 (pushnut is found
in hardware bag).
.
NOTE: check all carriage bolts in flange for tightness.
DO NOT overtighten.
Figure 11
Figure 12
Snow Chute Deflector
Snow Chute Extension
Flange
Carriage Bolt
Flat Washer
Nut
Snow Chute Deflector Cable
Pushnut
Weld Stud
Snow Chute Deflector Cable
Cable Chute Bracket
Nuts
NOTE: Before starting step 6 make sure that the chute
deflector is in the full open position and the remote
chute lever is in the full open position.
Содержание 6331790-43 Series
Страница 37: ...NOTES 37 1741078...
Страница 38: ...NOTES 38 1741078...


