background image

 3 ENGINE 

3 ENGINE 

EF494T TM 06/2011 edition


98 


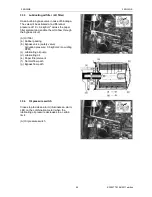
(17)  To aid in reassembly, make reference marks 

on the fuel injection pump drive gear, and 
on either the gear case cover or idler gear. 


CAUTION 

After marking the position of the pump drive gear, 
do not rotate the engine crankshaft. Rotating the 
crankshaft will cause the fuel injection pump to 
become misaligned.  


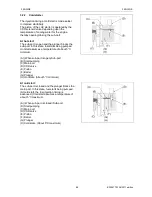
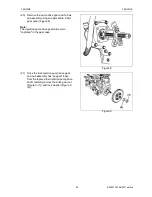
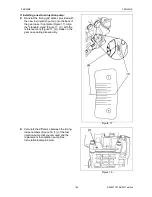
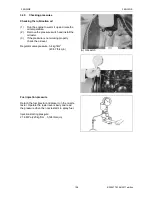
The idler gear is not visible. Make a reference 
mark on the fuel injection pump drive gear 
(Figure 6, (1)) and a matching mark on the bore 
of the gear case opening (Figure 6, (2)). 


CAUTION 

Do not loosen or remove the 4 bolts retaining the 
fuel injection pump drive gear to the fuel injection 
pump hub. Do not disassemble the fuel injection 
pump drive gear from the hub. Correct fuel 
injection timing will be very difficult or impossible 
to achieve.  


Figure 6 

 
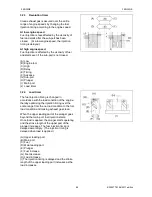
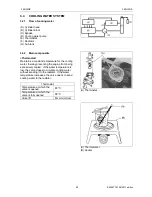
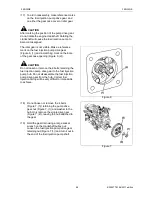
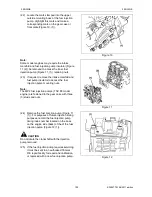
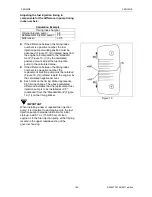
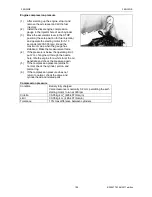
(18)  Do not loosen or remove the 4 bolts 

(Figure 7, (3)) retaining the pump drive 
gear nut (Figure 7, (1)) and washer to the 
hub. Only remove the single drive gear 
(Figure 7, (2)), leaving the hub attached to 
the gear. 

 
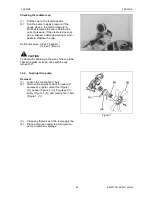
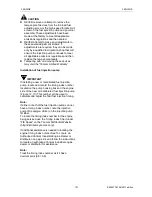
(19)  Hold the gear train using a large socket 

wrench on the crankshaft pulley nut. 
Loosen the fuel injection pump drive gear 
retaining nut (Figure 7 (1)) and turn it out to 
the end of the fuel injection pump shaft. 


Figure 7 


Содержание EF-494T

Страница 1: ...EF494T TM 06 2011 edition ...

Страница 2: ... NG G G Never attempt to operate or service this machine until you have first read and understood all of the applicable Safety Instructions that are set forth in this Manual The failure to comply with all relevant Safety Instructions could result in bodily injury ...

Страница 3: ...SPECIFICATION 4 11 12 12 14 16 17 18 20 21 21 1 PERIODICAL INSPECTION 22 1 1 CHECK INTERVALS 1 2 OIL AND GREASE 1 3 OIL AND WATER VOLUME 1 4 EQUIVALENT TO TF 500 1 5 REPLACING OIL 1 6 REPLACING FILTER ELEMENTS 1 7 REPLACING COOLING WATER 1 8 REMOVING WATER FROM WATER SEPARATOR 1 9 CLEANING AND REPLACING AIR CLEANER ELEMENT CLEANING RADIATOR SCREEN 1 10 CHECKING BATTERY 1 11 CHECKING HOSE AND PIPE ...

Страница 4: ...ing the clutch housing and transmission 2 6 3 Rear axle 2 6 4 PTO module 2 7 FRONT AXLE UNIT 42 42 42 43 43 43 43 45 47 47 53 53 53 55 59 60 61 3 ENGINE 64 3 1 FUEL SYSTEM 3 1 1 Flow of fuel and layout of components 3 1 2 Water separator 3 1 3 Fuel feed pump 3 1 4 Fuel filter 3 1 5 Fuel injection pump Type MP4 direct injection pump 3 1 6 Fuel injection nozzles 3 2 COMBUSTION SYSTEM 3 2 1 Low emiss...

Страница 5: ... 3 5 10 Cylinder block 3 5 11 Crankshaft 3 5 12 Thrust bearing 3 5 13 Piston 3 5 14 Piston rings 3 5 15 Connecting rod 3 5 16 Tappet 3 5 17 Lubricating oil pump Trochoid pump 3 5 18 Tightening torque tables 75 75 75 77 88 90 92 94 94 94 94 95 95 95 95 95 96 96 96 96 96 97 97 97 98 99 4 CLUTCH 100 4 1 STRUCTURE AND FUNCTIONS 4 1 1 Outline 4 2 DISASSEMBLY AND ASSEMBLY 4 2 1 Disassembly 4 2 2 Assembl...

Страница 6: ...ears and axle shaft 131 131 132 133 134 136 136 137 138 7 FRONT AXLE 139 7 1 STRUCTURE AND FUNCTIONS 7 2 CROSS SECTION VIEW 7 3 FRONT WHEEL ALIGNMENT 7 4 DISASSEMBLING THE FRONT BEARING CASE 7 5 DISASSEMBLING THE FRONT GEAR BOX 7 6 DISASSEMBLING AND ASSEMBLING THE FRONT DIFFERENTIAL SECTION 7 6 1 Disassembly 7 6 2 Assembly 140 141 142 143 143 144 144 146 8 POWER STEERING 148 8 1 STRUCTURE AND FUNC...

Страница 7: ...mp trailer etc 9 3 2 For double action front blade etc 9 3 3 Hydraulic pressure flow 160 160 161 162 162 163 163 164 165 167 170 172 172 173 174 175 176 176 177 178 10 ELECTRIC EQUIPMENT 182 10 1 ENGINE START CIRCUIT 10 1 1 Location and operation of components 10 1 2 Circuit diagram 10 1 3 Checkpoints of electrical equipment 10 2 CHARGING CIRCUIT 10 2 1 Location and operation of components 10 2 2 ...

Страница 8: ...ONTENTS EF494T TM 06 2011 edition vi 11 APEENDIXES 206 11 1 HYDRAULIC CIRCUIT DIAGRAM 11 2 ELECTRICAL DIAGRAM AND PARTS 11 2 1 WIRING HARNESS 11 2 2 LOCATION OF ELECTRICAL PARTS 11 2 3 ELECTRICAL WIRING DIAGRAM 207 208 208 209 210 ...

Страница 9: ...s after we discontinue production of this machine The supply of maintenance parts will in principle terminate at the end of the supply period stated above However even after the supply period has terminated we still consult with you about the delivery time and the prices for parts still in stock if required IMPROVEMENTS To improve or upgrade the feature of the machine or for some other reason part...

Страница 10: ...not taken DANGER 2 WARNING indicates the hazard that would result in injury if proper precautions are not taken WARNING 3 CAUTION indicates the general precautions CAUTION 3 Service Instructions 1 This stop symbol indicates an important message about proper operation or service When you see this symbol read the message that follows carefully IMPORTANT 2 NOTE describes precautions to take while wor...

Страница 11: ...se issues you will damage the transmission case and create a dangerous situation Aluminum cases Reference The bolt length B in the case must be 2 0 times the diameter of A For casting metal cases rear axles etc The bolt length B in the case must be 1 5 times the diameter A D Transmission case Cast metal cases When you install part a behind the transmission case use bolts whose length includes meas...

Страница 12: ...ould be sufficient flat without holes at the service factory place to perform check and service work If not It may cause unexpected accidents such as falling down CAUTION CLEANED AND WELL ARRANGED PLACE Do not leave dust mud oil or any parts on the floor If not It may cause unexpected accidents CAUTION WELL AND SUFFICEINTLY LIGHTED PLACE A working place must have enough lighting Use a portable saf...

Страница 13: ... helmet safety goggles safety shoes a mask gloves and other protective items as appropriate Take particular precautions when generating metal debris when striking metal objects with a hammer or when cleaning components with compressed air Also make sure there are no persons near the machine If not Moving part may catch dust may get in eye heavy part may drop on foot etc It may cause serious injury...

Страница 14: ... TORQUE Be sure to tighten bolts and nuts with the specified torque in this manual If not Bolts or nuts may be loosen or drop It may cause breakdown of components and or injury WARNING AVOID SHORT CIRCUITING Be sure to disconnect the terminal of battery before servicing If not Short circuit may cause a fire WARNING CHARGING BATTERY Keep a battery away from the fire while charging Gas from battery ...

Страница 15: ...ning Smoking during refueling must be strictly prohibited Firmly tighten the caps on the fuel and oil tanks Store fuel and oil in a cool and well ventilated place where they are not subjected to direct sunlight Fuel and oil must be stored in a place which meets all applicable safety regulations Unauthorized persons should not be allowed entry DANGER PROVIDE ADEQUATE VENTILATION WHEN WORKING IN AN ...

Страница 16: ... cap to release the inner pressure before removing the cap WARNING BE CAREFUL OF HOT OIL UNDER HIGH PRESSURE Hydraulic fluid escaping under pressure can have sufficient force to penetrate the skin and do serious damage and that immediate medical assistance be sought The hydraulic system for the implement operates under high pressure When replenishing or draining hydraulic oil be sure to first reli...

Страница 17: ... radiator fan or fan belt with any object Contacting the rotating radiator fan or fan belt with any object can result in serious bodily injury CAUTION ALWAYS BE ENVIRONMENTALLY RESPONSIBLE Follow the guidelines of the governmental agency for the proper disposal of hazardous materials such as engine oil diesel fuel engine coolant and machine fluid grease NEVER dispose of hazardous materials irrespo...

Страница 18: ... on rim or rim parts Do not use damaged rims If rim is damaged replace it Do not replace rims with anything but a genuine or a part of proper size type and quality Always deflate tire before removing spikes or other objects from tire carcass If not Damaged rim may cause an explosion AFTER SERVICING THE MACHINE MAKE SURE TO a Retighten all removed fasteners bolts and nuts to specified torque b Rein...

Страница 19: ...sed your tractor total hours of operation Any other information about the problem that has occurred Availability of spare parts Maintenance parts and spare parts will be available for 10 years after the production of this tractor series has been discontinued However special parts will be available subject to consultation Yanmar may be able to supply a particular part after the normal supply period...

Страница 20: ...r meter The hour meter numerically indicates the operating hours of the tractor The indicated number is used to determine when to check the engine oil and other similar consumables The hour meter starts counting when the engine is started A Hour meter WARNING Prior to disassembly or reassembly disconnect battery cable A from the negative port B to prevent short circuit To separate the transmission...

Страница 21: ... sanp ring B Internal snap ring C Arrow indicates force direction To drive in a spring pin spring pin place the split part mating part in the direction that the force is loaded as the right figure shows Force in axial direction Force in rotating direction Once you remove a split pin replace the split pin with a new one and split it surely As for a thrust washer with grooves pay attention to the as...

Страница 22: ...o 3 5 mm Set a squeezing tool if available Do not level the applied liquid gasket with a finger or a spatula It may cause incomplete sealing 3 When the liquid gasket is supposed to be applied around a bolt hole apply it inner side of the mating surface 4 Assemble mating surfaces within 15 minutes after applying liquid gasket 5 Tighten all bolts lightly and tighten them further till specified tight...

Страница 23: ...hen use it 2 When the surface of squeezed out liquid gasket glitters it means the filler oil is separated and the gasket is deteriorated It sometimes is found the oil of liquid gasket is separated within the period of validity It is not deteriorated Normal gasket will be hardened in about 2 hours but the deteriorated gasket would not be hardened A When liquid gasket is deteriorated oil is separate...

Страница 24: ... 0 M10 24 50 34 36 2 5 3 5 44 59 4 5 6 0 M12 44 10 58 80 4 5 6 0 78 98 8 0 10 0 M14 68 80 83 30 7 0 8 5 118 147 12 0 15 0 M16 107 80 137 20 11 0 14 0 167 206 17 0 21 0 M18 156 80 186 20 16 0 19 0 235 284 24 0 29 0 M20 215 60 264 60 22 0 27 0 324 402 33 0 41 0 IMPORTANT The tightening torque of fine thread screws shall be 80 of that of the standard thread screws To tighten any aluminum part apply t...

Страница 25: ...uses are 60A slow blow fuses A Alternator fuse 60A B Main fuse 60A 2 The electrical fuses are in the engine compartment START Starter motor 5A WORK Working light 5A TURN Turn signal light 5A TAIL Tail light 5A HEAD Head light 15A HORN Horn 5A FUEL Fuel pump 5A ENG Timer relay 5A IND Indicator light 5A ...

Страница 26: ...Headlights 3 Side lens 4 Front axle bracket 5 Front tires 6 Steering wheel 7 Safety frame ROPS 8 Tail lamp 9 Fuel tank 10 Rear tire 11 Hydraulic stop slow return valve 12 Step 13 Operator s seat 14 Top link 15 Lower link 16 PTO shift lever 17 Flasher lamp Side marker lamps 18 Rear fender ...

Страница 27: ...utch pedal 4 Parking brake lever 5 Operator s seat adjusting lever 6 Range shift lever 7 Front wheel drive lever 8 Seat belt 9 Main switch 10 Accelerator lever 11 Main shift lever 12 Brake pedal 13 Accelerator pedal 14 Differential lock pedal 15 Position control lever 16 Hydraulic stop slow return valve 17 PTO shift lever ...

Страница 28: ... Thailand only 6 Label Tractor ID 7 Label Engine ID on the engine 8 Label Caution muffler 9 Label Safety cover 10 Label ROPS ID 11 Label ROPS safety 12 Label Seat belt 13 Label speed 14 Label PTO shaft lever 1 198283 65360 2 198283 65310 3 198283 65250 4 198163 65350 5 198283 65651 6 7 8 198163 65930 10 11 1A7680 65350 12 1A7680 65910 9 198163 65940 14 1A6150 93151 13 1A7781 65560 ...

Страница 29: ...m hr 1 7 29 7 Max speed forward km hr 30 8 Tire Front 8 18 6 Rear 13 6 26 8 Rear PTO Type Transmission PTO PTO shaft SAE1 3 8 inch 35mm 6 spline Speed rpm 568 769 at rated engine speed Hydraulic Type Position control Hitch 3 point hitch category SAE 1 Draw bar hitch Clevis type NOTE All technical data measurement and weight are approximate and the manufacturer has the right to make alteration with...

Страница 30: ...1 PERIODICAL INSPECTION 1 PERIODICAL INSPECTION EF494T TM 06 2011 edition 22 1 PERIODICAL INSPECTION ...

Страница 31: ... x x x x x x x x x x x Clean cooling fan radiator x x x x x x x x x x x x Battery liquid level Check before every work Battery liquid gravity x x x x x x Fuel piping connections x x x x x x x x x x x x Rubber hoses Power steering x x x x x x x x x x x x Radiator hoses Replace hoses every 2 years Hydraulic rubber hoses Replace hoses every 2 years Fuel pipe electric wires Replace pipes and wires eve...

Страница 32: ... 3 OIL AND WATER VOLUME Capacity liters Oil type Fuel 40 Diesel light oil Cooling Radiator 4 Anti rusting fluid water Sub tank 0 45 Anti rusting fluid Engine oil 5 3 YES EO SAE 30 or 40 API Grade CD or better Transmission oil 27 TF 500A Transmission fluid YES HO Front axle oil 7 5 TF 500A Transmission fluid YES HO SAE 90 1 4 EQUIVALENT TO TF 500 Supplier Brand name Mobil Mobil Fluid 425 424 Castro...

Страница 33: ...A Dipstick B Oil supply port NOTE Check the oil level before the engine starts or when the engine is cool Never check oil level immediately after engine stop Oil is in various places and it may show insufficient level Wait for more that 20 minutes after engine stop and check oil level A Dipstick a Upper limit b Lower limit c Specified level zone Replacing oil Remove remaining oil through the drain...

Страница 34: ...n case Removal is easy if the transmission case is warm Add the new oil through the supply port on the rear part Transmission oil is commonly used with hydraulic oil and power steering oil Use Yanmar transmission fluid TF 500 or equivalent for transmission oil A Drain plug Replace First 50 hrs then every 300 hrs Capacity 27 litters Type TF500 YES HO or equivalent Cleaning transmission oil strainer...

Страница 35: ...0A or equivalent for front axle oil A Center drain plug B Gear case R drain plug C Gear case L drain plug Replace First 50 hrs then every 300 hrs Capacity 7 5 litters Type TF500 YES HO or SAE 90 1 6 REPLACING FILTER ELEMENTS Engine oil element Replace engine oil element first 50 hours and then every 300 hours or every 2 3 times of replacing the engine oil Replacing 1 Remove engine oil and turn the...

Страница 36: ...t may cause trouble in the engine Fuel filter element Replace fuel filter every 300 hours Replacing 1 Close fuel cock on water separator 2 Remove the cartridge by turning anticlockwise 3 Apply a little oil on the rubber ring on the new cartridge Mount the cartridge by hand first and tight it with filter wrench 4 Open the cock and bleed the air from the fuel NOTE Use genuine element Otherwise FIE F...

Страница 37: ... of fluid When cooling water level becomes low add only fresh water A Radiator drain plug 1 8 REMOVING WATER FROM WATER SEPARATOR The water separator is mounted on the lower part of the fuel tank When the red O ring comes up put the fuel cock in the C position and detach the transparent case Then remove water Clean water separator every 300 hours and drain water every 50 hours If strainer was dama...

Страница 38: ...ove inner element B This element avoids from getting dust into engine while cleaning outer element A When the inner element B is broken or very dirty replace it It cannot be cleaned A Air cleaner Outer B Air cleaner Inner Cleaning air cleaner element 1 Open the bonnet 2 Remove the sub tank 3 Open the lid and take out the element A Never remove inner element B 4 Blow air from inside of the element ...

Страница 39: ...line If the level is lower than the lower limit add distilled water as high as the upper limit A Battery B Upper limit C Lower limit NOTE Excessive battery electrolyte may overflow during recharging damaging the metallic parts of the tractor Add distilled water only Adding battery electrolyte such dilute sulfuric acid may shorten the battery life Quick charge is not recommended When replacing the ...

Страница 40: ... 1 11 CHECKING HOSE AND PIPE CAUTION Aged or damaged hose or pipe causes leak Leak may cause fire if it is fuel If damaged replace it with new one Check the power steering pipes fuel pipes and radiator hoses for leak or loose couplings Replace them every 2 years A Radiator hose B Fuel pipe C Power steering pipes NOTE Bleed the air when a fuel pipe is replaced 1 12 CHECKING ELECTRICAL WIRING WARNIN...

Страница 41: ...ion at each point Grease up after a work on a muddy field As a general rule grease up various points at intervals of 50 hours A Brake pedal shaft B Clutch pedal C Tie rod end D Power steering rod end E Center pin front and rear F Lift link right NOTE Power steering rod ends are modified and no greasing is required from S N 000530 A A B C C D E F ...

Страница 42: ...e the front shaft cover D backward as the right picture shows A Band B Bolt C Collar D Front shaft cover 4 Turn over the rubber boots E as the right illustration shows 5 Slide the coupling F backward as the right illustration shows Be careful not to lose ball G 6 Apply enough multipurpose grease to six balls G 7 Turn back the rubber boots E to their original position 8 Fix the front shaft cover D ...

Страница 43: ... over the rubber boots E as the right illustration shows 4 Slide the coupling F frontward as the right illustration shows Be careful not to lose ball G 5 Apply enough multipurpose Grease to six balls G 6 Turn back rubber boots E to their original position 7 Fix the rear shaft cover H with bolt B and collar C Be sure to install the collar C If not the rear shaft cover may be broken in a short time ...

Страница 44: ...ided braking effect Keep the same amount of play otherwise an accident can result Depress the brake to see a required play of 30 40 mm is available and if the left and right pedals work together If not adjust the turnbuckles behind the pedals for a play of 30 mm Secure the turnbuckle with the lock nuts Make sure the parking brake lock is put on when the brake pedals are fully stepped in A Play 30 ...

Страница 45: ... play for the steering wheel It should be within a tolerable range Otherwise an accident may occur Turn the steering wheel slightly left and right to see if there is a play of 20 50 mm Improper play will fail to provide the smoothness and linearity of steering function If a play is not adequate contact your service representative A Play NOTE Steering free play is not adjustable due to hydrostatic ...

Страница 46: ... belt tension If the belt still slips after full shift of the alternator replace the belt with a new one Check the new belt at intervals of 50 hours A Alternator B Alternator fastening bolts C Fan belt 1 18 ADJUSTING TOW IN Poor adjustment of tow in will result in an abnormal steering performance Measure the front wheel dimension a and b The difference of a b should be 4 8 mm If out of this range ...

Страница 47: ...main fuse slow blow fuse which shuts off the electrical circuit when an excessive current flows Fused condition can be checked by the changed color of the outer sheath A Fuse box START Starter motor 5A WORK Working light 5A TURN Turn signal light 5A TAIL Tail light 5A HEAD Head light 15A HORN Horn 5A FUEL Fuel pump 5A ENG Timer relay 5A IND Indicator light 5A Slow Blow Fuse A Main fuse 60A B Alter...

Страница 48: ...ront loader Air pressure kg cm2 Front tire 2 4 34 lb sq in Rear tire 2 0 28 4 lb sq in Fastening torque Fixing bolts for wheel and axle shaft 186 N m 19 kgf m 137 lb ft Excessive Standard Insufficient 1 21 COLOR OF EXHAUST GAS The color of exhaust gas is black when the engine is started and gray during normal operation Black Incomplete combustion due to dense fuel White Engine oil is burning Norma...

Страница 49: ...2 DISASSEMBLY OF COMPONENTS 2 DISASSEMBLY OF COMPONENTS EF494T TM 06 2011 edition 41 2 DISASSEMBLY OF COMPONENTS ...

Страница 50: ...he bonnet 2 Put the locking knobs in the vertical position each forward and rear 3 Remove the side covers Mounting 1 Clamp the cover lower hooks x 2 2 Fix the cover top with the locking knob 2 1 2 Removing the engine bonnet cover Remove the 3 bolts A and the pin B and remove the engine bonnet cover CAUTION This work should be done by 2 people If you work alone you may be injured ...

Страница 51: ...2 Removing the nuts and bolts that fixing the fender Note Be careful not to lose the rubber washers A or the collars B The fender can be removed without removing the rear tire 2 3 REMOVING THE STEP 1 Remove the 2 screws A the three M6x20 bolts B and pull the front column cover D Then disconnect key switch coupler 2 Remove the four M6x20 bolts A and remove the cover B Note Be careful not to lose th...

Страница 52: ...ove the left floor following the same sequence of right side floor 4 Remove the three M8x20 bolts A and remove the right floor stay IMPORTANT The entire parking brake assembly can be removed Remember the relative positions of the various parts 5 Remove the two M8x20 bolts A that fix oil filter the four M8x20 bolts B and then remove left floor stay ...

Страница 53: ...edition 45 2 4 REMOVING THE SEAT STAY Note It is necessary to remove the fuel tank 1 Remove the seat lever knobs A and housing cover B M6x16 8 pieces B 2 Remove fender Refer 2 2 REMOVING THE FENDER 3 Drain the fuel from the fuel tank Fuel can be drained easily from section A ...

Страница 54: ... rubber packing A is used when installing the fuel tank Be sure to reinstall it when reassembling the tractor 5 Slide the fuel tank upward to remove it After removing the tank 6 Remove the differential gear lock pedal return spring A from the seat stay transmission breather B and then the piping and wiring clamps C and D 7 Remove the four M8x16 bolts E and the two M8x25 bolts on the back of the se...

Страница 55: ...e the M8x12 bolts B front and rear that fixing propeller shaft cover Loosen clam of rubber boots on the center of shaft cover and slide front cover rearward 3 Remove the 4 0x40 cotter pin A Move propeller shaft coupling B rearward and remove propeller shaft with covers WARNING Since the propeller shaft is heavy Be careful so that you are not injured if the shaft falls when removing it B IMPORTANT ...

Страница 56: ...nder clutch housing 5 Remove the following parts from the upper part of the engine A Water temperature meter wire B Engine speed and revolution cable 6 Disconnect the battery cable from the negative terminal to prevent short circuit A Battery cable B Battery terminal negative 7 Remove the following parts from the right side of the machine A Wire clamps B Power steering cylinder pipes C Fuel hose D...

Страница 57: ... Remove the front column cover A and the dashboard cover B 10 Remove bonnet stay fixing bolt A air cut plate air deflection plate fixing bolts B and hydraulic pipe fixing bolt C 11 Remove the accelerator lever assembly A and the air cut plate air deflection plate D A Accelerator lever assembly B Accelerator links C Fixing bolts D Air cut plate ...

Страница 58: ...ring valve A Pipe from the hydraulic pump High pressure B Return pipe Low pressure IMPORTANT When the clutch housing section is separated without removing the pipes A and B the pipes could get caught in the starter and be destroyed When removing the pipes A and B remember the position they were in in order to reassemble them correctly ...

Страница 59: ...ssembling tighten it securely to the torque specified below 167 186 N m 17 0 19 0 kgf m 123 137 lb ft IMPORTANT If a short lifting bolt is used the lifting rope may touch peripheral equipment on the engine and some damage could occur Do not jack up the engine oil pan The oil pan may deform and this can cause oil leaks 14 Place the jack under the transmission B and raise the jack until the jack is ...

Страница 60: ...lutch housing Note If clutch housing adhered to engine by liquid gasket too strongly place a piece of wood as right photo shows and push or tap on it lightly It will be easy to separate them WARNING Be careful transmission not to come off supporting jack This operation should be done by at least 2 people IMPORTANT After separating put a rigid stand to section A and remove the lifting bolt If not t...

Страница 61: ...TO to the shift position Dock the machine by turning the rear axle PTO shaft by hand Note The shaft is docked to the clutch plate when the PTO shaft does not turn any more 3 Move the main shift lever and the sub shift lever to ON Insert a screwdriver though the view port on the flywheel and complete the docking procedure by turning the flywheel 4 After docking the machine reinstall the parts by re...

Страница 62: ...linder case is heavy IMPORTANT Two positioning pins are used between the transmission case and the hydraulic cylinder case When you push the lift arms A up from the bottom the pins will come off and the hydraulic cylinder case can be separated easily 5 Keep the hydraulic cylinder case upright as shown in the photo so that the mating surface is not damaged IMPORTANT Completely remove the packing lo...

Страница 63: ...2 3 3 Remove the seat stay See 2 4 4 Remove the propeller shaft See 2 5 1 2 3 5 Remove the front column cover and the dashboard See 2 5 1 9 6 Remove the bolts A in order to take out the oil filter Then remove the left step stays B and C At the same time remove the low pressure hydraulic pipe at section D IMPORTANT The clutch pedal return spring E must be installed in the correct direction Note Whe...

Страница 64: ...ods C G Separation position IMPORTANT The brake pedal return springs D must be installed in the correct directions Note Remember the position of the parking brake E 8 Remove the fuel pipe at section A and remove the 4 pipe clips B 9 Remove the coupler to the PTO neutral switch on the rear end of the transmission IMPORTANT Remember the route the harness follows ...

Страница 65: ...l position and remove the reverser rod A IMPORTANT Before removing the reverser rod be sure that the reverser lever is in the neutral position 12 Remove the nut B and pull the reverser C change arm out about 15 mm 13 Attach a support to the front and back at the separation point Note When the front section is lifted the preferred position is shown in the photo ...

Страница 66: ...ly CAUTION This operation should be done by at least 2 people IMPORTANT Before joining the clutch housing and the transmission remove the old packing C completely and use a new one Note If the engine section has already been separated separate the clutch housing and the transmission as shown in the photo However pass a lifting rope through the steering wheel to prevent it from turning over ...

Страница 67: ... well 6 Remove the brake rod 7 Remove the rear axle housing fixing bolts Be careful not to drop the friction plate and the steel brake plate Left and right side 9 Bolt M12 x 40 x 8 pcs 10 Bolt M12 x 50 x 2 pcs Left side only 4 Nut M10x 2 pcs 5 Stud M10x90x2 pcs Right side only 11 Bolt M10x85x2 pcs Rear axle housing fixing bolts allocation Tightening torque Rear axle housing M10 450 600 kgf cm M12 ...

Страница 68: ...TO is left in the neutral position the PTO safety switch and the shift arm will hit each other and the shift arm cannot be pulled out 6 Remove the rear cover bolts and separate the PTO assembly Reassembling Tightening torque 230 300 kgf cm A Shift arm B Keeper plate C PTO safety switch IMPORTANT Pay attention to the clearance between the change arm and the PTO safety switch Push the change arm C i...

Страница 69: ...he power steering hose B 4 It loosens bolts of the front wheels 5 Jack up the front part of the tractor and take out front wheels 6 Set the jack or the support under the front axle 7 Remove 4 bolts A and take out the center pins B Then the front axle is separated from the tractor WARNING When removing the center pins be careful that the front axle does not topple forward or backward IMPORTANT Adju...

Страница 70: ...usted by shims F Enclose grease The injection entrance to be assembled downward DANGER Apply thread locker Loctite on the bolt D If you don t it may cause the central pin to come off and this is dangerous IMPORTANT When reassembling the front axle unit on a new tractor When raising and lowering the front wheels while jacked up make sure the front axle swings smoothly If there is no free play the f...

Страница 71: ... bolt torque 177 196 N m 18 0 20 0 kgf m 130 145 lb ft 3 Reinstall the propeller shaft and shaft cover IMPORTANT Put grease into the rubber boots on both sides Replace the split pin B with a new one There are 6 steel balls C on each side Be sure to install spacer E on rear and front side If not cover may be broken in a short time A Mounting bolt B Split pin C Steel balls ...

Страница 72: ...2 DISASSEMBLY OF COMPONENTS EF494T TM 06 2011 edition 64 D Rubber boots E Spacer 4 Connect the pipe to the power steering cylinder 5 Supply oil to the front axle 3 ENGINE 3 1 FUEL SYSTEM 3 1 1 Flow of fuel and layout of components ...

Страница 73: ... ENGINE EF494T TM 06 2011 edition 65 1 Fuel tank 2 Water separator 3 Fuel feed pump 4 Fuel filter 4 Fuel filter 5 Fuel injection pump 6 High pressure tubes 6 High pressure tubes 7 Injection nozzles A Feed A Feed ...

Страница 74: ...r boots on both sides Replace the split pin B with a new one There are 6 steel balls C on each side Be sure to install spacer E on rear and front side If not cover may be broken in a short time A Mounting bolt B Split pin C Steel balls D Rubber boots E Spacer 4 Connect the pipe to the power steering cylinder 5 Supply oil to the front axle ...

Страница 75: ... 3 ENGINE 3 Reinstall the propeller shaft and shaft cover IMPORTANT Put grease into the rubber boots on both sides Replace the split pin B with a new one There are 6 steel balls C on each side Be sure to install spacer E on rear and front side If not cover may be broken in a short time ...

Страница 76: ...F COMPONENTS 2 DISASSEMBLY OF COMPONENTS EF494T TM 06 2011 edition 68 A Mounting bolt B Split pin C Steel balls D Rubber boots E Spacer 4 Connect the pipe to the power steering cylinder 5 Supply oil to the front axle ...

Страница 77: ...se into the rubber boots on both sides Replace the split pin B with a new one There are 6 steel balls C on each side Be sure to install spacer E on rear and front side If not cover may be broken in a short time A Mounting bolt B Split pin C Steel balls D Rubber boots E Spacer 4 Connect the pipe to the power steering ...

Страница 78: ...ly oil to the front axle 3 Reinstall the propeller shaft and shaft cover IMPORTANT Put grease into the rubber boots on both sides Replace the split pin B with a new one There are 6 steel balls C on each side Be sure to install spacer E on rear and front side If not cover may be broken in a short time ...

Страница 79: ...Connect the pipe to the power steering cylinder 5 Supply oil to the front axle 3 Reinstall the propeller shaft and shaft cover IMPORTANT Put grease into the rubber boots on both sides Replace the split pin B with a new one There are 6 steel balls C on each side Be sure to install spacer E on rear and front side If not cover may be broken in a short time ...

Страница 80: ...Rubber boots E Spacer 4 Connect the pipe to the power steering cylinder 5 Supply oil to the front axle 3 Reinstall the propeller shaft and shaft cover IMPORTANT Put grease into the rubber boots on both sides Replace the split pin B with a new one There are 6 steel balls C on each side Be sure to install spacer E on rear and front ...

Страница 81: ...LY OF COMPONENTS EF494T TM 06 2011 edition 73 side If not cover may be broken in a short time A Mounting bolt B Split pin C Steel balls D Rubber boots E Spacer 4 Connect the pipe to the power steering cylinder 5 Supply oil to the front axle ...

Страница 82: ...ew one There are 6 steel balls C on each side Be sure to install spacer E on rear and front side If not cover may be broken in a short time A Mounting bolt B Split pin C Steel balls D Rubber boots E Spacer 4 Connect the pipe to the power steering cylinder 5 Supply oil to the front axle 3 Reinstall the propeller shaft and shaft cover IMPORTANT Put grease into the rubber boots on both ...

Страница 83: ...oken in a short time A Mounting bolt B Split pin C Steel balls D Rubber boots E Spacer 4 Connect the pipe to the power steering cylinder 5 Supply oil to the front axle 3 Reinstall the propeller shaft and shaft cover IMPORTANT Put grease into the rubber boots on both sides Replace the split pin B with a new one There are 6 steel balls C on each side Be sure to install spacer E on rear and front sid...

Страница 84: ...F COMPONENTS 2 DISASSEMBLY OF COMPONENTS EF494T TM 06 2011 edition 76 A Mounting bolt B Split pin C Steel balls D Rubber boots E Spacer 4 Connect the pipe to the power steering cylinder 5 Supply oil to the front axle ...

Страница 85: ...3 ENGINE 3 ENGINE EF494T TM 06 2011 edition 77 3 ENGINE ...

Страница 86: ...3 ENGINE 3 ENGINE EF494T TM 06 2011 edition 78 3 1 FUEL SYSTEM 3 1 1 Flow of fuel and layout of components ...

Страница 87: ... ENGINE EF494T TM 06 2011 edition 79 1 Fuel tank 2 Water separator 3 Fuel feed pump 4 Fuel filter 4 Fuel filter 5 Fuel injection pump 6 High pressure tubes 6 High pressure tubes 7 Injection nozzles A Feed A Feed ...

Страница 88: ...3 ENGINE 3 ENGINE EF494T TM 06 2011 edition 80 B Return ...

Страница 89: ... cock Cleaning the water separator Move the fuel cock to position C close and loosen the cup mounting screws Clean strainer and related parts Open the cock to bleed out the air Drain water every 50 hr Cleaning every 300hr shorter is preferable IMPORTANT When the water indicator ring A is floating up should clean the water separator as soon as possible If not it would cause trouble of fuel injectio...

Страница 90: ... and delivers it to the fuel injection pump A Fuel feed pump 3 1 4 Fuel filter Removes foreign particles from the fuel to prevent them from entering the fuel injection pump Replacement interval Every 300 operating hours or 6 months whichever is earlier Every 300 operating hours or 6 months whichever is earlier B Fuel filter ...

Страница 91: ...00 operating hours or 6 months whichever is earlier Every 300 operating hours or 6 months whichever is earlier B Fuel filter Replacement interval Every 300 operating hours or 6 months whichever is earlier Every 300 operating hours or 6 months whichever is earlier B Fuel filter Replacement interval Every 300 operating hours or 6 months whichever is earlier Every 300 operating hours or 6 months whic...

Страница 92: ...months whichever is earlier B Fuel filter 3 1 5 Fuel injection pump Type MP4 direct injection pump A mono plunger pump where in response to the signal from the actuator of the Eco governor a pinion rotates the plunger to adjust the relative positions of the plunger notch and the fuel port thereby controlling the fuel injection quantity C Fuel injection pump ...

Страница 93: ... 3 to 2 9kgf m Case nut 39 to 44N m 4 to 4 5kgf m Note Do not lubricate the bolt threads and the nut face 2 When removing the injection valve make sure that protector A and packing B do not remain in the cylinder head Replace them whenever reinstalling the injection valve 3 An increase of 0 1 mm in thickness of the pressure adjusting shim section will result in an increase of about 19 MPa in injec...

Страница 94: ... by high pressure injection 70 MPa Injection timing optimized by using a multi functional timer mechanism Fuel injection technology 2 New type nozzle Increased number of nozzle hoes 5 nozzle holes Finer atomization by making the nozzle hole diameter smaller Uniform injection by rounding the edge of each nozzle hole A Nozzle for TNV engine R Rounded inlet of nozzle hole ...

Страница 95: ...timized by using a new combustion chamber Uniform injection achieved by reviewing the nozzle mounting angle locating it at the center of the combustion chamber A Injection nozzle B Combustion chamber C Piston Three new mechanisms of the MP4 pump The mono plunger type fuel pump uses a single plunger to distribute fuel uniformly to each cylinder thereby eliminating the variation in fuel distribution...

Страница 96: ...rt In this state fuel starts being pumped Hot start assumes a temperature of about 5 C minimum A When sub port is open Sub port B Start pumping C Main port D CSD valve E Piston F Barrel G Plunger H Hot state About 5 C minimum At cold start The sub port is closed and the plunger blocks the main port In this state fuel starts being pumped At cold start the fuel injection timing is advanced Cold star...

Страница 97: ...timer 3 2 4 Load timer The fuel injection timing is changed in accordance with the load condition of the engine thereby optimizing the injection timing over the entire range from the no load condition to the full load condition and making exhaust gas clean When the upper leading part of the plunger goes beyond the main port fuel injection starts Once load is applied the plunger starts operating an...

Страница 98: ...hrough the oil filter and cooler A Oil filter B Strainer C Fuel injection pump D Lubrication pump E Hydraulic pressure switch A Relief valve bypass B Lubricating oil filter C Regulator D Lubricating oil pump E Lubricating oil filter F Cylinder body G Main gallery H Hydraulic switch I Fuel injection pump J Intermediate gear shaft K Gear shaft L Cam bearing M Valve arm pin N Valve arm O Tappet cam f...

Страница 99: ...ter I Pump J Strainer K Oil filter secondary L Oil pump 3 3 2 Lubrication oil pump LO pump A trochoid pump installed on the cylinder block driven by a crank gear and provided with a relief valve to protect the oil cooler Discharge pressure at rated rpm 0 44 MPa 4 5 kgf cm2 A Crank gear B Cranks shaft C Cover D Relief valve E Spring F Plug G Outer rotor H Inner rotor Driven by crank gear I Gear cas...

Страница 100: ... enable the oil to flow through the bypass circuit A Oil filter a Rubber packing b Bypass valve safety valve Activation pressure 0 6 kgf cm2 Low idling RPM c Lubricating oil pump d Lubricating oil e Paper filter element f Normal flow path g Bypass flow path 3 3 4 Oil pressure switch Closes to provide an alarm illuminate an alarm LED on the combination meter when the lubricating oil pressure decrea...

Страница 101: ...erature for the cooling water thereby preventing the engine from being excessively cooled If the water temperature is low the valve closes to circulate cooling water without sending it to the radiator If the water temperature increases the valve opens to send cooling water to the radiator Thermostat Temperature at which the valve is opened 85 C Temperature at which the valve is fully opened 95 C V...

Страница 102: ...sure of the radiator becomes negative and then the water in the sub tank is sucked back to the radiator A From sub tank B To sub tank C When vapor pressure decreases D When vapor pressure increase E Water is sucked from the sub tank back to the radiator F Steam is sent to the sub tank Checking a leak from the radiator or engine cylinder block 1 Remove the radiator cap and add cooling water until i...

Страница 103: ... cap Normal pressure 0 9 0 15 kgf cm 2 12 8 2 1 lb sq in CAUTION To deal with variations in the size of the cap tabs check the pressure twice once with the cap turned 180 3 4 3 Fuel injection pump Removal 1 Loosen the cooling fan V belt 2 Remove the engine coolant fan guard if equipped engine coolant fan Figure 1 2 spacer Figure 1 3 if equipped V pulley Figure 1 4 and cooling fan V belt Figure 1 1...

Страница 104: ...emove the high pressure fuel lines as an assembly being careful not to bend any of the fuel lines Be sure to protect the fuel system from contamination by covering all open connections 8 Disconnect the coolant lines from the cold start device Figure 2 3 on the fuel injection pump Plug the open ends of the lines to minimize leakage and prevent contamination 9 Disconnect the fuel return lines from t...

Страница 105: ... 5 1 Note The fuel injection pump drive gear cover is secured with an adhesive sealant Use a gasket scraper to separate the fuel injection pump cover from the gear case cover The fuel injection pump drive gear cover is retained to the gear case cover by 4 bolts 16 To position the fuel injection pump for easier removal and installation install a dial indicator into the injection pump plunger openin...

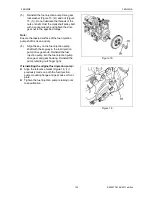
Страница 106: ...ening Figure 6 2 CAUTION Do not loosen or remove the 4 bolts retaining the fuel injection pump drive gear to the fuel injection pump hub Do not disassemble the fuel injection pump drive gear from the hub Correct fuel injection timing will be very difficult or impossible to achieve Figure 6 18 Do not loosen or remove the 4 bolts Figure 7 3 retaining the pump drive gear nut Figure 7 1 and washer to ...

Страница 107: ...e 2 bolt gear puller Figure 8 Note The injection pump drive gear will remain captured in the gear case Figure 8 21 Once the fuel injection pump drive gear and hub assembly has popped loose from the tapered fuel injection pump drive shaft carefully remove the drive gear nut Figure 9 1 and lock washer Figure 9 2 Figure 9 ...

Страница 108: ...ump insulator to access the fuel injection pump mounting nuts Note The MP2 fuel injection pumps TNV 88 model engine are fastened to the gear case with three 3 studs and nuts Figure 11 24 Remove the fuel injection pump Figure 11 1 For purposes of future injection timing purposes record the fuel injection pump timing index number located on the boss on the engine side back of the of the fuel injecti...

Страница 109: ...If installing a new or recalibrated fuel injection pump locate and record the timing index number located on the pump housing boss on the engine side of the new or recalibrated fuel injection pump Figure 12 1 This number will be used to calculate and adjust the final fuel injection timing Note If either or both of the fuel injection pumps do not have a timing index number note the injection pump I...

Страница 110: ...timing marks Figure 15 A B C are aligned 1 Fuel Injection Pump Drive Gear 2 Camshaft Drive Gear 3 Crankshaft Drive Gear 4 Direction of Rotation 5 Idler Gear Figure 14 3 Install a new O ring on the pump mounting flange Apply grease to the O ring to hold it in place during installation of the injection pump Note Ensure the tapered surface of the fuel injection pump shaft is clean and dry 4 Align the...

Страница 111: ...jection pump shaft is clean and dry 6 Align the key on the fuel injection pump shaft with the keyway in the fuel injection pump drive gear hub Reinstall the fuel injection pump into the fuel injection pump drive gear and gear housing Reinstall the pump retaining nuts finger tight Figure 15 If reinstalling the original fuel injection pump Align the reference marks Figure 16 1 previously made on bot...

Страница 112: ...to the back of the gear case front plate Figure 17 Align the standard mark Figure 17 1 with the reference mark Figure 17 2 made on the gear case during disassembly Figure 17 Calculate the difference between the timing index numbers Figure 18 1 of the fuel injection pump that you removed and the replacement fuel injection pump See Calculation Example below Figure 18 ...

Страница 113: ... value If the difference between the timing index numbers is a negative number the replacement injection pump must be retarded Figure 19 3 rotated toward the engine by the calculated negative amount Each mark on the timing sticker represents 0 50 timing change The above calculated difference indicates that the replacement fuel injection pump is to be installed at 0 5 advanced from the Standard Mar...

Страница 114: ...the propeller shaft 4 Remove the oil pan Assembling Use Three Bond 1212 5 Remove the dual axis balancer assembly Note Mate the balancer gear A hollow with the crankshaft balancer gear mark A tooth Remove the connecting rod through the bottom of the engine and pull the piston up A Balancer gear mark A B Strainer mounting stay C O ring ...

Страница 115: ...e on the connecting rod A Embossed brand name B Alignment marks on large end of connecting rod Assembling the piston rings Install the top piston ring and the second ring so that their openings are 120 away from each other Install the oil ring so that its opening and the second ring opening are also 120 away from each other Install the piston rings with the embossed side up The oil ring may be ins...

Страница 116: ... and install the oil tester 3 If the pressure is not working properly check the oil level Regulator valve pressure 3 4 kgf cm2 43 57 lb sq in A Oil switch Fuel injection pressure Detach the fuel injector and place it on the nozzle tester Operate the tester lever slowly and read the pressure when the nozzle starts to spray fuel Injection starting pressure 21 6 MPa 220 kgf cm2 3 124 lb sq in ...

Страница 117: ...e the measurement twice 4 If the pressure is below the operating limit put 2 cc of engine oil through the nozzle hole Idle the engine for a while to let the oil penetrate and check the pressure again 5 If the compression pressure returns to normal check the cylinder piston and piston ring 6 If the compression pressure does not return to normal check the valve and cylinder head and related parts Co...

Страница 118: ...t kgf m No Parts Lube oil Torque Model 1 Head bolt Yes 8 7 9 3 M10 x 1 25 2 Rod bolt Yes 4 5 5 0 M9 x 1 0 3 Flywheel bolt Yes 8 5 9 0 M10 x 1 25 4 Metal cap bolt Yes 9 5 10 5 Ml2 x 1 5 5 Crank V pulley bolt Yes 8 7 9 3 M14 x 1 5 6 Nozzle lock bolt No 2 5 2 9 M8 x 1 25 7 FO pump gear nut No 8 0 9 0 M14 x 1 5 8 High pressure sleeve lock nut No 3 0 3 5 M12 x 1 5 ...

Страница 119: ...nd ring 0 035 0 070 0 190 Opening 0 200 0 400 0 490 Oil ring Groove width 4 015 4 030 4 130 Dimension B 3 970 3 990 3 950 Min gap between groove and ring 0 025 0 060 0 180 Opening 0 200 0 400 0 490 A Dimension B width B Thickness Piston and piston ring table oversize 0 25 mm Model Piston assembly code Piston assembly code Valve clearance A Valve clearance B Lock nut C Adjusting screw 4TNV88 129005...

Страница 120: ...actuating pressure MPa kgf cm 2 50 10 0 5 0 1 9 Thermostat Temperature at which the valve is opened C Lift to fully open the valve mm temperature 85 8 minimum 95 C 3 5 2 Cylinder head No Inspection item Standard Limit 1 Distortion of combustion surface mm 0 05 maximum 0 15 2 Valve recession mm Intake 0 30 to 0 50 0 8 Exhaust 0 36 to 0 56 0 8 3 Valve seat Seat angle degrees Intake 120 Exhaust 90 Se...

Страница 121: ...al mm 0 to 0 02 0 05 3 Cam height mm 38 600 to 38 800 38 350 Outer diameter of camshaft and inner diameter of bearing No Inspection item Standard Limit 1 Gear end mm Bushing I D 44 990 to 45 055 45 130 Can shaft O D 44 925 to 44 950 44 890 Clearance 0 040 to 0 130 0 240 Intermediate mm Bushing I D 45 000 to 45 025 45 100 Can shaft O D 44 910 to 44 935 44 875 Clearance 0 065 to 0 115 0 225 Flywheel...

Страница 122: ...7 962 47 902 Bearing I D 48 000 to 48 026 Bearing insert thickness 1 492 to 1 500 Clearance 0 038 to 0 074 0 150 3 Journal mm Selective combination O D 53 952 to 53 962 53 902 Bearing I D 54 000 to 54 020 Bearing insert thickness 1 995 to 1 990 Clearance 0 038 to 0 068 0 150 3 5 12 Thrust bearing No Inspection item Standard Limit 1 Crankshaft end play mm 0 13 to 0 23 0 28 3 5 13 Piston No Inspecti...

Страница 123: ... 0 490 Oil ring mm Ring groove width 4 015 to 4 030 4 130 Ring width 3 970 to 3 990 3 950 Clearance 0 025 to 0 060 0 180 End gap 0 200 to 0 400 0 490 3 5 15 Connecting rod No Inspection item Standard Limit 1 Thrust clearance mm 0 2 to 0 4 Dimensions of connecting rod small end No Inspection item Standard Limit 1 Bushing I mm 26 025 to 26 038 26 068 Pin O D mm 25 955 to 26 000 25 967 Clearance mm 0...

Страница 124: ...Standard Limit 1 0 02 to 0 07 0 12 Inner rotor to gear boss clearance No Inspection item Standard dimension Standard Limit 1 Inside clearance of inner rotor mm Gear box diameter 53 05 to 53 15 0 3 to 0 5 0 6 Rotor I D 53 45 to 53 55 2 Clearance in width across flats of inner rotor mm Width across flats of gear boss 49 45 to 49 75 0 2 to 0 6 0 7 Width across flats of rotor 49 95 to 50 05 ...

Страница 125: ... to 88 8 to 9 No High pressure fuel line tightening nut M12 1 5 29 4 to 34 3 3 0 to 3 5 No Bolts and nuts for general use lubricating oil not applied No Item Thread size x pitch mm Tightening torque N m kgf m Remarks 1 Hexagon head bolt 7T and nut M6 1 9 8 to 11 8 1 0 to 1 2 If these kinds of bolts and nuts are tightened for any aluminum part use 80 of the torque values indicated here For 4T bolts...

Страница 126: ...4 CLUTCH 4 CLUTCH EF494T TM 06 2011 edition 118 4 CLUTCH ...

Страница 127: ...se load pedal depressing force and reduction in decrease of spring pressure regardless of wear of the clutch fading Clutch size mm 260 1 Clutch pedal 2 Clutch rod 3 Pedal return spring 4 Pedal stopper 5 Main drive shaft 6 Flywheel 7 Clutch disc 8 Pressure plate 9 Clutch cover 10 Diaphragm plate Engage 11 Diaphragm plate Release 12 Release bearing 13 Clutch release sleeve 14 Release shaft 15 Clutch...

Страница 128: ... As for disassembly of the clutch housing refer to 2 5 2 Remove the nine M8x16 bolts A 3 Remove the pressure plate B together with the clutch disc C from section D using a flathead screwdriver CAUTION Be careful not to drop the clutch disc C Be careful not to get oil or grease on the clutch disc C ...

Страница 129: ...he clutch face measure the depth of the rivet If there is 0 5 mm or less of clutch face remaining replace the clutch disc If hardened material or a distorted clutch face is seen replace the clutch disc If the clutch disc has oil on it wash it with gasoline If the wear is seen in the splined section or runout is seen replace the clutch disc 5 Remove the return spring A and remove the clutch release...

Страница 130: ...4 CLUTCH 4 CLUTCH EF494T TM 06 2011 edition 122 ...

Страница 131: ...release bearing A Release bearing B Bearing sleeve C Release spring 4 2 2 Assembly 1 Match the clutch disc and pressure plate to the flywheel of the engine with the clutch guide tool Then tighten the pressure plate by the 9 bolts M8x16 with the specified torque Tightening torque of pressure plate 23 29 N m 2 3 3 0 kgf m 16 6 21 7 lb ft ...

Страница 132: ...ach part off oil dirt Pay attention to the direction of the clutch disc See 2 1 3 When reassembling apply heat resistant grease to the inside A of the clutch disc splines Note If the tool is not available make a jig 2 For details about adjusting the clutch see 1 1 15 ...

Страница 133: ...5 TRANSMISSION 5 TRANSMISSION EF494T TM 06 2011 edition 125 5 TRANMISSION ...

Страница 134: ...5 TRANSMISSION 5 TRANSMISSION EF494T TM 06 2011 edition 126 5 1 POWER TRANSMITTING DIAGRAM Engine model 4TNV88 HP 49 RPM 2 800 ...

Страница 135: ...72 12 25 F9 28 80 17 90 R1 1 68 1 04 R2 2 33 1 45 R 3 3 41 2 12 R 4 4 13 2 57 R 5 5 74 3 57 R 6 8 39 5 21 R 7 14 62 9 09 R 8 20 33 12 64 R 9 29 70 18 46 MAX SPEED Engine rpm Rear tire Km h Mile h 2 995 13 6 26 30 8 19 2 Front tire Rear tire Over speed ratio EF494T Size Radius m Size Radius m 8 18 6PR 0 406 13 6 26 8PR 0 612 1 032 ENG Rated 2 800 rpm PTO speed rpm PTO 1 568 PTO 2 769 ...

Страница 136: ...5 TRANSMISSION 5 TRANSMISSION EF494T TM 06 2011 edition 128 5 2 TRANSMISSION SYSTEM CROSS SECTION ...

Страница 137: ...5 TRANSMISSION 5 TRANSMISSION EF494T TM 06 2011 edition 129 A Main shifting lever B Reverser lever C Range shifting lever D PTO lever E Front drive lever ...

Страница 138: ...ule The main shift module is a constant mesh type transmission 1 Operating the main shift lever activates the shifter A B so that they engage gears 53R 49L and 41R 2 Gears 53R 49L and 41R are always engaged with gears 21L 27R 33L on the main shaft C The engine rotation is transferred to the driven shaft D ...

Страница 139: ...s engaged with the connecting shaft B The rotation of the driven shaft C is transferred to the reduction gear D by way of the connecting shaft B to provide forward force 3 Gear 44R is always engaged with the driven shaft C and the reverse idle gear 32L E The rotation is reversed by this gear and transferred to the reverse gear E The rotation of the driven shaft C is transferred to the reduction ge...

Страница 140: ... are always engaged with the reduction gear C and the range shift shaft D Then the rotation E of the connecting shaft is transferred to the differential gear module F 5 3 4 Front drive 1 When operating the front drive lever to front drive ON position the shifter H moves to the gear 54R to engage the front drive shaft G and the gear 54R 2 Then the rotation of range shift shaft D is transferred to t...

Страница 141: ...hift module is a constant mesh type transmission 1 Operating the PTO shift lever activates the shifter A so that it engages gears 51R and 74T 2 They are always engaged with gears 14L and 15L on the PTO pinion shaft B Then engine rotation is transferred to the PTO shaft C to provide PTO output ...

Страница 142: ... HOUSING CASE SIDE Each gear in the main shift module A and reverse module B is contained in the front of the transmission 1 Left side of the reverser section A Reverser shift fork B Reverser gear C Reverse gear 2 Rear of the reverser section D Engine to PTO C Reverser to Range shift ...

Страница 143: ...ibed in 2 6 2 Separating the clutch housing and transmission 2 Remove the M10x55 bolts A the M10x85 bolt B and the M10x150 bolt C IMPORTANT Pay attention so that the idle gear shaft E fits securely into the keeper plate D when reassembling these parts 3 Remove the bearing retainer B from center plate section A using a screwdriver ...

Страница 144: ... gear 48L 13 Connecting shaft 14 Bearing retainer 15 Thrust washer 17x32 16 Needle 202615 17 Idle gear 18 Thrust washer 20x32x2 19 Idle shaft 20 Reverser fork shaft 21 Spring pin 6x25 22 Reverser shift fork 23 Steel ball 5 16 24 Flat head pin 4x35 25 Spring 26 Reverser shift arm 27 Snap ring 62 H 28 Ball bearing 6204 29 Gear 30 Plate 31 Bolt M8x16 4 Reverser gear A Reverser shift fork B Drive gear...

Страница 145: ...unting section A located under the steering wheel and the reverser lever mounting section B 6 Remove bolts A and B on the lower part of the steering wheel and the five M8x25 bolts that secure the change lever retainer Then slide shafts D and E upward Note The shaft D mounting section has a positioning pin F on the main shift lever ...

Страница 146: ...ION 5 TRANSMISSION EF494T TM 06 2011 edition 138 7 Remove the change lever retainer C G Main shift arm IMPORTANT Pay attention so that the main shift arm G fits into the main shift shifter H when reassembling them ...

Страница 147: ...enter plate section B is heavy and it will be slippery because it is covered in oil IMPORTANT Replace the oil seal A on the engine side of the clutch housing with a new one when reassembling the unit To prevent the oil seal from deforming due to the weight of the center plate section B reinstall the oil seal from the clutch side after reinstalling the center plate section B ...

Страница 148: ...1 edition 140 5 4 2 Main shift section 1 A Reverser section B Main shift section C Main shaft D Clutch E Main shift F Drive shaft G Center plate H Shifters I Shift forks 2 The main shift detent A is located on the reverser side of the center plate ...

Страница 149: ... Right side 1 Position control lever 2 Diff lock pedal 3 Stop slow return valve 4 Rear axle Right 5 Hydraulic cylinder case 6 Lift arm 7 Top link hinge 8 Transmission oil filler port 9 PTO shaft 10 Brake arm Right A Double action output port B Double action input port 2 Left side 11 Range shift lever 12 Front wheel drive lever 13 PTO lever lever for a trial run 14 Lift angle feedback rod 15 Rear a...

Страница 150: ...3 Counter shaft Hard Lock nut 4 Reverser shift arm 5 Range shift arm 6 Range shift shaft 7 Front wheel drive shift arm 8 Front wheel drive shifter 9 Front wheel drive shaft 4 Inside A Range shift arm B Range shifter C Reduction gear D Range shift E PTO shaft F Differential lock shaft G Differential H Ring gear ...

Страница 151: ...must enter the slider groove when the unit is reassembled 2 Remove the oil seal and snap ring then remove the front drive shaft assembly The oil seal can be replaced from the outside A Oil seal TC356212 24421 356212 B Bearing 6007 C Slider D Drive gear E Collar 18 x 30 x 15 Be sure to install F Steel ball NOTE Collar 18 x 30 x 15 may fall down Make sure it is installed in position To remove it giv...

Страница 152: ...k nut B and take out the inside gear B Hard lock nut C Bearing retainer D Counter shaft E Reduction shaft IMPORTANT The Hard Lock nut is a special type of double nut Both nuts must be tightened to the specified torque Tightening torque for installation Hard lock nut 800 1000 kgf cm ...

Страница 153: ... the shift arm holder B about 5 mm 6 Remove the bolt C and take out the ball D in the detent 7 Remove the spring pins F and remove the fork shaft E and the shift forks G IMPORTANT When you remove something else the spring pins fall inside the transmission Therefore be sure to take them out using a magnet or some other tool ...

Страница 154: ...r shaft D Note The bearing retainer can only be mounted in the position shown in the photo 9 Remove the bearing retainer A using a coupler 10 The parts shown in the photo can be taken out from the center case side of the counter shaft Note The counter shaft cannot be taken out through the back without removing the differential lock shaft ...

Страница 155: ...5 TRANSMISSION 5 TRANSMISSION EF494T TM 06 2011 edition 147 11 Remove the spring pins C and D and remove the fork A and the differential lock shaft B A Fork B Differential lock shaft ...

Страница 156: ...ION 5 TRANSMISSION EF494T TM 06 2011 edition 148 5 5 2 PTO module 1 To remove the PTO module see 2 6 4 Note When the hydraulic cylinder case is removed the PTO module can be seen as shown in the photo on the right ...

Страница 157: ... 2011 edition 149 2 To remove the PTO module see 2 6 4 A Shift arm B Change arm position C Oil level check port D PTO shaft E Shifter F PTO shift Note When the PTO lever is in the neutral position the change arm G pushes on the neutral switch H ...

Страница 158: ...6 REAR AXLE AND BRAKE 6 REAR AXLE AND BRAKE EF494T TM 06 2011 edition 150 6 REAR AXLE AND BRAKE ...

Страница 159: ... AND FUNCTIONS 6 1 1 Structure drawing The rear axle is designed to effectively convey the transmission output to the rear wheels It consists of a differential gear and final reduction gears planetary gears A Differential lock arm B Brake C Differential ring gear D Differential gear case ...

Страница 160: ...rential gear could be locked The illustration shows 2 pinion type differential gear and pin type differential lock Never turn tractor when differential lock is applied A Differential ring gear B Differential case C Differential side gear D Differential side gear for lock E Differential pinion F Slider Differential lock G Shims for adjusting backlash H Differential lock arm Free Locked Note The ope...

Страница 161: ...011 edition 153 6 1 3 Final drive system The final drive is a ring gears type planetary system This provides high torque load capabilities and proper reduction ratio A Planetary carrier B Ring gear C Planetary gear D Final drive pinion shaft E Rear axle shaft ...

Страница 162: ...ls farce the actuator toward the differential carrier support This compresses the disks between the friction plates and stops rotation of the shaft The parking brake is of the pedal lock system and works the same way as the brake above A Parking brake lever B Brake pedal C Brake rod D Cam shaft lever E Actuator F Cam lever shaft G Actuator H Friction plate I Steel plate J Differential carrier supp...

Страница 163: ...ply a good amount of TF500 over the friction plate and steel plate when they are replaced with new ones before installing them in the assembly Note Wear limit of the brake discs 4 8mm When the brake discs are new 5 3 0 1mm Inspecting and adjusting the brakes Step on the brake pedal to see if the specified amount of play 30 40 mm is present and if both left and right pedals have the same amount of ...

Страница 164: ... 9 Bolt M12 x 40 x 8 pieces 10 Bolt M12 x 50 x 2 pieces Note Refer to 2 6 3 Rear axle for details 3 Remove the differential lock fork To assemble make sure the return spring is positioned as shown to the right A Differential lock pedal B Differential lock fork C Return spring Note direction IMPORTANT When attaching the spring pins of the differential pedal shaft match the match positions as shown ...

Страница 165: ... K and the bolt M12x30 J The thrust washer works as a thread lock 3 Remove the bolt M10x30 B 4 pieces 4 Tap the flange of the rear axle shaft A outward to pull out the rear axle shaft 5 Tap the oil seal case C to remove it from the rear axle Remove the oil seal G and bearing I from the oil seal case Assembling 1 Spread lubricating oil on the exterior of new oil seal and insert it into the oil seal...

Страница 166: ...e shaft 1 Remove the rear axle housing 2 Remove bolt A below to remove the planetary gears B Assembling Bolt fine thread A 12 x 30 8 pieces 800 1000 kgf cm Bolt C M10x55 700 890 kgf cm A Shaft end bolt B Planetary gears C Ring gear fixing bolt D Rear axle housing E Ring gear F Rear axle shaft G Oil seal ...

Страница 167: ...7 FRONT AXLE 7 FRONT AXLE EF494T TM 06 2011 edition 159 7 FRONT AXLE ...

Страница 168: ...The drive power is conveyed from the drive pinion of the rear axle assembly counter shaft to the drive gear and drive shaft then to the front axle through the propeller shaft Note A The need for adjustment shims and the number of shims used varies with the machine B Oil seals C Front differential unit C Detailed view of C D Front drive input from transmission ...

Страница 169: ...7 FRONT AXLE 7 FRONT AXLE EF494T TM 06 2011 edition 161 7 2 CROSS SECTION VIEW ...

Страница 170: ...rection These factors are shown below Note 1 2 and 3 cannot be adjusted Adjusting the toe in If the steering response is irregular or subject to vibration check the toe in Toe in is the arrangement in which the front wheels are oriented slightly inward so that the distance between the front edges of the wheels A is slightly smaller than the distance between the rear edges B The toe in difference s...

Страница 171: ...terisk Tighten the bolts evenly to remove the bearing case A IMPORTANT The number of shims B and their positions varies with each machine When reassembling the front bearing case use the same number of shims in the same positions as were found during disassembly 7 5 DISASSEMBLING THE FRONT GEAR BOX Support the bearing case A using a garage jack and remove the knuckle arm B 2 x M12 bolts and 2 x M1...

Страница 172: ...e left front wheel 4 Remove the tie rod A 5 Put a rope around the front gear case and prepare to lift the front gear case with a crane 6 Remove the 11 M12x30 bolts that secure the left front axle case 7 With the front gear case supported by the crane separate the left front axle case from the gear case IMPORTANT When disassembling and reassembling the front differential section be careful not to d...

Страница 173: ...on 165 8 Remove the pinion and the bearing as an assembly Note There are some ring gear adjustment shims A IMPORTANT Apply screw lock to the six M10x70 bolts C shown in the drawing on the right A Ring gear CMP B Differential gear C M10x70 bolt D Shims ...

Страница 174: ...s B using the following method C Seal collar D Bearing retainer 1 Set the drive pinion A tapered roller bearings B O ring and oil seal into the bearing retainer D Temporarily tighten everything with the seal collar C 2 Secure the parts indicated by the arrows with a hand vice Note Secure only the drive pinion A The hand vice should not come into contact with the other parts ...

Страница 175: ...until the torque reaches the specified level of 0 032 to 0 160 kgf m Make sure to measure the torque repeatedly IMPORTANT The seal collar should be replaced with a new one If the torque is less than specified the gear may be damaged If the torque is greater than specified the bearing may be damaged 5 After the adjustments are finished tap section A and the opposite side on the seal collar using a ...

Страница 176: ...8 POWER STEERING 8 POWER STEERING EF494T TM 06 2011 edition 168 8 POWER STEERING ...

Страница 177: ...8 POWER STEERING 8 POWER STEERING EF494T TM 06 2011 edition 169 8 1 STRUCTURE AND FUNCTIONS 8 1 1 Structure drawing A Power steering cylinder B Power steering valve C Hydraulic pump ...

Страница 178: ...ower steering valve C To transmission a Power steering relief valve Pressure 12 2 12 9 MPa 125 132 kgf cm2 Remarks The power steering system is fully hydraulic The cylinder is a double rod type featuring excellent stability while moving Oil from the power steering module is returned to the sump through the line marked ...

Страница 179: ...he gyrator 2 The oil of the gyrator flows into the cylinder through the control spool 3 The oil of the cylinder opposite the cylinder into which the oil flowed returns to the tank through the control spool 4 If the hydraulic pump pressure becomes too high 125 7 kgf cm2 the relief valve will be activated and the oil will return to the tank A Right turn B Left turn During manual rotation If there is...

Страница 180: ...ront H O Pump 1 Gasket HO P 2 Nut Supack 8 3 Hydraulic pump CMP 7C 4 Ring 5 Housing CMP 6 Pin 11x 7 7 Cover CMP 8 Snap ring Hole 32 9 Oil seal TC153207 10 Bolt M8 x 35 11 Bolt M8 x 80 12 Stud bolt Oil Transmission oil TF500 Pump output 17 litre at engine speed 2700 rpm pump shaft speed 2438 rpm 7 cc REV ...

Страница 181: ... Cap assy 1 10 Packing 22 1 11 Packing 34 1 12 Scraper seal 1 13 Cylinder cap 1 14 Bush 1 15 Adapter 1 4 2 16 Packing 1 17 Bearing 2 18 Piston 1 19 Ring 40x3 2 1 20 Snap ring 36S 1 21 O ring 1B P 18 0 1 22 O ring 1A 24035 1 23 Grease nipple 2 24 Lock nut 14 1 25 Cotter pin 4 0x25 2 26 Knuckle arm R 1 27 Bearing retainer 1 Cylinder bore x rod diameter x stroke 40 x 22 x 214 mm Single rod type ...

Страница 182: ...it with a new one The damaged packing may cause oil leak 1 High pressure pipe to from PST 2 Low pressure pipe from PST valve 3 High pressure pipe to from PST 26 Power steering PST valve 28 High pressure pipe from hydraulic pump 3 Loosen 4 bolts 26 with which the power steering valve 7 is fixed Remove 4 bolts 27 with which the steering column 1 is fixed to instrument support 8 4 Pull the steering c...

Страница 183: ...ngine speed to 2700 rpm 4 Turn the steering wheel clockwise until a relief sound is heard Read the tester NOTE Do not turn the wheel the wrong direction Otherwise the cylinder will blow oil out of its port Specified pressure 125 132 kgf cm2 12 2 12 9 MPa If the pressure is too high Loosen the adjusting screw the oil temperature will increase If the pressure is too low Screw in the adjusting screw ...

Страница 184: ...item No Parts name Q ty 16 1 Cap 2 Plate Spacer 3 Ring 4 Bush 5 Screw 6 Screw 7 Bearing comp Needle 8 Bearing 9 Thrush needle 10 Kit Seal 11 O ring 12 O ring 13 Seal Oil 14 Seal Dust 15 Packing 16 O ring 17 Valve assy 18 Drive comp Gerotor 19 Drive 20 Seal 21 Gerotor 22 Ball 7 32 DANGER Do not disassemble the inside of Valve assembly 17 If not it may cause a serious accident ...

Страница 185: ...e valve in a vise with padded jaws and take off the 6 screws from cap A IMPORTANT The steel ball is only in 1 place Remember the mounting place Torque specifications Initial Sequence 11 N m 95 lb in Final Sequence 21 N m 182 lb in A Cap B O Ring 3 used C Seal D Packing E Cam F Drive G Spacer plate H Gerotor Note Be careful not to drop cam E when taking off the drive F 4 Take off parts A thru H ...

Страница 186: ...r damage or wear Replace any defective parts A Bearing Races 2 B Thrust Bearing C O Ring D Spool and Sleeve E Oil Seal F Seal Gland Bushing G Dust Seal H Retaining Ring I Relief Valve Note The housing spool and sleeve must be serviced as a single unit Do not disassemble it by things except the cleaning IMPORTANT If it is necessary to remove the spool and sleeve from the housing to clean them do no...

Страница 187: ...9 HYDRAULIC LIFT UNIT 9 HYDRAULIC LIFT UNIT EF494T TM 06 2011 edition 179 9 HYDRAULIC LIFT UNIT ...

Страница 188: ...9 HYDRAULIC LIFT UNIT 9 HYDRAULIC LIFT UNIT EF494T TM 06 2011 edition 180 9 1 STRUCTURE AND FUNCTIONS 9 1 1 Hydraulic line A Hydraulic pump B Filter C Hydraulic cylinder case ...

Страница 189: ...ter 18 Filter adapter Relief valve No Parts 18 Relief valve CMP 19 Spring Relief valve 20 O ring 2 5 x 23 21 Plug Relief valve 22 Packing 20x27 8x2 23 Shim set Safety valve No Parts 24 Spring Relief valve 25 Plug Safety valve 26 Shim pack 27 Seat Safety valve 28 Poppet 29 Spring pin 6x30 30 O ring 1A P 12 0 31 O ring 1A P 18 0 Cylinder head No Parts 32 O ring 1A P 12 0 33 O ring 1A P 11 0 34 Valve...

Страница 190: ... lowered This valve allows oil to escape from the cylinder when the lift arm is in the down position 4 Load check valve Prevents back flow 5 Main spool Switches between the circuits used for changing the lift arm positions neutral up and down 9 1 4 Relief valve If the pressure in the hydraulic circuit becomes excessively high this valve will open to allow oil to escape to the tank The pressure set...

Страница 191: ...nd cause oil in the cylinder to escape to the tank The pressure setting can be adjusted by increasing or decreasing the size of shims Pressure setting 19 6 1 MPa 190 210 kgf cm2 A Safety valve B From the hydraulic cylinder C To the tank D Valve seat E Pressure adjustment shims 9 1 6 Stop valve Used to stop motion and to adjust the speed during lowering of the hydraulic lift A Valve holder B Stop v...

Страница 192: ...edition 184 9 1 7 Hydraulic pump exploded view No Parts name A Rear H O Pump 1 Gasket HO P 2 Nut Supack 8 3 Hydraulic pump CMP 13A 4 Flange 5 Bolt 8 x 83 5 6 Oil sea 7 End plate 8 Seal kit 9 Pin 6x 12 10 Key 11 Snap ring 30 dia 12 Bolt 8 x 120 13 Stud bolt 8 x 40 ...

Страница 193: ... the piston causing the lift arm to rise However if the lift arm fails to move a rise signal continues to be output For this reason even if the control lever is in the up position the spool of the control valve will be returned to the neutral position by the action of the feedback rod attached to the lift arm The same applies when the control lever is in the down position When the control lever is...

Страница 194: ...e force applied by the spool will be released and the spool will return to its original position by the action of the spring and the oil in the cylinder will return to the tank The lift arm will be lowered and the spool will be returned to neutral by the action of the feedback rod Control lever down Lift arm down Neutral A Main spool B Control lever up C Feedback rod D Lift arm ...

Страница 195: ... 6 Relief valve 7 Control valve 8 Tank Circuit in the control valve Back pressure b of the unload valve spring chamber disappears and the oil pressure a from the pump pushes up the unload valve The oil returns to the tank reducing the pressure The load check valve and the mechanical valve remain closed B Load check valve C Mechanical check valve D Tank E Unload valve ...

Страница 196: ... the pump increases to cause the oil to go through the throttle in the spool to the cylinder after opening the check valve This is the process of a rapid pressure increase The flow control valve and mechanical check valve are both closed When the hydraulic lift rises a feedback takes place to make the spool return to the neutral position and the main spool throttle makes part of oil flow through t...

Страница 197: ...Tank Oil in hydraulic cylinder 1 Cylinder 2 Slow return valve 3 Mechanical check valve 4 Tank Oil from the hydraulic pump opens the unload valve and returns to the tank likewise in the neutral condition The oil in the cylinder returns to the tank by opening the mechanical check valve by moving the spool through the pin A Flow control valve B Load check valve C Mechanical check valve D Tank E Unloa...

Страница 198: ...1 Safety Valve 2 Relief Valve 3 Flow Control Valve 4 Valve Spool 5 Unload Valve 6 Stop Valve 7 Check Valve 8 Mechanical Check Valve 9 Load Check Valve Hydraulic power port Single action 10 Out IN to from actuator Double action 11 IN from actuator 12 OUT to actuator 13 Plug up to use double action port ...

Страница 199: ...AULIC LIFT UNIT EF494T TM 06 2011 edition 191 1 When operating the relief valve For details about the valve operating principle see 9 1 4 2 When operating the safety valve For details about the valve operating principle see 9 1 5 ...

Страница 200: ...sembling disassembling the control valve The control valve is located in the back of the hydraulic cylinder case First remove the hydraulic cylinder case assembly NOTE Never fail to adjust the feedback link after the control valve assembly is adjusted and installed A Control valve B Hydraulic cylinder case ...

Страница 201: ... 14 0 15 0 ring IA P 16 0 16 Mechanical check valve CMP 17 Mechanical check valve sub CMP 18 Backup ring 19 0 ring ID S14 0 20 O ring 1BS16 0 21 0 ring 1 A P 7 0 22 Mechanical check SP 23 Plug M check seat 24 Push bar 25 Push bar 26 Bolt 8 x 14 IMPORTANT When disassembling Never loosen M10 bolts A fixing the push bar of the mechanical check valve Springs of respective valves look like do not mix t...

Страница 202: ... output block Note Size 3 4 16 UNF 3 Start the engine and lower the hydraulic lift arm 4 Close the stop valve increase the engine speed and set the control lever to the position of UP Read the tester when relief valve chattering noise is heard Specified pressure 170 178 kgf cm2 16 7 17 4 MPa A Attach the hydraulic pressure tester here If pressure is too high Remove shims If pressure is too low Ins...

Страница 203: ...ition and listen relief valve chattering noise If no noise turn position feed back rod to raise lift arm A until the noise comes 4 Adjust length of position feedback rod B so that the free play C from the highest would be 15 15mm or height of the lift arm A is 317 mm IMPORTANT As a guide adjust the play C in the lift arm A to 10 to 15 mm when in the highest position Rod lengthened Lift arm lowers ...

Страница 204: ...se of a single action cylinder remove the hydraulic output plug on cylinder case left side and connect the hose from an implement Operation 1 Set the position control lever at about 50 mm below the highest position 2 To hydraulic stop valve clockwise fully to close 3 Remove the front cover C and plug D of the hydraulic output Connect hydraulic hose of the implement NOTE Keep copper packing and plu...

Страница 205: ...TF 1 4 18 198245 42160 C 1 Filter adapter 3 4 16UNF 1A7780 45950 C 2 Gasket 19x1 0 23414 190000 D Plug 3 4 16UNF NOTE Rear hitch implement can be controlled by position control lever Keep plug D for future reuse IMPORTANT Double action operation should be performed using the implement s operation lever CAUTION Takeoff of the external hydraulic pressure should always be performed at the specified p...

Страница 206: ...e is below the setting for the relief valve the high pressure hydraulic oil is fed to the control valve mounted under the hydraulic cylinder case The hydraulic circuit is switched by the control valve to move the 3 point hitch up and down When the control valve is in the neutral position the hydraulic oil under pressure is returned to the transmission through the unload valve IMPORTANT If the impl...

Страница 207: ...ake off for the double action hydraulic pressure Since high pressure hydraulic oil fed into the hydraulic cylinder case can not escape through the hole closed by the screw plug it will be fed to the implement s valve through the external takeoff port When the implement s valve is in the neutral position the high pressure hydraulic oil is returned to the transmission just as in the case of the 3 po...

Страница 208: ...e and the returning hydraulic oil is sent to the transmission through the control valve When the implement s cylinder stops moving due to an obstacle the high pressure hydraulic oil will not flow from the takeoff outlet into the implement s valve Instead it will flow to the transmission through the relief valve which will open due to the increased pressure This action protects the hydraulic circui...

Страница 209: ...der stops moving due to an obstacle and since there is no relief valve in the hydraulic circuit there is no place where the high pressure hydraulic oil can escape Then the high pressure hydraulic oil will flow from the unload valve to the transmission while applying high pressure to all of the hydraulic circuits CAUTION The hydraulic circuit and other parts will be damaged The supply of external h...

Страница 210: ...10 ELECTRIC EQUIPMENT 10 ELECTRIC EQUIPMENT EF494T TM 06 2011 edition 202 10 ELECTRIC EQUIPMENT ...

Страница 211: ...ponents 1 2 3 4 5 6 7 8 2 Slow blow fuse 6 Fuel feed pump 7 Body earth 8 Fuse box 1 Battery 3 Starter motor 14 PTO N switch 12 Key switch 9 Starter relay 10 Solenoid relay 11 Timer 4 Fuel shut off solenoid 5 Diode 13 Main shift N switch Fuel feed pump Diode Body earth Fuel shut off solenoid Starting motor Fuse box Slow blow fuse Battery ...

Страница 212: ...10 ELECTRIC EQUIPMENT 10 ELECTRIC EQUIPMENT EF494T TM 06 2011 edition 204 9 10 11 12 13 14 PTO N switch Start relay Solenoid relay Either of these Timer Key switch Main shift N switch ...

Страница 213: ... injection pump 7 Body earth 8 Fuse 5A Fuse 198535 52110 Fuse for Fuel feed pump Stop solenoid and Neutral switches Inside of front Column 9 Start relay Starter relay 1A7870 52950 It is activated when the range shift lever PTO lever are set to the N position It gives requisites for application of 12 V to the terminal S of the starter motor 10 Solenoid relay It is activated when the range shift lev...

Страница 214: ...10 ELECTRIC EQUIPMENT 10 ELECTRIC EQUIPMENT EF494T TM 06 2011 edition 206 10 1 2 Circuit diagram Engine start ...

Страница 215: ...minal M Terminal S Continuity Terminal M Terminal B The pinion is drawn out Continuity Range Measuring point Status Result Tester probe Tester probe DCV Terminal B Chassis grounding Approx 12 V Terminal S Chassis grounding Reverser N PTO N Approx 12 V Battery terminal Battery terminal Result Starter body Connect to terminal M The motor runs Starter body Connect to terminal S The pinion is drawn ou...

Страница 216: ...r of the governor The fuel shut off solenoid allows the operator to start or stop the diesel engine using the starter switch only This is a dual coil type solenoid having a fail safe feature if a failure occurs in the electric system the return spring in the solenoid will cause the engine to stop Range Measuring point Status Result Tester probe Tester probe Ω 2 1 Approx 12 4 Ω Ω 3 1 Approx 0 33 Ω ...

Страница 217: ...lunger 7 Return spring 5 Diode Diode 1A8160 51130 Individual component check A end Range Measuring point Status Result Tester probe Tester probe Continuity 1 2 Yes 2 1 None 3 4 Yes 4 3 None The hold coil is magnetized The pull coil is magnetized and the plunger is pulled The hold coil holds the plunger The return spring urges the plunger to move back ...

Страница 218: ...0 Solenoid relay Relay CB 1A7870 52950 Single item check Range Measuring point Status Result Tester probe Tester probe Continuity 1 3 No continuity Resistance 2 4 Cold Approx 103Ω 11 Timer Timer 129211 77920 Single item check cannot be done Range Measuring point Status Result Tester probe Tester probe Resistance 1 2 Approx 11 M Ω Continuity 2 1 None 1 0 5R 2 0 5B A end coupler ...

Страница 219: ...ety starter switch 194464 52190 Single item check Range Measuring point Key switch status Result Tester probe Tester probe 3 2 OFF Continuity 2 1 ON Continuity 3 1 ON Continuity Continuity 2 1 ST Continuity 3 1 ST Continuity 4 1 ST Continuity 5 1 ST Continuity Range Measuring point Status Result Continuity Between terminals 1 and 2 Plunger pressed Continuity Between terminals 1 and 2 Plunger free ...

Страница 220: ... 2011 edition 212 10 2 CHARGING CIRCUIT 10 2 1 Location and operation of components 1 2 3 4 5 6 Slow blow fuse Starting motor Fuse box Key switch Instrument Panel Battery 3 Alternator 4 Fuse box 6 Key switch 2 Slow blow fuse box 5 Instrument Panel 1 Battery ...

Страница 221: ...t protects wiring electric equipment related to battery charge Engine left side 3 Alternator 40 A Generator 119620 77201 It generates electric power while the engine runs and charges the battery IC regulator incorporated type Front column 4 Fuse box Fuse 5A 198535 52110 Fuse for indicator lamp 5 Instrument panel Panel assy 1A7780 56502 It displays information of the machine 6 Key switch Starter sw...

Страница 222: ...ternator coupler without removing B terminal With removal of IG and L terminal couplers Instrument panel Panel assy Inst 1A7780 56502 When the key switch is turned to ON charge lamp 1 turns on Turning the key switch further to SATRT the engine runs and the charge lamp turns off after a while 1 Charge lamp 6 Key switch See Electric equipment 10 1 1 12 Key switch Range Measuring point Status Result ...

Страница 223: ...ation and operation of components 1 2 3 4 5 6 Oil pressure switch Body earth Fuse box 1 Battery 2 Slow blow fuse 9 Alternator 40 A 3 Water temperature sensor 5 Body earth 6 Fuse box 7 Instrument panel 10 Fuel gauge sensor 4 Oil pressure switch 8 Key switch Water temperature sensor Slow blow fuse Battery ...

Страница 224: ...l pressure switch L O switch 0 5 KG 114250 39450 When the engine lubricating oil pressure is decreased the meter lamp Engine oil pressure pilot lamp blinks 5 Body earth 6 Fuse 5A Fuse 198535 52110 Fuse for alarm circuit Stop solenoid and Neutral switches Front column 7 Instrument panel Panel assy 1A7780 56502 Displays information of the machine 8 Key switch Starter switch CMP 198162 52110 Used for...

Страница 225: ...10 ELECTRIC EQUIPMENT 10 ELECTRIC EQUIPMENT EF494T TM 06 2011 edition 217 10 3 2 Circuit diagram Alarm ...

Страница 226: ... 0 1 kgf cm2 Range Measuring point Result Tester probe Tester probe Ω 1 Chassis grounding Resistance alters depending on the coolant temperature DCV 2 Chassis grounding Approx 5 0 V DC when the key switch is turned on Temperature C Resistance Ω Temperature C Resistance Ω 35 670 105 54 5 50 350 115 42 2 5 80 118 6 120 36 2 100 63 5 140 22 Range Measuring point Result Tester probe Tester probe Conti...

Страница 227: ...3 Water temperature gage 8 Key switch See Electric equipment 10 1 1 12 Key switch 9 Alternator 40 A See Electric equipment 10 2 3 2 Alternator 10 Fuel gauge sensor Fuel sensor assy 198240 56600 Single item check Values in parentheses are reference only Range Measuring point Float position Result Tester probe Tester probe Ω 1 2 F 3 2 Ω 1 2 32 5Ω E 110 7 Ω ...

Страница 228: ...0 4 1 Location and operation of components 1 2 3 4 5 Head lamp Horn Battery Slow blow fuse Body earth 1 Head lamp 2 Horn 3 Battery 5 Body earth 6 Fuse box 7 Head lamp relay 8 Flasher relay 11 Turn signal lamp 9 Key switch 13 Working lamp Option 4 Slow blow fuse 12 Tail lamp 10 Combination switch ...

Страница 229: ...ECTRIC EQUIPMENT 10 ELECTRIC EQUIPMENT EF494T TM 06 2011 edition 221 6 7 8 9 10 11 12 Key switch Fuse box Head lamp relay 2pcs For High Low beams Tail lamp Turn signal lamp Flasher relay A Combination switch ...

Страница 230: ...lumn 5 Body earth 6 Fuse box Fuse 5A 198535 52110 Fuse 15A 198535 52130 Fuse for lamp circuits 7 Head lamp relay Relay ACM13211M01 1K1140 82500 2 pieces of relay are provided for Low and High beams Inside of front column 8 Flasher relay Flasher relay 1E6650 82400 Relay for blinking flasher lamps Front column 9 Flasher relay Key switch Starting switch 198162 52110 Used for ON OFF of the battery pow...

Страница 231: ...10 ELECTRIC EQUIPMENT 10 ELECTRIC EQUIPMENT EF494T TM 06 2011 edition 223 10 4 2 Circuit diagram Safety ...

Страница 232: ...k 7 Head lamp relay Relay ACM13211M01 1K1140 82500 Single item check Range Measuring point Result Tester probe Tester probe Continuity 1 4 Continuity Continuity 1 2 No continuity Continuity 2 4 No continuity Ω 3 5 Approx 120Ω 8 Flasher relay Flasher relay 1E6650 82400 Single item check cannot be done Blinking 60 120 times min Range Measuring point Result Remarks Resistance 1 2 Approx 0 3 Ω Low bea...

Страница 233: ...ty 3 8 Flasher right Continuity 3 7 Flasher left 2 5 Lighting 2 6 Low beam 2 1 High beam 4 9 Horn 12 Turn signal lamp right and left 20 W Turn signal lamp 198010 53400 Bulb 12V20W 194200 53400 Single item check Range Measuring point Key switch status Result Tester probe Tester probe 3 2 OFF Continuity 2 1 ON Continuity 3 1 ON Continuity Continuity 2 1 ST Continuity 3 1 ST Continuity 4 1 ST Continu...

Страница 234: ...11 APPENDIXES 11 APPENDIXES EF494T TM 06 2011 edition 226 11 APPENDIXES ...

Страница 235: ...11 APPENDIXES 11 APPENDIXES EF494T TM 06 2011 edition 227 11 1 HYDRAULIC CIRCUIT DIAGRAM ...

Страница 236: ...228 11 2 ELECTRICAL CIRCUIT DIAGRAM 11 2 1 WIRING HARNESS ...

Страница 237: ...ec 10 Battery 11 Battery cable 12 Harness Head lamp 13 Harness A 14 Meter cable 15 Head lamp relay x2 16 Instrument panel 17 Starting motor 18 Combination switch 19 Kew switch 20 Transmission neutral switch 21 Harness flasher 22 Flasher lamp 23 Tail lamp 24 Fuel gauge sensor 25 PTO neutral switch 26 Flasher relay 6 11 2 2 LOCATION OF ELECTRICAL PARTS ...

Страница 238: ...230 11 2 3 ELECTRICAL WIRING DIAGRAM ...

Страница 239: ......

Отзывы: