4 - 83
ENG
CONNECTING RODS AND PISTONS
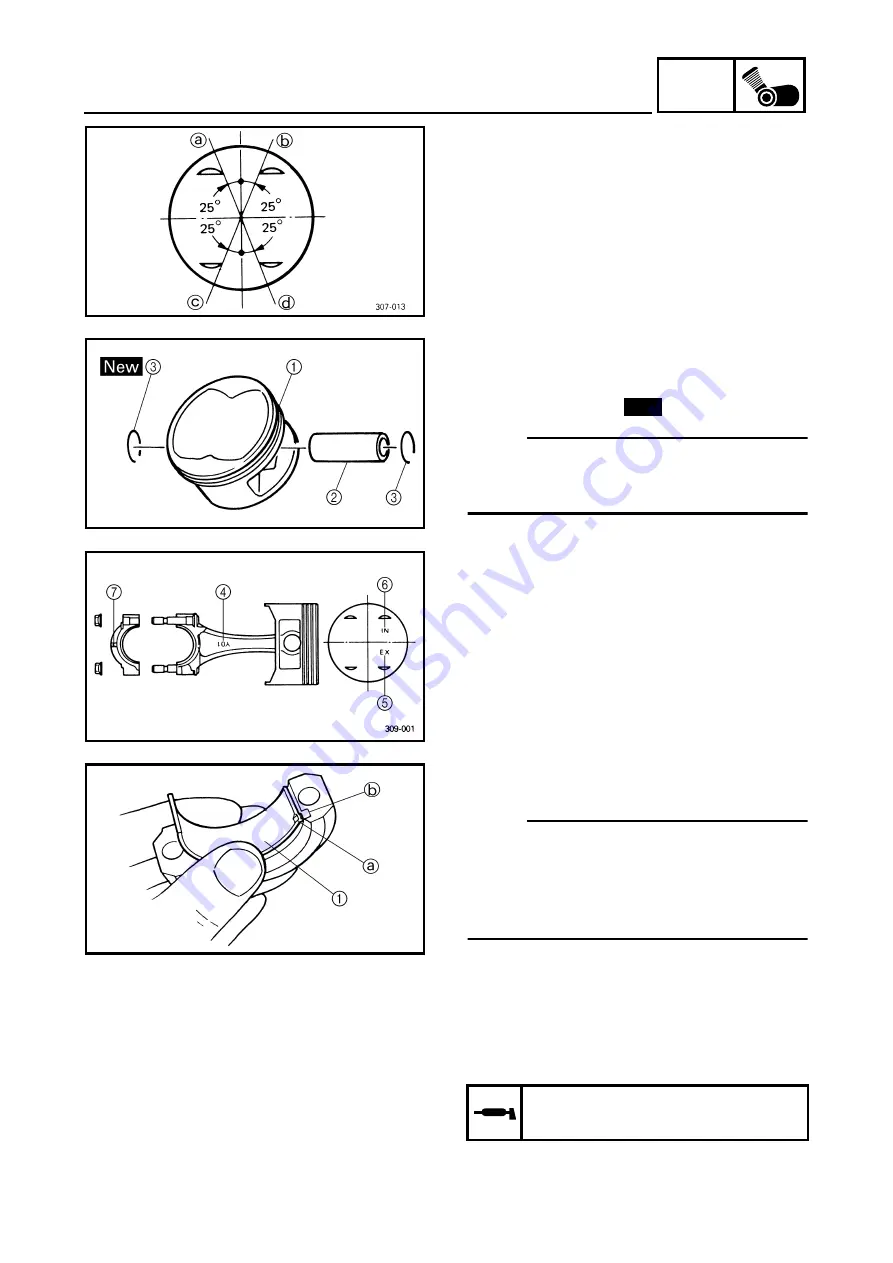
2. Position:
• top ring
• 2nd ring
• oil ring
Offset the piston ring end gaps as shown.
a
Top ring end
b
Lower oil ring end
c
Upper oil ring end
d
2nd ring end
3. Install:
• piston
1
• piston pin
2
• piston pin clip
3
NOTE:
@
• Apply engine oil onto the piston pin.
• Be sure that the piston is positioned cor-
rectly, as shown in the illustration.
@
4
“Y” mark
5
“EX” exhaust side
6
“IN” exhaust side
7
Projection
New
4. Install:
• big end bearings
1
NOTE:
• Align the projections
a
on the big end bear-
ings with the notches
b
in the connecting
rods and connecting rod caps.
• Be sure to reinstall each big end bearing in
its original place.
5. Lubricate:
• piston
• piston rings
• cylinder
(with the recommended lubricant)
Recommended lubricant
Engine oil
Содержание VMX12 2001
Страница 1: ...VMX12 2001 3LRD AE1 SERVICEMANUAL ...
Страница 2: ......
Страница 8: ......
Страница 9: ...GEN INFO 1 ...
Страница 11: ...GEN INFO ...
Страница 21: ......
Страница 22: ...SPEC 2 ...
Страница 24: ...SPEC ...
Страница 52: ...2 28 SPEC OIL FLOW DIAGRAMS 1 Camshaft 2 Main gallery 3 Crankshaft 4 Oil level switch ...
Страница 54: ...2 30 SPEC OIL FLOW DIAGRAMS 1 Crankshaft 2 Oil pipe 3 Oil filter ...
Страница 65: ...CHK ADJ 3 ...
Страница 125: ......
Страница 126: ...ENG 4 ...
Страница 130: ...ENG ...
Страница 150: ...4 20 ENG 4 Install timing mark accessing screw 1 crankshaft end cover 2 T R 7 Nm 0 7 m kg CAMSHAFTS ...
Страница 236: ......
Страница 237: ...COOL 5 ...
Страница 239: ...COOL ...
Страница 258: ...CARB 6 ...
Страница 260: ...CARB ...
Страница 272: ......
Страница 273: ...CHAS 7 ...
Страница 389: ......
Страница 390: ...ELEC 8 ...
Страница 396: ...8 4 ELEC SWITCHES ...
Страница 417: ...8 25 ELEC STARTER MOTOR 3 Install O rings 1 bolts 2 New T R 5 Nm 0 5 m kg ...
Страница 445: ...TRBL SHTG 9 ...


