


4 - 19
ENG
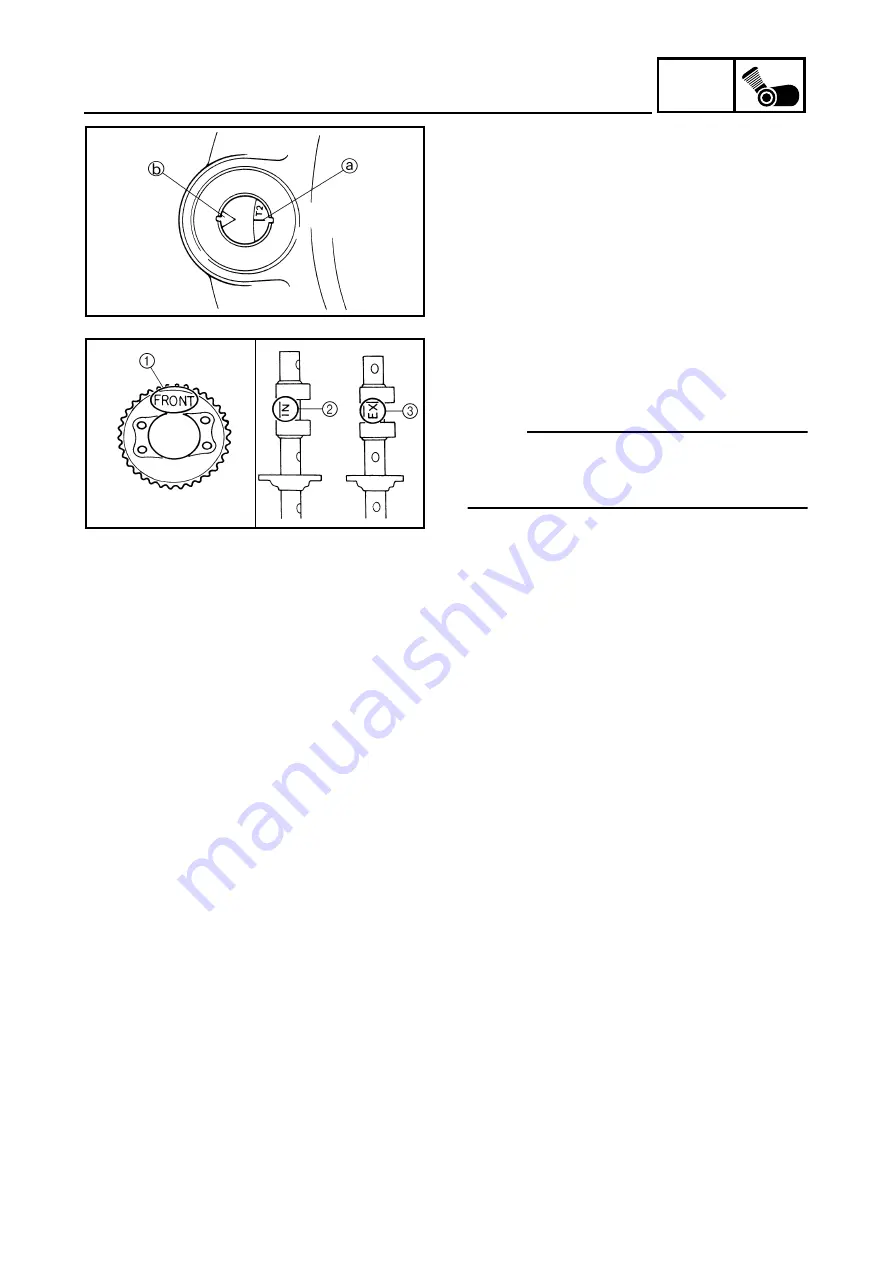
CAMSHAFTS
1. Install:
• exhaust camshaft
• intake camshaft
▼▼▼▼▼▼▼▼▼▼▼▼▼▼▼▼▼▼▼▼▼▼▼▼▼▼▼▼▼▼▼
a. From the “T1” marks, turn the crankshaft
counterclockwise 430° (i.e., 360° plus an
additional 70°).
b. When piston #2 is at TDC on the compres-
sion stroke, align the “T2” mark
a
with the
stationary pointer
b
.
c. Install the camshaft sprockets onto the
camshafts.
Refer to the camshaft sprocket installation
steps below.
NOTE:
@
Make sure the “FRONT” marks
1
on the cam-
shaft sprockets face away from the “IN”
2
and
“EX” marks
3
on the camshafts.
@
d. Turn the camshafts by hand so that the
camshaft timing marks (o: big hole) face up.
▲▲▲▲▲▲▲▲▲▲▲▲▲▲▲▲▲▲▲▲▲▲▲▲▲▲▲▲▲▲▲
2. Install:
• intake camshaft sprocket
• exhaust camshaft sprocket
(onto the camshafts)
▼▼▼▼▼▼▼▼▼▼▼▼▼▼▼▼▼▼▼▼▼▼▼▼▼▼▼▼▼▼▼
a. Align the “T2” mark on the generator rotor
with the stationary pointer.
b. Install the camshaft sprocket with the
“FRONT” mark facing out, and then finger
tighten the camshaft sprocket bolts.
c. Turn the intake and exhaust camshafts and
align the camshaft timing marks (o: big
hole) with the camshaft cap marks.
▲▲▲▲▲▲▲▲▲▲▲▲▲▲▲▲▲▲▲▲▲▲▲▲▲▲▲▲▲▲▲
3. Measure:
• valve clearance
Out of specification
→
Adjust.
Refer to “ADJUSTING THE VALVE
CLEARANCE” in chapter 3.
Содержание VMX12 2001
Страница 1: ...VMX12 2001 3LRD AE1 SERVICEMANUAL ...
Страница 2: ......
Страница 8: ......
Страница 9: ...GEN INFO 1 ...
Страница 11: ...GEN INFO ...
Страница 21: ......
Страница 22: ...SPEC 2 ...
Страница 24: ...SPEC ...
Страница 52: ...2 28 SPEC OIL FLOW DIAGRAMS 1 Camshaft 2 Main gallery 3 Crankshaft 4 Oil level switch ...
Страница 54: ...2 30 SPEC OIL FLOW DIAGRAMS 1 Crankshaft 2 Oil pipe 3 Oil filter ...
Страница 65: ...CHK ADJ 3 ...
Страница 125: ......
Страница 126: ...ENG 4 ...
Страница 130: ...ENG ...
Страница 150: ...4 20 ENG 4 Install timing mark accessing screw 1 crankshaft end cover 2 T R 7 Nm 0 7 m kg CAMSHAFTS ...
Страница 236: ......
Страница 237: ...COOL 5 ...
Страница 239: ...COOL ...
Страница 258: ...CARB 6 ...
Страница 260: ...CARB ...
Страница 272: ......
Страница 273: ...CHAS 7 ...
Страница 389: ......
Страница 390: ...ELEC 8 ...
Страница 396: ...8 4 ELEC SWITCHES ...
Страница 417: ...8 25 ELEC STARTER MOTOR 3 Install O rings 1 bolts 2 New T R 5 Nm 0 5 m kg ...
Страница 445: ...TRBL SHTG 9 ...