background image

MENU Button

71

DTX-PRO DTX-PROX Reference Manual

3.

Press the “IMPORT” button ([F3]) and the confirmation 
screen appears.

4.

Press the “YES” button ([F1]) to import.
Press the “NO” button ([F3]) to cancel the Import and the 
screen returns to Step 1.

Press the “CANCEL” button ([F3]) during Import to stop the Import 
and the screen returns to Step 1.

Completed

.” appears when the Import is complete, and the screen 

returns to the Import All screen.

Not all files may be imported depending on the condition or the number of 
audio files.

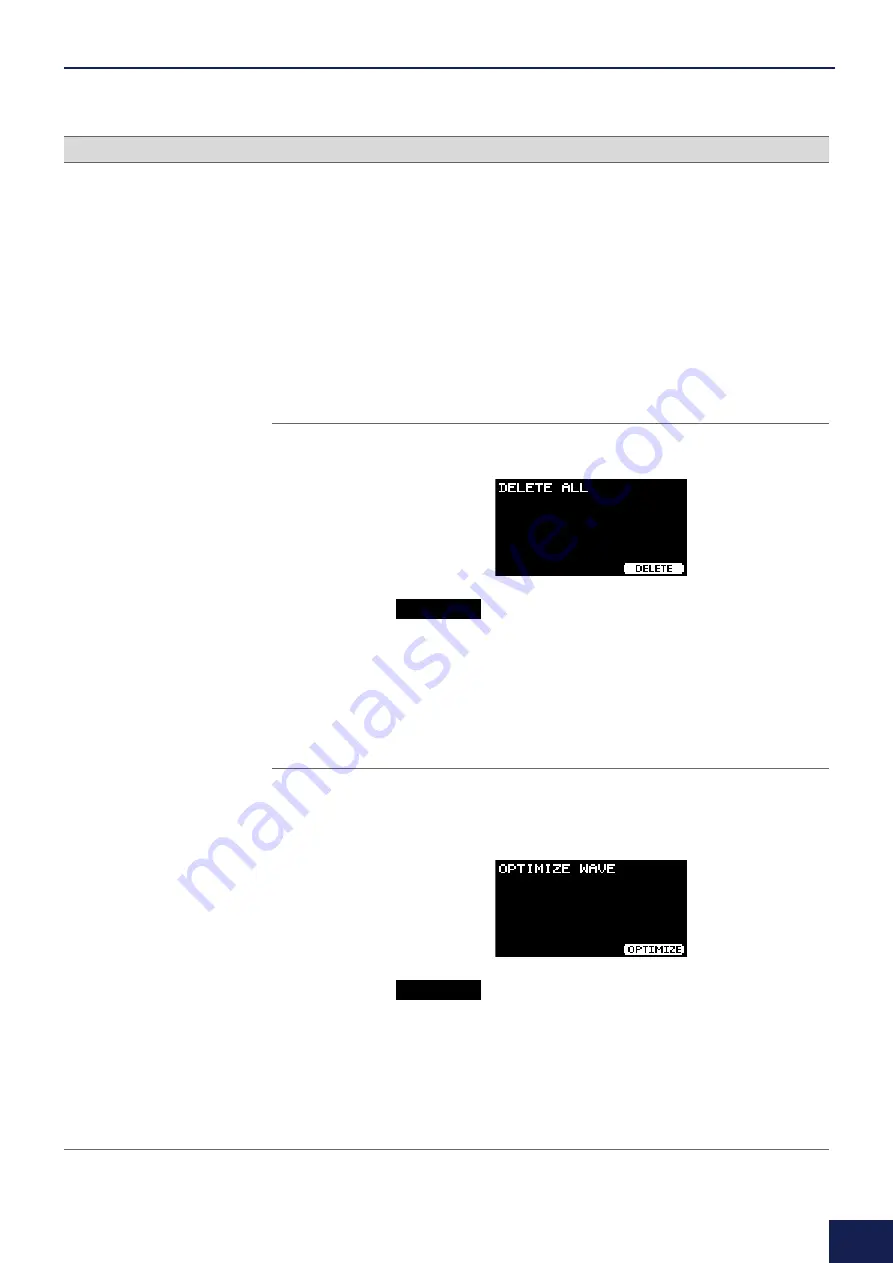
Delete All

Deletes all waves from the internal wave memory of the PRO series 
module.

1.

Press the “DELETE” button ([F3]) and the confirmation 
screen appears.

2.

Press the “YES” button ([F1]) to delete all waves.
Press the “NO” button ([F3]) to cancel deletion and the 
screen returns to Step 1.

Completed

.” appears when the deletion is complete, and the 

screen returns to the Delete All screen.

Optimize Wave

Optimizes the wave memory of the PRO series module. Optimization 
reorganizes the memory content to make more efficient and effective 
use of memory space. Optimizing memory can increase the amount of 
free contiguous memory space.

1.

Press the “OPTIMIZE” button ([F3]) and the confirmation 
screen appears.

2.

Press the “YES” button ([F1]) to optimize the memory.
Press the “NO” button ([F3]) to cancel optimization and the 
screen returns to Step 1.

Completed

.” appears when Optimization is complete, and the 

screen returns to the Optimize screen.

Screen

Parameter

Description

NOTE

Procedure

Procedure

Содержание DTX-PRO

Страница 1: ...1 DTX PRO DTX PROX Reference Manual EN Drum Trigger Module Reference Manual Manual Development Group 2021 Yamaha Corporation Published 09 2021 PO B0 ...

Страница 2: ...rces 9 Trigger Input Jack Input Mode 10 Sounds that are played by trigger Inst and Voice 11 Voices and Layers 11 User Voices 12 Importing to User Voices 12 Changing the way a user voice is played one shot or Loop 12 Editing and auditioning user voices 12 Selecting the Trigger Input or Trigger Input Source 13 Individual Trigger Input Settings 13 Individual Trigger Input Source Settings 14 Pad Selec...

Страница 3: ... Bluetooth DTX PROX 88 Factory Reset 89 Version 91 KIT Mode 92 Playing imported audio files as Inst sounds 92 CLICK Mode 95 SETTING F3 Function List 95 SETTING F3 Parameter Descriptions 96 Playing imported audio files as Click sounds 98 RECORDER Mode 99 SETTING F3 Function List 99 SETTING F3 Parameter Descriptions 100 Practicing with the Training Feature 101 Starting and Ending Training 102 Detail...

Страница 4: ...ion 124 Editing Live Sets 124 Selecting the Step You Want to Edit from LIVE SET 124 Registering Steps 126 Matching Click to the Tempo of the Audio File 128 Deleting Steps 129 Sorting Steps 130 Saving a Customized Live Set under a New Name 130 Using the stored Live Sets 131 Settings for live performances 133 Settings 133 Functions 134 Connecting a Computer 135 Installing the Yamaha Steinberg USB Dr...

Страница 5: ...commend updating the firmware https download yamaha com DTX PROX The DTX PROX provides Live Set functions and INDIVIDUAL OUTPUT jacks in addition to the same functionalities as those of the DTX PRO The same Training menus as those on the DTX PRO can be accessed from the MENU button 120 CLICK Metronome KIT MODIFIER TRAINING RECORDER 120 Mode select knob Fader select knob LED rotary faders Sliders C...

Страница 6: ...wing icons and background colors are used to distinguish between each model NOTICE and NOTE Applies only to the DTX PRO Applies only to the DTX PROX Applies only to the DTX PROX Bluetooth equipped models NOTICE Descriptions of issues which may cause failure or damage to the device malfunction or data loss Supplementary descriptions Reference Manual Notations PRO PROX PROX with Bluetooth NOTE ...

Страница 7: ...rum set sound MENU Kit Edit 37 Importing audio files KIT mode Playing imported audio files as Inst sounds page 92 40 Changing other click settings CLICK SETTING 42 43 Changing other recorder settings RECORDER SETTING 42 Exporting your performance recorded to the DTX PRO as an audio file MENU Job Recorder Export Audio 46 Training song selection training duration timer settings difficulty levels and...

Страница 8: ...d audio files as Inst sounds page 92 39 Changing the amount of effect applied to each Inst Fader Select FX page 120 39 Master EQ Phones EQ gain volume of the individual click timing send set tings on MIDI control change and other custom settings Fader Select CUSTM page 122 43 Changing other click settings CLICK SETTING 45 Changing the Trigger Settings TRIGGER SETTING 46 47 Changing other recorder ...

Страница 9: ... and the 4 jack can be used for a single piezo 3 zone pad or a multi piezo 2 zone pad The setting is changed automat ically when the PadType is selected Trigger input sources Trigger input source is a trigger signal transmitted from each zone of a pad When the PRO series modules receive a trigger signal from a pad they play the trigger input source The Relationship Between Trigger Input Jacks Trig...

Страница 10: ...ger signal received by the 3 jack is connected to the trigger input source KickRm The Pad13 signal is not produced Trigger input sources that are not set to be played from the pads connected to the trigger input jacks can be played from the external MIDI device Alternately you can press the F3 button on the screen for changing the Trigger input source to audition the trigger input source When usin...

Страница 11: ...ts electronic sounds and more In addition to the internal voices you can import audio files and play them as user voices Four layers A to D are provided for each trigger input source You can set a voice to each layer making it possible to assign up to four differ ent voices to each trigger input source You can play all four voices simultaneously or in sequential order Also you can set the velocity...

Страница 12: ...e used for other kits and user click sets You can import up to 10 audio files into each user voice However multiple waves cannot be played simultaneously Set the velocity range to each wave so that you can play a different wave in response to the strength of each strike If the velocity range overlaps for multiple waves the wave with the lower number will be played Generally the user voice stops af...

Страница 13: ...he DTX PROX you can use the PAD SELECT button to open the screen Selecting the Trigger Input or Trigger Input Source Trigger Input Example For MENU Kit Edit Inst Trigger Input Source Example For MENU Kit Edit Voice Trigger input name Trigger input source name and layer A B C or D Proceed to the screen for changing the trigger input Proceed to the screen for changing the trigger input source Screen...

Страница 14: ...ource The trigger input source can be changed with the controllers Name of the currently selected trigger input source Currently selected layer Layer selection Pad lock Auditioning sounds Pad Selection By pressing the PAD SELECT button different screens appear depending on the situation When you change the Inst using the fader select knob and LED rotary faders use the PAD SELECT button to switch b...

Страница 15: ...the effects applied to each kit and the effects applied to the entire system Effect Block Diagram WAVE Ambi WAVE RealAmbi InstDpt Transient Master EQ Phones EQ Comp Insertion Inst Effect Kit Modifier Ambience Kit Modifier Effect Kit Modifier Comp RealAmbi Depth toAmbi Send InstSend EQ Ambi FX1 FX2 Ambi InstDepth Ambi Depth Kit Edit System Setting MFX Comp ...

Страница 16: ... for RealAmbi and for Ambi are controlled You can increase the amount of RealAmbi first and then increase the amount of Ambi later When using an Inst that does not support RealAmbi select the curve in which Ambi becomes effective from the start Comp Comp is applied to the entire sound of your performance Effect This is comprised of the following three blocks MFX Master Effect This block is for the...

Страница 17: ...usts the attack and release Comp Finely adjusts the comp settings Insertion The same effect types as those of MFX can be used Note however that these effects cannot be applied to Pad3 Pad5 Pad7 or Pad13 Master EQ This is a five band EQ that adjusts the sound of your performance and the tone of training songs Note that this effect is not applied to sounds from the auxiliary input or click sounds Ph...

Страница 18: ...a Files All data saved in the PRO series modules can be saved to a USB flash drive Files saved to a USB flash drive can be loaded back into the PRO series modules However the DTX PROX files saved on a USB flash drive cannot be loaded to the DTX PRO For more information see MENU File page 76 DTX PRO DTX PROX User kits 200 User click sets 30 User songs 1 User voices 100 Waves Up to 1 000 Up to 10 pe...

Страница 19: ...u often call up and use Select a bookmark and then press the button below ENTER F3 to display the relevant parameter settings screen You can use the buttons below and F1 and F2 on the parameter settings screen to move the cursor between bookmarks Press the EXIT button to return to the bookmark Basic Screen Operations F1 and F2 Move the cursor up and down ENTER F3 Opens the screen Changes the value...

Страница 20: ...bi EQ LoGAIN Ambi EQ HiGAIN Ambi F M Frequency Modulation Ambi KnobVal RealAmbiKnob Ambi Knob Comp Comp Knob Effect MFX MFX Type MFX Depth FX1 FX1 Type FX1 Send FX1 InstSend FX1 toAmbi FX2 FX2 Type FX2 Send FX2 InstSend FX2 toAmbi Other EffectKnobVal EffectKnobMFX EffectKnobFX1 EffectKnobFX2 Inst Category InstNumber Import Wav Tuning Size Muffling Sustain Clutch Decay Pan MENU ...

Страница 21: ...pe CompAttack CompRelease CompThres CompRatio OutputLevel Insertion InsertionType InsertionDepth Voice Category VoiceNumber Import Wav VoiceTune VoiceDecay VoicePan VoiceFilter VoiceQ VoiceLayerSw VoiceHoldMode MessageType note AMBI COMP EFFECT CC01 CC95 Note 1 4 MinValue MIDI Ch MaxValue GateTime MIDI Ch CC only VelLo VelHi TrgVel Volume Kit Volume Inst Volume Voice Volume Other Tempo TrgSetupLin...

Страница 22: ...l PRO MIDI LocalCtrl Humanize AUX In Volume USB In Volume Rec Volume Song Volume Bluetooth Vol PROX Pad PadFunction Xstick Adjust Snare Position Ride Position FootClosePos FootSplashSens Output Gain L R Phones USB Audio Indiv 1 2 PROX Indiv 3 4 PROX Indiv 5 6 PROX Indiv 7 8 PROX Input Output AUX In Input Mode Phones Output USB Audio Backing Output Level USB Audio In Input Mode Phones Output USB Au...

Страница 23: ...ng Output Level AUX In Gain AUX In Gain Indiv Out PROX Master EQ MEQ Gain Lo LoMid Mid HiMid Hi MEQ Freq Low LowMid Mid HighMid High MEQ Q Low LowMid Mid HighMid High MEQ Shape Low High Phones EQ HPEQ Gain Lo LoMid HiMid Hi HPEQ Freq Low LowMid HighMid High HPEQ Q Low LowMid HighMid High HPEQ Shape Low High ...

Страница 24: ...Setup Click Sort Clear User Voice Voice Edit Sort Wave Import All Delete All Optimize Wave Wave Info Training Import SMF Clear Recorder Export Audio LiveSet PROX Sort Clear File Save Type File Load Type File Rename Type File Name Delete Type File Format Memory Info Bluetooth PROX Factory Reset Version ...

Страница 25: ...e set for each Inst voice settings set by input source or layer volume settings master volume Inst vol ume voice volume and others Kit Block Diagram NOTICE Save Store the kit once it has been customized to your liking Owner s Manual Customized kit data will be lost when you select another kit without first storing the settings MENU Kit Edit Parameter Descriptions Kit Edit Inst Voice Inst Effect Ki...

Страница 26: ...d settings for the KIT MODIFIER knobs A diagram of the relationship between the knobs and parameters is provided below Parameters associated with the knobs Ambi KnobVal RealAmbiKnob curve Ambi Knob curve RealAmbi Depth Ambi Depth Comp Knob MFX Depth FX1 Send FX2 Send EffectKnobMFX EffectKnobFX1 EffectKnobFX2 EffectKnobVal ...

Страница 27: ...so control this parameter with the AMBIENCE knob RealAmbiInstDpt 0 100 Adjusts the depth of RealAmbi to be applied to each Inst Ambi InstDepth 0 127 Adjusts the depth of Ambi to be applied to each Inst Ambi Type Effect Type page 143 Sets the Ambi type Ambi TIME 0 3s 30 0s Adjusts the Ambi length Ambi EQ LoGAIN 12 0 12 Adjusts the gain of the low band for Ambi to be adjusted with the EQ Ambi EQ HiG...

Страница 28: ...lled with the AMBIENCE knob RealAmbiKnob Ambi Knob Choose the curve for controlling the RealAmbi Depth or Ambi Depth to be applied when the AMBIENCE knob is turned off RealAmbi Depth or Ambi Depth will not change when the AMBIENCE knob is turned curve1 curve2 curve3 curve4 Screen Parameter Settings Description Depth Knob Value Depth Knob Value Depth Knob Value Depth Knob Value ...

Страница 29: ...ust the value controlled with the COMP knob Effect MFX MFX Type Effect Type page 145 Selects the type of Master Effect to be applied MFX Depth 0 127 Sets the depth of Master Effect to be applied You can use this parameter to finely adjust the value controlled with the EFFECT knob Screen Parameter Settings Description Depth Knob Value Depth Knob Value Depth Knob Value ...

Страница 30: ...Send 0 127 Adjusts the level of the entire sound to be sent to Effect 2 FX2 InstSend 0 127 Adjusts the level of the Inst sound to be sent to Effect 2 FX2 toAmbi 0 127 Adjusts the level of Effect 2 to be sent to Ambi Other EffectKnobVal 0 127 This value is adjusted with the EFFECT knob You can use this parameter to finely adjust the value controlled with the EFFECT knob EffectKnobMFX off on Sets wh...

Страница 31: ...rts audio files When you press the button below ENTER F3 the IMPORT screen appears Different parameters will be shown depending on the Inst category Tuning 12 00 0 00 12 00 Adjusts the pitch in units of 25 cents 0 01 corre sponds to 1 cent A cent is a unit of pitch defined as one hundredth of a semitone 100 cents 1 semitone Size 32 0 32 Simulates the effect of changing the cymbal size Muffling 0 1...

Страница 32: ... of the high band to be adjusted with the EQ EQ Freq EQ LowFreq 32Hz 2 0kHz Adjusts the frequency of the low band to be adjusted with the EQ EQ MidFreq 100Hz 10kHz Adjusts the frequency of the mid band to be adjusted with the EQ EQ HiFreq 500Hz 16kHz Adjusts the frequency of the high band to be adjusted with the EQ EQ MidWidth 0 1 12 0 Adjusts the width of the mid band Transient TranAttack 50 0 50...

Страница 33: ...e Comp effect reaches its peak CompRelease 10ms 680ms Sets the duration until the Comp effect fades away CompThres 48dB 6dB Sets the input level at which Comp starts being applied CompRatio 1 0 20 0 Sets the compression ratio of the Comp effect OutputLevel 18 0dB 0 0dB 18 0dB Sets the output level Insertion These parameters cannot be set for Pad3 Pad5 Pad7 or Pad13 InsertionType Effect Type page 1...

Страница 34: ... IMPORT screen appears VoiceTune 24 0 0 0 24 0 0 1 10 cents Sets the tuning of the voice assigned 0 1 cor responds to 10 cents VoiceDecay 64 0 Sets the decay the time it takes for the sound to fade away to silence for the voice assigned The smaller the value the crisper the sound produced becomes VoicePan L63 C R63 Sets the stereo pan of the voice VoiceFilter 64 0 63 Sets the filter cutoff frequen...

Страница 35: ...fter the gate time has elapsed MessageType Sets the type of MIDI message to be sent when the pad is struck Any setting other than note does not produce a sound when the pad is struck note Sends a MIDI note Use this parameter to set the pad to produce a sound when struck You can assign a MIDI note to each layer to send up to four MIDI notes at once Note 1 4 off 1 C 2 127 G8 Sets the MIDI note numbe...

Страница 36: ...b according to how hard the pad is struck No sound is pro duced when the pad is struck MinValue 0 127 Sets the amount of Comp minimum value applied when the pad is struck lightly MaxValue 0 127 Sets the amount of Comp maximum value applied when the pad is struck strongly EFFECT Controls the amount of Effect knob according to how hard the pad is struck No sound is pro duced when the pad is struck M...

Страница 37: ...between layers MENU Kit Edit Other Screen Parameter Settings Description Tempo off 30 300 Sets the metronome tempo for the selected kit When set to off the tempo stays the same when the kit has been changed For using the metronome to check the tempo during live performance or for using tempo sync effects use the tempo set to the kit Note that this parameter is not applied to Live Sets on the DTX P...

Страница 38: ...With the DTX PROX you can change the trigger settings using the button below SETTING F3 Settings need to be stored after being changed In this section the screen examples are from the DTX PRO TRIGGER SETTING Input Mode Input Mode Sets how to use the mono 2 input jack Select paired when using a Drum Trigger DT50S or similar device MENU Trigger MENU Trigger Input Mode Screen Parameter Settings Descr...

Страница 39: ...the selected pad A velocity curve determines how the velocity of the sound is affected by how hard you strike the pad loud2 loud1 norm hard1 hard2 fix1 fix5 spl11 spl15 n o r m l o u d 1 h a r d 1 h a r d 2 l o u d 2 Velocity Trigger input level fix1 fix2 fix3 fix4 fix5 Velocity Trigger input level spl15 spl13 spl12 spl11 spl14 Velocity Trigger input level ...

Страница 40: ...n 40 DTX PRO DTX PROX Reference Manual spl21 spl25 ofs1 ofs5 Screen Parameter Settings Description spl25 spl24 spl23 spl22 spl21 Velocity Trigger input level ofs3 ofs4 ofs5 ofs2 ofs1 Velocity Trigger input level ...

Страница 41: ...PRO series modules come preloaded with pad types for each different set of characteristics allowing you to use them to their maximum potential MENU Trigger Pad Type Screen Parameter Settings Description PadType MENU Trigger Pad Type PadType Sets the pad type OFF KK KP128 KP125W 125 KP100 KP90 KP65 KU100 SN XP125SD X XP125SD M XP120 100 XP80 TP70S 70 TM XP125T X XP125T M XP105T X XP105T M XP120 100...

Страница 42: ...d Type RejectTimeTRIGGER SETTING Pad Type RejectTime RejectTime 4ms 500ms Trigger signals that occur within the time set here are regarded as double triggers and will not produce any sound Larger values increase the amount of time that no sound is produced In the following case a sound is output with the sec ond input even though it occurs within the reject time When Trigger Level of the second st...

Страница 43: ...ti piezo supported jack When using a mono 2 input jack this parame ter is effective only in the paired input mode H R Balance H49 H1 0 R1 R49 Sets the balance between the head and rim of a multi piezo pad If the head sound is produced when the rim is struck increase the R value to make the rim sound louder If the rim sound is produced when the head is struck press the button to increase the H valu...

Страница 44: ...g crosstalk they can also make it diffi cult to play other sounds at the same time Specified rejection level from P1 to P14 Level 0 1 99 Source Pad 1 Snare 2 Tom1 3 Pad3 4 Tom2 5 Pad5 6 Tom3 7 Pad7 8 Ride 9 Crash1 10 Crash2 11 HiHat 12 Kick 13 Pad13 14 Pad14 Resolves crosstalk between the pad that is dis played at the upper right of the screen and other individual pads For example in a case where ...

Страница 45: ...ect a pre set trigger setup 2 Press OK F3 to copy the trigger set tings to the user trigger setup currently being edited 3 Press EXIT to return to the TRIGGER screen 4 Press the STORE button to save the set tings PROX Procedure Training PROX Training DTX PROX The training menu can be accessed from the TRAINING button on the DTX PRO or by selecting Training in the DTX PROX menu For more information...

Страница 46: ...sable the Auto Power Off function NOTICE The time setting for the Auto Power Off function is approximate Unsaved data is lost when the PRO series modules are turned off by the Auto Power Off function Make sure to store data before the power is automatically turned off LCD Contrast 0 63 Adjusts the contrast on the screen L R Vol variable works with the MASTER VOLUME knob 1 127 fixed value Sets the ...

Страница 47: ...ze on off Sets whether to create a natural variation in sounds on or not off to prevent each note to be too uniform when striking the same pad repeatedly AUX In Volume 0 127 Sets the volume for the AUX IN jack USB In Volume 0 127 Sets the volume for the USB audio input Rec Volume 0 127 Sets the volume of recorder playback Song Volume 0 127 Sets the volume of training songs Bluetooth Vol 0 127 Sets...

Страница 48: ...ects the kit Kit number toggle kit Switches between kits Every time the pad is struck the setting changes between two kits Kit number 1 Kit number 2 inc tempo Increases the tempo value by 1 dec tempo Decreases the tempo value by 1 tap tempo Sets the tap tempo click start stop Starts or stops the click Screen Parameter Settings Description ...

Страница 49: ...nce Controls the amount of Ambience AMBIENCE knob value according to how hard the pad is struck MinValue The minimum amount of Ambience to be applied when the pad is struck lightly MaxValue The maximum amount of Ambience to be applied when the pad is struck strongly comp Controls the amount of Comp COMP knob value according to how hard the pad is struck MinValue The minimum amount of Comp applied ...

Страница 50: ...roduce the open rim shot when the pad is struck lightly Turn the cross stick setting off to always play the open rim shot sound Note that this parameter is not effective when a sin gle piezo pad is connected Snare Position off on Switches the position sensor on the snare pad on or off Turn the snare position on for creating tonal changes according to the location within a zone that is struck To us...

Страница 51: ...t in splash sounds being unintentionally produced when for example you depress the hi hat controller or the hi hat pedal lightly as you keep time It is a good idea to set this parameter to off if you do not want to play foot splashes MENU Utility Output Gain Screen Parameter Settings Description L R 18dB 12dB 6dB 0dB 6dB 12dB 18dB Sets the output gain for the L R jacks Phones Sets the output gain ...

Страница 52: ... other than PA HP the output desti nation switch is set to on Note that the output destination cannot be switched on or off for L guide R guide or PA HP stereo Outputs the audio source in stereo L mono Outputs the audio source only from the L chan nel in the center pan position R mono Outputs the audio source only from the R chan nel in the center pan position L Rmono Mixes the audio source from t...

Страница 53: ...io Out by moving the cursor with F2 and then changing the settings with the controllers this is separate from Phones volume settings R guide PA HP Uses only the L channel to output exclusively to Phones in the center pan position AUX IN only This is useful in live performance situations when connecting a PA system such as a mixer to the AUX IN jack to receive the audio signals mono audio Phones of...

Страница 54: ...ts available for the ALL setting PRESET1 Uses eight Indiv Out signal paths to output Kick Snare Tom and Cymbal HH in stereo PRESET2 Uses eight Indiv Out signal paths to output Kick Snare HH and Ride in mono and Tom and Crash in stereo PRESET3 Uses four Indiv Out 1 3 5 and 7 signal paths to output Kick Snare Tom and Cymbal HH in mono PRESET4 Uses three Indiv Out 1 3 and 5 signal paths to output Kic...

Страница 55: ... sound but provides greater routing flexibility Other Output Assign off L1 R2 L3 R4 L5 R6 L7 R8 L 1 2 R 1 2 L 3 4 R 3 4 L 5 6 R 5 6 L 7 8 R 7 8 L1 R2 L3 R4 L5 R6 L7 R8 L R 1 L R 2 L R 3 L R 4 L R 5 L R 6 L R 7 L R 8 ROUTING F3 TransCompInsByps off on Choose whether to bypass the Transient Comp or Insertion of the Inst effects to output to Indi vOut MixerBypass off on Choose whether to bypass the m...

Страница 56: ...ndiv Out on the DTX PROX In specific terms this five band master EQ allows the signal level to be freely boosted or cut around a center frequency specified for each of the bands In addition the low and high frequency bands can be set to either shelving or peaking type equalization With the DTX PROX you can quickly adjust the master EQ gain by setting the fader select to CUSTM and using the LED rot...

Страница 57: ...cies of the Low LowMid Mid HighMid and High frequency bands respectively LowMid 100Hz 10kHz Mid 100Hz 10kHz HighMid 100Hz 10kHz High 500Hz 16kHz MEQ Q Low 0 1 12 0 Use these parameters to change widths for the Low LowMid Mid HighMid and High fre quency bands respectively The greater the value the narrower the frequency range becomes resulting in sudden changes in tone The smaller the value the bro...

Страница 58: ...t frequencies in the vicinity of the center frequency will be boosted or cut High shelving Signals at frequencies below or above a specific frequency will be boosted or cut peaking Signals at frequencies in the vicinity of the center frequency will be boosted or cut Screen Parameter Settings Description EQ low Gain Center frequency Frequency Hz Gain Center frequency Frequency Hz EQ high Gain Cente...

Страница 59: ... the Low and High frequency bands can be set to either shelving or peaking type equalization Although results may vary depending on the headphones you use boost the Lo setting when low sounds such as kick are too quiet to hear Cut the Hi setting when cymbals are too loud With the DTX PROX you can quickly adjust the Phones EQ gain by setting the fader select to CUSTM and using the LED rotary faders...

Страница 60: ...ters to set the center frequen cies of the Low LowMid HighMid and High frequency bands respectively LowMid HighMid High HPEQ Q Low 0 1 12 0 Use these parameters to change widths for the Low LowMid HighMid and High frequency bands respectively The greater the value the narrower the frequency range becomes resulting in sudden changes in tone The smaller the value the broader the frequency range beco...

Страница 61: ...at frequencies in the vicinity of the center frequency will be boosted or cut High shelving Signals at frequencies below or above a specific frequency will be boosted or cut peaking Signals at frequencies in the vicinity of the center frequency will be boosted or cut Screen Parameter Settings Description EQ low Gain Center frequency Frequency Hz Gain Center frequency Frequency Hz EQ high Gain Cent...

Страница 62: ...before saving stor ing the settings However edits are retained in recall memory so changes can be recalled using the Recall Kit function The edited kit number and kit name are displayed If there is no recall data No data is displayed for the kit name 1 Press the RECALL button F3 and the confirmation screen appears 2 Press the YES button F1 to recall the data Press the NO button F3 to cancel the da...

Страница 63: ... INSERT button F3 Pressing the INSERT button F3 sets the rearranged order and changes the kit numbers accordingly Exchange Swaps the order of the two kits 1 Select the two kits that you want to swap 2 Press the EXCHANGE button F3 and the confirmation screen appears 3 Press the YES button F1 to change the order of the two kits Press the NO button F3 to cancel the swap and return to the screen in st...

Страница 64: ...1 Completed appears when the Initialization is complete and the screen returns to the Clear screen MENU Job Trigger Screen Parameter Description Trigger Setup Sets the sensitivity of all pads 1 Use the controllers to select a drum kit trigger setup 2 Press the OK button F3 With the DTX PROX the trigger setup for the drum kit you have selected will be copied to U01 to U10 The trigger setup name for...

Страница 65: ...position where you want it press the INSERT button F3 Pressing the INSERT button F3 sets the rearranged order and changes the click numbers accordingly Clear Initializes the selected click set 1 Use the controllers to select the click you want to ini tialize 2 Press the CLEAR button F3 and the confirmation screen appears 3 Press the YES button F1 to initialize the selected click set Press the NO b...

Страница 66: ...SB flash drive containing the audio file into the USB TO DEVICE terminal Editing user voices If the cursor is on the wave bank number press BANK F1 as many times as necessary to move to the user voice number User voices without imported audio files cannot be edited 1 Use the controllers to select the user voice you want to edit 2 Press the FUNC button F2 to choose the type of edit ing you want to ...

Страница 67: ...TE When the confirmation screen appears press the YES button F1 Press the NO button F3 to cancel changes NAME Use the controllers to select a character and then use the and buttons F1 and F3 to move the cursor to the next character position A user voice name of up to 16 characters can be assigned When you are finished entering all characters press the OK button F2 Audition sounds IMPORT Add DELETE...

Страница 68: ...In the confirmation screen press the YES button F1 Press the NO button F3 to cancel changes LO HI Select the target for editing Low or High with F3 and then set the value with the controllers You can also use with the COMP knob to set the lowest value and the EFFECT knob to set the highest value SPLIT When the confirmation screen appears press the YES button F1 Press the NO button F3 to cancel cha...

Страница 69: ...ears when a wave bank with waves is selected 3 Use the and buttons F1 and F2 to move the selected wave 4 After moving the wave to the position where you want it press the INSERT button F3 Pressing the INSERT button F3 sets the rearranged order and changes the wave bank numbers accordingly Additionally while a voice or a wave is selected you can use the button to delete it or the button to import a...

Страница 70: ...es can be imported TO EMPTY TO 1VCE Use the controllers to select a user voice to import BY NAME Prepare a file with the user voice number 001 100 and wave bank number 01 10 added to the beginning of the file name and save it on a USB flash drive Example Importing DTX wav to user voice 5 at wave bank 3 00503DTX wav SEL FILE 1 Use the controllers to select a file to import 2 Press the CHECK button ...

Страница 71: ...nfirmation screen appears 2 Press the YES button F1 to delete all waves Press the NO button F3 to cancel deletion and the screen returns to Step 1 Completed appears when the deletion is complete and the screen returns to the Delete All screen Optimize Wave Optimizes the wave memory of the PRO series module Optimization reorganizes the memory content to make more efficient and effective use of memo...

Страница 72: ...space is displayed in units of MB megabytes Also the free space for the entire memory is displayed as a percentage Fragmented memory may prevent importing of audio files even when there is sufficient space In such cases using Opti mize Wave for memory optimization can resolve the issue Units used to denote capacity may change according to memory size KB kilo byte MB megabyte Screen Parameter Descr...

Страница 73: ...u want to import 2 Use the and buttons F1 and F2 to select a file to import 3 Press the IMPORT button F3 to start importing Select training song number 1 to start playing the imported song However the imported song cannot be used for Song Part Gate or Song Score Gate Clear Initializes a user song Press the CLEAR button F3 to initialize the user song Procedure Procedure ...

Страница 74: ...Press the NO button F3 to cancel the export and the screen returns to Step 1 Completed appears when the export is complete and the screen returns to the Export screen NOTICE Recorded data will be lost when the power is turned off or when the factory reset operation is carried out Audio data is not backed up in All files Procedure Entering the File Name 1 Use the controllers to select a character a...

Страница 75: ...ition where you want it press the INSERT button F3 Pressing the INSERT button F3 sets the rearranged order and changes the Live Set numbers accordingly Clear Initializes the selected Live Set 1 Use the controllers to select the Live Set you want to initialize 2 Press the CLEAR button F3 and the confirmation screen appears 3 Press the YES button F1 to initialize the selected Live Set Press the NO b...

Страница 76: ...e of file Files that the PRO series modules use have a bin extension which is not displayed on the PRO series modules screen File size This refers to the size of the file The file size is determined by the amount of data saved in the file File size is measured in units indicated with a B byte Large files and also the memory capacity of devices are represented using units of KB kilobytes MB megabyt...

Страница 77: ...If the kit contains user waves the user waves are also saved MENU File Save Description Setting All All data all user kits all waves trigger settings utility data AllKit All user kit data waves used for all kits OneKit Selected user kit data waves used for the selected kit Trigger Trigger Settings NOTICE Songs recorded with the recorder internal memory are not saved in All files Use MENU Job Recor...

Страница 78: ...appears If you wish to overwrite the file press the button F1 to move the cursor to the file name and then use the control lers to select the file you want to overwrite Entering the File Name 1 Use the controllers to select a character and then use the and buttons F1 and F3 to move the cursor to the next character position A file name of up to 16 characters can be assigned 2 When you are finished ...

Страница 79: ...e file under a different name press the NO button F3 and the screen returns to step 2 6 Press the YES button F1 to save A message shown below appears during the Save process Pressing the CANCEL button F3 during the Save process stops the process and the screen returns to step 2 Completed appears when the Save process is complete and the screen returns to step 2 NOTICE Do not disconnect the USB fla...

Страница 80: ...es modules into the USB TO DEVICE terminal 2 Navigate to MENU File Load The following screen appears Type 3 Select the Type file type 3 1 Use the controllers to select the file type for the file you wish to load MENU File Load Description The PRO series modules cannot load the file if it is in a sub directory folder Setting All All data all user kits all waves trigger settings utility data AllKit ...

Страница 81: ... file you want to load When the kit contains user waves the user waves are also loaded 5 Press the LOAD button F3 The Load confirmation screen appears 6 Press the YES button F1 to load The message shown below appears during the Load process Press the CANCEL button F3 during the Load process and the screen returns to step 2 Completed appears when the Load process is complete and the screen returns ...

Страница 82: ...e 3 1 Use the controllers to select the file type of the file you want to rename File 4 Select the file to be renamed 4 1 Press the button F2 to move the cursor to File 4 2 Use the controllers to select the file you want to rename MENU File Rename Description Setting All All data all user kits all waves trigger settings utility data AllKit All user kit data waves used for all kits OneKit Selected ...

Страница 83: ...s complete and the screen returns to step 2 Entering the file name 1 Use the controllers to select a character and then use the and buttons F1 and F3 to move the cursor to the next character position A file name of up to 16 characters can be assigned 2 After entering all characters press the OK button F2 NOTICE Do not disconnect the USB flash drive from the USB TO DEVICE terminal or turn off the p...

Страница 84: ... the and buttons F1 and F2 to move the cursor to Type 3 2 Use the controllers to select the file type File 4 Use the and buttons F1 and F2 to move the cursor to File 5 Use the controllers to select the file you want to delete Depending on the files selected in step 3 only the files you can delete are presented MENU File Delete Description Setting All All data all user kits all waves trigger settin...

Страница 85: ...e the file Completed appears when the Delete process is complete and the screen returns to step 2 NOTICE Do not disconnect the USB flash drive from the USB TO DEVICE terminal or turn off the power to the PRO series modules while the file is being deleted Doing so may cause the PRO series modules to malfunction or corrupt memory in the USB flash drive ...

Страница 86: ...1 Connect the USB flash drive into the USB TO DEVICE terminal 2 Navigate to MENU File Format The following screen appears 3 Press the FORMAT button F3 The Format USB flash drive confirmation screen appears MENU File Format Description NOTICE Formatting erases all data in the USB flash drive Before formatting ensure that the USB flash drive does not contain any important data Procedure ...

Страница 87: ...ce for the entire memory is displayed as a percentage Total Total memory size MB Displays the total memory size in units of MB megabytes NOTICE Do not disconnect the USB flash drive from the USB TO DEVICE terminal or turn off the power to the PRO series modules while the USB flash drive is being formatted Doing so may cause the PRO series modules to malfunction or corrupt memory in the USB flash d...

Страница 88: ...r each mode and on the upper right of the MENU Bluetooth screen If pairing failed first remove the registered DTX PROX AUDIO entry on the connected device such as a smartphone and then try pairing the devices again Turning the Bluetooth function on or off Use the controllers to turn Bluetooth on or off Once the setting is complete press EXIT to return to the top screen for MENU MENU Bluetooth Desc...

Страница 89: ...ory Reset Screen Parameter Description Factory Reset NOTICE A factory reset erases all data in the user settings restoring them to the factory default settings Be sure to save any important data to a USB flash drive beforehand page 77 1 Navigate to MENU Factory Reset The following screen appears 2 Press the RESET button F3 The Factory Reset confirmation screen appears Factory Reset Restoring defau...

Страница 90: ...F1 to carry out the factory reset If you do not want to carry out the factory reset press the NO button F3 The following message appears during the operation When the factory settings have been restored the trigger setup wizard will be displayed Screen Parameter Description ...

Страница 91: ...MENU Button 91 DTX PRO DTX PROX Reference Manual MENU Version Screen Description Displays the firmware version Version ...

Страница 92: ... format Note that some wav format audio files may not be imported The PRO series modules do not recognize the audio file if it is in a folder You can also import an audio file as a voice When doing so you can play a different wave for each zone In MENU Job User voice you can import multiple audio files into a single user voice to play different waves in response to the velocity 3 Press the button ...

Страница 93: ...ruck is shown on the Inst selection screen 5 Press the button below IMPORT F3 on the DTX PRO or F1 on the DTX PROX The IMPORT screen appears 6 Use the controllers to select a file to import You can change the pad selection by pressing the TRG button F2 or by striking the pad PRO PROX PRO PROX Name of the audio file to be imported Pad to be assigned or ...

Страница 94: ...ncel the import and the screen returns to step 5 Press the CANCEL button F3 during import to stop the import and the screen returns to step 5 Completed appears when the Import is complete and on the DTX PRO the screen returns to the import screen and on the DTX PROX the screen returns to the one shown before using the fader select knob After importing make sure to store the settings ...

Страница 95: ...3 you can change other settings such as beat timer settings click sound type and output destinations SETTING F3 Function List CLICK F1 TAP F2 VOLUME F3 SETTING SoundSet Beat Timer ClickOut L R ClickOut Phones ClickOut USB ClickCountOff Voice Category VoiceNumber Tuning Import Wav ...

Страница 96: ... on the DTX PRO or press the CLICK button on the DTX PROX The remaining time will be displayed while the timer is in use Press the button below 30 SEC F3 while the timer is in use to extend the timer by 30 seconds ClickOut This sets whether to output click sounds to each jack on or not off L RClickOut L R on off Switches the output to the OUTPUT R and L MONO jacks PhonesClickOut Phones Switches th...

Страница 97: ...c and beats You can also import an audio file to use as click sound CategoryVoice Category Kick1 Kick2 Snare1 Snare2 Tom1 Tom2 Cymbal1 Cymbal2 HiHat1 HiHat2 Perc Effect User Select the voice category of the click sound VoiceNumber 0 No Assign Value depends on the voice category Refer to the Data List Select the voice number for the click Tuning 24 0 0 0 24 0 Set the tuning for the voice selected f...

Страница 98: ... file you want to import and then press the button below Acc or other names F2 to choose the rhythm you want to use the audio file for 5 Press the button below IMPORT F3 6 When the confirmation screen appears press the YES button F1 If you do not want to import press the NO button F3 to return to the previous screen Audio file conditions wav format Note that some wav format audio files may not be ...

Страница 99: ...G F3 to change other settings such as the playback speed and recording source SETTING F3 Function List Recorder Select audio F1 Record Stop F2 Play Stop F3 SETTING Speed RecGain RecordingSource Click RecordingSource AUX In RecordingSource USB Audio RecordingSource Bluetooth PROX PlayMode ...

Страница 100: ...iles L guide Select these settings for the audio file in which the guide click sound and accompaniment sound are separated into L and R channels Outputs the guide click sound and accompaniment sound from Phones in the center pan position and the accompaniment sound from OUTPUT USB Audio in the center pan position For the output from Phones you can adjust the volume of the guide click sound with th...

Страница 101: ...amaha com Learning to Play Various Songs 1 TRAINING SONG Play along with various music categories and phrases 2 PART MUTE Practice phrases with one instrument or one part at a time 3 SONG PART GATE Learn to play specific parts or sections of the training song independently 4 SONG SCORE GATE Check how well you ve mastered the performance Learning to Play Rhythms Precisely 5 RHYTHM GATE Learn to pla...

Страница 102: ...Use the buttons below and F1 and F2 to select Training and then press the button below Enter F3 The TRAINING screen appears 3 Use the controllers to select a training type For more information on the training types see Details on Training Types page 104 For other settings such as training song selection the duration of the training timer setting or the difficulty level press the button below SETTI...

Страница 103: ...UDIO slider 6 To end the training press the button below STOP F1 SONG SCORE GATE and FAST BLAST stop automatically The results or the grades of your training appears after the exercise To restart the training press the button below RETRY F1 and to end the training press the button below OK F3 Training results are not shown at the end of TRAINING SONG and PART MUTE With SONG PART GATE and MEASURE B...

Страница 104: ...1 TRAINING SONG You can play along various music categories and phrases What you can do during training 1 Use the controllers to select a training song 2 Play the drums along with the training song Details on Training Types or Drum Mute Mute the drum part of the training song Press the button to turn the setting on or off Drum part on Drum part off ...

Страница 105: ...only the snare part of the training song or for tightening up your rhythm section skills by practicing only with a bass guitar sound Keep in mind that this exercise is not scored What you can do during training To select a part to mute Use the buttons below and F2 and F3 to move the cursor then use the controllers to select a part BACKING BASS Bass part OTHER Parts other than bass DRUMS Drum part ...

Страница 106: ...exercises before trying Song Part Gate Then try Song Score Gate page 107 to play through all sections of the training song The score PDF is available at the Yamaha website https download yamaha com After accessing the Support website and clicking on Manual Library enter the appropriate model name What you can do during training To change the training song or the part to practice Use the buttons be...

Страница 107: ...e page 106 before working on Song Score Gate The score PDF is available at the Yamaha website https download yamaha com After accessing the Support website and clicking on Manual Library enter the appropriate model name What you can do during training To change the training song Use the controllers to select a training song Here you can only use training songs 1 to 10 The score is shown when you r...

Страница 108: ...otes When you strike too early or too late no sound is produced What you can do during training To change the difficulty level gate width Set a narrower gate width to increase the difficulty level Use the controllers to adjust the gate width To change the direction of the timing indicator The direction of FAST to SLOW can be switched to SLOW to FAST Press the button below FAST SLOW F3 Difficulty l...

Страница 109: ... Gate you will be a skillful drummer at controlling dynamics depending on the situation What you can do during training To set the pad sounds to be muted for specific dynamics For example you can set the pad sound to be produced only when the pad is struck within the NORM range In such case disable WEAK and STRONG Use the buttons below and F2 and F3 to move the cursor then use the control lers to ...

Страница 110: ...e break is evaluated Once you master Measure Break you can keep a steady tempo even after breaks or fill ins What you can do during training To set a specific number of measures to play the click or the total number of measures Use the buttons below and F2 and F3 to move the cursor then use to set the number of measures Measure to play click Measure to disable click Total number of measures Number...

Страница 111: ...p a steady tempo even when the rhythms change The seven practice rhythm patterns What you can do during training To select which rhythm to practice Use the button below F3 to move the cursor then use the controllers to change the setting The number of measures can be changed from SETTING Current Rhythm Rhythm Mute Mute the rhythm guidance Press the button to turn the setting on or off Rhythm guida...

Страница 112: ...ed for drumming Strike the pads as many times as possible within a time limit Strike the pads as many times as possible within the time limit The timer starts counting when you start striking the pads The result appears on the screen To see the count for each pad press the button shown below F2 Timer min sec Best score times Remaining time Counter ...

Страница 113: ...auto mute function on or off When on striking a pad will mute the drum part If the auto muted part is not struck for certain period of time it will be automatically unmuted SongNumber 1 37 Selects a training song Training songs 1 to 10 are the same as the ones included in the DTX402 series The drum scores PDF are available at the following site https download yamaha com Mute ON OFF on Plays sounds...

Страница 114: ...n Turns the auto mute function on or off When on striking a pad will mute the drum part If the auto muted part is not struck for certain period of time it will be automatically unmuted SongNumber 1 10 Selects a training song Training songs 1 to 10 are the same as the ones included in the DTX402 series The drum scores PDF are available at the following site https download yamaha com PartNumber Depe...

Страница 115: ... will mute the drum part If the auto muted part is not struck for certain period of time it will be automatically unmuted SongNumber 1 10 Selects a training song Training songs 1 to 10 are the same as the ones included in the DTX402 series The drum scores PDF are available at the following site https download yamaha com Ignore Timing off on Use this parameter to select which of the pads to produce...

Страница 116: ...culty level gate width Indicator normal FAST is on the left SLOW is on the right reverse SLOW is on the left FAST is on the right You can change the direction of the timing indica tor On the screen shown during training you can change the setting by pressing the button below FAST SLOW F3 Ignore Timing off on Use this parameter to select which of the pads to produce sounds when timing is off Hi Hat...

Страница 117: ... heavy stroke SelectLevel WEAK NORM STRONG Plays sounds Mutes sounds Selects the strength for striking each pad While on the screen shown during training use or F2 or F3 to move the cursor and then use the controllers to change the setting HI HAT SNARE KICK TOM RIDE CRASH Screen Parameter Settings Description Timer OFF infinite 30 sec 1 min 00 sec 1 min 30 sec 2 min 00 sec 2 min 30 sec 3 min 00 se...

Страница 118: ...ring train ing Level 1 Easy 5 Hard Sets the difficulty level LoopMeas 1 2 4 Sets the number of measures to loop Select Rhythm Practice Not practice Selects a rhythm to practice Use the buttons below and F1 and F2 to move the cursor and then use the controllers to change the settings While on the screen shown during training use the button below F3 to move the cursor and then use the controllers to...

Страница 119: ...the FAST BLAST screen When a time is selected the remaining time will be shown on the screen The timer starts when you start striking the pads The training ends automatically when the timer reaches 0 00 and the total number of strikes and the best score will be shown on the screen When off is selected the elapsed time will be shown on the upper right of the screen By press ing the STOP button F1 t...

Страница 120: ... SEND 0 127 Sets the send level for the Inst to be sent to Effect1 FX2 SEND 0 127 Sets the send level for the Inst to be sent to Effect2 TranAtk 50 0 50 Adjusts the attack of the Transient effect TranRls 50 0 50 Adjust the release of the Transient effect InsType Effect Type page 145 Cannot be set to Pad3 Pad5 Pad7 or Pad13 Selects the type of insertion effect Changing the Amount of Effect Applied ...

Страница 121: ... pads within a pad group press the PAD SELECT button to select the pad you want to use InsDepth 0 127 Cannot be set to Pad3 Pad5 Pad7 or Pad13 Sets the depth of Insertion effect to be applied Shown on the panel KICK SNARE TOM HI HAT CRASH RIDE MISC Pad Kick Snare Tom1 Tom2 Tom3 Hi Hat Crash1 Crash2 Ride Others Screen Parameter Settings Description ...

Страница 122: ... and Hi MEQ Freq settings MEQ parameters other than Gain can be adjusted in MENU Master EQ HPEQ Gain 12 0 0 0 12 0 Use this parameter to boost or cut the center fre quency levels of the Lo LoMid HiMid and Hi HPEQ Freq settings HPEQ parameters other than Gain can be adjusted in MENU Phones EQ CLICK Vol 0 10 Adjusts the volumes of each click timing F1 Switches between Human voice 1 and 2 These two u...

Страница 123: ...playing live or arrange a series of audio files in the order of difficulty level for use in your daily practice With the DTX PROX you can save up to 10 Live Sets and use them anytime during your performance LIVE SET Live Set 1 Live Set 10 Up to 20 steps etc Up to 20 steps etc Kit Tempo Audio file Step1 Kit Tempo Audio file Step1 LIVE SET Function List Select Live Set PROX F1 LIVE F1 PLAY STOP F2 X...

Страница 124: ...ts or stops audio file playback and click sounds This button does not appear when both tempo settings and file selection are set to off XSTICK F2 F2 XSTICK This is the same as the cross stick setting on the KIT screen DISPLAY F3 F3 DISPLAY Switches the display LIVE SET SETTING Screen Button Description EDIT F1 F1 EDIT Edits the Live Set DELETE F2 F2 DELETE Deletes the Live Set SORT F3 F3 SORT Sort...

Страница 125: ... Manual The LIVE SET screen appears 2 Use the controllers to select a Live Set 3 Press the button below SETTING F3 The LIVE SET EDIT screen appears 4 Use the controllers to select a step Live Set number and Live Set name Step name Step number or ...

Страница 126: ...e the cursor and use the controllers to select a setting Parameters that can be registered for each step are as follows Screen Parameter Settings Description Step Name Use the controllers to select a character and then use the and buttons F1 and F3 to move the cursor to the next char acter position A step name of up to 12 characters can be assigned When you are finished entering all characters pre...

Страница 127: ...le off 001 1000 Prepare an audio file and save to a USB flash drive as described in Preparing an Accompa niment Song Audio File under Overdub Recording Your Performance onto an Accom paniment Song in the DTX PROX Owner s Manual Wav Click Sync off on When on pressing the PLAY button starts the audio file and click sound in sync Set Tempo to a value that matches the tempo of the audio file set Offse...

Страница 128: ...or the audio playback will appear on the upper right of the screen 3 3 Set the time shown here as the Offset Time Note that the time shown on the screen may be different from the actual time of the first beat due to a slight delay caused by press ing the button Setting the Offset Time to around 100 ms shorter than the time shown on the screen makes it easier to set the offset timing You can also u...

Страница 129: ...delete selected press the button below DELETE F2 The DELETE STEP confirmation screen appears 2 Press the button below YES F1 to delete the step Press the NO button F3 to cancel deletion and the screen returns to step 1 Completed appears when the Delete is complete and the screen returns to step 1 ...

Страница 130: ...ep where you want it to go 3 Press the INSERT button F3 Pressing the INSERT button F3 sets the rearranged order and changes the step numbers accordingly Saving a Customized Live Set under a New Name The Live Set settings you have customized can be saved in the same way as saving a kit For more information refer to Saving a Customized Kit under a New Name of the DTX PROX Owner s Manual ...

Страница 131: ...e into the USB TO DEVICE terminal on the rear panel 1 Set the Mode Select knob to LIVE SET The LIVE SET screen appears 2 Use the controllers to select a Live Set 3 Press the button below LIVE F1 The LIVE SET PLAY screen appears Using the stored Live Sets or When the step name has not been entered only the step number appears in the step name field ...

Страница 132: ...rence Manual 4 If you wish to playback an audio file or click sound press the button below PLAY F1 5 Play the drums 6 To proceed to the next step press the button 7 To finish press the EXIT button This will return you to the LIVE SET screen ...

Страница 133: ... IndivOut You can adjust the gain when the output level for each output jack and the settings on the connected device are different MENU Utility Output Gain Aux In Input Mode At the live venue you can monitor the audio signals mono audio from the PA system only through the headphones simply by connecting the mixer to the AUX IN jack In MENU Utility Input Output AUX In Input Mode select PA HP To mo...

Страница 134: ...he crosstalk occurring may vary depending on the venue You can quickly change the crosstalk settings right at the venue and store the settings as a user trigger while keeping the original set of trigger settings unchanged Change settings in TRIGGER SETTING Store Switch trigger settings on the top screen for the TRIGGER mode You can change the trigger setup for each kit MENU Kit Edit Other TrgSetup...

Страница 135: ... or the instrument freezes restart the application software or the computer OS or turn the power to the instrument off then on again Computer USB terminal USB TO HOST terminal rear panel USB cable PRO series module NOTE NOTICE Use an AB type USB cable of less than 3 meters USB 3 0 cables cannot be used Execute the following before turning the power to the instrument on off or plugging unplugging t...

Страница 136: ...ware When you use a macOS computer or when you use a Windows computer only to handle MIDI data installation of the Yamaha Steinberg USB Driver is not required Information on system requirements is provided on the above web page For improvement the Yamaha Steinberg USB Driver may be upgraded without notice For details and the most up to date information please visit the above website MIDI related R...

Страница 137: ...lter and VoiceDecay settings in MENU Kit Edit Voice MIDI settings have not been properly config ured Ensure that the MessageType parameter from MENU Kit Edit Kit Modifier Voice is set to note When the MessageType parameter from MENU Kit Edit Kit Modifier Voice is set to note the sound will not play if the Voice Number parameter from MENU Kit Edit Kit Modifier Voice is set to no assign Ensure that ...

Страница 138: ... is set improperly the cymbal pad may not be fully functional The shaft on the hi hat stand may come loose during use and cause the hi hat pad to rotate If this happens the pad may not function properly To avoid the problem we recommend that you tighten the shaft and check the position of the hi hat pad on a regular basis Putting extra felt under the cymbal pad may result in lower vol ume Ensure t...

Страница 139: ...XER screen or the LED rotary fader for the pad for which a sound is not being produced is set high enough Hi hat splash sounds are not produced as intended Adjust the FootSplashSens parameter from MENU Utility Pad Hi hat splash sounds will not be produced if off has been set here Pads with position sensing do not pro duce sounds properly Check the Pad Type parameter from MENU Trigger Pad Type or T...

Страница 140: ...Pad 14 select the proper pad type in MENU Trigger Pad Type or TRIG GER SETTING Pad Type Check the crosstalk setting min level setting and sensitivity set ting Sounds are distorted Ensure that effects have been set appropriately Sound can be distorted with certain combinations of effect type and parameter settings Ensure that the VoiceFilter parameter in MENU Kit Edit Voice is configured properly D...

Страница 141: ... drives cannot be used on the PRO series modules Ensure that there is sufficient free space on the PRO series mod ule Format the USB flash drive with the PRO series module Ensure that the file to be read is located within the root directory of the USB flash drive that is not within any folder Cannot send data to or from the smart device Check the connection For more information refer to the iPhone...

Страница 142: ...ly when struck harder than the value set here Ensure that the Minimum Level parameter from MENU Trig ger Pad Type or TRIGGER SETTING Pad Type has not been set too high as this can prevent sound from being output Cannot exchange data with DAW applications When the Auto Power Off function activates to turn off the PRO series module any connection with DAW software will be lost To restore this connec...

Страница 143: ... the acoustics of a stage Space Simulator Effect emulating the reverberating sound in a large space like a tunnel a cave and so on Reverb Gate Effect that combines a Gated Reverb and Reverb effect Reverb Chorus Effect that combines a Chorus and Reverb effect Reverb Phaser Effect that combines a Phaser and Reverb effect Reverb Flanger Effect that combines a Flanger and Reverb effect Reverb Harmonic...

Страница 144: ...ffect without modulation created by adding a slightly pitch shifted sound VCM Flanger These effects emulate the characteristics of an analog flanger used in the 1970s recreating a warm high qual ity flanger effect Classic Flanger Conventional type of flanger Tempo Flanger Tempo synchronized flanger Dynamic Flanger Dynamically controlled flanger AmbienceFlanger A flanger that adds early reflections...

Страница 145: ...e shifter Overdrive Stereo distortion Compressor Conventional compressor Lo Fi Degrades the audio quality of the input signal to get a lo fi sound Noisy Adds noise to the current sound Turntable Simulates the noise of an analog record Bit Crusher Produces distortion by reducing the resolution or bandwidth of the digital sound Dynamic RingMod Dynamically controlled Ring Modulator Dynamic Filter Dyn...

Отзывы: