


~100-230V 50/60Hz
INPUT
S-VIDEO
VIDEO
L
SL
C
L
R
VIDEO
S-VIDEO
OPTICAL
COAXIAL
AUDIO OUTPUT
5.1 CH
OUTPUT
SR
SW
R
D
IG
IT
A
L
O
U
T
P
U
T
SERVICE
SCART INPUT
SCART OUTPUT
VIDEO OUT
Y Cb/Pb Cr/Pr
DVB-T TUNER
IN
OUT
ANTENNA
IN
OUT
ANALOGUE
TUNER
ANTENNA
OPEN/CLOSE
STANDBY/ON
USB
DV
L-----AUDIO-----R
VIDEO
8
50
System Setup
OSD Language
Audio Language
Subtitle Language
Disc Menu Language
SETUP MENU -LANGUAGE
English
English
English
English
SETUP MENU -LANGUAGE
1. To satisfy the needs of consumers in different regions, the unit provides various interface languages.
2. Enter the system setup mode.
In the System Setup control bar menu, use the or button to move the cursor, select the
Language
item,
and press the
SELECT
button to enter the Language Settings menu, which contains four items, as shown in
the chart.
System Language
Audio Language
1. In the Language Settings menu, use the or but ton to
select the
System Language
item, and press the
SELECT
button to drop down a menu.
2. Use the or button to select the language you want and
press the
SELECT
button to confirm. The interface
language will change immediately according to the settings.
1. In the Language Settings menu, use the or button
to select the
Audio Language
item, and press the
SELECT
button to drop down a menu.
2. Use the or button to select the language you want
and press the
Select
button.
* If you play a DVD disc supporting the selected language,
the system will adopt that language as the DVD menu
language.
* If the disc doesn't support the selected language, the system will adopt the language provided by the disc.
Some DVD discs may contain various subtitle languages. This setting is to determine the default DVD subtitle
language.
1. In the Language Settings menu, use the or button to select the
Subtitle Language
item, and press the
SELECT
button to drop down a menu.
2. Use the or button to select the language you want and press the
SELECT
button.
*
Off
means the subtitle output is off.
* The system will give priority to this setting as the DVD subtitle language. If the DVD played does not support
the selected language, the setting shall be invalid.
* You can change the subtitle language at any time during playing. See
Play Mode
for details.
Subtitle Language
OSD Language
Audio Language
Subtitle Language
Disc Menu Language
SETUP MENU -LANGUAGE
English
English
French
German
Italian
LPCM Output
The unit can set the LPCM96K and LPCM48K difference Audio Sampling frequency.
Dynamic Range
The unit can set the
full
3/ 4
1/ 2
1/ 4
off
value, You can select different value to compress Audio
output range. You can feel the difference of Audio output effect under different values.
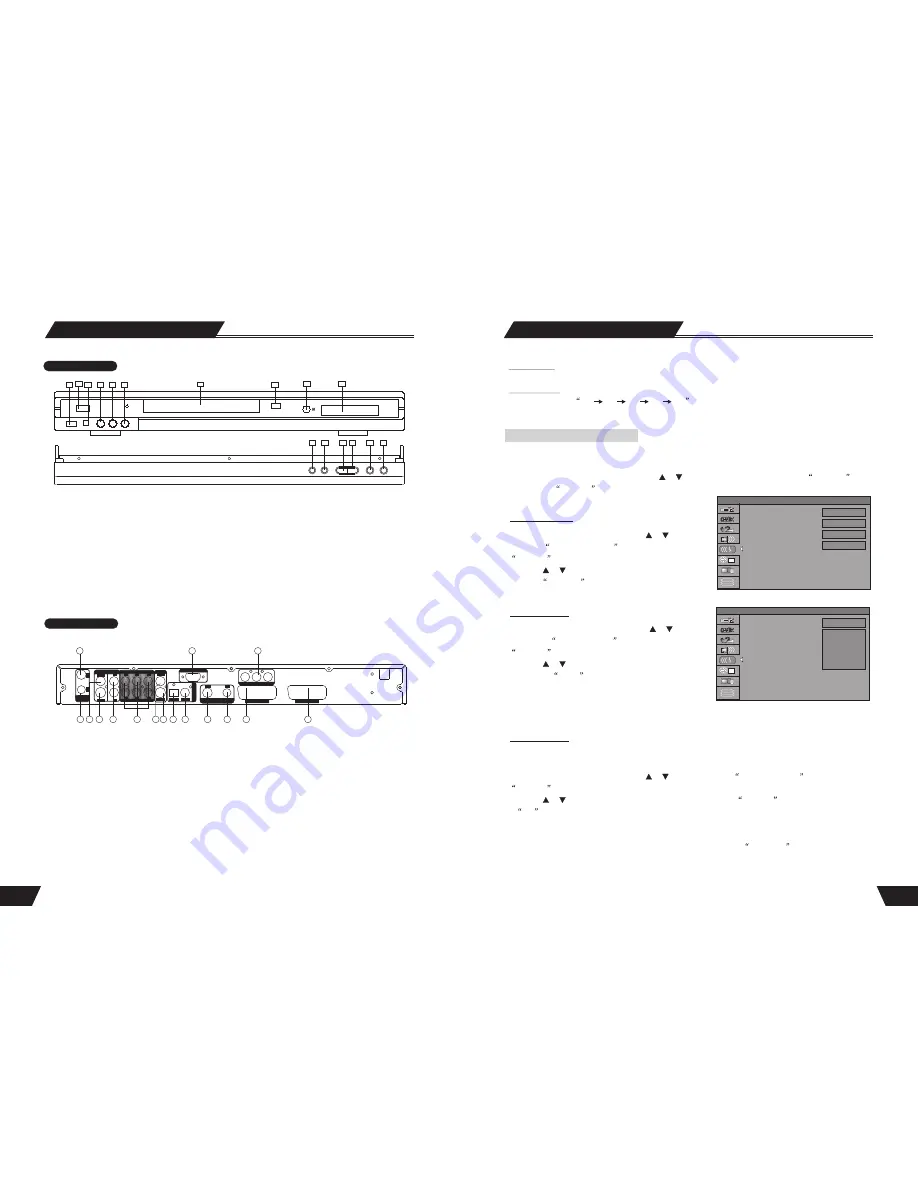
Identification of Controls
REAR PANEL
1. Analog RF SIGNAL INPUT
2. Analog RF SIGNAL OUTPUT
3. COMPOSITE VIDEO INPUT(REAR)
4.S-VIDEO INPUT
5. AUDIO INPUT (REAR LEFT/RIGHT)
6. 5.1CH AUDIO OUTPUT
(L, R, SL, SR, C, SW )
7. COMPOSITE VIDEO OUTPUT
1
2
3
4
5
7 8
10
12
11
13
14
9
6
8. S-VIDEO OUTPUT(REAR)
9. DIGITAL AUDIO- OPTICAL OUTPUT
10. DIGITAL AUDIO-COAXIAL OUTPUT
11. DIGITAL RF SIGNAL INPUT
12. DIGITAL RF SIGNAL OUTPUT
13. SCART INPUT
14. SCART OUTPUT
15. RS-232
16. COMPONENT VIDEO OUTPUT
FRONT PANEL
1.STANDBY/ON BUTTON
2.DVD DOOR
3.OPEN/CLOSE BUTTON
4.IR(REMOTE SENSOR)
5.VFD DISPLAY
6. PLAY BUTTON
7.STOP BUTTON
8.HDD BUTTON
9. DVD BUTTON
10.SOURCE BUTTON
11.RECORD BUTTON
12.USB INPUT
13.DIGITAL VIDICON INPUT
14.AUDIO INPUT (FRONT LEFT)
15. AUDIO INPUT (FRONT RIGHT)
16.VIDEO INPUT
1
12
3
10
4
6
2
7
8
9
5
11
13
14
15
16
SOURCE
STOP
HDD DVD
PLAY
RECORD
16
15
1
1