


41
To satisfy customers with different characteristics and suit related devices of different qualities, the unit provides
various functions. You can setup the system of the unit and regulate its operations to cater for your taste and suit well
with other related devices of yours. But if you think it's too complex, you may also use the default settings, which
can meet your basic demand.
Operation Interface and General Steps
This section will introduce the menu interface of the System Setup and general operation steps.
1.Press the
SETUP
button to enter the System Setup mode. Now the system setup control bar menu will appear
on the top of the OSD, as shown in the following chart.
The meanings of the icons are as follows.
1)Auto Chapter Marker
2)
4)
5)
6)
7)
2.Use the or button to select items to be setup in the control bar and press the
SELECT
button to enter the
setup menu of the item. In the setup menu of a certain item, press the arrow buttons and the
SELECT
button
to operate some control units, and the corresponding settings will be done.
3.Press the
RETURN
button to return to the upper level menu. Press the
SETUP
button to exit the System
setup mode.
Record Quality
Modify Channel
Program Table
Timer Setting Menu
Country Selection
3)
Autoscan
Note
The steps above are general and typical operations. Some settings might not need a certain step, or require more
steps.
Please set up the system in the Eject Disc mode or No Disc mode, otherwise some settings cannot be done.
1.In the Recording Settings menu, use arrow buttons to select
Automatic Chapter Marker
, and press the
SELECT
button to drop down a menu.
2. Use the or button to select a proper value ( 5min, 10min,
20min, 30min or off ), and press the
SELECT
button to
confirm.
3. Press the
RETURN
button to return to the upper level
menu and set up other items.
*
Use different time option to insert chapter markers at
x-minute intervals during recording.
Auto Chapter Marker
System Setup
Auto Chapter Marker
Record Quality
Autoscan
Modify Channel
Program Table
Timer Setting Menu
Country Selection
SETUP MENU -RECORDING
Off
SP
SCAN
EDIT
SORT
OK
Deutschland
Auto Chapter Marker
Record Quality
Autoscan
Modify Channel
Program Table
Timer Setting Menu
Country Selection
SETUP MENU -RECORDING
Off
SP
SCAN
EDIT
SORT
OK
Deutschland
18
Timer Recording
Standard play quality.
Timer Recording Setup
Record executes only on the date set
Timer Recording Setup
Source
Record To
Quality
Mode
Date
Start
End
Title
VPS
M y T i t l e
OK Cancel
Front CVBS
My Title
OFF
0 4 / 0 5 / 0 6
0 0 : 2 4
0 0 : 5 4
0 6 / 0 1 / 0 5
0 0 : 2 4
0 0 : 5 4
HDD
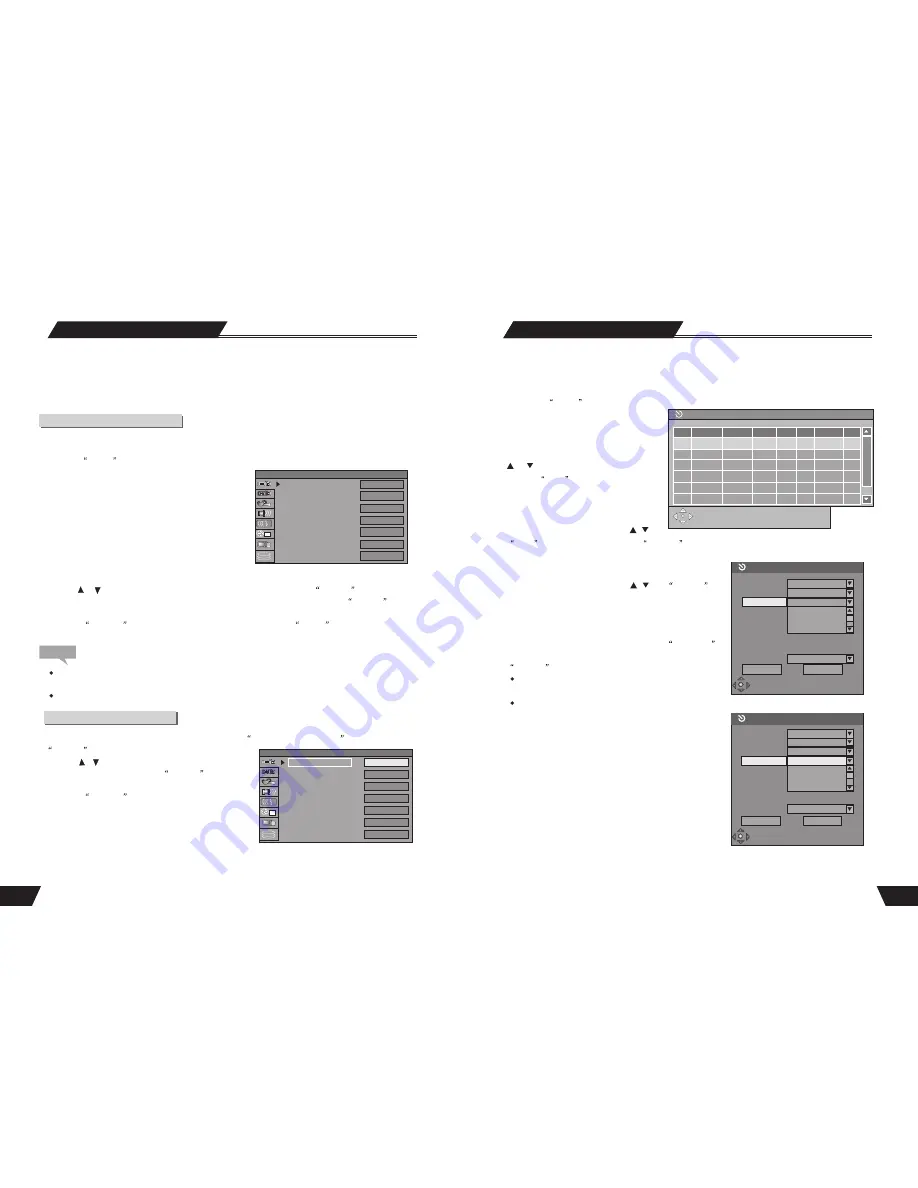
Timer Recording
You can set-up the product to schedule recordings to begin and end at a specific time. The recording can be onto
HDD or DVD. This feature is useful if the specific quality, time, date and channel of a program you want to
record is known in advance.
1. Press the
TIMER
button to enter the timer recording schedule setup menu, as shown in the chart to the
right. There are 8 records in this menu. Each
record represents a recording schedule.
2. In the timer recording setup menu, use the
or
button to select a record, and
press the
Select
button.
3. Set up the input source
In the Item Editor dialog box, use the
,
and
Select
buttons to select the value of
SOURCE
.
4. Set up the recording quality
In the Item Editor dialog box, use the
,
and
SELECT
buttons to select the quality value. For more in formation about
recording quality, for reference: HQ, SP, SP+, EP, LP, SLP.
5. Set up the recording mode
This setting is done with the third control unit in
Item Editor
dialog box. Move the cursor, select the row, and press the
SELECT
button to initiate the drop-down menu.
The setting may arrange a timer recording everyday, or on
some day of every week, or on a certain day of the year.
There are three options in the list. Their meanings are as
follows.
Weekly:
recording every week.
Daily:
recording everyday
Once:
recording on a certain date
Front CVBS
HDD
Once
Once
Daily
Weekly
1
1
OK Cancel
Source Quality Date Start End
1
2
3
4
5
6
Timer Recording
Record VPS
Press Select to review a scheduled recording or
create a new one. Press functions for other options
Source
Record To
Quality
Mode
Date
Start
End
Title
VPS OFF
SP
HQ
SP
SP+
SP