background image


Page 28 


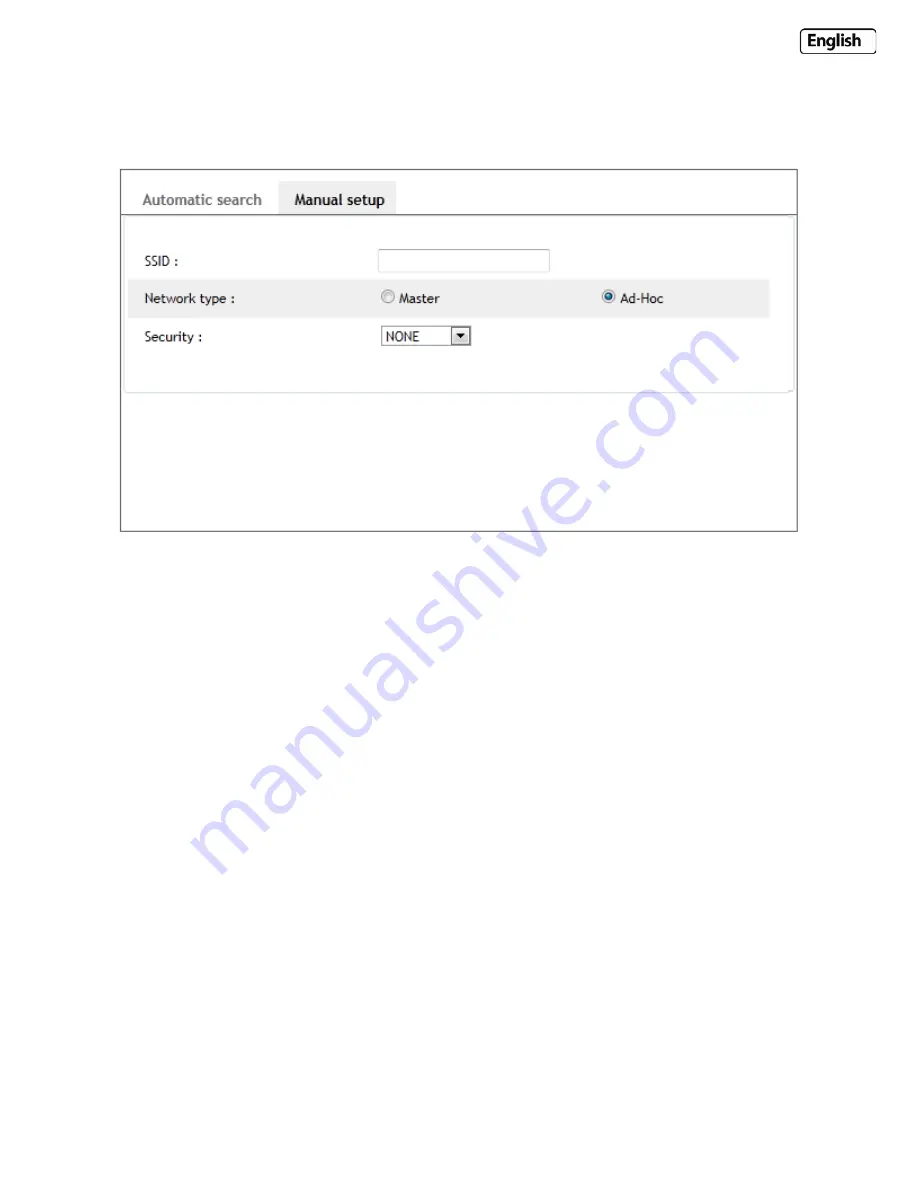
6.2.1.2 Ad-Hoc Wireless Setup Options 

If you wish to make a direct wireless connection from your camera to your computer, you will need to setup the Y-cam 

in “Ad-Hoc” mode. 


In order to view the Y-cam directly from your computer you first need to configure the wireless device in your computer 

according to the Y-cam settings above.  


Once “Ad-Hoc” has been selected, select a “Security” type and type in a connection key, click “SAVE SETTINGS”. 


Содержание Bullet HD 1080

Страница 1: ...1080 Please read this manual carefully before attempting to install or operate this product Please retain this manual for your future reference This User Manual is a work in progress and is constantly...

Страница 2: ...WINDOWS 14 4 2 Y CAM SOFTWARE INSTALLATION FOR MAC 16 4 3 FINDING YOUR CAMERA WITH Y CAM SETUP 17 5 0 WELCOME TO YOUR Y CAM 18 5 1 LIVE VIEW ON BULLET HD 1080 USING INTERNET EXPLORER 20 5 2 LIVE VIEW...

Страница 3: ...8 6 5 1 CONTINUOUS RECORD 48 6 5 2 SNAPSHOT AT INTERVAL 49 6 5 3 E MAIL PERIODIC SENDING 50 6 5 4 PERIODIC SENDING FTP 51 6 6 MOTION RECORDING MENU 52 6 6 1 SCHEDULE 52 6 6 2 MOTION DETECTION 53 6 6 2...

Страница 4: ...a Class A digital device pursuant to Part 15 of the FCC rules These limits are designed to provide reasonable protection against harmful interference in a residential installation this equipment gener...

Страница 5: ...ent 3 This product should be placed at least one foot away from any heart pacemaker Radio waves might potentially influence a heart pacemaker 4 DO NOT use this product for any illegal activities It is...

Страница 6: ...disassemble or attempt to repair the camera doing so might cause damage to the product and will invalidate warranty Applies to products YCBLHD6 Please note Infrared LEDs produce heat Do not place any...

Страница 7: ...recommended Memory RAM 512Mb or higher recommended Operating System Windows XP Vista Windows 7 Web Browser Internet Explorer Version 9 or above Mozilla Firefox Google Chrome Safari and most other brow...

Страница 8: ...1080 is on the Ethernet connector on the cable Please note To reset your Y cam Bullet HD 1080 back to factory default settings you will need to press the reset button This is located inside the Y cam...

Страница 9: ...mportant Notes and Information 1 There is a limit to the number of rewrites possible on any microSD memory card If you notice the card becoming slow or sluggish after reasonable usage you will probabl...

Страница 10: ...unted in a wall or in a non easily accessible place Unscrew the front part of the camera and lift this carefully from the lens array Be careful not to break the lens or infrared LEDs The microSD card...

Страница 11: ...pplied by your broadband provider or a network switch or hub that is connected to your computers network Using the standard Ethernet network cable plug this in to the network connection socket on the...

Страница 12: ...der A to E and make sure you tightly fasten the screws Please Note To ensure water proof function put the waterproof rubber in place see the figure before installing the back cover There is one additi...

Страница 13: ...ble through the flex conduit not included 6 Thread through the outside part of the conduit gland with the flex conduit 7 Attach the inner part of the conduit gland to the back cover 8 Pull the network...

Страница 14: ...work and displays any cameras it finds It is very useful if you ever forget the address of you camera or in this case when you first install it 4 1 Y cam software installation for Windows 1 Insert the...

Страница 15: ...want to change the default folder click Change to replace otherwise click Next 5 Click Install to install the Y cam Setup utility 6 Click Finish to end the installation You should now find a Y cam ico...

Страница 16: ...ork section 3 Select Firewall tab then click Advanced 4 Make sure the check box next to Block UDP Traffic is un ticked then click Ok 5 Quit System Preferences and test the Y cam Setup software again O...

Страница 17: ...to search for cameras again Refresh Searches your local network for cameras Setup Select the required camera and click Setup to configure the network settings for the camera Open Select the required...

Страница 18: ...in Password 1234 This is login is case sensitive so should be entered exactly as they are above It is recommended you change your password as soon as you are logged in to avoid unauthorised access to...

Страница 19: ...sing this homepage is a common way to access the camera when you are using it on your local network so it may be worth writing down the address that is displayed in your web browsers address bar or bo...

Страница 20: ...en using the camera for the first time you will be prompted to install an ActiveX Control Please follow the on screen instructions to download and install this control You will then view the following...

Страница 21: ...hard disk 3 Snapshot Press the Snapshot button to capture a still image of the camera view 4 Listen Mute Click to listen and mute the audio 5 Audio Upload Press and release to start sending audio from...

Страница 22: ...era image will begin to load QuickTime or your media program may ask you to re enter your login username and password at this point This is common on most systems Please note You need to have QuickTim...

Страница 23: ...setup with SMART SETUP To make the setup process quicker for users we have created SMART SETUP This will take you through common options to getting your Y cam setup wirelessly and with your custom se...

Страница 24: ...a system Motion snapshot and recording E mail FTP alerts This should help you get your camera setup and working very quickly It will also allow you access to the complete functionality of the camera s...

Страница 25: ...Page 25 6 2 CONNECTION MENU The CONNECTION menu is located within the main navigation menu bar When you click on the CONNECTION tab a sub menu of network setup options will be displayed...

Страница 26: ...thernet cable Once camera is connected to the router wirelessly the green LED on the Ethernet connector should be solid green rather than flashing If you need to you can enter your Wi Fi network detai...

Страница 27: ...st installations The key your Y cam requires is the password you use to access your Wi Fi Wireless Connection You need to enter this twice so it matches Security Mode Options Authentication Select the...

Страница 28: ...r computer you will need to setup the Y cam in Ad Hoc mode In order to view the Y cam directly from your computer you first need to configure the wireless device in your computer according to the Y ca...

Страница 29: ...option to have the IP address is assigned automatically If you select Obtain an IP address automatically you should select Obtain a DNS Server address automatically DHCP Service Static IP Address Sele...

Страница 30: ...der from the drop down list Make sure you sign up with one of listed service provider s and register your own personal host name Please follow the instructions on the provider s site and then return t...

Страница 31: ...t settings 6 2 5 Network Port HTTP port The default HTTP port number is 80 RTSP port In order to view video over RTSP the router should be setup to forward a port in the range 30000 to 30100 to the ca...

Страница 32: ...http yourname dtdns com Port 8150 So with the above information your camera would have the address of http yourname dtdns com 8150 Open any internet browser on your computer and type your own DDNS acc...

Страница 33: ...ports used by the Y cam are blocked from access over the Internet therefore these ports need to be made accessible This is achieved using the Port Forwarding function on your router The ports used by...

Страница 34: ...Page 34 6 3 1 Image For most users many of these settings can be left as default...

Страница 35: ...re camera image can be set according to needs to configuration from the drop down list Exposure Two options 50Hz 60Hz This should be set according to the mains frequency of the country the camera is b...

Страница 36: ...in quality or different streams for different devices such as laptop or mobile phone Default settings will normally suffice for most users There are three video streams available You can configure set...

Страница 37: ...Increase Bit Rate to increase the picture quality or vice versa Higher bitrates require greater bandwidth Please select the appropriate settings according to your connection speed and network traffic...

Страница 38: ...rent cameras on the network 6 3 4 3 System time setting The Y cam will allows you to set the date and time and is used for the timestamp on any files created by the camera Current device time Internal...

Страница 39: ...e setting to update to the server below Time server Type the SNTP server name There are suggestions included Note 1 If the SNTP server is not found the time on the Y cam will be synchronized with the...

Страница 40: ...ra User List page then fill in a username and password twice and then click Add To edit a user s password Click on the user name then enter the new password for that user twice and click Save To delet...

Страница 41: ...s recommended you reboot your computer before attempting this operation and then close ALL programs that may interfere with the process Interruption to this process will result in your camera being un...

Страница 42: ...ve your camera setup as you require this is recommended To restore a backup file Restore settings Click Browse to search for a backup configuration you wish to upload to the camera then click Restore...

Страница 43: ...emory card 6 4 1 1 NAS server setup Select NAS server setup k to record to a NAS drive on the same network as the camera IP Address Address where to save the files on NAS Drive NAS remote path Path wh...

Страница 44: ...rch for recorded files during a specific time period You can also filter by file type To use enter the start date and end you wish to search through the desire file type and the allotted time Click se...

Страница 45: ...o four email servers SMTP server name Please enter the name you want to give to this SMTP e mail server SMTP server IP Type the name or IP address of the SMTP server you want to use for sending the e...

Страница 46: ...TP server other than their own British Telecom BT are a good example of this 6 4 3 1 Y cam Common Email Server Settings Some email server settings to use your Y cam with popular email providers gmail...

Страница 47: ...her upload on motion detection or upload periodically These functions are available under the TIME RECORDING and MOTION RECORDING menu FTP Server ID Select the ID of the FTP server You can connect to...

Страница 48: ...d period to select You can select multiple periods by pressing Ctrl on the keyboard and clicking and dragging another Click SAVE SETTINGS to confirm your settings 6 5 1 Continuous record Y cam can con...

Страница 49: ...ng to schedule 6 5 2 Snapshot at Interval Y cam allows for programmed snapshot at interval records a JPG snapshot to your storage device at a set interval Snapshot at interval Enable Disable saving a...

Страница 50: ...umber from the list set under STORAGE Menu File attachment Select if you would like a snapshot of the camera view attached to the e mail Snapshot From Select the stream from which it should get the sn...

Страница 51: ...ime interval between uploads FTP Server ID Select the FTP Server number from the list set under STORAGE Menu Remote path Path where to save the image file on the FTP server Snapshot From Select the st...

Страница 52: ...hich you would like the motion recording snapshot e mail FTP sending to be active Click hold and drag the desired period to select You can select multiple periods by pressing Ctrl on the keyboard and...

Страница 53: ...able the window Threshold Determines at what point the alarm is triggered A lower threshold means less motion is needed to trigger the alarm A higher threshold means more motion is needed to trigger t...

Страница 54: ...g to get right but it s the best way to obtain good results 6 6 2 2 Privacy Mask Window Y cam privacy mask can be set up to block out areas that you do not wish any recording or snapshot to take place...

Страница 55: ...d record the video Record file name A name for the video file Suffix of file name Video file name suffix can either be date time or a sequence number Split Time of Record file This specifies the maxim...

Страница 56: ...ds that the camera should keep saving images when motion stops Trigger FPS The number of frames per seconds that the camera should keep saving images when an alarm is triggered Snapshot From Select th...

Страница 57: ...at when an alarm is triggered Interval Time Time interval between e mails e Mail Server ID Select the e mail server number from the list set under STORAGE Menu File attachment Select if you would like...

Страница 58: ...frames per seconds that the camera should keep sending images at when an alarm is triggered Interval Time Time interval between uploads FTP Server ID Select the FTP Server number from the list set und...

Страница 59: ...tion alarm is triggered GPOUT Enable or disable GPOUT signal on motion detection Effective Period Always Always trigger the alarm upon motion detection Schedule FTP periodic sending effective period a...

Страница 60: ...n if in use IP address The internal IP address of your camera so you can access it on your local network DNS Servers If this option is empty it may prevent your camera from sending email alerts Enter...

Страница 61: ...elect a camera click on Setup and the following setup interface will pop up 4 Enter a unique name for the camera the location optional and leave the default port number as 80 Obtain an IP address auto...

Страница 62: ...of the camera is 192 168 1 150 This can be changed to any IP address on your IP range For example if the IP address of your PC is 192 168 1 52 then the IP address of your camera should be unique and...

Страница 63: ...k of image quality and delays in refresh intervals Consult your network administrator for further details Start Internet Explorer Select Tools Internet Options Connections tab and click LAN Settings V...

Страница 64: ...1 Open a new Internet Explorer window 2 From the menu bar select Tools and then select Internet options 3 From the Internet Options window select the Security tab 4 Click on the Custom Level button 5...

Страница 65: ...IP settings 4 In the IP Address Field type in the number 192 168 1 20 5 In the Subnet Mask type in 255 255 255 0 6 In the Default Gateway type 192 168 1 200 The camera will automatically assign itsel...

Страница 66: ...install ActiveX controls 2 Maximum 16 users are allowed to access the camera simultaneously through the network 3 Network traffic may prevent the viewing interface from appearing quickly Wait for a w...

Страница 67: ...ectedly 1 Motion detection is based on changes in pixel in the image This means that if there are sudden changes in the lighting motion detection may be triggered mistakenly Lower the sensitivity sett...

Страница 68: ...network system in which devices communicate with each other by first going through the wireless router IP Address The unique 32 bit number assigned to each computer connected to the Internet IP number...

Отзывы: