5
www.xprgroup.com
20
4.
WIRING
LD16
R55
C41
C28
L2
R36
LD20
R18
R25
R24
C40
R10
C34
L10 L1
1
C18
C33
R9
C42
C1
R5
R45
C43
C44
R28
R21
C45
D13
LD14
R46
C3
C5
R38
ZD3
C29
L9
LD13
R14
ZD4
C32
R19
R37
A
LD17
A
LD19
A
LD18
L7
C27
L6
C16
C15
RX4
D5
D10
R32
R33
R35
R49
IC6
ZD5
ZD6
R22
L3
R53
R34
TAS1
IC11
R15
IC15
R3
R4
L8
R47
FUSE1
IC8
R20
R16
R11
C2
X1
C4
IC7
ICN2
R1
C13
C12
ICN1
R23
R48
A
LD5
RE1
RE3
A
LD8
X3
IC1
C6
U5
L5
L4
RE4
RE2
A
LD6
A
LD9
ZD2
LD15
R13
ZD1
R54
R50
R6
IC12
R17
R7
R62
A
LD23
D3
D2
RX3
J1
Rb6
R2
LD21
IC2
H1
A
LD22
BAT
U1
IC5
FUSE2
IC3
U4
A
A
IC1
A
A
A
A
Earth
screw
Free Led 1
Free Led 2
GND
12V out
D0
D1
Free Led 1
Free Led 2
GND
12V out
D0
D1
Door Sensor2
Door Sensor1
Exit Button1
Exit Button2
GND
GND
Free In 2 -
Free In 2 +
Free In 1 -
Free In 1 +
Rx
Tx
Busy
System
OK
Door 1
Door 2
Free Out 1
Free Out 2
TCP/IP
Earth
12Vdc Out
12V
gnd
D1
D0
12V
gnd
led2
led1
12V
IN1
IN1
IN2
IN2
+
-
+
-
D1
D0
12V
gnd
led2
led1
PB2
PB1
DS2
DS1
gnd
gnd
COM
NC1
NO1
NC2
NO2
COM
COM
NC3
NO3
NC4
NO4
COM
GND
B
A
gnd
Fuse
Ser No: 11-04-16-013
Mac: 00-04-A3-16-90-D
RoHS
3 3 6 1 1 1 0 1 3 1
50m. max
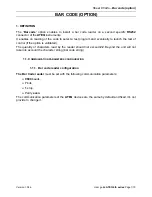
5. CONNECTING BIOMETRIC READERS TO EWS CONTROLLER
- The Biometric readers can be connected to virtually any controller that conforms to Wiegand format
standards (standard Wiegand 26bit or self-defined Wiegand).
- The lines D0 and D1 are the Wiegand lines and the Wiegand Number is sent through them.
- The RS485 line (A, B) is used for fingerprint transfer and reader settings.
- The Biometric readers must be powered from the controller.
- If you use different power supply for the biometric reader, connect the GND from the both devices to ensure
correct transfer of the wiegand signal
- Fingerprint enrollment is done from the PC Software. Connection between the Biometric readers and the PC
must be established.
pink
violet
green
orange
black
B
LG-
LR-
GND
A
red
white
yellow
+12V
D0
D1
www.xprgroup.com
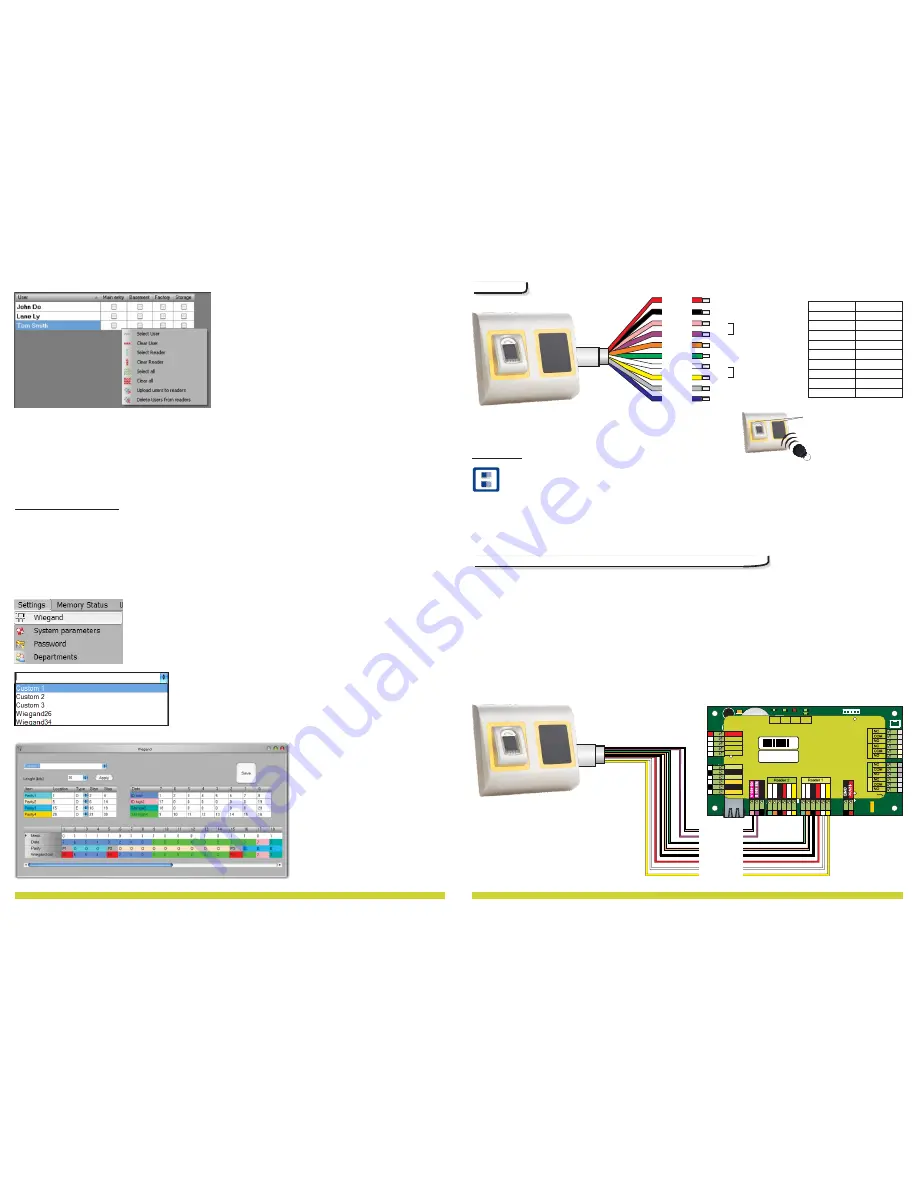
Use mouse click to select the combination you need or use right-click to check or clear entire row or column
Select
Upload Users to readers
or
Delete Users from readers
at right-click menu
As upload is progressing, check boxes are cleared mining appropriate combination was successfully done
When upload is over, if there are still checked items, repeat the upload command
9.12 CUSTOM WIEGAND
BioManager has defined Wiegand 26 and 34 bit as standard options and other 3 Wiegand settings as user
definable.
To setup custom Wiegand format
Select
Wiegand
menu from
Settings
At Wiegand setup window select one from customs Wiegand
Set Wiegand parameter
Click on
Save
button
Note:
Wiegand settings are out of
scope for common end user.
Please ask your installer to set
the parameters and do not
change it later.
B
12V DC
LED Green -
D0
D1
LED Red -
GND
A
Tamper
Tamper
RS485
WIEGAND
LR-
LG-
Tricolor LED (Red, Green, Orange)
12V DC
GND
Tamper
Tamper
Tamper Switch(NO)
9-14V DC
ground
D1
D0
Data 1
Data 0
LR-
Red LED -
LG-
Green LED -
A
B
RS485 A
RS485 B
Tamper Switch(NO)
Orange
Yellow
Red
Black
Pink
Violet
Green
Gray
Blue
White
Note:
The conversion from 7byte ID to 4 byte ID is only possible with cards that have 7 byte ID Number.
Those are: Mifare plus, Desfire and Ultralight. The number is converted according to NXP algorithm. It
corresponds to the number obtained by the USB desktop reader PROXE.
1
2
ON
1
- Convert 7byte UID to 4byte UID
DIP Switch
2
- not used


